CARDS FOR SALE

Most cards you see on this site are available for purchase. Simply click the Pay Now button at the bottom of the post of an available card to purchase the card. You will be linked to PayPal for payment. It will come up as "greensnaggletooth@cox.net" which is the name of my internet company. Price is $5.00 unless otherwise stated and includes shipping. Your card will come with an envelope also. Email me with any questions or requests at: sharynsstampbiz@gmail.com
Thanks for taking a look at my creations!!

Thursday, June 30, 2011

Christmas Is Coming

Is it really every too soon to start thinking about Christmas?  I don't think so.  I love everything about Christmas.  The lights, the decorations, the food, being with family and friends, the holiday movies, Santa and his elves, and most of all celebrating the birth of Christ.  Notice I did not say presents.  While they are always nice to receive, they are not what the holiday is all about.  So without a doubt, I look forward to working on my Christmas cards each year.  It puts me in the holiday spirit.

This year, I decided to try a few stain glass cards.  Today and tomorrow, I am going to share the 2 I have done so far.  So without further ado, let's get to it.


Today's card has a beautiful poinsettia as its centerpiece.  I used softer colors for the outer rim of the stain glass as well as for the snowy look on the window in order to really make the poinsettia pop.  I was very proud of this one.  I was even more excited when I found out I could use the 3 1/2" circle die for the Big Shot to cut the piece of backing for this as well as to cut the actual circle with the poinsettia out.  I simply lined up the acetate onto the die, glitter side away from the die, and ran it through.  I always worry when I free hand cut that it will not look right so this made me very excited.


Here is a closer look at the poinsettia.  I just love the shimmer.  The lovely DSP I used to layer this on is from a set called Christmas Cocoa.  Unfortunately, this set is not longer available.  Have no fear, there will be more holiday paper in the catalog as well as in the holiday mini I am sure.  I thought the snowflakes on it were a good match to the gold in the outer rim of the circle.  

The greeting I chose to use is from the set Four the Holidays.  This one is still available in the new catalog.  I stamped it directly onto the DSP with VersaMark ink.  Then using silver embossing powder, I heat embossed it to give it a little shine and raised texture.
All in all, I am pleased with the outcome of this card.  I hope you liked it.  Be sure to leave me a comment and let me know.  Thanks for dropping in today.

Wednesday, June 29, 2011

S'More of My Favorite Bear

Yes I am back again to share another card with that adorable bear from the Under the Stars stamp set. I used the grid technique on the front of the card.  If you remember, I used this technique on a cupcake card I shared with you a little bit ago.  However, I love this little bear.

I started by stamping the bear and the raccoon on a piece of whisper white card stock.  I colored them using the Stampin' Up! stampin' write markers.  Then I cut them out and put them to the side.  Then I took a piece of whisper white cut at 4" x 5" and using a pencil and a ruler, divided it into 1" squares.  I then stamped my bear and raccoon (no I did not forget they are waiting on the side, but you need to stamp the images on the grid too.  Last stamp I used was the smore.  I had it go from one corner diagonal to the opposite bottom corner.  Then I erased the pencil lines that go through the stamped images and traced the remaining lines with my soft suede marker.  I colored a checker board pattern alternating white and crumb cake.  Then I colored in my bear, raccoon, and smores.  Once that was all done, I took my bear and raccoon who had been waiting patiently and using dimensionals, I placed them on top of the matching stamped image.  This adds dimension to the card.  And here is the final product:


Did you think I forgot the picture?  I just decided today to change it up a bit and give you a recipe first.  This card is perfect to send to that person in your life who loves to camp or loves smores.  Inside you could include a message for a birthday or just to say hi.  In other words, it is an anything card.  Don't you just love those?
That's it for today.  Tomorrow and Friday, I will be sharing some more Christmas cards I have been working on so be sure to stop by.  Thanks for dropping in today.

Tuesday, June 28, 2011

Faux Aluminum Tile

Have you ever toured a historical home or seen pictures of one?  If you have, you have probably seen those beautiful tile ceilings.  Some were made to resemble stamped aluminum.  This means that the impression on the tile is 3D and not just drawn onto it.  I thought "wow, wouldn't it be great to do this technique on a card."  So today share has my version of the faux tile on it.


I really like to look you get when doing this technique.  Now you may be thinking this is a lot of work but really it is pretty simple.  The make the tiles, I started with a neutral color piece of card stock.  I used crumb cake that was 5" x 8 1/2".  You take your VersaMark ink pad and stamp over most of this piece being sure to leave an area of about 2 inches unstamped where you can hold onto the paper.  Once it is covered with the ink, you will need some silver embossing powder.  Sprinkle this all over the inked area and then heat emboss it.  We are not finished yet.  You will repeat the process again in order to ensure the silver is built up to make the impression very visable.   So once the paper has cooled (it only takes a minute) take your VersaMark and stamp over the area again, sprinkle on your embossing powder and heat emboss.  Once this has cooled, grab your 1 1/4" square punch and punch out at least nine squares.  Now choose your favorite impression folder for the Big Shot.  Place your squares inside.  I line them up 3 across and 3 down.  Then run it through the Big Shot.  You will be amazed at the beauty of your tiles.  

As you can see from my card, I used a Rich Razzleberry base card, a layer of basic black, and my beautiful tiles.  For the center piece of my card, I did a layer of basic black, rich razzleberry, and then whisper white.  Please note that the whisper white has been run through the big shot using the same impression folder I used for the tiles.  I finished it off with a beautiful butterfly.  The large razzleberry one is made using the Bigz Beautiful Butterfly and then impressed with the same impression folder I have used for everything else.  By the way, in case you are wondering, I used an impression folder called Finial Press.  The small white butterfly was made using an embosslit folder called Beautiful Wings.  The nice thing about these is it not only cuts out the shape, it also embosses it.  I added Dazzling Diamond glitter to it for fun.

Well, that is all I have to say today.  I hope you find these instructions helpful.  If you love the look and would like a card with this texture on it but really do not have time to do it yourself, be sure to let me know and I will make sure some are in my store.  Thanks for stopping by today.

Monday, June 27, 2011

Childhood Memories

Every child has a toy that is special to them as they grow up.  For me, it was my panda teddy bear named Teddy who traveled everywhere with me and got me through both good times and bad.  Teddy still lives with me today and reminds me of many childhood times.  He is still my best friend.

You are probably thinking, "why did she tell us this?"  Well, the card I want to share with you today is based on a toy.  I did not have this toy when I was growing up but both of my girls did.  I must confess though, I have one now that comes out each Halloween and gets dressed up.  Today, my special guests on my card are none other than Mr. and Mrs. Potato Head.  They have to be two of my favorite toys my girls ever had.  We had so much fun dressing them up.  When the Toy Story movies came out, I fell in love with these characters.  So it seemed like a good idea when punch queen Ellen Kemper posted a recipe to make Mr. Potato Head to give it a try.


They are such a cute couple.  Now I have to tell you that they take a bit of time to make and a lot of patience.  You are dealing with small pieces and I found that a good pair of tweezers really made a difference.  This particular card was a money holder I made for our oldest daughter for her birthday last year.  She loved it.  I will tell you that the basic shape of the potatoes comes from the 2 step owl punch.  Yes you have to cut the little owls feet off and I did feel bad about that but it was worth it in the end.  If you are interested in the full recipe, visit my hero, Ellen Kemper .  By clicking on her name, you will go directly to the Potato Heads tutorial.  It is the best way to learn it.  Don't give up.  If at first you don't succeed, keep on trying.  If I can do it, so can you.

Hope you liked this card.  Thanks for dropping in today.  See you tomorrow.

Friday, June 24, 2011

Gum Machine Fun

How many times have you been at a store or restaurant and seen those big gum machines?  My kids and husband use to love to get gum out of them, especially the ones where the gum spirals down to to exit.  Who am I kidding?  My husband still loves those gumballs.  Personally, I do not chew gum so I simply enjoy the colorful balls in the machine. 

In trying to find a new idea for a birthday card, I came across a Stampin' Up! stamp set called Something Sweet.  In it, there is a gumball machine base, the "glass" ball, and a gumball stamp.  Now I could have simply used this set to create a card but I wanted to be a little more creative.  So out came the punches.  I knew I could use them to make a machine.  I had seen one on another site by Chanda Stehlik.  I had bookmarked it.  I used it for the pattern but designed my own card. 


This makes me almost wish I liked to chew gum!!  (No fear.  The headache I get from it is not worth it!)   The "glass" globe is made using the 2 1/2" circle punch.  On top the Cherry Cobbler dome is made from a 1 1/4" circle punch.  I used only half of one.  The tiny silver top is a 1/4" punch.  The word window finishes it off at the top.  I used brushed silver card stock to make a few of the top pieces.  The "exit door" is made with the large oval punch in basic black.  For the base, I used the globe as my point of reference and made my own pattern for it.  I sponged the globe with bashful blue ink and the base of the machine with black.  The gumballs were made using the small circle punch from the itty bitty punch pack, highlighted with a white gel pen.  I used daffodil delight, tangerine tango, pacific point, elegant eggplant, real red, and garden green.  The designer paper is not from Stampin' Up!.  It was a piece I picked up somewhere, though I cannot remember where now.  It is layered on top of a piece of early expresso.  The base card is very vanilla.  The Happy Birthday sentiment is from the Create A Cupcake stamp set in early expresso, punched out with the word window, then layered on top of an early expresso modern label.  Now to the inside.


The sentiment is from the stamp set Crazy for Cupcakes.  I stamped it in early expresso on very vanilla then punched it out with the large oval punch.  I layered that on an early expresso scallop oval punch piece.  The gumballs were made once again using the small circle punch from the itty bitty punch pack and a white gel pen, same colors as on the front.

So what do you think of it?  Leave me a comment and let me know.  I so look forward to your feedback.  Once again we have arrived at another weekend.  I hope you all have a wonderful one.  Thanks for dropping in today.  See you Monday!!

Thursday, June 23, 2011

Christmas Comes Early

Okay so I know Christmas isn't until December, but as I stated several days ago, card makers have to get an early start on their cards.  I usually make 3 to 5 different designs to send to family and friends as well as make several sets to put in my online store for sale.  So I thought I would share one of the card designs that I put together for this year.

Created By Sharyn Jensen

I used the Northern Flurry impression folder with a piece of Whisper White card stock and ran it through the Big Shot.  I placed a rhinestone in the center of each snowflake.  The tag attached to the top of the card comes from the stamp set called Perfect Punches.  I stamped it using VersaMark ink and then heat embossed it with silver embossing powder.  Once it cooled, I punched it out using the scallop circle punch.  Very simple but pretty to look at.  The base card is Bashful Blue.  I am thinking about using Marina Mist next time.  I think it would work nicely.  I also would suggest if you want a little shimmer on it, you can use the shimmery white card stock or add a few drops of Frost White shimmer paint to about 2 oz. of rubbing alcohol in a spray bottle.  Shake it well and spritz it on.  It will shimmer quite a bit depending how much you put on it.  Be sure to stay back about 6 inches when you spray and do it in a well ventilated area and a clear area as it will spray out and get on anything within reach.  I use a color catcher myself.

Created By Sharyn Jensen

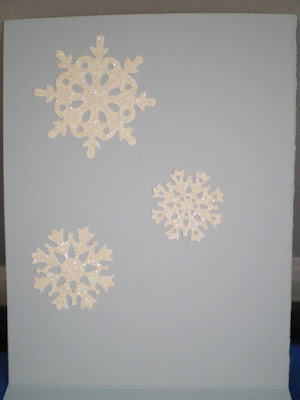
This is the inside flap of my card.  I wanted to add a little sparkle so I used the Decorative Strip called Northern Frost with whisper white card stock.  I ran this through the Big Shot and got those cute little snow flakes.  It actually cuts out 8 but I only used 3 on my card.  Then I added Dazzling Diamond glitter to glam it up.

I must say I have been having problems getting the photos to upload to my blog today.  That is why my watermark is missing from the photos and instead I did a caption underneath.  Hopefully they will fix the glitch by tomorrow so I will not want to throw the computer across the room.  I do appreciate your stopping by to view my cards.  Thank you so much.  See you tomorrow.

Wednesday, June 22, 2011

Sneak Peek

I think I shared on Monday that it was my sister's birthday.  I thought I would show you the card I made for her this year.  It uses one of the new 2011-2012 Idea Book and Catalog stamp sets.  It also uses the punch that coordinates with it.


I absolutely adore this pennant stamp set and punch.  The actual name of the stamp set is Pennant Parade and the punch is the Petite Pennant Punch.  Now I added the doodle dots to the outside of the first and last pennant on this card.  Of course there had to be glitter.  You know I love it and so does my sister.  So I used a glitter glue to add dots on the card.  I used 2 pieces of Hemp Twine to "hang" the pennants from on the front.  The frame for the front was made using the framed tulips impression folder and my trusty big shot. 


For the inside, I made a border using the new Lace Ribbon Punch from the 2011-2012 catalog.  I really like this border.  The cupcake was made using the Build a Cupcake punch.  I ran the bottom through my crimper to get that textured look.  The saying is from the stamp set A Word For You. 
This set is a current set and will still be available in the new catty. 

Simple but elegant is what this card is.  My sister seemed to like it.  We went to dinner with her that night to Oreganos.  None of us had ever been and a new one opened down the street.  We had a very nice time.  The food was good and the service was great.  It is a small place.  Luckily we went early enough that we got a table within 5 minutes.  By the time we left, no tables were available and the waiting area was full of guests.  I think it is a hit.

Well, thanks for stopping by today.  I look forward to seeing you tomorrow. 


Tuesday, June 21, 2011

Grid Look to Your Card

One of the most interesting cards I ever received had a grid look on the face of it.  I guess I just enjoyed the symmetry look to it.  This is one of the easiest looks to achieve and does not take a lot of time to do.  In fact, all you need is your card stock,  a ruler, and a pencil and you are ready to go.


To make getting the squares simple, I used a piece of Whisper White card stock cut at 4" x 5".  The using my ruler, I made 1" squares on the card stock.  Be sure to use a pencil when you do this and do not make your lines so heavy that they are still visible when you erase them.  Once you have your lines drawn horizontally and vertically forming your squares, choose the stamp set you want to work with.  I used the Crazy for Cupcakes set for this one.  Stamp your image onto the card.  I used StazOn ink so it would dry quickly and not smear when I erased lines.  Once your images are stamped on, you will erase any pencil lines that go through your image.  You do not want them seen so they must go.  You will then trace over the remaining lines with a fine tip black marker.  I added the little dots just to enhance the decoration a little more.  Then color in your images using your favorite medium to color with.  Feel free to even color in some of the squares if you choose.  I am sure whatever you do, it will look beautiful.  
Well, that's it for today.  Thanks for dropping in and I hope to see you tomorrow.

Monday, June 20, 2011

A Very Happy Weekend

Happy Monday everyone.  First off I want to wish my sister Mary a HAPPY BIRTHDAY!!!!  I hope her day is filled with laughs and joy.  I know her office staff will probably do something special so have fun.

What a busy weekend this was.  It was once again errand weekend for me so that meant grocery shopping.  While it is not my favorite thing to do, it was certainly a lot cheaper since I got to go by myself.  Husbands and children are famous for finding that one extra item that turns into a dozen before you know it.  God bless them for I know they are just trying to make sure no one goes hungry. 

Now I will skip Saturday for a moment and go to Sunday.  My husband is a fire fighter.  Unfortunately that means we sometimes go without him for holidays.  This Father's Day was one of those days.  So my daughters and I took him out to dinner Friday night to celebrate.  Now anyone who knows or is related to a fire fighter knows that the crew he or she works on is a second family.  In family tradition, the boys at the station fixed a delicious meal and had all of the families come for dinner.  It was so nice to spend time with everyone and for my girls to get to be with daddy on his special day!!

Let's jump back to Saturday for a moment. (Don't worry there is a card coming after this!!)  This was such a special day.  My niece and her husband renewed their wedding vows on Saturday.  They were married by a justice of the peace 17 years ago but always wanted to be married in the church.  They had their dream become a reality on this special day.  The ceremony was beautiful and my niece, Michelle, was absolutely gorgeous.  This was such an important day for my family.  Now you may be thinking that 17 is an odd anniversary to renew your vows on but it seems so appropriate after the year my family has had.  The last time I was with all of my family as well as my nephew-in-law, Gus, and his family was at my brother's funeral.  While he was missed terribly and could not be there to walk his little girl down the aisle, I know he was there in spirit.  At the reception, Michelle made sure to include a dedication for her dad.  It was so touching to me.  That was the only time I had tears in my eyes.  If there is one thing I can say for my family and Gus' family, they know how to party and have a good time!!  We ate and drank and danced the night away.  Yes even my husband who does not dance got out on the dance floor with me and got his groove on. My favorite was slow dancing with him.   It was a blast.  I wish Michelle and Gus many more years of happy times and know there will be lots of laughter in their lives. 

Okay now to the card.  I made a similar one a while ago.  This has that adorable kitty on it again but instead of black, I used a white one.  The main color scheme for this card is Concord Crush and Whisper White. 


I really love this little guy.  I did chalk his nose with Regal Rose chalk from the Stampin' Pastels.  Again this card goes together very quickly so it can be made when you have forgotten to make a card ahead of time.  
Well, that is all for today.  I do appreciate you reading all my weekend adventures.  Stop by tomorrow for another card.  Thanks for dropping in today.

Friday, June 17, 2011

Halloween Kitty

Although it is only June, all card makers know it is vital to work ahead for holiday cards.  Let's face it--once Halloween rolls around, Thanksgiving, Christmas and New Years are quick to follow.  If you do not work ahead some, you will inevitably be caught in that holiday chaos that seems to come every year.  So the idea of starting work on Halloween cards seems very logical to me.

I made this cute little kitty birthday card which I sold to a good friend.  She and another customer liked it so much, I was wishing I had 2 of them so they could each buy one.  So I sat down the other day and started building the cat again.  It is such a simple punch art piece to do.  I can easily mass produce these cute critters.  For some odd reason, as I was looking at one of the white cats, I thought "this would be great for a Halloween card!"  So I took the idea and brought it to fruition (big word isn't it).


I just love this cat.  I used the large oval punch for the head, the word window punch for the body, the 5 petal flower punch for the ears and legs (one flower will do both) and the full heart for the tail.  I cut the heart in half and trim one of the halves to make the tail.  That means 2 tails from each heart.  The eyes were made using the 2 step owl punch and the cute little nose is the flame from the build a cupcake punch.  Her had uses the large oval this is trimmed for the brim and the point is made using the new petite pennant punch.  

For the background, I used basic gray card stock which I sponged black ink onto for a night look.  The moon is the 1 3/8" circle punch in daffodil delight.  It has also been sponged with black ink.  The grass is a piece of garden green card stock which I have torn.  The fence is so easy to make.  I used the jewelry tag punch.  Each post is made from 2 of these little tags.  The rails going across is the modern label punch.  I cut the top and bottom off of each one leaving the center part with the rounded ends.  The bat is the bitty bat punch, which is retiring this month. 

Here is a close up of the kitty.


Do you love the hat?  Of course I had to glam it up with lots of glitter.  Now I will admit the glitter you see on the bat is from Stampin' Up! but the hat was done with a glitter glue.  Last but not least, I used the retired horizontal slot punch for the collar.  You could use a scrap of paper to make this.  I put Stampin' Up!'s crystal effects on it which makes it look shiny.  I know it is hard to see in the picture, but trust me it looks shiny.

Simple and easy to make don't you think?  Well that's it for today.  Have a wonderful weekend and I will be back Monday!!  Thanks for stopping by.


Thursday, June 16, 2011

Does Anyone Have A Tissue?

No one likes to be sick.  But one thing that really helps is receiving a card from a friend with a simple get well message.  It lets you know someone cares and wants you to feel better. 

I always like to make "cute" cards.  I know it seems silly, but I like cards that send a message to someone and hopefully put a smile on their face.  Get well cards can be a challenge.  You have to know who you are giving it to, what their illness is, and though it is sad to say, is it an illness they will get better from or not.  It all makes a difference in what you say.

One of my favorite cards to make is one I would give to a friend with a cold or the flu or a sinus infection.  Now if you have ever suffered from any of these, you know one thing you constantly seem to do is grab for a tissue.  So why not make a cute card with that theme?  So here is the one I made:


Now I added a lot of sparkle to this one because I had a girl in mind to send it to.  The adhesive I used to put the glue on is sticky strip tape.  It is all uniform all the way around and the glitter really sticks to it.  You could also adhere micro beads to this.  Now let's look a little closer.

I have seen other designs that actually have a little box raised off the card.  I have found this one I made is a lot easier to mail since it is flat.  Really it is your preference as to what you like to make.  I think this is cute.  I know the few people I have given one to have really appreciated the thought and loved the creativeness of it.  What do you think of it?  Leave me a comment to let me know.
I hope all of you readers out there are well.  I truly appreciate your reading my blog and leaving comments.  Keep it up!!  Thanks for stopping by and I will see you tomorrow.

Wednesday, June 15, 2011

A Simple Flower

Every woman I know loves to receive flowers.  So it made sense to me to make cards for friends and family that had flowers on them. 

Stampin' Up! added a beautiful die for the big shot called Flower, Daisies #2 to their catalog a few years ago.  This was a very popular die.  It was constantly on backorder for the first month or so it was offered.  I got lucky and was able to get one and quickly fell head over heels for it.  I wanted to share how cool this flower looks.


Isn't it pretty?  You cut all 3 sizes of flowers out as well as the circles from the middle of each flower.  The leaves I used are a sizzlets die for the big shot.  

Here is a close up of the flower.  You can see the layers  more clearly.  I used the middle from the largest flower for the center.  I cut 2 sets out, one white and one yellow.  The yellow flower went on another card and I used the white circle for the center.  The background is embossed with an impression folder.  I cannot stress enough how easy this card is to make.  Once everything is cut out, it is a five minute project to put together.  
If you are interested in any of these dies, please contact me.  I would be happy to help you get them.  I hope you like the card.  Be sure to stop by tomorrow for another cute card.  Thanks for dropping in today.

Tuesday, June 14, 2011

Send In The Clowns

In my home, I have a small clown collection.  No I am not referring to my family although they would probably qualify.  I am referring to my porcelain clowns.  My husband started this for me the year we were married.  He absolutely loves clowns.  In fact, he went to clown school for his job in the fire service.  He was hoping to use this skill to teach fire prevention in schools.  Well, that did not pan out, but his love of clowns remains.  It became a goal of mine to in the last year or so to learn to make a clown out of punches.  I worked long and hard at it and finally came up with one I love.


This card was made for my husband.  I love how happy this little guy is.  At the time I made this, I used my cricut machine to cut the large circle for his body.  Now Stampin' Up! has a 2 1/2" circle punch and a 3" circle die for the big shot.  Either of these will work for his body.  The only punch I used that is no longer available is the small oval punch which is retiring this year.  Now I wish I could tell you that you can still order one, but sadly, they have sold out.   You can use the large oval and trim it down to the size you want.  I stamped the hearts on the white card stock using the I {Heart} Hearts stamp set, then ran it through the big shot using an impression folder.  This card is on display in my husband office here at home.  I smile every time I see it.  I also made a purple and pink clown, but I knew my husband would prefer this color scheme.

Well, the laundry is calling my name.  I wish it would take care of itself.  Oh well.  Off to laundry land I go!!  Thanks for stopping by today.  See you tomorrow.

Monday, June 13, 2011

Another "Doggone" Birthday Card

As I was posting my blog last Friday, I cannot tell you how much I wanted to share my daughter's birthday card with you.  I was afraid she might look at my blog and see it prior to my giving it to her.  So I had to wait until today.  Even though my girls are not little anymore, they still get a kick out of receiving their handmade cards.  So my challenge every year is to come up with a new idea to make.  This year, I decided to make a card that would be cute and funny.  I took out my punches and let my mind go to work.  Again, I must thank Ellen Kemper for helping in my creative process.  I believe I saw this on her blog first but had never made it.  So without further ado, her it is.


Isn't he cute?  Now this does not look like our dog but my Kaitlyn loves all animals (except bugs) so I knew she would like him.  I used the little Happy Birthday stamp from the Pretty Postage stamp set for my background.  I stamped the images and then punched them out using the new postage stamp punch.  I adhered them down to the Garden Green card stock and ran it through my big shot using an impression folder.  The do was made using several punches.  I built him off the card and once he was completely finished, I adhered him down with dimensionals.  Now let me show you the inside.  


The stamp I used inside came from a different company than Stampin' Up! I usually try to find a saying that really goes with the card design and this one was perfect.  I stamped it in Tangerine Tango, just like to Happy Birthday on the front.  This matched to base card.  She really seemed to like this card when she opened it up.  I know I was happy with the outcome!!

As we begin another week, I am preparing to attend another wedding this coming Saturday.  My beautiful niece is getting married in the church.  When she first go married, they went to a justice of the peace, so this is her big formal wedding she has always wanted to have.  I am so excited for her.  

Well, I best get busy making more cards.  I am so glad you took time to drop in today. Be sure to stop by tomorrow for another card.  See you then.  

Friday, June 10, 2011

New In Colors 2011-2013

First and foremost, HAPPY BIRTHDAY to my youngest daughter, Kaitlyn.  She is the big 19 this year.  I told her to enjoy her last year of being a teenager.  She is one smart little cookie ( just like her mom) and I am so proud of her for all her accomplishments as well as for the person she has become. 

Earlier this week, I promised to share the new In-Colors that will be in Stampin' Up!'s 2011-2012 catalog.  In-Colors now stay around for 2 years instead of one, so the 5 colors introduced in the 2010-2011 catalog (Peach Parfait, Pear Pizzazz, Poppy Parade, Concord Crush, and Blushing Bride) will still be around for one more year, and the new ones I share with you today will be around until 2013.  I like that a lot because one year just was not long enough to really enjoy the colors.  Okay, lets move onto the new ones.

I thought I would introduce them by also sharing a couple of new punches that will be in the new catty.  So first I will show you the punch, then I will show you pieces of the new colors punched out with the punch.  First up is the new Petite Pennant Punch and coordinating stamp set called Pennant Parade.


The new In-Colors are as follows:  Island Indigo, Pool Party, Lucky Limeade, Calypso Coral, and Wisteria Wonder.  Here they are punched out using the Petite Pennant Punch.


My lighting does not do these colors justice.  Perhaps the next sample will be better.  Next we have the new Lace Ribbon Border Punch.


Unlike the other border punches, this one is a little bit bigger.  The lace look is beautiful as you can see by the next sample of the new In-Colors:


I love, love, love all the new colors.  When I first ordered them, I was not sure I would use some of them as much as the others, but once they arrived, I quickly saw that I will use all the colors.  They are absolutely gorgeous!!  If you would like a new catalog when they come out July 1, be sure to let me know and I will get you one.
Once again we have reached Friday and the weekend is here.  I wish all of you a weekend of fun and laughter.  I will be back on Monday to share the birthday card I made out daughter.  Until then, thanks so much for stopping by .  See you soon!!


Thursday, June 9, 2011

Another Way to Stain Glass

Before we get started today, I want to wish my wonderful sister-in-law, LouAnne, a very HAPPY BIRTHDAY!!!  I hope it is a wonderful day filled with many blessings from the Lord above.  I am always here for you!!  Now onto my card.

As you know, I love the look of stain glass cards.  While making them using acetate and glitter is my favorite way, I recently came across another type of stain glass card made by Joan Jeffery.  Now this is a sample to show you the effect.  I will be making another card to share soon.  Here is the basic idea:


Can you see the shine on the colored card stock?  The basic ides of this card is to cut out various shapes in different colors.  I used my punches to get mine.  Then I adhered them to a blank piece of white card stock.  Once they were glued down, I took my handy little fine tip black marker and a ruler and drew the lines between the shapes at various angles.  Then I found my bottle of Crystal Effects from Stampin' Up! and put some on each shape.  Set this aside and give it 5 to 10 minutes to dry.  It will leave your pieces looking shiny.

I admit, if you saw Joan's compared to mine you would quickly see that this is definitely a first attempt.  One way to improve it is to place each shape on a black background.  That would help to highlight them even more.  Then if you place the entire white piece on black and then on your base card, it will again highlight all the wonderful colors.  I would also recommend using more shapes than I did.  I would add some smaller circles to it in order to add a little more color.  As I said, this was my first try and I am not ashamed to say I can do better next time.  After all, I love to learn so failure is a part of the success equation.  

If you decide to give this technique a try, please send me a copy of your card so I can see it.  I would love to see your creative genius at work.  Thanks for dropping in today and please come back tomorrow.  Until then, have a wonderful day. 

Wednesday, June 8, 2011

Bye Bye Bumble Bees

One of my absolute favorite stamp sets that Stampin' Up! put out is a set called Just Buzzin' By.  When it first came out, I ordered it immediately.  Those little bees were just so cute!  It was the first set I ever designed an entire class around.  Many of my students ordered the set for themselves prior to and after the class.  They loved it as much as me.  Well, just look at it! You would love it too.


So you can just imagine how disappointed I was when the retiring stamp set list came out and there it was.  The bees were leaving.  I was so sad.  I use this set for lots of things and don't know what I will do without it.  I dared to try several new card styles using this because I could envision what the cards would look like.  One of the card styles I tried was the step card.  

Look at those happy little faces!!  These little guys always bring a smile to the receiver's face.  I can only hope Stampin' Up! has some new stamp set that is as cute as this one is.  Speaking of new sets, my copy of the new catalog is due to arrive today.  I cannot wait to get my hands on it!  I will share the new In-Colors with you in the next few days too.  If you would like a 2011-2012 catalog, please email me or leave it in a comment with your email and I will be sure to get one for you.  

If you would like to get these cute little bees before they are gone, just click over to my Stampin' Up! website and click on the shop button.  Don't miss out on this set and be sure to look at all the others leaving too.  Thanks for stopping by today and I will see you tomorrow.   

Tuesday, June 7, 2011

Surfer Dogs Ride Again!!

I think I mentioned yesterday that I was going to make another card with those crazy dogs behind the wheel of their beach buggy.  They were driving to the beach before for a day of fun so the sky was blue and the sun was up.  Today, I wanted to make and share a card of them driving home (okay so they look the same) at the end of the day.


Once again I chalked the background to the card using the same blue for the water and the same browns for the sand.  But this time, I used yellow and orange for the sun and made the sunset from yellow, orange, and red.  I highlighted the water once again with some glitter.  I used the light blue glitter this time for a little contrast.  As you can also see, I added glitter to the sun.  I wanted to have it shimmer above the water as it says goodnight for another day.   The birds were added with a black fine tip pen.

Here are those crazy dogs again, traveling on their journey home.  As you can see, I used a different color for the car and the surfboards.  I wish I had done a better job on the glitter in the water.  Next time, I will use my fine tip glue pen instead of the tombow.  
I hope you will visit my Stampin' Up site to check out the list of stamp sets and accessories that will be retired as of July 1st.   Don't miss out on this opportunity to get these items before they disappear for good.  Also, I will be ordering the new 2011-2012 catalogs soon.  Please let me know if you would like one so I will be sure to order enough.  

I will be back tomorrow with another card or tip to share with you so be sure to stop by.  Thanks for visiting today.  See you tomorrow. 

Monday, June 6, 2011

Surf's Up!!

Summertime is upon us once again and as those temperatures rise, we think of the fun times we have had at the beach.  Now, no one in my family is a surfer.  Not sure why.  Goodness knows my cousins grew up around the water and can water ski like experts.  Even their children are pros at it.  But surf?  I do not think that is part of their talent. 

I grew up in a home where the Beach Boys music was played regularly.  I can sing most of their songs from memory and always loved to go see them at the fair when they played.  I really owe my love of their music to my mom who always had a song on her lips and to my brother who played their records over and over.  So it seemed fitting to me to do a beach type card for someone special in my family.  I was online the other day and came across the most adorable card which used the Loads of Love pickup truck.  The truck had been modified to make it an open car with surfboards in it.  Of course I had to try this.  The brilliant demonstator who made the card is Lorri Heiling.  You can visit her blog by clicking on her name.  So I set out to make a convertible of my own.


Lorri had just one dog driving her car but I wanted all three included in mine.  When I showed my daughter, she laughed at the dogs driving.  I chalked the background using a light blue for the sky, a medium blue for the water and several browns combined to make the sand.  The sun of course was done with a bright yellow.  I added a little dazzling diamond glitter to the water so give it that shimmer you often see when at the beach.  I added the birds by free handing them using a fine tip black marker.  Let's take a closeup look at those doggies!!


I used my Stampin' Up markers to color the surfboards in order to have a variety of colors when I stamped it.  By the way, the surfboard stamp is part of the  Summer Splash stamp set from the Summer Mini.  After I stamped the boards, I cut them out individually in order to place then in the car.  Since I wanted to color the car and I was not sure what medium I would use, I stamped it using StazOn ink.  That way, it I used markers or watercolored, I would not pull the black pigment in to it.  Well, I decided to go a completely different route and colored them using colored pencils.  I did the same with the dogs.  Once I colored the trucks and dogs, I cut them out individually.  I trimmed the cab of the truck off to make this cute convertible.  Now I did not stamp the dogs in the truck.  I stamped them separately and trimmed them out then glued them onto the truck.  That way, I had no risk of damaging the dogs when I cut the car out.   Once put together, you have the surfing dogs out for a day of fun in the sun!

I did stamp several trucks and made them all different colors.  I am going to try something different for the background, still at the beach but a different time of day.  If it works, I will share it with you.  If not, well at least you can look at this cute card.  Stop back by tomorrow if you can.  Thanks for dropping by today!

Friday, June 3, 2011

My Niece's Wedding Invitations

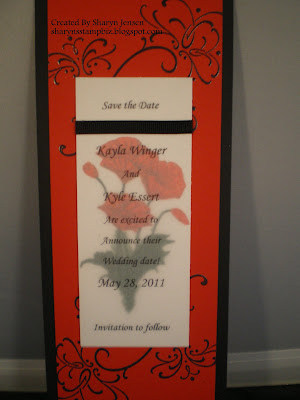
I realized as I was posting yesterday that while I have shared some wedding invitations with you, I have not share the ones I made for my niece.  I am very proud of the work I did and want to share them with you today.  First up, the Save the Date announcement which basically just lets everyone know to keep their calendars open for the special couple.


I used a vellum overlay to print the information on and placed it on top of a poppy flower stamp.  Believe it or not, I hand-stamped each one and colored each flower.  I think I did at least a 100 of these.  I attached the vellum with adhesive and covered the adhesive line with the black ribbon.  The image on the poppy card stock comes from a stamp set called Wedding Sweet and was stamped with versamark ink and heat embossed with black embossing powder.

On to the invitation!!


This is the front of the invitation.  The saying is from the stamp set Occasional Quotes.  Once again, I stamped the flowers using the poppy flower stamp and hand colored each one.  This did take some time, but it was well worth it.  
This is the inside of the invitation.  As you can see I one again used the vellum overlay to print the information on and put it over stamped and hand colored poppy flowers (to match the front of the card).  This time, I attached the vellum using square black brads and placed them in the corners looking like little diamonds.  The bottom portion of the card was a pocket design.  The outer wording on the pocket told guests when to return the RSVP card by and also that an envelope was included to return it in.  These were placed in the pocket, with the envelope folded in half so it would fit.  Also included in the pocket was an information card about the reception so guests would know where it was and what would be served.  The small stamp on the outer pocket is also from the Wedding Sweet stamp set and is also heat embossed in black.  

My job for this set of invitations would not be complete without a set of thank you cards to send to people for gifts received.


Yes I am completely insane by now as you can see I once again stamped the flower and hand colored it.   The background is embossed using an impression folder called Vintage Wallpaper.  The "thank you" stamp is from the Wedding Sweet set.  


The inside is very simple.  I stamped just the flower portion of the stamp and hand colored it.  The rest of the paper I left blank so there would be plenty of room to write a note. 

Now I should let you know that I love to color.  I find it very calming and peaceful.  My niece was a great help during a difficult time in my life.  I got to work on her invitations which had a lot of coloring involved while caring for my brother.  These cards really kept me sane and gave me a distraction from an otherwise difficult time (to say the least) in my life.  

Well now that I have bored you, I want to say thank you for looking at these today.  If you know anyone getting married who would like hand made invitations, let me know.  I love to make this stuff.  See you on Monday.  Have a wonderful weekend.

Thursday, June 2, 2011

Here Come The Bride

When I was first asked to design and create the wedding invitations for my niece, I decided to create a card that could also be used for a bridal shower invitation.  Now her maid of honor and bridesmaids were already going to do hers so I made a sample just to see what she thought.  She loved it so much I gave it to her to keep in her keepsake book.  So I thought I would share them with you today.


I made these using the same punches but changed the color of the ribbon and flowers as well as the hair to show how the card can be custom made for a bride to be.  I did use different impression folders for the backgrounds and the designs on the dresses.  The square lattice folder worked well for all the hats.  Let's take a closer look at each bride so you can see the differences.


 This one is made with daffodil delight card stock. 


 This one is done with cherry cobbler card stock.


This one is marina mist card stock.


This one was made with pink pirouette card stock.


Although they may look complicated to make, they are really pretty simple.  I thoroughly enjoyed making these and love to do them as actual invitations for bridal showers.  Tomorrow I will share another wedding card with you.  I hope you like these little ladies.  If you want more information on how to make these, let me know and I will get you the recipe.  Thanks for stopping in today!


Wednesday, June 1, 2011

A Fan Tail Fish

Happy Wednesday everyone and happy first day of June.   Can you believe June is already here.  Time seems to be flying by.   I hope all of you are enjoying your week so far. 

I made a fish card a week or so ago using the build a blossom stamp set and punch.  I think I mentioned in the blog that the largest petal could be used to make a fan tail fish.  So I of course wanted to make one for you. So I pulled out all my stuff and got right to work.  Now my "stuff" happens to include my cricut machine to which I happen to have a cartridge called Life's A Beach.  I used it to add some pizzazz to my card. 


OOH isn't he pretty?!  The sea shells come from a Stampin' Up! stamp set.  The sand is a piece of torn crumb cake paper dotted with a stamp from the Confetti set.  The treasure chest is from my cricut machine.   I thought it would be a nice addition to the card.  I added gem stones that I had picked up at a local craft store.  What would a treasure chest be without a treasure inside of it?  I used my light blue glitter from SU! to glitter the fish tail.  The gold dots on the chest were made using gold glitter and of course the card has to have bubbles so I added those to it too.  The little fish eye is made with black glitter.  I could not seem to make this card sparkle enough or myself.  I guess I got a little carried away.  

So what do you think of the little fish?  I used the same body and small fins for him.  The only difference was the tail.  I love the look of the big fan tail.  I always love to watch how the tails seem to flow side to side as fish swim so this is a great addition to this little guy.  Please feel free to leave a comment and let me know what you think of him.   I would love to hear from you.

June is another busy month for my family so be sure to tune in each day for that latest.  Thanks for stopping by today.  See you tomorrow.