CARDS FOR SALE

Most cards you see on this site are available for purchase. Simply click the Pay Now button at the bottom of the post of an available card to purchase the card. You will be linked to PayPal for payment. It will come up as "greensnaggletooth@cox.net" which is the name of my internet company. Price is $5.00 unless otherwise stated and includes shipping. Your card will come with an envelope also. Email me with any questions or requests at: sharynsstampbiz@gmail.com
Thanks for taking a look at my creations!!

Monday, April 30, 2012

Has Your Prince Come Along Yet?

All little girls dream of being a princess and of course they wait for the day that Prince Charming comes along.  Sometimes, we encounter those frogs that we think might be the prince but in actuality is just a frog.  Been there done that.  But if we wait long enough our prince will come.  Remember all princes start as frogs.  It is how they grow and mature that either keeps them a frog or turns them into a prince. 

Now what does all of this have to do with my share for this fine Monday?  Well, I bet you can guess there is a frog involved and you would be right.  Once again, I was sitting at my craft table trying to get inspired to make something.  I happened to look up and saw my punch art sample board.  For some reason this frog stood out to me.  He is another punch art I made for the board but never used on a card.  So it was his turn to be used today!!  Here we go on a froggy adventure!!


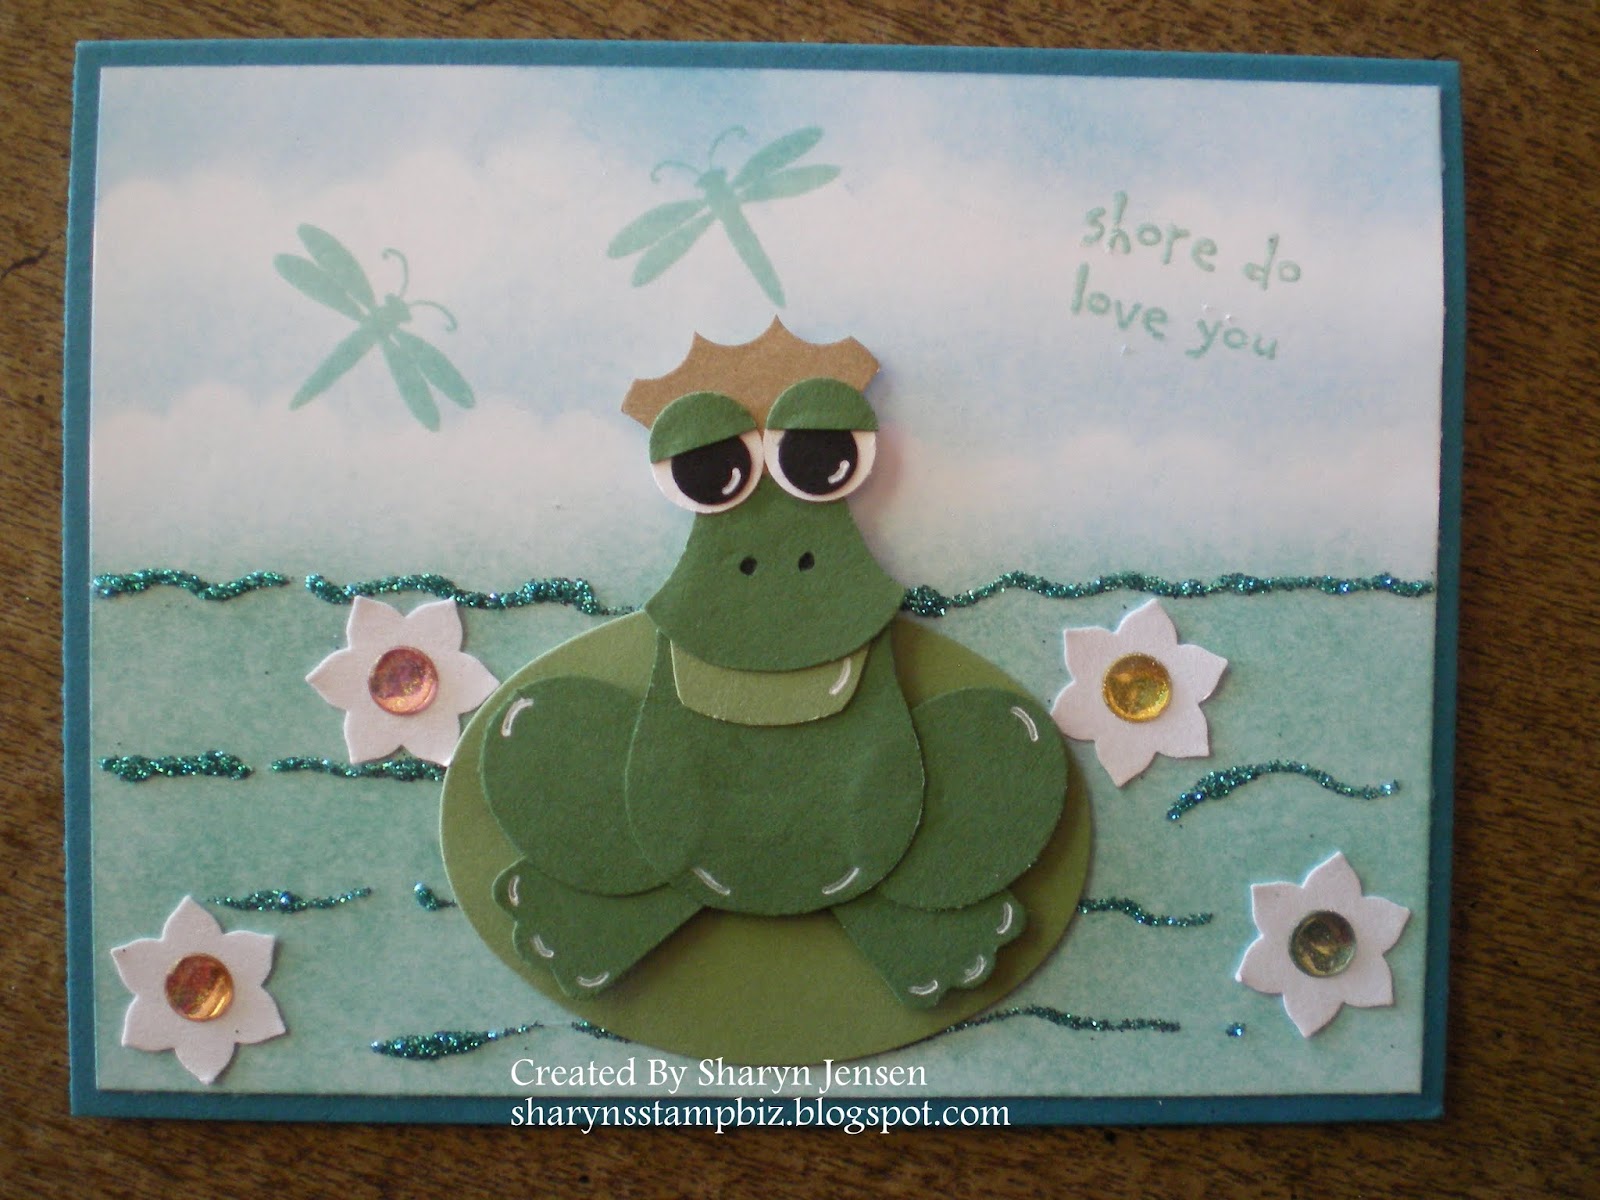
It is a relaxing day at the pond for this frog.  I started with a base card of Island Indigo cut at 5 1/2" x 8 1/2", scored at 4 1/4".  For the top layer, I cut a piece of Whisper White to be 4" x 5 1/4".  I used my pastels and created a sky look for the top half of the card and a water look for the bottom.  To enhance the water color, I used a glitter I picked up at a stamp convention called Ocean Spray.  Using my liquid glue, I made little lines for the ripples.  Allow this to dry completely before you put any of the details on it.  Adhere it to the card using runner adhesive.  For the dragonflies in the sky, I used a stamp I happen to get at a stamp convention.  It is stamped using Pool Party ink.  I really had to look around to find my greeting for this one.  I ended up using a stamp from the retired stamp set called Crab & Company.  I inked it first with VersaMark ink and then immediately with Pool Party ink.  This way once I stamped it I could sprinkle clear embossing powder on the words and heat emboss them.  


For the flowers floating in the water, I used my boho blossom punch and punched out the pointy petal flower from Shimmer White card stock.  These were adhered down using liquid glue and have a sparkly sticker added to the center of each.  


Now for the star of the card.  His color scheme is Garden Green, Wild Wasabi, Brushed Gold, Whisper White and Basic Black.   I used a total of 4 punches to make this guy.  His legs were made with the small oval punch.   For the feet, I used the modern label punch and cut the punched piece in half.  I now turned to my owl builder punch for the main components of Mr. Froggy.  The actual owl makes up his body.  I trimmed the ears and feet off of it.  For the face and the "ribbit pouch" under it (afraid I don't know the technical name), I used the vest from the owl punch.  I trimmed the pouch to be smaller than the face.  The nostrils were drawn on with a fine tip black marker.  The eyes and eyelids are pretty self explanatory.  For the crown, I started by punching a vest out of it.  Then I used the circle from the itty bitty punch pack and punched out small pieces of the bottom of the vest to get the points of the crown.  It is glued upside down, but I bet you knew that.  All pieces of the frog were adhered with liquid glue.  The lily pad is an oval cut out from the Ovals die using the big shot.  It is the middle sized one on the die.  I glued the lily pad down with liquid glue.  I added white gel pen to the various parts of froggy to enhance them.  The frog was added to the pad and card using dimensionals.  

I left the inside of this one blank by adding a piece of white cut at 3 1/2" x 4".  It is edged with Pool Party ink.  This way you can use the card for whatever you want to by adding your own stamp or writing your own message.  

If you have any questions about this frog please feel free to drop me a line.  I would be happy to hear from you.  I hope you come back tomorrow and visit again.  Thanks for dropping by today!!


Friday, April 27, 2012

A Different Kind of Blog

Alright.  You caught me.  My day was eaten up with appointments and being helpful to others.  I did not have any time for fun stamping today.  The weather was great in AZ today though.  It is all overcast and sprinkled off and on.  Unfortunately the change in weather also means my migraines come back with a vengeance.  So while I am not feeling so great today, I wanted to share with you which of the Stampin' Up! punches are retiring this year.  There are at least 13 of them so let's get started shall we. 


The first 2 I will share with you are the Butterfly punch and the Heart to Heart punch.  I was extremely saddened by the news that they are being retired.  There is a lot of punch art I make that uses these 2 punches.  


The next 2 punches that are retiring are the Large Tag and the Rounded Tab.  I love to use the rounded tab to make index labels and it comes in handy for some punch art.  The large tag is another one I find myself missing already.  I use it for Christmas tags and for some punch art also.  


The 5 Petal Flower and the Ticket Corner are also retiring.  I was surprised to see the Eyelet Border punch is retiring.  I love this one to edge my card stock with.  It is just so pretty.  


Both of the triple layer punches are leaving.  The one on the left is the Blossom Bouquet .  Not only does it make pretty flowers, I used the little teardrops for rain, water spray and eyes.  The right one is called the Doily.  I will admit I do not use this one very much and will not miss it as much.  But it is still cool.


Here you can see the Snowflake punch and the Lace Ribbon Border punch.  I used my snowflake for antlers on reindeer and other things.  The lace ribbon border punch is a little difficult for some people to work with but it is a beautiful accent to any scrapbook page or card.  


By now you must be thinking is this list ever going to end?  I promise these are the last 2 punched being retired.  Sorry they are difficult to see.  They are the Pinking Hearts Corner punch and the Pinking Hearts Border Punch.  I really thought I would use these a lot when I got then but actually I did not use them much at all.  

So there you have it.  There are some really cool punches leaving us.  If you want any of these order them now.  Don't wait.  They go fast and once they are gone you will not be able to get them anymore.  If you would like to see the full retiring accessory list or the retiring stamp set list, please visit my Stampin' Up! page.  You will be able to order from there also.  The link is on the right hand side bar of my blog.  

I wish you all a wonderful weekend and hope it is filled with fun.  I will return on Monday with another share for you.  Thanks for stopping by today.  


Thursday, April 26, 2012

One Smart Dog

Hello fellow stampers and welcome to my Thursday blog.  I wasn't sure this one was going to get done.  We spent yesterday morning at the doctor for my husband's follow up appointment and then spent the afternoon running some errands.  I thought I would never get home and see my craft room again.  It's funny how much I miss being in it even when just running errands.  But I am happy to report we arrived back at home in time for me to make a card and post the blog about it.  Yeah!

First I want to be sure to tell you that the retired accessories list is up from Stampin' Up!.  There are several punches that are being retired.  Be sure to check the list out and order anything you want quickly as these items go fast.  Once they are gone you are out of luck. 

Now let's get back to my card.  Yesterday I shared a sad little dog with you who was not feeling so well.  Today, I thought I would continue with the dog theme.  This time my little dog is a smart dog out for a walk.  Let's get going on this one!


Just look at him, out for a stroll.  I started with a base card of Night of Navy measuring 4 1/4" x 11", scored at 5 1/2".  I added a layer of Whisper White measuring 4" x 5 1/4".  I chalked the sky background onto it using my pastels and then added torn strips of Garden Green to it for the grass.  I added some dazzling diamond glitter to the edge of the grass just to give it a little sparkle.  I attached it to the base using runner adhesive.


I learned to make this little guy from the punch queen herself, Ellen Kemper.  Her name for him is Smart Mutt.  I am so glad to see she is back to posting again.  I have really missed her.  Anyway, you can visit her blog to get the instructions on how to put him together.  I first made this little guy to put on my sample punch art board I keep for others to see what types of things I make.  I had never made another one to use on a card.  So it was about time I got around to using this guy.  The colors I used for him are Basic Gray, Whisper White, Basic Black and Real Red.  Once he was completed I attached him to the card using dimensionals.


For my greeting, I used a stamp that came in a little set I picked up at a local craft store.  I stamped it directly to the sky using Night of Navy ink.  The butterflies are a punch made by Fiskers.  It was part of a set a friend gave to me.  I punched one in each of the following colors:  Rich Razzleberry, Melon Mambo, Daffodil Delight, Tangerine Tango and Marina Mist.  I adhered them to the card using a liquid glue and added a small rhinestone to the center of each.  

I do realize this post is a little short but after all I am blessed to have gotten it done in time for you to see.   Now I have another full day of activities going on so I will once again do my best to find time to escape to my craft room and create another card.  Please come back tomorrow to see if I succeed!  Thanks for dropping by today!!!


Wednesday, April 25, 2012

In Need of a Get Well Card?

There are several types of cards that I like to keep on hand.  One of them is get well cards.  Don't worry, no one is ill right now but for some reason when someone gets ill it is always a surprise.  So today I wanted to share with you a card I made just for this type of situations.  This particular card was inspired by 2 people:  the first is a fellow demonstrator named Kim Score and the second is my little dog Sadie.  I know that sounds weird but this card was made the same day I took her to the vet to get her yearly shots.  I am sure this card shows her feelings for this particular day.  So let's get started. 


This little guy makes me want to hug him.  I started with a base card cut at 4 1/4" x 11", scored at 5 1/2" out of Garden Green card stock.  My first layer on this is a piece of Night of Navy measuring 4" x 5 1/4".  I ran it through my big shot using my stripes impression folder.  It just seemed like a good texture for the "wall".  I turned to my box of dsp that is retired and found this neat plaid piece.  I love the colors of this.  I wish I could remember the name but it us just gone.  I cut a piece to be 2" x 5 1/4" and rounded the top 2 corner.  This would serve as the dog's bed.  All of these pieces were adhered together using runner adhesive. 


For the greeting, I used a stamp set that did originally come from Stampin' Up!.  It is a retired one.  However, I did not purchase it new.  I got it from a fellow stamper who was getting rid of some of her old sets.  She did not have the name of the set on the box and could not remember it either.  So I just refer to is as the "get well" set.  I stamped it using Garden Green ink onto Whisper White card stock.  I used my paper trimmer and trimmed the piece down.  Then using my corner rounder punch, I rounded all the corners.  It is finished off by adding some Garden Green ink to the edge of the card stock using a sponge.  I adhered it to the card using runner adhesive.  


I fell head over heels for this little dog.  I really think he represents how everyone feels when they get sick.  I learned how to make this little guy including the thermometer and tissue as well as his pillow from Kim Score.  I am not going to list the punches used since this is her design.  Instead, I would suggest you visit her blog which is called Paper Punch Addiction.  Once you get there scroll down and look for the free tutorials on the left hand side.  This one is called Sick as a Dog.  I have found wonderful tutorials on her site and tweek them as my own.  For this card, the colors scheme was all my own as was the background embossing and the "bed".  The greeting is also different from hers.  I used Soft Suede and Early Espresso for my doggy colors.  The pillow was adhered using runner adhesive as was the dog's head, body, and ears.  For the muzzle and the 4 paws, I attached them using dimensionals.  This was Kim's suggestion and I like the look of it on the card.  White gel pen and a fine tip black marker finish off the dog.  Anyway, if you have questions about how to do some part of him, I would be happy to help.  Now let's move to the inside.


This saying is from the same stamp set as the greeting on the front.  I stamped this one is Night of Navy onto Whisper White card stock.  I trimmed it down and rounded the corners.  Night of Navy ink was sponged onto the edges.  It is attached to the card using a runner adhesive.

I do hope you enjoyed this one.  For a get well card, it will hopefully bring a smile to someones face.  I appreciate you taking a few minutes out of your day to stop by and see what I made.  I sure hope you come back tomorrow.  I will see you all then!


Tuesday, April 24, 2012

It's Almost Mother's Day

It is hard to believe that April is almost over.  Next week we will welcome May.  There are so many events coming up it May it is a bit overwhelming.  Between birthdays, graduations, anniversaries, and Mother's Day, I will be very busy. 

Mother's Day has always meant a lot to me.  I love spending time with my children and celebrating all the moms in my life.  I am blessed to have a wonderful mother in law and always look forward to seeing her.  I will admit that this day is also a bit sad for me because I miss my mom very much.  So while it may sound strange, I find comfort in creating cards for this special day.  It just brings peace to my heart. 

Today's card is another Mother's Day card for you to view.  Believe it or not, this special day will be here in just over 3 weeks.   If you have not made your cards yet maybe mine will inspire you.  Of course, you can always order one from me and I will be happy to make it for you.  So let's get started.


As you can see, this card has that fun rosette flower again.  But let's not get ahead of ourselves.  I started with a base card of Very Vanilla cut at 5 1/2" x 8 1/2", scored at 4 1/4".  I used my corner rounder punch and rounded all the corners of this card.  Next I chose to use Calypso Coral card stock.  I cut a piece to measure 4" x 5 1/4".  I rounded the corners of this using the corner rounder also.  I ran it through my big shot using the Vintage Wallpaper impression folder.  I placed the embossed piece inside my color catcher and used my smooch spritz spray to spray it all over giving it a nice glimmering effect in the right light.  I adhered it to the base card using a runner adhesive.  


Next I went to work on my rosette.  Step one was to choose my designer paper I wanted to use.  Now I did choose this prior to starting my entire card so that the base card and the layer would coordinate with the dsp nicely.  This particular paper came from one of my local craft stores.  I cut a strip to be 1 1/2" x 12".  Using my simply scored tool, I scored this strip every 1/4".  Once the entire strip was scored, I accordion folded it just like the fans you use to make when you were little (or was that just me?).  I adhered the ends together using a liquid glue.  I allowed this to dry before going on so that it would not come apart on me.  I punched a 1" circle to adhere the rosette to on the bottom.  I placed sticky strip on this to ensure I had a strong adhesive for it.  Pressing down on my accordion circle, I formed the rosette and carefully set it on top of the 1" circle.  I was slightly off center but not too bad.  This really does not matter though because you will not be seeing the bottom of this one on the card.  I punched the large flower from the boho blossom punch in vanilla and layered a 3/4" coral circle on top of it.  I added a dot of coral ink to the petals using my SU! marker.  The pearls in the center were bought at a local craft store.  They are a champagne color and looked good with the vanilla.  The flower center was adhered to the rosette with liquid glue.  I then placed this in my color catcher and spritzed it with the same spray as the card.  I adhered it to the card using dimensionals.  


For the greeting, I used a stamp from the retired stamp set called Well Scripted.  I stamped it using VersaMark ink onto a piece of Calypso Coral and heat embossed it with black embossing powder.  I cut it out using the Framelits Labels Collection for my big shot.  I also cut out one size larger than my greeting in Very Vanilla.  These were layered together and coral dots were added on the exposed vanilla part.  I then spritzed the greeting in the color catcher with the same spray as I had used before.  I adhered it to the actual card with dimensionals.

I do understand that from just looking at the photos you probably cannot see the shimmer on the card.  I promise if you were holding it under a light, you would definitely get the glimmer.  It is very beautiful.


For the inside saying, I used a stamp from the stamp set called Word Play.  I stamped it with VersaMark ink onto Calypso Coral card stock and heat embossed it with black embossing powder.  I cut it out using the Framelits Labels Collection and my big shot.  I adhered it to the inside of my card using runner adhesive.  I had space left at the top and decided to add a flower to match the center of the rosette on the front.  So I punched the large flower from the boho blossom punch, added a 3/4"  coral circle on top and finally added a 1/2" vanilla circle on top of that.  I added coral dots to the petals again as well as to the center vanilla circle.  

Don't let this special day sneak up on you.  Get your cards ready now so you have no pressure as the date approaches.  

That is all I have for you today.  I hope you enjoyed seeing my card.  Maybe I will give this one to one of my mom figures.  Please come back tomorrow to see what I come up with next.  Thanks for stopping by today.


Monday, April 23, 2012

Gift Bag

As I was working on a special project the other day, my sister called and said she needed a few gift bags to place a small gift in to give to students who are graduating from ASU this year.  Now don't think she needed them for all the students.  She only needed 18 for students who are part of her college and I believe they have worked there.  So of course I said I would do it.  Unfortunately I only had a few hours to get them ready.  She had to pick them up that night and pass them out the next day at work.  So I put together a really quick design and got started on production. 


This is the first side of the bag.  I started with Whisper White card stock cut at 6" x 12".  I ran it through my big shot using the XL Bigz die Fancy Favor.  This actually cut out the bag shape and scored the lines where I would need to bend them to put it together.  To secure it, I knew I would need a strong adhesive so I used my sticky strip.  Now because I knew I wanted to decorate the sides prior to assembling the bag, I put the sticky strip on where it would be needed but did not peel off the top red layer of it.  That way it would be ready when I needed it to be and not stick to anything while I worked on it.  

As you can clearly see, my sister works for Arizona State University.  The school colors are maroon and gold so I chose to use Bravo Burgundy and Daffodil Delight as my colors of card stock.  My Cricut machine came in very handy to use for making the letters.  I used a cartridge for the machine called Plantin Schoolhouse.  It is an alphabet cartridge which actually came with my machine when I got it.  As you can see, I cut out sets of letters in both of the colors so I could alternate them on my cards.  I adhered the letters down using a liquid glue.  

Next I pulled out a retired stamp set called Go, Graduate.  I used the cap stamp from it and stamped one with Bravo Burgundy ink and the other with Daffodil Delight ink.  Now I could have stamped these all over the side and then adhered the letters but I wanted a simple clean look.  I also could have added glitter but I did not really have time to today.  


Here is the other side of the box.  I basically stuck to the same theme.  I began by using the same Cricut cartridge and cutting out numbers in both Bravo Burgundy and Daffodil Delight so I could also alternate them on here.  They are adhered with liquid glue.  Again I used the same stamp to add my decoration.  Once the letters and numbers had been adhered and had a chance to dry, and the stamping was all done, I assembled my bag together and it was ready to go.  

While I did not get a photo on the gift I will tell you we finished the bags off by placing a half sheet of tissue paper in each and then placed the gift which was a really cool key chain.  Hopefully, her students will love the key chains and take time to look at the bag.  All in all, I kept the task simple for myself so I knew I could finish it in time for her to get them.  I had a lot of fun making these. 

 Now I have a secret project to work on for someone special.  I cannot share any details about it yet since the someone has not received it.  However, I do promise to share it with you as soon as I can.  I think you will appreciate it when you see it (at least I hope you will. 

Thanks for stopping by today and please come back tomorrow.  See you all then!


Friday, April 20, 2012

New Arrival

The other day, I received a request from my niece to create invitations for her baby shower.  This will be her first baby and I am so excited for her.  My routine when I make invitations is to make a few samples and allow whoever requested them to choose from.  I worked on a couple of samples the other day and she absolutely loved one of them.  So while I will not share that invitation with you until after they have been sent out, I will share the other sample I made for her.  This was the first one I made. 


I made the card a color scheme that is fairly neutral.  Although we know if it will be a boy or a girl, I want to keep that a secret for now.  I started with a base card of Real Red measuring 5 1/2" x 8 1/2", scored at 4 1/4".  Next I took a piece of Whisper White measuring 4" x 5 1/4" and chalked a sky background using my pastels.  It seemed like a perfect setting for Mr. Stork to be in.  I chose the saying from a retired stamp set called Occasional Quotes.  The inside of the card will contain all the information for the shower so no saying is needed for it.  I stamped this on Whisper White using Real Red ink.  I then punched it out using the 1 3/4" circle punch.  I then punched a 2 3/8" scallop circle out of Real Red.   I layered the greeting on top of this with runner adhesive and attached it to the card with the same adhesive.  I added a pearl on every other scallop.  


Here is a close up of the stock himself.  I made him using the New Arrival Cricut Cartridge.  I cut him out in Tangerine Tango first.  I then cut the layer for his head and body and hat out of Whisper White and again out of Basic Black.   This allowed me to layer all the pieces I had together and get the completed stork.  I added glitter to the band of the hat just to make it sparkle.  I traced the eye with a fine tip black marker.


Again I used the same cartridge and my Cricut to make the baby.  I cut him out of Blushing Bride.  While the Cricut does cut little dots to indicate the nose and eyes, I wanted them a little more pronounced.  So out came my owl builder punch.  I punched the nose using the smallest circle out of Blushing Bride and the eyes using the same circles out of Pacific Point.  I traced the mouth with black ink and added a little white gel pen to the eyes.  I then cut the delivery pouch out of a red and white gingham paper.  When you cut the baby, it also cuts this pouch.  So once I had the gingham one,  I simply layered it on top of the baby, added a pearl at the knot and attached it to the beak of the stork.  

I used a liquid glue to attach all the pieces of the stork and baby together.  I also used the same glue to attach these to the card.  Overall, I like the look of the card very much.

Well that's it for today.  I wish you all a wonderful weekend.  I will be back on Monday.  I hope you will too.  Until then thanks for dropping by today!


Thursday, April 19, 2012

Friendship Card

Since I shared a card with 2 best friends on it yesterday, I thought I would share another card that I would send to a friend today.  This one does not involve characters or even punch art although I do use the owl punch on this one.  After all I can't give up all my favorite things!


This is a really simple card to make.  I started with a base card of Tempting Turquoise measuring 4 1/4" x 11", scored at 5 1/2".  Next I cut a piece of Basic Black into a 3 3/4" square.  It is attached to the card with runner adhesive.  Daffodil Delight is the top layer of this one.  I cut it into a 3 1/2" square.  I took out my dotted scallop ribbon border punch.  I centered each side into the punch and punched one time per side.  This created the frame I have.  I attached it to the black with runner adhesive.  A piece of scrap turquoise card stock and one of the flower punches from the itty bitty punch pack is what I used to decorate the corners of the card.  The flowers were adhered using a liquid glue.  I added a rhinestone to the center of each flower.  


For my owl, I used a retired stamp set from a past Sale-a-bration catalog called Punch Bunch.  I stamped the owl using VersaMark ink onto Whisper White card stock and sprinkles Tempting Turquoise embossing powder on it.  I heat embossed it and then punched it out using my owl builder punch.  I added some turquoise rhinestones I picked up at a craft store to his eyes and colored his beak in with the Tangerine Tango marker.  I attached him to the card with dimensionals.   To finish decorating this area, I used a turquoise Stickles glitter glue to add dots around the owl.  


For the greeting, I used my Teeny Tiny Wishes stamp set.  I stamped my saying in Tempting Turquoise ink onto Whisper White card stock.  I punched it out using the retired small oval punch.  I layered this on top of a large oval punched out of Daffodil Delight using runner adhesive.  This was then layered onto a Basic Black scallop oval.  This was adhered to the card using runner adhesive.  I added yellow Stickles glitter glue dots around the scallop.  I left the inside blank to write a note or to stamp an appropriate greeting.

I know this post may seem short but I am so busy this week with chores and errands.  Finding time to be creative is tight this week.  I am so glad you stopped by today.  Please come back tomorrow for a new share.  I can't wait to show you what I have!!  See you tomorrow.


Wednesday, April 18, 2012

Friendship

Friends are very important people.  They are the ones you go out and have a good time with and they are the ones you call when life throws you a curve ball.  They are the people you probably got into trouble with when you were young, and the ones who know all your secrets.  All in all, they are very special.

Today my card has some friends gracing the front of it.  I am sure you will recognize them.  They have known each other for a very long time and have starred in several commercials together.  They even had a movie in Las Vegas.  Have you guessed who they are yet?  Well how about I show you the card and you will find out if you are right. 


When I made the card with Ms. Brown on it a few weeks ago, I really wanted to make one with Yellow and Red too.  Unfortunately at the time, I did not do it.  So when I sat down to work on a card yesterday afternoon, I remembered these guys and decided I would make a card to feature them.  I started with a base card of Crumb Cake card stock cut at 5 1/2" x 8 1/2", scored at 4 1/4".  Next I took a piece of Whisper White card stock cut to be 4" x 5 1/4" and ran it through my big shot using my spots & dots impression folder.  I adhered this to the Crumb Cake with runner adhesive.  Next I took a piece of Basic Black card stock measuring 2 1/2" x 5 1/4" and ran it through the big shot using the stripes impression folder.  I adhered this to the bottom have of the white with runner adhesive.  I used Stickles glitter glue in red and yellow to fill in some of the open circles on the white.


For the greeting, I pulled out a retired stamp set called Define Your Life and used the "together" stamp.  After all, if you see the Red guy, the Yellow is usually close behind.  I stamped this one Whisper White using Real Red ink and punched it out with the decorative label punch.  I then punched out 2 red decorative label punches and created the border around the definition.  I adhered this one to the card using dimensionals.  


Here is a close up of the Yellow M & M.  Handsome isn't he?


Here is the Red M & M.  He has a bit of a worried look but he always does when Yellow is around.

To make both of these, you basically use the same card stock and the same punches.  Blushing Bride serves as their arms and legs.  Whisper White is for their hands, feet, eyes and the "m".  Basic black is also used in the eyes.  For Yellow, I chose Daffodil Delight card stock while Red is made from Real Red card stock.  For the punches, I used a 3/4" circle for the feet of each.  Just cut it in half and you have 2 feet.  I used my retired horizontal slot punch for the top of the shoes.  A strip of card stock would work for this too.  I used the opwl builder punch to make the white and black circles for the eyes and the eyelid.  The hands come from the boho blossom punch.  For the arms and legs, I started by punching out a small oval using the retired small oval punch.  I then used the large oval punch to punch a ring around the hole of the small oval.  I did 2 of these for each M & M, one for the arms and one for the legs.  The "m" was cut out using the Billboard die for the big shot.  I added dazzling diamond glitter to these before adhering them to the the guys.  For Red, I punched his body with the 1 3/4" punch while Yellow's body was punched out using the wide oval punch.  Each is assembled using a liquid glue and a glue pen.  They are attached to the card using dimensionals.

I left the inside of this one blank as I designed it to be a note I would drop to a friend.  Of course, you can use it for whatever occasion you would like.  I just love these guys.  They are truly so much fun to make.  

I hope you enjoyed seeing my friends today.  Come back again tomorrow and see what I come up with next.  Thanks for dropping by today.  


Tuesday, April 17, 2012

Still Dancing

Last week I seemed stuck on my owl punch and the many creations you can make with it.  Now I pretty much planned to do that but I promise I do not have a theme planned for this week.  Of course you might not believe me in a minute.  If you remember yesterday's card, you will recall I chose 2 of my favorite things to use on the card - the owl punch and a dance theme.  I promise no owl punch today!  However, on today's card, my character is doing a little dance.  I guess he is just really happy to be seen by all of you.  It also has another aspect to the theme that I am fond of -- dogs.  So let's get started shall we.


IT'S SNOOPY!!!  Once again I must give props to Ellen Kemper as she is the one who showed me how to make him.  I started with a base card of Night of Navy cut at 5 1/2" x 8 1/2", scored at 4 1/4".  Since Snoopy was doing a little dance, I wanted to incorporate that into the card.  To dance, you really should have some music.  If you are like me you have danced around your home without it but it is usually done with music.  I cut a piece of Whisper White to be 4" x 5 1/4".  I then stamped my greeting onto it using Real Red ink.  The greeting came from the stamp set called Perfectly Penned.  I ran it through my big shot using the music note impression folder.  I adhered it to the base card using runner adhesive.  I did add Night of Navy dots to it using my Night of Navy Stampin' Up! marker. 


I started my Snoopy section by taking a piece of Real Red card stock measuring 2 1/2" x 2 3/4".  I used one of the frames from the designer frames impression set and ran this piece through the big shot.  Doodle dots were added to the corners of this and to the outside of the frame.  I adhered it to the card using runner adhesive.  

Now we get to Snoopy.   His colors are Whisper White and Basic Black.   I will tell you up front 3 of the punches that were used in the creation of him are retired.   The head and body are the butterfly punch with one section trimmed on the bottom portion of the butterfly.  His ears are made by punching our a small heart using the punch by the same name.  Once you punch it out, set that heart aside for use on a different card.  Offset the punch with the hole and punch again.  I punched another heart, set it aside and repeated the offset punch for the other ear.  His little happy feet are made using the 3/4" circle punch.  Punch a circle for each foot.  You will need to reinsert each circle into the punch and punch it again to get the shape.  To do this, I have found it is easiest if you use a post-it note.  Stick the circle to the sticky part and you will have the other end to of the note to hold when reinserting the circle.  The nose is 1/4" circle with one side flattened.  I drew his eyes and mouth on him.  Now for the retired punched.  His arms were made with the my way punch which was arrows.  For this you could substitute just a strip of card stock.  His hands are from the flower trio punch.  I used 2 flowers and trimmed them to be 3 "fingers" on each hand.  A great substitute punch for this feature is the boho blossom punch.  Finally, the last retired punch used is the horizontal slot punch for his collar.  Again, a strip of card stock would work just as well. 


Here is the saying I used on the inside of the card.  I picked this stamp up at a convention years ago.  It is stamped using Real Red ink onto Whisper White card stock.  I layered this onto a piece of Real Red card stock.  Since the letters of this saying are open, I decided to punch Night of Navy doodle dots inside each one, just like the dots on the front.  It was truly the perfect saying for this card.

One really nice thing about this card is it can be given to a male.  No glitter but a really nice color scheme and design.  Guys are not always glitter fans so I try to leave it off their cards.  Remember, I said try.  Sometimes the need for glitter overtakes me and I have to use it.  

Well that is all for today.  I hope you all have a terrific Tuesday.  By the way, the retired stamp list is out on the SU! site.  Be sure to look it over and get any that you want before they disappear forever.  Thanks for dropping by today and I will see you tomorrow.  
 

Monday, April 16, 2012

Dance, Dance, Dance

I hope you all had a wonderful weekend.  Here in Phoenix, we actually got to enjoy some cooler weather.  What a blessing!  Now we will be back in the 90's by the end of the week but I am truly grateful for the cool time we had this weekend.

From the time I was little through my teenage years, I took dance classes.  I took ballet and jazz and tap.  I loved tap.  It was my favorite class.  When I got into college, I as no longer taking dance class but I did take dance history classes.  I always hoped if I had girls that they too would develop a love of dance.  No such luck with my two.  They excel in other areas though.

So what does all this have to do with today's post?  Well remember I told you I might do some more work with the owl punch.  I still have lots of ideas and want to give them a try.  So this weekend, I decided to make a card using that punch once again.  I took one of my favorite characters, the mod girl, and turned her into a dancer.  A ballerina to be exact.  Let me show you what I came up with and see what you think.


Isn't she cute!  This is another one of those ideas that hit me in the middle of the night.  I am so glad it does not keep me up.  At least I go back to sleep and create the actual card the next morning.  Oops!  I got off track.  Back to the card we go!  I started with a base card of Pink Pirouette card stock cut at 5 1/2" x 8 1/2", scored at 4 1/4".  I knew I had bought some designer paper a few years ago with dance themes from a local craft store so I went to my stash of paper and found the ballet one.  It works perfectly with the color scheme I did on this one.  I cut it to be 4" x 5 1/4".  I adhered it to the pink using runner adhesive.  Next I cut a piece of Perfect Plum card stock and cut it at 2 3/4" x 3 1/2".  I ran it through my big shot using the Vintage Wallpaper impression folder.   also punched a modern label out of plum.  I took the label and the impressed piece and sprayed them using my frosted spritz.  I used my Teeny Tiny wishes stamp set and stamped my greeting using StazOn ink onto the Whisper White card stock.  It was punched out using the word window punch,  I adhered the impressed plum piece to the card using runner adhesive. Next I attached the word window greeting to the modern label using the same adhesive.  Then I attached the greeting to the card using dimensionals.  I also added a couple of teardrop pink rhinestones, one to each end of the greeting.  


For my little ballerina, I used the same recipe to make her as I did to make the mod girls last week.  The only addition I made was a scallop oval for the tutu.  I also added some slivers of Pink Pirouette card stock to the legs for the ballet shoe ribbons.  In the picture, her eyes look green to me.  However, I made them out of Soft Suede.  The tutu, headband and shoes are all from Pink Pirouette.  The face, neck, arms and legs are Blushing Bride card stock.  For her hair, I decided to use Early Espresso.  I drew the mouth on with a light pink felt tip marker.  I added pink rhinestones to the base of the top of the tutu where it meets the skirt.  I also added dots of Stickles glitter glue called Cotton Candy to the top, headband and edge of the skirt.  She is adhered together using a liquid glue and attached to the card using dimensionals.  


For the inside greeting, I used a stamp I have had for years.  I stamped it using StazOn ink onto Whisper White card stock.  I attached it to a piece of Perfect Plum card stock with runner adhesive and attached it to the card with the same adhesive.  I pulled out my Stampin' Up! markers out.  I pulled the Daffodil Delight, Perfect Plum and Pink Pirouette one and traced over the words as well as colored in the stars and dots.  I chose to add the Daffodil Delight since the designer paper had yellow ballet shoes as well as purple and pink.  I liked the additional color.  

Okay I will try to tear myself away from the owl punch but no promises.  I hope you are not bored with the creations from it.  I do appreciate you stopping by today.  Please come back tomorrow.  I will see you all then.


Friday, April 13, 2012

The Owl Punch In Action Again!

Happy Friday everyone!  As promised I am finishing out this week using my owl punch.  I must tell you though that I still have more ideas for it so it may be back next week.  Today card is a combination of different materials and techniques.  I have used the punch art and pastel technique before but the new material on this comes from scrapbook packs and stickers.  I have been doing cards and some scrapbooks for a long time.  I have quite the collection of stickers and scrapbook packs in my home.  For the card I am going to share today, I turned to some of these for help.  How about I show you the card and you can see how I incorporated these into it. 


Today we find mod girl doing the job of a teacher.  The base card is once again Real Red cut at 5 1/2" x 8 1/2", scored at 4 1/4".  I added a layer of Basic Black on top of that using runner adhesive.  It measures 4 1/8" x 5 3/8".   Next came the Whisper White layer cut at 4" x 5 1/4".  I used my handy pastels to created the sky scene on it and adhered it using runner adhesive to the card.  I wanted to have a little grass so I took a scrap of Garden Green measuring 4" wide and tore a strip.  Again the runner adhesive was used to attach it.  

When you go to your local craft store, you can find themed pack of paper and cutout that can be used in a scrapbook.  That is where I found my school house.  Since I use to be a teacher, I have a couple of scrapbooks I made using that theme.  This piece was a left over.  As all good crafters know, you always keep your left overs.  It is a textured piece that give a nice look to the card.  It has no adhesive of its own so I used the same runner adhesive to attach it down.  I made sure to tuck it under the edge of the grass giving the appearance that the grass grew in front of it.  


Here you get a better look at the teacher herself.  As you can see, she is a product of the owl punch.  I am not going to bore you with the detail of making her since they are listed in previous postings.  The texture I created on her dress and headband were completely an accident.  I had put cute little glitter glue dots on both and set her aside to dry.  Well apparently I did not sit her far enough away from me.  I went to pick up my tweezers and brushed against the dots of the headband.  I knew I could not just redo the dots so I took my finger and spread out all the dots.  I kind of liked the look so I thought why not do that to her dress too.  So I did.  I am not sure if I like the dress as much as the headband.  Next time maybe I will leave the dots.  She is attached to the card using dimensionals.

The only 2 accessories she has are the glasses and her bell.  The bell was part of a sticker pack that was 3 dimensional.  I placed it under her hand and actually glued it into place on the hand.  The main part of the bell has a dimensional on it making it easy to attach.   For her glasses, I decided to once again use my Everyday Paper Doll cartridge and my Cricut machine.  It is a lot easier making it this way than trying to do it on my own.  

I left this card blank on the inside.  You could stamp a phrase if you want or write a note.  This is perfect for a teacher at the beginning of the year or the end of the year.  It is also perfect for a new teacher who is graduating and entering the education work force.  

I certainly hope all of you have a wonderful weekend.  I will probably be playing with my owl punch some more.  If you don't have one of these think about getting one.  You can visit my Stampin' Up! demonstrator site by clicking on the link in the side bar on the right under "Other Places to Find Me".  The punch can be ordered there.  I am so glad you decided to drop by today.  I will see you all on Monday.  Happy stamping!


Thursday, April 12, 2012

The Mod Girl Gets A Job

Okay.  I am officially addicted to my owl punch this week.  I have had so much fun making all the little people with it.  I have been blessed with lots of ideas and just want to share them with you.  So of course, as I was laying in bed this morning I thought about the mod girls I made and shared last week.  I still think they look like go go dancers.  I just need to give them boots.  Well the thought occurred to me that these girls could be made into other professions.  I mean if a chef can become a fireman, why can't a mod girl become something else too.  So I set off to my craft room to make the magic happen.

As I was pondering what job I wanted her to have, I was also baking a dessert to take to our friends house for dinner.  They were so nice to ask us over so I wanted to bring something along to eat too.  Well all of a sudden, I knew what job I would do.  It is in honor of my friend Valerie.  She has been in this profession for a while and deserves to be honored.  I hope she likes this.


Now Valerie if you are looking at this little girl I did not make her to look just like you, but she is in honor of you.  I do not know how but somehow I managed to cut off one side of the edge of the card.  I guess my hand moved when I snapped the photo.  Oh well.  I think you can see the card pretty well.  So let's get started.

My base card for this on is done with Real Red card stock.  It is cut at 5 1/2" x 8 1/2", scored at 4 1/4".  I added a layer of Basic Black measuring 4" x 5 1/4" using runner adhesive.  For the top layer, I went with Crumb Cake card stock.  I wanted to be sure the nurse would stand out and this color lent itself to that.  It is cut to be 3 3/4" x 5".  Before adding it to the card, I ran it through the big shot using the Stripes impression folder.  It is adhered to the card using runner adhesive.  Once the base card was assembled, I was ready to begin the pieces.  


First up was the greeting.  Now since I knew I was making a nurse, decided to make this a get well card.  The saying is stamped using StazOn ink.  Now this saying does come from a retired Stampin' Up! set but I do not know the name of it.  I received this one as a gift from a friend and the name label was not on it.  Once it was stamped on Whisper White card stock, I punched it out using the decorative label punch.  I then edged it with Real Red ink.  I took a scrap of Real Red and punched out 2 more decorative labels and ran them both through the big shot using the Perfect Polka Dots impression folder.  I then made the frame for the greeting.  It is adhered together with runner adhesive and attached to the card using dimensionals.  


Since I have made these little mod girls before, I knew what the completed size would be.  I also knew I would need something else to go on the front of the card.  So I pulled another stamp out of the retired stamp set the greeting came from and stamped it using StazOn ink onto Whisper White.  I used my Stampin' Up! markers to color in the bottle and bouquet.  I added dazzling diamond glitter to the edge of the bottle cap and then attached it to the card using dimensionsals.


Finally, we come to the star of the card - our nurse.  If you remember, you only need three punches to make her:  the owl builder, the 1" circle and the 3/4" circle.  Once difference on this girl is instead of drawing her eyes and nose onto her face, I used the tiniest circle from the owl punch to make these.  The face, neck, nose, arms and legs are out of Blushing Bride card stock.  I used Wild Wasabi for her green eyes and added a small white gel pen dot.  Her mouth is drawn on using a fine tip red marker.  The back of her hair is the owl himself with feet cut off, turned upside down.  This is out of Soft Suede card stock.  Her bangs are 1/2 of a 1" circle with snips taken out of them.  Her face is a 3/4" circle.  Once it was punched, I punched a 1" circle around the hold left and cut it into 5 pieces: 1 for the neck, 2 for the arms and 2 for the legs.  Her hands are the feet off of a Blushing Bride owl.  For her hat, I punched a 1" circle around a 3/4" circle hole in Whisper White card stock.  I trimmed it to sit behind her bangs.  The top part is the owl vest cut in half.  Take the side with the "v" in it and attach it to the band with liquid glue.  I drew free hand the "+" using a red marker.  You will want to place this hat behind the bangs before attaching them to the girl.  The dress is a full owl vest and the shoes are the small heart from the owl punch cut in half.  All piece are attached together using a liquid glue.  I added dazzling diamond glitter to the entire nurse outfit (I did not cover the "+").  


For the inside greeting, I used a stamp I found on clearance at a local craft store years ago.  It is stamped on Whisper White using StazOn ink.  I colored it using my SU! markers.  I then cut it out using my big shot and the Labels Collection framelits.  It is edges with Crumb Cake ink.  I then cut our the next size up of the framelits using Crumb Cake and ran it through the big shot using the perfect polka dots impression folder.  I layered these together using runner adhesive and attached it to the card using runner adhesive.

I will admit, I am already trying to come up with another card using the owl punch for tomorrow.  It seems only fitting since all the other days are filled with owl punch creations.  So please come back and see if I succeed with an idea to use it once more.  If you have any questions regarding this card or anything else drop me a line and I will be happy to help.  Thanks for dropping by today and I will see you tomorrow!!


Wednesday, April 11, 2012

Same Man Different Job

I have really been on a punch art kick this week and my owl punch has become my best friend.  I made those cute little chefs using it and loved the result.  So when I was in the shower, it came to me -  why not use the same basic pattern for a man but give him a different profession.  Of course a few things would need to be tweaked but overall I felt pretty confident I could pull this off.  All I needed to do was choose the profession.  Well that was easy for me.  I chose to do my favorite husband's job - a fireman.  So are you ready to see the result?  Here we go. 


I had a lot of fun making this card.  I started with a base card of Pacific Point card stock measuring 4 1/4" x 11", scored at 5 1/2".  Using my beautiful pastels, I chalked a sky background onto a piece of Whisper White card stock cut at 4" x 5 1/4".  A torn strip of Wild Wasabi card stock serves as the grass area.  I adhered it to the white with runner adhesive and then adhered the white to the pacific using runner adhesive again.  Now let's move on to the really fun stuff!!


To make the fireman, you use the owl punch most of the time.  The owl vest makes the face, the jacket, the sleeves, the pants, and the back of the helmet.  The heart of the owl makes the hands.  I trimmed one side to make the thumb of each hand.  For the feet, I used the smallest heart on the heart to heart punch.  The small oval made the top of the hat while the word window is the brim.  I free hand drew the shield on the helmet and cut it out.  The nose is the circle from the owl and the mustache is a 1/2" circle punched around the itty bitty circle punch hole.  The hair is the owl's feet.  I chose to make the fireman suit out of So Saffron.  I used Basic Black, Whisper White and Blushing Bride as the other colors.  I attached him to the card using dimensionals.

Since you can see the hose I may as well go ahead and explain it.  I used Soft Suede as the main hose color.  I punched a 1 3/8" circle out and then punched a 1 3/4" circle around it.  I ended up using 2 1/2 circles to complete my hose.  I bent the paper to make the folds in it.  For the nozzle, I used a piece of brushed gold for one end and then added a strip of brushed silver for the rest of the nozzle with a horizontal slot piece for the end. (The horizontal slot punch is retired.  A small strip would work too.)  For the water coming out, I punched a modern label out of Pacific Point card stock.  I cut one end off and trimmed it down to be the size I wanted and to have the taper look I wanted.  I turned to my blossom bouquet triple layer punch and punched a few flowers out of the pacific card stock so I could use the inner petal pieces as the spray of water.  The hose and spray were attached using a liquid glue.   


Here you can really see the spray.  I had a lot of fun making this one! The fireman had to have a reason to be there so I made him a little fire.  I punched petals out from the blossom petal builder punch.  I used Daffodil Delight card stock for this and dabbed some Tangerine Tango ink onto each petal with my sponge dauber.  The logs for my fire are just small strips of Chocolate Chip card stock.  For the puffs of smoke, I used the small scallop flower punch from the itty bitty punch pack and Basic Gray card stock.  

This is a card I would use to send to a boy for a special day.  I did not use glitter on this one.  I did not feel the card needed it.  I know can you believe I said that?  Knowing how my husband feels about glitter it just seemed like the right choice.  

I really love to work with my punches.  I cannot wait to see what I can make next.  I am so glad you decided to stop by today.  I hope you enjoyed my little fireman.  Please come back by tomorrow.  I promise to come up with another share.  Thanks for looking today and I will see you tomorrow.


Tuesday, April 10, 2012

Here Comes The Chef Again!

Happy Tuesday everyone.  I apologize that my blog did not get posted on time yesterday.  I hit a wrong  button thinking it published and it actually just saved as a draft.  So I got it straightened out as soon as I saw it.  It was just a typical Monday I guess.  I did get a new tire for my car, well actually 2.  We had replaced our back ones but not the front.  They were both due to be changed.  Now my little car is ready to go go go.

I could not help but sit down and make another chef.  I just love this little guy.  I decided to change the look of the front and use a color that I feel you could give to a boy or girl.  So let's get started shall we.


I went with a color scheme of Baja Breeze, Glimmer Red, and Cherry Cobbler.  My base card is Baja Breeze cut at 4 1/4" x 11", scored at 5 1/2".  I added a layer of Basic Black on top of that.  It measures 4 1/8" x 5 3/8".  I like to use the black to highlight the top designer paper against the base card.  On this one I could have cut the designer paper smaller but I chose not to.  It is cut at 4" x 5 1/4".  This piece of designer paper came from the same paper stack as the one I used yesterday.  I chose this background first.  When I was looking for the base card color to put it on, I could not believe how much it is like the Baja Breeze.  Funny how that happens sometimes.  Each layer is adhered using runner adhesive.


Here is a closer picture of the chef and background.  One thing I should tell you is the cherries are not part of the designer paper.  I took a strip of Glimmer Red card stock and using the cupcake builder punch, I punched out several cherries.  Next I laid them out in a pattern and adhered them using a liquid glue.  

My little chef was made the same way as the one yesterday with the owl builder punch, the 1/2" circle, the circle from the itty bitty punch pack and the large oval.  The only difference is this chef has 2 trays instead of 1.  

For the cupcake, I started with my Create A Cupcake stamp set and stamped the bottom portion using VersaMark ink.  I then took my Cherry Cobbler embossing powder and heat embossed them.  They were punched out using the cupcake builder punch.  Next the tops were punched out using the same punch and Shimmer White card stock.  I used the Glimmer Red once again and punched out the cherries and sprinkles used on each cupcake.  I glued the cupcake together including its topping with liquid glue.  Once the cupcakes were together, I glued them to the trays which were glued to the chef using liquid glue.  I put dimensionals all over the back of him and attached him to the card.  


 For the inside, I pulled out my A Word For You stamp set and chose the birthday greeting.  I thought it went nicely with the card because it referenced the cherry.  I stamped the greeting using Baja Breeze ink onto Whisper White card stock.  I punched it out using the decorative label punch and brushed the edges with Baja Breeze ink.  I adhered it to the card using runner adhesive.  I added a couple of Glimmer Red cherries for added detail with liquid glue.  I thought they carried my theme to the inside nicely.  

Well I did 5 loads of laundry yesterday so today must be cleaning for me.  Oh boy!  I am sooooo excited! (NOT)  I hope you give this chef a try.  He is really easy and so cute.  I will be back with another share tomorrow.  I sure hope you come by to see me again.  Thanks for stopping by today!