CARDS FOR SALE

Most cards you see on this site are available for purchase. Simply click the Pay Now button at the bottom of the post of an available card to purchase the card. You will be linked to PayPal for payment. It will come up as "greensnaggletooth@cox.net" which is the name of my internet company. Price is $5.00 unless otherwise stated and includes shipping. Your card will come with an envelope also. Email me with any questions or requests at: sharynsstampbiz@gmail.com
Thanks for taking a look at my creations!!

Friday, May 31, 2013

Welcome To The Owl League

Hi everyone and happy Friday.  Well it must have just been a hiccup in the system as far as my internet goes.  It finally started working just fine yesterday and I had absolutely no difficulties with typing my blog!!!!! 

As promised, I took my Superman Owl, Batman Owl, Hulk Owl, and Spiderman Owl and put them on card for you to see.  I think I will just jump right in and start.  Here we go!!!!!!


I started with a base card of Real Red cut at 4 1/4" x 11", scored at 5 1/2".  For my layer I went with a 4" x 5 1/4" piece of Crumb Cake.  I ran this through my big shot using the argyle impression folder.  I attached it to the card using runner adhesive.  I punched out 4 Whisper White squares using the 1 3/8" square punch (which is retiring).  I put these through the big shot using the cloudy day impression folder.  I then attached these to the base card using runner adhesive.  I attached my super hero owl to these squares using dimensionals.


I wanted a name for my owl heroes so I opted to call them the Owl League.  Now I know very well that while Batman and Superman are part of the Justice League, Hulk and Spiderman are not.  They are from Marvel comics and run with the Avengers.  Anyway, in Owl World, all super heroes work together.  I punched a 1" circle out of Daffodil Delight and wrote the name of their group on it using black marker.  I attached it to the center of the card with runner adhesive.  Now I think next time I would either layer this onto a black circle or sponge the edges with black ink.


The final touch for my card are the words.  When I was trying to decide what to do to complete the look, I started thinking about the old Batman television show and cartoons and how they always put those silly words up when the hero fought with the villain.  I chose four words:  Wham, Biff, Zap and Pow.  I cut the letters out using the retired Billboard decorative strip to cut the letters out.  I wanted to do a shadow effect so I cut them out of Daffodil Delight and Basic Black card stock.  They are layered together using a 2 way glue pen and attached them to the card with the same pen.  All in all I think this makes a great card for a man or a boy.  

Well we have once again reached the end of a week.  We have also reached the end of a month.  I hope you all have a wonderful weekend and do something fun.  I plan to make a few cards so I should have one to share on Monday.  Thanks for stopping by today and I will see you next week (or should I say next month).  See you later!!!!!

Thursday, May 30, 2013

Internet Problems Again!!!!!!!

Well this post will be brief as my internet keeps losing its connection.  What should take just a few minutes to do is taking hours.  So I thought I would share a card with you that I recently found and really liked.  I hope you like it too.


I know it may seem a little early for Christmas but if you are like me it is never too early.  Here is another card with the same type of theme:


Cute aren't they?  I sure hope this is just a glitch in the system and that my internet will be back to normal tomorrow.  Thanks for stopping by today and please come by tomorrow for the owl superhero card!!  See you all then.

Wednesday, May 29, 2013

Owl Punch Strikes Again!!!!!!!

Hi everyone and happy Wednesday.  I don't know about you but I sure wish the laundry would do itself sometimes.  I had put off doing ours as long as I could but finally had no choice.  There was no more room in the basket and the clothes were running low.  So I spent a majority of my day yesterday doing that.  I did still find time to craft.

I really did not know what I wanted to make to share with you today but I had an itch to work with punches.  Somehow I ended up with my favorite punch - the owl builder punch.  Now I did not know what I was going to do with this but I knew I wanted to work with it.  Well wouldn't you know I happened to look up and see my hubby's shelf with his Looney Toon superheroes on it and that was it.  I decided I would do super hero owls!!  It took me a while to make these so they are not on a card yet.  I was so excited I wanted to share these will you right away.  I will show the card once I have it.  So let's get started shall we.


Well here they are:  Spiderman Owl, Batman Owl, Hulk Owl, and Superman Owl.  Now please keep in mind that this was my first attempt to make these so I know there is probably room for improvement.   I did think about adding a Wonder Woman Owl but my silly bursitis in my right elbow flared up and I had to stop for the day.  Maybe in the future I will add her.  Let's take a closer look at each one shall we.


I used Real Red and Pacific Point card stock for Spiderman.  Of course his eyes are Basic Black and Whisper White.  I drew the spider on myself as well as the web lines on his uniform.  


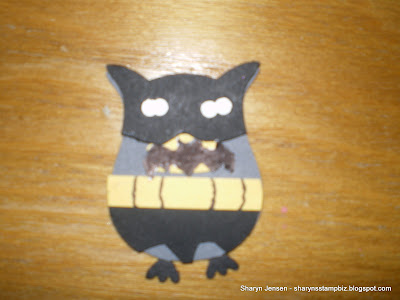
Batman was made using Basic Black, Whisper White, Daffodil Delight, and Basic Gray card stock.  I punched the eyes using the 1/8" circle punch.  I needed to trim out the little bits from the eyes so they would be more oval.  I drew the lines on the belt and drew the bat by hand onto white.  It was then cut out to be attached.  I cut the mask down from a full owl to just the mask.


Basic Black, Whisper White, Perfect Plum, Elegant Eggplant and Gumball Green card stock for the Hulk.  His hair was cut freehand.  White gel was added to the eyes.  


Finally here is Superman.  Basic Black, Whisper White, Real Red, Daffodil Delight and Pacific Point card stock for him.   His emblem was made by hand and the lines on the belt were drawn by hands.  White gel was added to his eyes too.  I made sure I gave him hair too and he had to have his cape.  

For a first attempt, I am pleased with how these turned out.  I think they are rather cute.  All the pieces were adhered together using a 2 way glue pen.  I think it took more time to decided how to make certain pieces for the uniforms than to actually put them together.  My hope is to get these guys on a card for you to see tomorrow.  Maybe if inspiration strikes and my bursitis settles down, I will try a Wonder Woman.  No promises though.

I hope you enjoyed today's post.  Please come back to visit tomorrow and thanks so much for dropping by for a visit today.  Have a wonderful day!!!!

Tuesday, May 28, 2013

Let's Look at the New In-Colors

Hi everyone.  Welcome to Tuesday and to a new week.  I do hope you all enjoyed your Memorial Day weekend.  I spent mine with my hubby.  We attended a graduation party for one of his fire fighter's daughter on Saturday night and had a lot of fun.   On Sunday we decided to indulge a little for the long hot summer of Arizona and bought an inflatable pool.  Now this is not a big pool.  It is a smaller one we can get in to cool off and just relax.  We set it up and had a nice relaxing afternoon.  Monday was a work day for my hubby so I spent most of the day with my sister doing girl stuff!!

I went into my craft room to make a card to share with you today and decided I should showcase a few of the new items from the upcoming catalog as well as the new in-colors.  I also decided I would just make a card front instead of a whole card.  With the card front, I may choose to add it to a card in the future or I can just use it as an example.  So let's get started shall we.


Okay so I forgot to rotate the photo prior to uploading it to my blog.  Don't know why I cannot seem to remember to do this.  Oh well I can still talk you through my card.  Just pretend it is vertical.  Since I made just a card front, I started with a piece of Basic Black cut at 4 1/4" x 5 1/2".  Next I cut a piece of Whisper White at 4" x 5 1/4".  I took this piece and ran it through my big shot using the new Modern Mosaic impression folder.  I attached the piece to the black with runner adhesive.


Next, I grabbed a half piece of each of the new in-colors:  Crisp Cantaloupe, Baked Brown Sugar, Pistachio Pudding, Strawberry Slush and Coastal Cabana.  I used the new mosaic punch and punched 2 out of each color.  I then randomly attached them to the card using runner adhesive.  As you can see from the photo, I used the side of the white where the mosaic is depressed and not raised.  That way my punched pieces would fit and look really nice.  I added crystal effects to these added on mosaic pieces and left them to dry.  Once dry, I attached a rhinestone to the top and bottom points of the punched shapes.  


My greeting is from a new hostess set called Sweetly Framed.  I stamped the frame, saying, and hearts using Basic Black ink onto Whisper White card stock and cut it out using my scissors.  I then took a scrap of black and used one of the frames from the Apothecary Accents framelits set to cut out the background for the white piece.  I added rhinestones to this and attached it to the card using dimensionals.  

Well that's all for today.  I will return tomorrow with another card to share with you.  Thanks for dropping by today.  See you all later!!

Friday, May 24, 2013

More Inspiring Cards for You to See

Hi everyone and welcome to Friday.  It is going to be a sad day for the fire service as we say good bye to one of our own.  I usually have my buddy Jackson in the mornings and that always cheers me up but mommy is out of school now and she is taking him with her to her meeting (her principal is so nice) so I will no longer be keeping him.  That saddens me.  I guess it is just an all around depressing day.

As you can probably tell, I just did not have it in me to come up with anything new to share.  So I decided to share some wonderful cards I have seen recently that inspired me to try something new.  I hope you enjoy these.


Graduation Card Graduation Cards

A nice graduation card.


March sponge silhouette card

I love the pop of color on this one as well as the lines in the corners.


Can you ever go wrong with a butterfly?!!!!!


This is one of the most elegant sympathy cards I have ever seen.

Well that is it for today.  I hope you all have a safe and fun holiday weekend.  Since it is Memorial Day weekend, I will not be posting on Monday.  I will return on Tuesday with another creation of my own to share with you.  Maybe I will used some of the new products I recently bought!!  Until Tuesday, thanks for dropping by to visit!!!!!


Thursday, May 23, 2013

New Items!!!!!!!!

Hi everyone and welcome to Thursday!  As promised I am going to share some photos of new items and some info on the retiring colors and new colors which will be in the new catalog.  So I think we just jump right in and get started.


This is a new stamp set with a matching impression folder.  The stamp set is called Wildflower Meadow.  This is a background stamp.  You would stamp this onto your card stock and then run it through the big shot with the matching Wildflower Meadow impression folder.  You just need to be sure to line up the stamped image with the impression folder image.  


Here is the new mosaic punch, Modern Mosaic impression folder, and the artisan label punch.  There are coordinating stamp sets to go with each punch.  I did not preorder those so I cannot show them to you.  I may get them in the future but trust me I spent enough on my new items!!


These are 2 of the new hostess sets that will be in the new catalog.  During the preorder, demonstrators are allowed to order 2 of the hostess sets to share with our customers.   I chose to order these 2.  They are called Sweetly Framed (which can use the decorative label punch) and Express Yourself.  I am always looking for new stamps with sayings and thought this one would get a lot of use. 


In-colors in the catalog are good for 2 years and then they retire.  Each year 5 retire and 5 new ones are introduced.  These are the new in-colors for 2013-2015.  They are (from left to right):  Strawberry Slush, Pistachio Pudding, Crisp Cantaloupe, Baked Brown Sugar and Coastal Cabana.  As you can see I ordered the stamp pads, a pack of 8 1/2" x 11" card stock of each color and  the in-color cards.  I really like these colors.


Besides the new in-colors, Stampin' Up! is refreshing their color families so that means new colors are introduces while others are retired.  Most of the new colors are actually returning in-colors from previous years.  The returning colors are Bermuda Bay, Calypso Coral, Wisteria Wonder, Pear Pizzazz, Pool Party, Blushing Bride, Crushed Curry, Island Indigo and Soft Sky.  Now I have most of the stamp pads as well as some left over card stock of each of these so I did not need to order them.  I did not have Sky Blue (on the right) so I did order it.  The only new colors is Smoky Slate.  Of course I ordered a pack of card stock and stamp pad.  

The colors that are retiring from the color groups are:  Regal Rose, Pretty In Pink, Bashful Blue, Certainly Celery, Baja Breeze, Riding Hood Red, Bravo Burgundy, Not Quite Navy, More Mustard and River Rock.  If you want any of those colors be sure to order them before the end of the month.

Well that's it for today.  Tomorrow I am going to share some cards that have inspired me.  I am doing that because we have a funeral to attend.  I hope you understand.  Thanks for stopping by today.

Wednesday, May 22, 2013

Going Simple Again

Hi everyone and happy Wednesday.  Well the nice UPS man came and delivered my new SU! items.  I have not yet taken time to really go through them so I cannot wait to get into them today.  I think that for tomorrow's blog, I will share some the new items with you.

Our week started with the loss of 2 public safety officers - 1 firefighter and 1 police officer.  I wish I could say the week has leveled out and things were at least calm right now.  However, my aunt called the other day to tell us that my uncle is in the hospital.  We are still waiting for test results to find out exactly what is going on but his blood pressure was so elevated from the pain he was in that they actually were afraid he was going to have a stroke.  We are praying for him and hope his hospital stay will not be a long one.

With everything going on, I decided to keep today's card simple.  I went back to basics in order to keep myself calm.  So let's get started.


As you can see, I really did keep it simple.  I started with a base card of Daffodil Delight cut at 4 1/4" x 11", scored at 5 1/2".  I added a layer of Whisper White measuring 4 1/8" x 5 3/8".  I sponged the edges of this piece with Daffodil Delight ink and attached it to the base with runner adhesive.  For the top layer I used a 4" x 5 1/4" piece of Daffodil Delight.  I ran this through the big shot using the Elegant Lines impression folder.


Here is a closer shot of the Elegant Lines impression folder design.  When I run this one through the big shot I do it a little different than other folder.  I use the base platform (no tab on this one) instead of tab 1 on the platform.  I place a shim on the the bottom cutting pad and then the folder with the card stock in it and finally the top cutting pad.  When I run this folder through on the tab 1 like all the others it tends to cut through the card stock.  I found by doing it this way, it does just the impression and leaves the card stock intact.  I added little pearls into all the open circle areas for added glitz.  


For my butterfly, I started by punching it out of Whisper White card stock using the Elegant Butterfly punch.  I added a line of liquid glue to the center of the body and put green glitter onto it.  Next, using a 2 way glue pen, I added some white glitter all over the wings.  For the final accent I added 3 dots to each wing of liquid glue and put yellow glitter onto the dots.  I attached the butterfly to the card using a glue dot.


I must have taken a photo of the greeting at least 3 times and every time it came out blurry.  So I do apologize for that.  I chose the greeting from the stamp set Teeny Tiny Wishes.  I stamped it using Daffodil Delight ink onto Whisper White card stock.  I then stamped a small butterfly under the greeting using a stamp from the set Fitting Occasion using the same ink.  I punched this out with the 1" circle punch.  I layered it onto a 1 1/4" Daffodil Delight circle with runner adhesive.  I then layered this onto a 1 3/8" circle of Whisper White.  Prior to layering the circles onto this one, I added some Dazzling Diamond glitter tot he edges with a 2 way glue pen.  For the final touch I used added a yellow rhinestone and then attached the greeting to the card using a dimensional.  

Well that's it for today.  I will be back tomorrow to share some of my new stuff with you.  I hope you stop by to see it.  Thanks for dropping by today to visit.  

Tuesday, May 21, 2013

My Second Attempt at a Floating Dress

Hi everyone.   This is a happy Tuesday for me as I wait for the man in the brown truck to stop by my house and drop off all my new Stampin' Up! stuff!!!!!  I cannot wait to see the upcoming in-colors and to play with all the new things.  It is like Christmas for me!!!!

When I went into my craft room yesterday I had one goal - make a graduation card for a special young lady.  Well I couldn't help but think that a floating dress card would be so much fun to make for her for this occasion.  So I set out to do just that.  Let me share with you my final result.


I will list the video link again at the end of this post so you can see how Karen Burnstein made her card.  For now I will focus on my colors, stamp and design.  I started with a base card of Very Vanilla cut at 5" x 11".  I ran this through my big shot using the card base pop 'n cuts die.  It will cut a 4 1/4" x 11" card.  I scored this at 5 1/2".  Next, I pulled a retired stamp set called Go, Graduate.  I used the cap stamp and made a background on the front of the card.  I then ran this once again through my big shot using the labels framelits to cut out the hole for the front.  Prior to removing the piece, I added runner adhesive to the back of the label and pressed it against the back of the card so that the piece removed from the front would now be inside the card.  Next, I took 3 pieces of Basic Black card stock all cut at 4 1/4" x 5 1/2" and placed the same label framelit I just used on it as well as the next size up so I could make frames for the opening and label of the card.  I did each individually.  I attached the front one to the card using runner adhesive.  I used a gold marker and added the year to each side and dots to the curves.  Rhinestones completed the look of the front.


Here is a closer look at the card with the frame.  You can see the gold numbers and dots as well as the rhinestones.  I really like how this all came together and how it looks.  


Here is the inside of the card.  You can see the label that was cut out from the front.  You can also see the frame I made to go around it.  I decorated the frame just like the front one so that it was consistent.  The greeting is another retired stamp called Happy Grad.  I stamped this using Basic Black ink and then cut it out using my set of oval framelits.  I sponged the edges with Basic Black ink and attached it to the inside label using runner adhesive.  


Here is a view of the floating dress from the inside of the card front.  As you can see I used the third frame here.  I decorated it with the gold marker.  The frames and the 3 dresses were all sprayed using the champagne shimmer spray.  Even though my dress is only one color, I went ahead and cut 2 strips of Basic Black card stock at 2 1/2" x 11".  I adhered them back to back using runner adhesive.  The reason I chose to do this was because I made the dress originally as just a single layer and it really did not work well.  It was really weak so I went an remade it using the 2 strips adhered together.  Once the card stock was prepared, I ran it through the big shot and cut out my 3 dresses, one at a time.  I sprayed both sides of the dress with the champagne shimmer spray.  I then added polka dots with my gold marker.  Then I cut the slits and notches, intertwined them and attached the main dress to the card on the front using glue dots.  


Here you and see the dress open and floating.  I just love the colors I chose for this!


Here is a shot from the top down which shows you the dress opened up.  Here is the video link to learn how to make the dress:  click here for video.

Now I have no idea what I will make to share with you tomorrow so you will just have to stop by to see if I come up with something boring or exciting.  Thanks for dropping by today to visit.  See you tomorrow.

Monday, May 20, 2013

A Floating Dress???????

Hi everyone and welcome to another Monday.  I hope everyone had a wonderful weekend.  I am saddened to say that while our weekend started out well, it all changed in the blink of an eye.  The Phoenix Fire Department lost one of its own early Sunday morning.  There was an accident involving fire apparatus while they were fighting a fire late Saturday afternoon.  The 23 year old firefighter became pinned between 2 vehicles and succumbed to his injuries around 1:30 Sunday morning.  On the heels of that, a 29 year old Phoenix police officer was hit by a car early Sunday morning and also passed away from his injuries.  The driver of the car fled the scene and we can only hope they do the right thing and turn themselves in.  We are praying for all of these families.  Being the wife of a firefighter I can tell you that my heart is broken for the widows and families of these heroes.  All fire and police departments work closely together and we truly are a family.  It is a reminder to us all to never sweat the small stuff, let the past go, and be sure to tell those around you how much they mean to you.  We never know when our time will end here.

I so appreciate your understanding about my blog last week.  After all that happened this weekend I am reminded that the time I spend with my hubby is so precious.  I got to some quality time with my hubby and I am so grateful for the time.  It just seems that we get so busy and worn out that we miss little opportunities to spend time with the ones who are most important to us and yet in an instant things change and people pass on.  I need to be sure to prioritize my time and put hubby and my girls at the top where they belong.  

Hubby went back to work last Friday and I spent the day with the other little man in my life, Jackson.  He is so much fun.  He is crawling all around and loves to play.  It saddens me that next week will be my last Friday with him as mommy is a teacher and school will be out for summer.  I hope that I get to keep him some over the summer too.  I will truly miss him.

I spent some time catching up on email and pinterest over the weekend.  I came upon an interesting card on pinterest and was immediately inspired to try it.  Now I am going to show you my card first and then will share the link to a video by Karen Burnstein which will teach you how to make this.


I started with a base card of Regal Rose I cut to be 5" x 11".  I ran this through my big shot using my pop n' cuts die for just the card.  It makes it be 4 1/4" x 11".  I then scored it at 5 1/2".  I stamped the front with an image from the Reason to Smile stamp set using VersaMark ink.  Now it is really light and too hard to see even in person so I would used Regal Rose next time and do tone on tone instead.  Anyway, I used the labels framelits collection to cut out  a label on the front of the card.   Prior to removing the label, I added adhesive to the back of it and adhered it to the inside of the card.  I then cut out the same size label along with the next size up from Very Vanilla card stock so I could make a frame for the front opening.  I made 2 of these.  The other one is on the inside.  I added the pink rhinestones to finish off the front look and headed to the inside.


Here is the inside.  You can actually see my VersaMarked flowers from the front of the card on this piece.   Remember this piece is from the front.  You can see the second frame I have adhered around the label with runner adhesive. I stamped the same flower image one more time onto Very Vanilla card stock using Red Rose ink.  I colored the center of the flower in with the same ink and punched it out using the scallop punch.  I then sponged the edges with the same ink and adhered it to the inside label with runner adhesive.   I added dots to the frame with the Red Rose marker.  I added the greeting using the Red Rose ink and the All Dressed Up stamp set. 


To fill the opening on the front left  by the label removal,  I made this cute little floating dress.  This is a view of it from the inside of the card.  You can see how it hangs when the card is open.


This is a view from the top of the card.  You can get an idea of the dress better from this viewpoint.  To make the floating dress I used a designer card stock I picked up last week.  You will be cutting 2 strips at 2 1/2" x 12".  You will adhere these pieces together back to back so that the same pattern is then on both sides.  Using the Dress Up framelits, you will cut out 3 of the sun dresses.  

Now I could go on trying to explain how you cut the slots and notches and intertwine them together but the video Karen did is wonderful and will actually go through the entire card (different color and stamps used) from start to finish.  So click here to see the video.  Let me know if you have questions.

I am going to try more of these cards.  I have ideas running through my head and hope that some of them work.   I will just have to try them to find out. 

Again thanks for your understanding about last week.   I plan to see you all tomorrow.  If there are days that I miss a post it would only be to spend time with my family.  I now have to help my hubby through this rough time as we prepare to attend funerals honoring each of these fallen heroes.  Thanks for all your understanding and for stopping by today to see me.  See you tomorrow.

Wednesday, May 15, 2013

Taking a Break

Hi everyone.  It's Wednesday.  I updated my post from yesterday but in case you did not see the update I wanted to share it again.  I am cutting my week short this week.  My hubby has a couple of days off and we have not had a lot of time together in weeks.  I am going to spend some much needed time with him for the rest of this week. 

Here is a card I found on Pinterest that I really liked this week:


I will be back next Monday with another share for all of you.  Thanks for stopping by today and I will see you all next week. 

Tuesday, May 14, 2013

Let's Keep It Simple

Hi everyone and Happy Tuesday!!!   I do hope your week is off to a better start than mine.  I spent part of the day yesterday cleaning and preparing for a Mother's Day dinner with my mom-in-law.  That was the fun part of the day - the dinner.  Good food and lots of family are a recipe for happiness.  However, to start my day, I wanted to be sure I made a card to share with all of you.  I had 2 ideas running in my head and started with the one I liked best.  Well, it didn't work.  I was disappointed with how it was looking and decided to scrap the idea and go to plan b.  Well that plan turned out as well as the first.  I just could not seem to get anything to work like I wanted it to.  I was ready to give up and call it a day for crafting when I spotted this background stamp I bought a few years ago and thought why not just make a really simple card.  So that's what I did.


I started with a base card of Garden Green cut at 5 1/2" x 8 1/2", scored at 4 1/4".  Next I added a layer of Daffodil Delight that was 4" x 5 1/4".  Prior to attaching it to the card I ran it through the big shot using the tulip frame impression folder.  Now I did trim a small strip off the bottom of this after it had been impressed.  I did this only because I had one side of the frame closer to the edge that the other and this evened it up a bit.  I then attached it using the runner adhesive and moved on to my Whisper White layer.  I cut this piece to measure 3 1/8" x 4 1/4".  This fits perfectly inside the frame.  I took this piece and stamped it with a tree stamp I bought several years ago.  This was the stamp I saw that inspired this card.  I used a green StazOn ink that I have to do this.  I attached it to the inside of the frame with the runner adhesive.


Here is a closer look at the tulip frame and the tree.  I wanted to be sure you could see the details of this.  


For my greeting, I started with a piece of Whisper White card stock.  I stamped the frame which is from the stamp set Four Frames onto this using Garden Green ink.  I punched it out using the decorative label punch.  I then used the Teeny Tiny Wishes stamp set and stamped the greeting in the center of the frame with Daffodil Delight ink.  Using my Daffodil Delight Stampin' Up! marker, I added the little polka dots.  I then created a frame from Daffodil Delight card stock for the greeting and adhered it with runner adhesive.  The finished greeting piece is attached to the card using dimensionals.  

Now I know this is not an overly fancy card, but keep in mind that sometimes simplicity is best.  I hope you have enjoyed this one.  I also hope that my next card will be more successful so I can share it with you all.  

I am cutting my week short this week.  My hubby has a couple of days off and we have not had a lot of time together in weeks.  I am going to spend some much needed time with him for the rest of this week.  I will be back next Monday with another share for all of you.  Thanks for stopping by today and I will see you all next week. 

Monday, May 13, 2013

My Stackable Card

Hi everyone and happy Monday.  I realized I forgot to wish all you mom's out there a Happy Mother's Day yesterday!  I hope you had a wonderful one.  I spent mine with my girls and enjoyed every minute of it!!!  I hope the rest of your weekend was fun.

I did find time to make my card with the stackable toy on it.  Ready to see it?  Here we go!


I started with a base card of Wild Wasabi cut at 5 1/2" x 8 1/2", scored at 4 1/4".  I added a layer of Whisper White cut at 4" x 5 1/4".  I added little circles punched using the circle from the itty bitty punch pack.  I used the colors of the stackable rings for these.  I attached them using runner adhesive and ran the piece through the big shot using my medium dots impression folder.  I apparently was not thinking clearly when I made this because had I been I would have placed the dots toward the top so they would be visible instead of hidden by the toy.  Oops!!  I attached the completed white layer to the base with runner adhesive.  


For my rings, I used ovals to make these.  I used the wide oval punch for the Real Red and the oval framelits for the rest of the colors:  Tangerine Tango, Daffodil  Delight, Garden Green, Pacific Point and the white base.  I trimmed off a piece of each side and tried to round the corners.  As you can see some of my edges are a bit rough but they will do.  The post in the center is a Daffodil Delight 1 1/4" circle.  I attached all pieces of the toy together using runner adhesive and added the finished product to the card with dimensionals.


The greeting for this one is from the stamp set called A Fitting Occasion.  I stamped it using Wild Wasabi ink onto Whisper White and punched it out using a 1" circle punch.  I layered it onto a Wild Wasabi 1 1/4" circle with runner adhesive and attached it to the card with a dimensional.  

For a first attempt I am happy but already have ideas of how to change things up a bit for the next one.  I hope you like it though.

Well I am off.  I am having my in-laws over for dinner tonight to celebrate Mother's Day so I have food to get ready.  I will see you all tomorrow.  Thanks for stopping by today!!

Friday, May 10, 2013

Hello Darkness My Old Friend.........

Hi everyone and happy end of the week.  Do you recognize the song lyrics in my title?  Well while I know the lyrics I cannot for the life of me tell you the name of the song or the band who sings it.  Oh well.  It might seem like a strange title for my blog but I have become great friends with the darkness. 

On Tuesday evening, I could tell I had a small headache but had no idea it would erupt into a full blown migraine over night.  I had baby Jackson on Wednesday and was able to play and care for him just fine because the small headache had become a little bigger and did not intensify fully until Wednesday night.  I could not sleep well at all and by Thursday morning, I could not stand the light.  Even wearing sunglasses did not help me.  It was still way to bright outside.  Thankfully it eased off a bit by late evening and I could stand to look at the computer screen to type this for you.  I just wanted you to know I had not fallen off the face of the earth!!

I am going to get a good night's rest hopefully and have fun once again with little Jackson in the morning.  I am sorry I did not get a card ready for you for today but I will return on Monday. 

Have a wonderful weekend and thanks for stopping by!!

Wednesday, May 8, 2013

I Had An Idea.........

Hi everyone and welcome to Wednesday.  I am happy to say that my sister is now in a walking boot and will hopefully be back to walking easily.  That's the plan at least. 

I have a very special day today as I get to spend the entire day with baby Jackson!!  I cannot wait!!!  My hubby and I went a bought him a couple of toys to have at our home.  One of those is the Fisher Price Stackable Rings.  Do you remember those?  Well I was washing the toys, getting ready for today and thought this would make a cute card.  I thought I had found my idea for today's share.  I sat down and decided to visit some of my favorite blogs and guess what I found?  A card featuring this very toy!!  I was so surprised.  Now I still could have made my own but I wanted to share with you first the one I found. 


It was made by Debbie Rippentrop.  Click here to visit her blog for the details.   I think it is so cute.  Now I do plan on making one of my own but will share it with you on Friday. 

Between the doctor yesterday and Jackson today I have not had a lot of time to craft.  So I promise to try to have a share for tomorrow but may not get one finished.  That's why I said you could see my stackable on Friday.  I know I will have plenty of craft time on Thursday. 

I hope you enjoy Debbie's card.  Thanks for stopping by today and I will see you all tomorrow (hopefully) !!!!!

Tuesday, May 7, 2013

A Super Hero that Almost Beat Me!!

Hi everyone and happy Tuesday!!!  At least I hope it is happy.  I am taking my sister to the doctor this morning to get her cast off.  Hopefully everything will look good and she will go into a walking boot.  Worse case would be she would be put back into a cast.  We are truly hoping that will not be the case.  I will let you know how it turns out tomorrow.

A while back, I saw a punch art character made by a lady named Anita.  I do not know her last name.  Anyway, I have always wanted to try to make this character and decided to give it a go.  I had no idea how hard this one would be.  Ready to meet this one? 


Well here he is.  It is Batman in case you could not tell.  I do apologize for I forgot to rotate the photo so you have to see him sideways right now.  He took me so long to make that I did not even try to get him onto a card.  Now maybe it's just me but I think he looks a little off.  Maybe it's because his legs look so short.  I don't know.  Something just doesn't seem right about him.  If you figure it out, please tell me.  For now, let's break him down.


Wow this photo is a little blurry.  This is the upper half of Batman.   I am going to do a list of punches after the bottom half photo that way I can list everything at once.


Head - owl punch; you will need to cut the eyes and mouth out (I did this free hand)
Face - 1" square trimmed to fit
Top of Cape - large oval
Cape - I cut this out free hand also
Chest - wide oval; cut and reshape with 5 petal flower punch or star punch
Lower Chest - wide oval; reshape with wide oval on each side to narrow for the waist
Shorts - wide oval; reshape again with the wide oval on each side to make leg openings
Legs - 2 large ovals
Boots - 2 large ovals
Shoes - 2 small ovals; 3/4" circle (2) flattened on bottom
Belt - 1/4" x 1" strip with a 3/4" x 1/2" pieces for bags and buckle
Upper Arm - small oval (2 for each arm)
Bottom arm - large oval
Glove - large oval reshaped
Hand - 1" oval

I will try to find the blog that had this character on it so that I can refer you to it for more detailed instructions.  I will be honest and tell you this one really challenged me today.  It is definitely one for the advanced punch artist to try.  

Well that's it for today.  I will return tomorrow with a much more sensible project to share with you.  Thanks for stopping by today!!!!!
 

Monday, May 6, 2013

Another Gown for the Ball

It's a brand new week!!  Welcome to Monday.  I hope all of you had a wonderful weekend.  I spent mine working on cards, cleaning, going to work with my sister, and seeing family.  It was busy and it was full but it was fun. 

Last week I decided to make Belle's ball gown from Beauty and the Beast using punches.  I received a very nice email about how wonderful it looked.  The author of that email also expressed how they hoped I would try Snow White's dress.  Well, I did!!!!  I used the one Michelle Suit made as a guide but really went by my own judgement as to how to make it.  Ready to see it?  Here we go!!


Ta da!!!!!  I started with a base card of Daffodil Delight cut at 5 1/2" x 8 1/2", scored at 4 1/4".  I added a layer of Pacific Point measuring 4 1/8" x 5 3/8" using runner adhesive.  For the top layer, I chose a 4" x 5 1/4" piece of Whisper White card stock.  I ran this through my big shot using the elegant bouquet impression folder.  I sponged the edges of this with Daffodil Delight ink and lightly sponged over the raised impression with the same ink.  This added just a hint of color to the background.  I attached the piece to the card using runner adhesive and finished the look with light blue rhinestones in the center of a few flowers.


My greeting comes from a Sale-a-bration stamp set called Pretty Petites.  This was stamped using Pacific Point ink onto Whisper White card stock.  I then punched it out using the Petite Curly Label punch and attached it to the card using a dimensional.  


Now let's focus on the top portion of the dress.  The colors used for this portion are Whisper White, Pacific Point, Real Red, Bashful Blue and Daffodil Delight.  Here is a list of the pieces and punches or big shot items used to make them:

Collar - 1 3/4" circle; I really used a lot of trial and error for this one.  I folded in each side to make it look as if it comes all the way around the back of the dress to the front.  

Bodice - Dress Up Framelits and big shot;  once again I used the sundress and cut the straps off

Sleeves - the blue portion is a 3/4" circle while the yellow that sticks out under it is a 1/2" circle which I flattened on one side.  The red tear drop shapes are from a retired triple layer punch that I have.  I think you could make these even from a circle.  You would just have to trim it and be patient.  I think there is also a hand punch I have seen at craft stores that would punch this shape.

I added red rhinestones to the center of the bodice.  The bodice was also edged using a sponge and Pacific Point ink.


Now the bottom portion.  I used Daffodil Delight and Whisper White for the dress.  The stand is cut using the Dress Up framelits set out of Basic Gray card stock.  Now onto the dress.

I used the large scallop circle punch for the white.  I placed pieces behind the Daffodil.  The very back of the skirt and the open sides are the 3rd smallest oval from the Oval Collection of framelits.  The back one is placed sideways.  The side panels were made by cutting an oval in half and attaching one half to the back oval of the dress.  The center of the gown is a 2 1/2" circle.  I attached the other halves of the ovals to the circle and then attached the circle to the bottom oval with dimensionals.  All pieces of the skirt were sponged with Daffodil Delight ink.  Trim the skirt to round the top.  The bodice is attached to the bottom oval with runner adhesive prior to attaching the circle top piece.  I added 3 blue rhinestones for added bling.

All pieces of the dress were adhered together using runner adhesive and liquid glue, except the circle of the skirt which was attached to the bottom oval with the dimensionals.   The finished dress was attached to the dress stand with runner adhesive.  You will need to cut the stand down a bit.  The finished piece is attached to the card with dimensionals. 

I hope you enjoyed this gown as much as Belle's.  Both of my girls will expect to see some other gowns designed soon as I have not yet done their favorite princesses. 

That's it for today.  I hope you have a wonderful Monday.  Thanks for stopping by and I will see you all tomorrow.