CARDS FOR SALE

Most cards you see on this site are available for purchase. Simply click the Pay Now button at the bottom of the post of an available card to purchase the card. You will be linked to PayPal for payment. It will come up as "greensnaggletooth@cox.net" which is the name of my internet company. Price is $5.00 unless otherwise stated and includes shipping. Your card will come with an envelope also. Email me with any questions or requests at: sharynsstampbiz@gmail.com
Thanks for taking a look at my creations!!

Showing posts with label wedding. Show all posts

Tuesday, July 30, 2013

I'm Back!!!!!

Hi everyone.  I have truly missed my daily talks with you.   I am so happy to be back!!

We went on vacation to California to visit my in laws.  It was absolutely wonderful.  We told them we did not want to run around doing things all the time.  We really just wanted to spend time with them and visit.  That's exactly what we did.  We have lots of family here in Phoenix so when they come see us, we share the time with everyone and it just never seems like we spend enough time with them.  By going to their home, we were able to have that one on one time that we wanted and that my husband needed.  He loves his dad a lot and needs that time with him.  We enjoyed out time so much that we extended our vacation just a bit to have more time to visit.  Luckily my hubby had the time off and could do that. 


We did go to Seal Beach one day and it was perfect.  While we did not swim, we walked the long pier and watched the waves, surfers, sea gulls, and pelicans.  We shopped in the little shops and found some really cool seashell items to bring home.  The sky was overcast, there was a breeze and the temperature was in the 70's.  It was heaven.

Once home, here is what was waiting for me:


Recognize this?  Yep it's the wedding cards for my daughter's friend.  Actually the top photo was taken after a day or two of my being back.  The Night of Navy card stock and the Old Olive card stock I needed for these arrived while I was gone.  So did my embossing powder.  I had all the heat embossing and card stock cutting to do once I was back.  Now I know this may not seem like a lot but when you are doing 100 cards, it takes a lot of time.  I am happy to say I completed the cards yesterday and am not able to get back to my craft room and make new things for all of you!!  

I must warn you though that my husband's charity banquet is coming up in 2 months and I am creating the invitations for it also.  I am hoping to be able to work on those as well as work on things to share with you at the same time.  However, it I run into trouble and need to devote more time to finishing those cards, I will let you know.  

I am so happy you came back to visit today.  Thanks for all your understanding and support.  Come back tomorrow to see what I make to share with you.  See you all then!!!

Monday, July 8, 2013

Another Wedding Invitation

Hi everyone.  Well we have made it through a very sad week and I am hoping we are coming out of the darkness finally.  My heart is still broken for all the families and I send lots of prayers out to all of them. 

I thought I would start this week by sharing with you an invitation to a wedding.  I think I might have mentioned I have been working on a sample wedding invitation for one of my daughter's friends.  I think I will just jump in and start.


I went with the square card for this one.  I started with a piece of Night of Navy card stock cut at 5 1/4" x 10 1/2", scored at 5 1/4".  I added a layer of Old Olive to this cut to be 5" x 5".   The final layer on the front is a 4 3/4" square of Whisper White.  I stamped this image from the retired stamp set called Wedding Sweet onto the white using VersaMark ink and Night of Navy ink.  First ink the stamp with the VersaMark and then the navy.  Once the image is stamped, I added clear embossing powder to it and heat embossed it.  I took a 4 3/4" strip of navy and used my eyelet lace punch to punch both sides of it.  I attached it and all the layers together using runner adhesive.  I added a few pearls to the eyelet lace for added effect.  For the final touch, I typed the saying on my computer and printed it out onto white card stock.  I punched this out using the full heart punch, sponged the edges with olive ink and layered it onto a navy scallop heart made using my big shot and an embosslit.   It was adhered with runner adhesive to the scallop heart.  The finished heart was attached to the card using dimensionals.


This would be the left hand side of the inside of the card.  I created a pocket on this side with a strip of navy card stock.  I used sticky strip to attach this so it was really secure.  I put a layer of olive and then white card stock onto this to keep the theme.  I added the stamp from Wedding Sweet (retired) to this using olive ink.   The pocket will hold the RSVP card and an envelope for it to be returned,  It will also contain the reception information and a map.  The words on the front let recipients know when to return the RSVP card by to the couple.  I always have my brides include the return envelope and encourage them to address them and add the stamp.  You have a better chance of people actually returning these if you make it easy for them.


The right hand side contains the wedding info itself.  Again I added a layer of olive to the base using runner adhesive.  I then took a piece of white and stamped the image of the tree from the set Thoughts and Prayers using olive ink.  The heart is from the retired set called Tiny Tags.  They are stamped using navy and olive ink.  The information for the wedding is printed out onto vellum.  The vellum is cut to match this white layer.  I attached it to the white using brads.  It softened the look of the stamps underneath.  The white is attached to the olive using the same runner adhesive.  

Well that's it for today.  My plan is to be here every day this week.  Thanks for all your understanding and thanks for stopping by today to visit.  I will see you all tomorrow.

Monday, March 19, 2012

Daffodil Delight Wedding

A few weeks ago I shared a card with you I made for my daughter to give to a friend who is getting married.  The color scheme was black, white and silver and it had interlocking rings with flowers and pearls.  Well remember the pink Mother's Day card I made last week?  You know the one with the pink rhinestones and the butterfly?  Well, my daughter saw it and loved it so much she asked if I would remake the wedding card using a yellow (it's one of the bride's colors) and rhinestones and 2 butterflies.  So I decided to be nice mommy and said yes.  My card share for today is the final result of that card.  Are you ready?  Let's get started.


Ta Da!!  Isn't it pretty?  Just like a ray of sunshine!  I started with a base card of Daffodil Delight cut at 5 1/2" x 8 1/2", scored at 4 1/4".  Next I took a piece of Whisper White card stock and cut it to be 4" x 5 1/4".  I ran it through the big shot using the Elegant Lines impression folder and using the same method as last time (do not use a numbered tab just use the bottom panel).  Attach this panel using runner adhesive.  Let me show you a close up of the greeting which will also show you the rhinestones.


The greeting for this card came from a stamp set called Wedding Sweet.  I stamped it onto Whisper White card stock using VersaMark ink and heat embossed it using black embossing powder.  Once it cooled, I punched it out using the word window punch.  I then punched a modern label out of a scrap of Daffodil Delight.  I layered the two together using runner adhesive and attached it to the card using dimensionals.  For the rhinestones on this one, I wanted to use colored stones again.  Unlike last week when I had the pink ones on hand, this time I did not have any yellow.  So I knew that meant if I wanted a yellow stone, I would have to make it.  To do this, I took a spare piece of plastic and put the number of stones in the various sizes on it.  I think I used about 17 of them.  Next I took out my alcohol ink called Butterscotch.  I put just a few drop onto a cotton ball and then pounced gently on the stones with it.  I added a little more ink to the cotton and pounced a little more until the color was just right.  The nice thing about this ink is it dries fast.  Using my paper piercer I picked the stones up one by one and placed them into the little circles on the impressed design just like last week.


Having the greeting and the stones finished meant it was time to make those gorgeous butterflies once again.  I used the same method as last week.  Take the big shot and the Beautiful Butterflies die and cut out one large and one small butterfly in Daffodil Delight.  Repeat this using vellum paper for the second set.  Layer the two together and attach using a glue pen.  I cannot remember if I put this in the past blog or not but you only put the glue along the path of the body.  The wings are free this way and you will be able to cover the glue up with the pearls.  This time I needed yellow pearls.  So out came my yellow Sharpie marker and I colored 5 of the white pearls, 3 for the large butterfly and 2 for the small butterfly.  Once they were dry, I used my paper piercing tool again to help me place them.  Next comes the Stickles glitter glue.  Add dots all over your butterfly wings and you are finished!

I must tell you my daughter was thrilled with the end result.  It looks absolutely fantastic.  I truly hope the bride likes it.  

That finishes my blog for this Monday.  I hope you all are off to a nice start of a new week.  Please come by tomorrow to see what I come up with next.  Until then, happy creating and thanks for dropping by today!!


Thursday, February 23, 2012

Another Wedding Card

My daughter has a friend who is getting married soon and came to ask me to make a wedding card.  So I thought why not share it with you too.  After all, I love sharing my creations and hope you enjoy seeing them.  So let's get started working on this now.


I spent quite a bit of time trying to decide my color scheme for this one.  I decided to start with a Shimmer White card stock base.  I cut it at 4 1/4" x 11", scored at 5 1/2".  I then added a layer of Basic Black card stock measuring 4 1/8" x 5 3/8".  I then took a piece of Brushed Silver card stock measuring 4" x 5 1/4" and ran it through the big shot using the Vintage Wallpaper impression folder.  I love the elegant look you get from this.  I then layered all 3 of these together using runner adhesive.  For the main design on top, I turned to my handy Blossom Bouquet Triple Layer Punch.  I punched flowers in Shimmer White and Basic Black.  Using the outer ring of the flower, I created this interlocking pattern to lay on the silver.  I used a liquid glue to adhere these together and to then lay them onto the silver.  


Here is a closer look at the interlocking flower rings as well as the flowers themselves.  I added a few white flowers into some black rings and some black flowers into white rings.  I adhered them with a glue dot in the center of the flower and liquid glue on the rest of the back.  I wanted to be sure they stayed put.  I then took out a pack of black and white pearls that I have and added white pearls to the black flowers and black pearls to the white flowers to make the centers really pop.  I liked the simple elegant look of the finished card.  But because she is my daughter, she decided she wanted some glitter added to it.  (Guess I raised her right!)


I chose to use my Stickles glitter glue in Silver to do the glittering of this one.  I was concerned that if I used the glue and loose glitter, it might get into areas I did not want.  This was a nice way to add just one color of glitter to the card and not worry about the clean look of it.  

So what do you think?  My daughter is out right now and has not seen the final product so I will have to let you know if she liked it or not.  Tomorrow, I am going back to more Easter punch art.  I can't wait to share this one with you!!  It is so cute!

Thanks for dropping by today and visiting.  Please come back tomorrow.  I will see you then!!


Monday, February 13, 2012

Congratulations to the Newlyweds!

Yesterday was a very special day as we watched our friends Becky and Mike be married.  The wedding was actually held at the fire station where Mike works as the engineer on my husband's ladder truck.  I had never been to a fire house wedding but it was a lot of fun.  The ceremony took place outdoors followed by a reception inside.  It was a beautiful day for a wedding and the bride looked beautiful too.  It was fun to watch the wedding and spend time with our fire family.   

I made a special card to give the special couple for their special day and wanted to share it with you.  I just had to wait until the wedding was over so they would not see it early.  I try really hard to do that with all my cards.  Most of the time it works.  Back to the wedding card.  Here it is:


This is a very simple design.  I did not feel the need to go big on this one.  The designer paper I found to use was elegant enough.  My base card is Shimmer White card stock cut at 5 1/2" x 8 1/2", scored at 4 1/4".  I added a layer of Basic Black to this which is cut at 4" x 5 1/4".  For the final layer of designer paper is cut at 3 1/2" x 4 3/4".  I found this beautiful paper at my local craft store.  As soon as I saw it I knew I wanted to use it for a wedding card.  I love the silver glitter design.  I have to tell you Becky is like me - she loves glitter and bling.  However, Mike says the less glitter the better.  Like most females, I know that Becky and I are right so there would be bling on this card no matter what!


I used my big shot and my Bigz XL Curly Label die.  This is the one that will cut a card out with a window in it.  It comes with the curly label window but I also bought one of the accessory sets which had the heart in it.  You do need the die for this.  If you run just the heart piece through, it does not cut anything.  I simply placed the heart in the middle of the opening and placed a piece of Basic Black card stock on top.  I ran it through and out came a heart.  I did this twice.  I then used the full heart punch to punch out a Whisper White and designer paper heart.  For the groom, I took the Whisper White heart and cut it down to form the "shirt"  I adhered it using runner adhesive to the black heart.  I then tied a know in a piece of black grosgrain ribbon for the tie and used a black marker for the buttons.  If you have black pearls you could use those for the buttons.  For the bride, I took the designer heart and attached it to the black heart with runner adhesive.  I chose to add the rhinestones to the "dress" but I could have left them off.  I have also used pearls on it before but did not like the look with the silver glitter.  I attached the bride and groom to the card using dimensionals.


For the greeting, I turned to my Teeny Tiny Wishes stamp set.  I stamped it on Basic Black card stock using VersaMark ink and heat embossed it with silver embossing powder.  I then punched it out using the Modern Label punch, attached it using dimensionals, and added a rhinestone at each end of it.  

For the inside message, I used the Word Play stamp set.  I stamped the message on Whisper White card stock using VersaMark ink and heat embossed it using silver embossing powder.  I punched it out using the 1 3/4" circle punch and layered it on top of a Basic Black scallop circle punched out using the 2 1/2" scallop circle punch.   I then attached it to the inside of the card using runner adhesive and added a rhinestone.

I wish Mike and Becky only the best and hope their marriage is a long one.  If they are 1/100th as happy as I am with my hubby, they will succeed!!

Thanks for dropping in today to see this special card.  I do hope you will come back by tomorrow to see what I do next.  (Wish I knew.  Hopefully the inspiration fairy will drop by with ideas.)  See you tomorrow!


Friday, December 16, 2011

Ready for the Weekend

I don't know why but this has been a long week around my house.  Maybe it is because we had some important decisions to make and my husband worked a lot.  Or maybe it is all the baking I did.  We also had a lot of rain this week and our little dog does not like to go out in the rain or when the ground is wet so that added to my frustration.  No matter why it has been a long week, I am so grateful the weekend is finally here.  I am hoping to watch a lot of football and get some rest.  After all, Christmas is only a week away!!

This past year,  I spent time with several brides to be as well as at a wedding.  So for today, I wanted to share a card I made yesterday with you.  The theme is wedding.  It is a card I would give to the happy couple on their special day. 


I chose to use the colors of Bashful Blue and Whisper White for this one.  I would try to coordinate it to the couples chosen color scheme for their wedding but since there is no special wedding in mind, I went with the first colors I grabbed.  Anyway, I used those delightful rosettes on this one.  The base card is the white.  I usually use either white or vanilla as the base then add the other colors.  The only layer added to this one is a Bashful Blue layer which had been run through the big shot using the Finial Press impression folder.  I then attached a piece of  Whisper White taffeta ribbon to the blue layer by applying runner adhesive to the ribbon that would go on the back and then bringing it around and making a knot in the front.  Using more runner adhesive, I attached the layer to the base card.  The smaller rosette is a solid blue layered on a 2 3/8" scallop circle in white.  I then added the small flower from the BoHo Blossom punch to the center.  I always use my Tombo liquid glue to attach the rosette to the back piece and the front piece.  I then sit something heavy on it until it dries completely.  I added a light blue rhinestone to the center and it was ready for the card.  It is attached with glue dots.


Here is a close up of the larger rosette on this card.  I started the same way with a solid blue strip.  I scored it a 1/4" intervals.  Once scoring was complete, I put it through the Lace Ribbon border punch.  This gives it an elegant look.  It kind of reminds me of a snowflake.  It is layered on a 2 1/2" circle in white.  I then added a flower from the BoHo Blossom punch with a flower from the flower punch in the itty bitty punch pack.  Again, I placed something heavy on it until it dried.  A rhinestone was added and it was attached using glue dots.

For the greeting, I turned to the Teeny Tiny Wishes stamp set.  If you do not have this set, I highly recommend it.  It works extremely well on so many cards for so many occasions.  It is my go to set.  I stamped the greeting in VersaMark ink and added silver embossing powder to it.  I heat embossed it to give it an shiny, elegant look.  I punched it out using the word window punch and attached it using dimensionals.  While I did not take a picture of the inside, I did heat emboss it with silver embossing powder too.  My card is all done and ready to go.  Now I just need someone to get married so I can send it to them!
As you head out to your weekend, I wish you a lot of fun.  Do something you really want to do and relax a little if you can.  I will return Monday with another card to share.  Until then, thanks for dropping in today. 

Tuesday, August 2, 2011

Wedding Card #4

I think this is the 4th card I have shared with you for a wedding invitation.  This one is done with a gate fold.  I have to admit, I had a bride request a sample of this type of card.  I am sure I would have thought of it eventually but I truly appreciate the help from her. 


The colors of this card are Very Vanilla and Basic Black.  I stamped the flourish on with VersaMark ink and used black embossing powder to heat emboss it.  The flourish is from the Wedding Sweet stamp set.  The bow in the middle is what keeps it closed.  When you open it, all the information is right inside.  Now I wish I could show you a picture of the inside.  However when I was going through the pictures on my computer, I could not find one.  So I apologize.  
Well I know this is a short post but I have been feeling a little under the weather.  So I think I will go lay down for a while.  Thanks for stopping by today.  See you tomorrow.

Friday, June 3, 2011

My Niece's Wedding Invitations

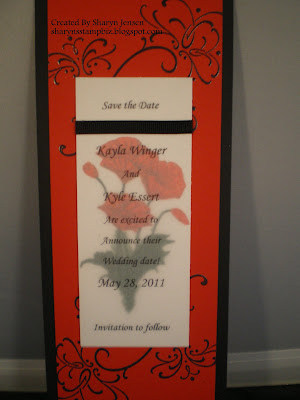
I realized as I was posting yesterday that while I have shared some wedding invitations with you, I have not share the ones I made for my niece.  I am very proud of the work I did and want to share them with you today.  First up, the Save the Date announcement which basically just lets everyone know to keep their calendars open for the special couple.


I used a vellum overlay to print the information on and placed it on top of a poppy flower stamp.  Believe it or not, I hand-stamped each one and colored each flower.  I think I did at least a 100 of these.  I attached the vellum with adhesive and covered the adhesive line with the black ribbon.  The image on the poppy card stock comes from a stamp set called Wedding Sweet and was stamped with versamark ink and heat embossed with black embossing powder.

On to the invitation!!


This is the front of the invitation.  The saying is from the stamp set Occasional Quotes.  Once again, I stamped the flowers using the poppy flower stamp and hand colored each one.  This did take some time, but it was well worth it.  
This is the inside of the invitation.  As you can see I one again used the vellum overlay to print the information on and put it over stamped and hand colored poppy flowers (to match the front of the card).  This time, I attached the vellum using square black brads and placed them in the corners looking like little diamonds.  The bottom portion of the card was a pocket design.  The outer wording on the pocket told guests when to return the RSVP card by and also that an envelope was included to return it in.  These were placed in the pocket, with the envelope folded in half so it would fit.  Also included in the pocket was an information card about the reception so guests would know where it was and what would be served.  The small stamp on the outer pocket is also from the Wedding Sweet stamp set and is also heat embossed in black.  

My job for this set of invitations would not be complete without a set of thank you cards to send to people for gifts received.


Yes I am completely insane by now as you can see I once again stamped the flower and hand colored it.   The background is embossed using an impression folder called Vintage Wallpaper.  The "thank you" stamp is from the Wedding Sweet set.  


The inside is very simple.  I stamped just the flower portion of the stamp and hand colored it.  The rest of the paper I left blank so there would be plenty of room to write a note. 

Now I should let you know that I love to color.  I find it very calming and peaceful.  My niece was a great help during a difficult time in my life.  I got to work on her invitations which had a lot of coloring involved while caring for my brother.  These cards really kept me sane and gave me a distraction from an otherwise difficult time (to say the least) in my life.  

Well now that I have bored you, I want to say thank you for looking at these today.  If you know anyone getting married who would like hand made invitations, let me know.  I love to make this stuff.  See you on Monday.  Have a wonderful weekend.

Thursday, June 2, 2011

Here Come The Bride

When I was first asked to design and create the wedding invitations for my niece, I decided to create a card that could also be used for a bridal shower invitation.  Now her maid of honor and bridesmaids were already going to do hers so I made a sample just to see what she thought.  She loved it so much I gave it to her to keep in her keepsake book.  So I thought I would share them with you today.


I made these using the same punches but changed the color of the ribbon and flowers as well as the hair to show how the card can be custom made for a bride to be.  I did use different impression folders for the backgrounds and the designs on the dresses.  The square lattice folder worked well for all the hats.  Let's take a closer look at each bride so you can see the differences.


 This one is made with daffodil delight card stock. 


 This one is done with cherry cobbler card stock.


This one is marina mist card stock.


This one was made with pink pirouette card stock.


Although they may look complicated to make, they are really pretty simple.  I thoroughly enjoyed making these and love to do them as actual invitations for bridal showers.  Tomorrow I will share another wedding card with you.  I hope you like these little ladies.  If you want more information on how to make these, let me know and I will get you the recipe.  Thanks for stopping in today!


Tuesday, May 31, 2011

The Wedding

Hello everyone!  I hope you all had a wonderful 3-day weekend.  It is always nice to spend time with family and friends and I sure hope you had some time to do that this weekend.

Our niece's wedding was this past Saturday evening.  It was very beautiful.  She of course was gorgeous.  We were fortunate enough to have my husband's 2 sisters from California and their families come into town as well as his Dad and step-mom (who is really a 2nd mom).  It was so nice to see all of them and especially to see how much the children have grown.  They have all gotten so big!!  Everything seems to go very smoothly.  I hope the wedding was everything our niece was hoping it would be and more.

I wanted to share with you the card I made for her and her new husband for their special day.  I made sure to use their colors which were black, white, and poppy.  Boy did she choose a great year to decide to use the color poppy.  I remember when she first told me that was her color.  I had just learned that Poppy Parade was one of the new in-colors in the 2010-2011 catalog.  I was thrilled to be able to use it for her to make all her save the dates, invitations, and thank you cards.  Oh well, back to the wedding card.


Yes I used the stain glass technique to make the doves and heart for the focal point of the card.  Now if you look closely at the doves, you can see little poppy hearts.  That's because I stamped the white background with little hearts and then put the stain glass image over it.  I used the photo corner punch to make the corners for the acetate which allowed me to attach it with glue dots on the corners because the corners would hide them.  The corners were run through the big shot with the square lattice impressions folder to add texture.  

I wanted to keep the inside of the card rather simple so I used a couple of stamps to stamp the sentiment and added little flowers to it.  Little "diamond" gems adorn the flowers and the "d"'s in the word wedding.  This left plenty of room for us to sign the card.  Simple but elegant.
Well, I must admit that after the long weekend, I am tired.  Perhaps I can rest while I work.  Thanks for dropping in today and I will see you tomorrow.

Wednesday, April 6, 2011

Heart to Heart Wedding Card

Hi everyone.  I wanted to share another wedding card that could be used as either an invitation or a card for the happy couple.


I love the look of the tuxedo for the groom and the dress with pearls for the bride.  I made this sample as I was preparing to meet with a bride to discuss her wedding invitations.  That is why I used the "You're Invited" stamp on it instead of a congratulations.  I used my full heart punch as well as a heart for the big shot the is part of the Movers and Shapers set called Punch Windows.  It pairs very well with the full heart because it is just a little bigger that it so you can layer.  The groom did not need an entire full heart to make his shirt so I punched it and trimmed it to fit.  I added the "buttons" on the shirt with a black pen.  His bow tie is a small piece of 1/4" basic black grosgrain ribbon tied into a knot.  For the bride, I embossed the full heart of her dress with the same impression folder as the background of the card.  It is called Finial Press.  I then added the pearls because, well as I have said before, I seem to associate pearls with weddings.  

So there you have it.  A simple, easy to make wedding card.  Feel free to try it.  Thanks for dropping in today.

Tuesday, April 5, 2011

Another Wedding Card

The other day I was trying to come up with a card to send to a couple who is getting married.  I have made a few and while I like them I wanted to make something different.  I was browsing through a demonstrator site and happened to see this really cool birthday cake.  It was two tiers and looked like it would be fun to make.  So I started playing with my card stock and decided to do a three tier wedding cake for the happy couple.  Of course, it needed a cake topper and I decided wedding rings would be perfect.  Here is the card I designed:


I of course added glitter to my cake and some pearls.  Each layer of cake is simply a piece of whisper white card stock with 2 corners rounded.  Then circle punches are used to make the "frosting" draped on the sides.  I used the cross looking flower punch from the itty bitty punch set to line the bottom of each tier.  Maybe this closer picture will show that better:

I guess not.  It is all white which makes it hard to see but each pearl is placed in the middle of the flower.  I embossed the background with an impression folder and my Big Shot, then put some doodle dots on it for fun.  The rings were made using the brushed silver card stock from Stampin' Up!.  The brushed gold would work well too.  I punched a circle using the circle from the itty bitty set (if you have not guessed by now, I love this set of punches!!), then punched a 1/2" circle around the hole.  I snipped one ring on one side so I could hook them together and added a diamond for the bride.  It is always nice to come up with new ideas to use for weddings.  Hope you liked this one.  Thanks for stopping in.

Saturday, March 12, 2011

Here Comes the Bride

Today is my niece's bridal shower. I am so happy for her and her husband to be. They have been together for several years and complement each other so well. I was lucky enough to be asked by the bride and groom to design their Save the Date announcements as well as the actual invitation. This got me started on the creation of several styles of invitations and my creativity just took over.

Today I thought I would share one of these samples with you. While this is not the one I used for my niece (I will share that another day) it is one of my favorites. The card measures 5" x 7". It is on very vanilla cardstock and trimmed with basic black. It amazes me how many brides today choose black as one of their colors. I do think it lends itself to a certain elegance though.
I used the little pearls because when I think of weddings I think of pearls. Not sure why but I really do like them. They matched very nicely with the very vanilla ribbon. The black strip of cardstock was punched with the Eyelet Border punch. This is one of my favorite border punches. I love the way it has the look of lace. For a wedding invitation especially I want to make sure it has a very elegant look to it yet is not over the top. The simplicity of the design and the elements used on this one just work for me.

I do work with brides on custom invitations so if you know someone who is getting married and would like handmade invitations, I would be happy to help. All they need to so is send me an email and we can get started.

Don't forget to stop by me online store to take a look at the cards on there. They are all available for you to purchase. Thanks for taking time to look today.
Posted by Picasa