CARDS FOR SALE

Most cards you see on this site are available for purchase. Simply click the Pay Now button at the bottom of the post of an available card to purchase the card. You will be linked to PayPal for payment. It will come up as "greensnaggletooth@cox.net" which is the name of my internet company. Price is $5.00 unless otherwise stated and includes shipping. Your card will come with an envelope also. Email me with any questions or requests at: sharynsstampbiz@gmail.com
Thanks for taking a look at my creations!!

Showing posts with label Thanksgiving. Show all posts

Tuesday, September 3, 2013

Easy Thanksgiving Card

Well here we are into the 3rd day of September.  Fall is coming and I for one and ready for the temperatures to go down a bit here in Phoenix.  The summer was actually pretty mild compared to some we have had but it still had its moments.

I started this past weekend with high hopes of getting a lot done.  Well in a way I did as I was cleaning some and doing laundry.  However, the weekend went downhill on Sunday.  I was so looking forward to attending the birthday party for Jackson but it was not to be.  I woke up that morning with a sore throat, congestion and a low grade fever.  Well there was no way I was going to expose everyone to my cold so I cancelled.  I do hope he had a wonderful time.  I will get to give him his present tomorrow so I still get to celebrate with him. 

I did manage to get into my craft room to make a relatively simple Thanksgiving card.  I kept it simple this time.  I have lots of ideas running around in my head but need to decided which to do first!!  So here we go with a turkey-day card.


The base card is a 5 1/2" x 8 1/2" Old Olive card stock scored at 4 1/4".  I added a layer of Cajun Craze to this.  It was cut at 4 1/8" x 5 3/8".  The final layer on top started as a 4" x 5 1/4" piece of Whisper White.


Prior to attaching the piece of Cajun Craze, I stamped some leaves along the top and bottom of the card stock.  The stamp comes from the retired set A Season of Friendship.  They are stamped on using VersaMark ink and heat embossed using clear embossing powder.  Before I go any farther I wanted to tell you that after the tree and leaves were stamped on the card I used the retired eyelet border punch to punch along the top and bottom edges of the white.  You can see it here in the photo.  I added a pearl to the top dot in each scallop.


The greeting on the front comes from another retired stamp set called Full of Blessings.  I stamped it using Cajun Craze ink onto Whisper White card stock.  I then punched it out using the small oval punch and inked the edges using a sponge and Cajun Craze ink.  It is attached to a piece of Old Olive 1/4" grosgrain ribbon (retired) using a dimensional.  I attached the ribbon to the card with runner adhesive.  Again you can see the eyelet border and the pearls along the bottom edge.   


The main image on the front is the tree.  The trunk and leaves stamps are from the retired Season of Friendship stamp set.  I started by stamping the tree trunk using Early Espresso ink onto the Whisper White cards stock.  I wanted to give my leaves fall colors so instead of using ink pads to stamp them, I used my Stampin' Up! markers.  I used the brush tip end and colored each petal on the stamp on of three colors:  Old Olive, Cajun Craze and Pumpkin Pie.  I used my stamp-a-ma-jig to help me place the leaves exactly where I wanted them.  I like the look of the tree.  I feel it represents fall and harvest time.

Well that's it for today.  I will be back again with another card to share with you soon.  Tomorrow is my day to keep Jackson and it is also my birthday so no promises to post tomorrow or Thursday.  I will see what plans my family have for me.  I do hope to have some crafting time again soon so check back each day to see if I have been creative!!  See you all later. 

Friday, November 2, 2012

A Cute Little Turkey

Happy Friday!!!  Well November is off and running.  I hope your first day was great.  I know that I shared a fish card with you yesterday but for today I am going to share a more appropriate themed card for this month.  I made one similar to this last year but have since made a few changes.  I think it is a much better version.  Let me share the card with you and see what you think.


Isn't he cute?!  Once again, the owl punch brings us another cute design.  I started this one with a base card of Soft Suede.  It was cut to be 4 1/4" x 11" and scored at 5 1/2".  I chose to add a layer of Very Vanilla cut at 4" x 5 1/4".  I love how the vanilla looks next to the suede.  I knew I wanted some sort of background on the vanilla but really did not want to use another impression folder.  So I pulled out this little stamp set I bought at a stamp convention a few years ago.  It is autumn themed and had the 2 leaf shapes as part of it.  I stamped the leaves using VersaMark ink and heat embossed them with a copper embossing powder.  I attached the layer to the suede using runner adhesive.  The rhinestones were added to the card once the turkey and greeting had been placed.


For my greeting, I used a stamp from the Teeny Tiny Wishes stamp set.  I stamped it onto vanilla card stock using the VersaMark ink and again heat embossed it using the copper embossing powder.  I punched it out using the word window punch and layered it onto a suede modern label with runner adhesive.  I added a rhinestone to each end and attached it to the card using dimensionals.


Finally we reach the turkey!!!  I used only 2 punches to make him - the owl builder and the blossom builder. For the owl, I punched the body out of Early Espresso card stock.  The eyes were made using Whisper White and Basic Black card stock.  I added white gel pen to the eyes.  The beak is Pumpkin Pie and is made using the heart from the owl punch and the gobbler (I hope that's what it is called) is a Cherry Cobbler heart from the owl punch cut in half.  

For the feathers, I used the large, thin petal from the blossom builder punch.  I chose to use Daffodil Delight, Pumpkin Pie, Cherry Cobbler and Cajun Craze card stock for the colors of the feathers.  I punched all of the pieces out and then brushed the edges of each feather using a sponge and the matching ink.  Then I used the matching Stampin' Up! marker to draw on the lines on the feathers to make them look more realistic.  Finally, I used my scissors and snipped each feather on the lines down each side.  This way I could flair the feathers again making them a little more realistic.  All pieces of the owl and feathers were attached using a liquid glue.  Once the owl turkey was made, I attached him to the card using dimensionals.  

Well once again we are at the end of the week.  I hope you all have a wonderful weekend.  I will return on Monday with another share for you.  Thanks for dropping by today and I will see you all on Monday!!!!!

Tuesday, October 23, 2012

New Friends in the New World

Happy Tuesday to you all but more importantly, HAPPY BIRTHDAY TO MY WONDERFUL HUSBAND, DAVE!!!!!!!!!  Yes today is his special day.  Unfortunately he has to work today so I do not get to spend lots of time with him but I am sure we will do lots of fun stuff once he is home. 

Every year, I feel like I do so much for Halloween and Christmas but often fall short on Thanksgiving.  So this year, I am trying to make more of an effort for this special day and not just cooking a turkey but actually making cards and decorating.  I do have an inflatable turkey that I put up in my yard every year.

Last year, I made a cute card for Thanksgiving using those cute little people you make with the owl punch.  You know the ones I usually turn into go go girls.  Well I made a boy and a girl pilgrim and put them on a card.  They are adorable but I wanted to change it up a bit for this year.  So as I was pondering what to do, I started thinking about the first Thanksgiving and how the pilgrims and Indians celebrated this day together.  Well of course I was struck quickly with the idea of turning these cute little people into Indians.  So let me share with you my card and I will go through how to make it.


I started with a base card of Daffodil Delight card stock cut at 4 1/4" x 11", scored at 5 1/2".  I then took a piece of Garden Green and Cajun Craze card stock and cut them to measure 4" x 5 1/4".  I ran the green piece through my big shot using the Top Note die.  I took the note that was cut out and put it aside for a future card.  I wanted to use the frame that it leaves behind.  I ran the frame through the big shot using the impression folder called Fancy Fan.  Next I ran the Cajun piece through the big shot using the same impression folder.  I layered the frame onto the Cajun and adhered it using runner adhesive.  If you notice, I turned the Cajun paper to the opposite side of the impression to be framed.  I apologize for the little white dot on the side of the frame.  I did not notice it when I took the photo.  It does not belong there.  It was just visiting.  Once the frame was attached to the Cajun, I attached the entire piece to the base card using runner adhesive. 


For my greeting I turned to my Teeny Tiny Wishes stamp set and stamped the greeting on Whisper White card stock using Cajun Craze ink.  It was punched out using the word window punch.  Then I punched a modern label out of Daffodil Delight and impressed it using the big shot and an impression folder called Mosaic.  I brushed the edges using More Mustard ink and then layered these together using runner adhesive and attached it to the corner using dimensionals.  


In the two bottom corners of the frame, I wanted to add a little something for decoration.  I chose to use corn.  I started by using my retired small oval punch and punched out 6 ovals.  I ran these through the big shot using the Mosaic impression folder.  Next I punched out the small petal from the blossom builder punch using Garden Green card stock.  I punched 6 of these, one for each ear of corn.  I drew on lines to give it more of a texture and then adhered the corn and leaves together into their bundles using liquid glue.  I attached them to the card using runner adhesive. 


Let's start with the boy Indian chief.  I used Crumb Cake card stock for the skin.  More Mustard, Chocolate Chip, Daffodil Delight, Real Red, and Pumpkin Pie as the color of the outfit.  Since I have made these people before, I am simply going to tell you the punches I used.  The head is the 3/4" circle; for the hair and feather band I used the 1" circle; the feathers are the small petal from the blossom builder punch; the pants, top and sleeves are from the owl builder (for the sleeves cut the vest in half lengthwise); shoes are from the owl builder as well as his hands, eyes, and nose; the neck is a piece of Crumb Cake snipped out of a l" circle ring.  I drew the zigzag on free hand using my Chocolate Chip marker and colored it in.  The mouth is also drawn on free hand as well as the lines on the feather of the head dress.  All pieces are attached using a 2 way glue pen and liquid glue.  The finished boy is attached to the card using dimensionals.


Here you can see the little Indian girl.  I used the same colors for her and basically all the same punches.   On her, I wanted to show arms and legs so I used a 1" circle ring that was punched out around a 3/4" circle hole.  For her pig tails, I punched out the owl body, cut the feet off, and turned it upside down.  I cut a section of it out of the middle giving the impression her hair is in pig tails.  The head band is simply a small strip of More Mustard which I glued on to her hair and cut any over hang off.  For the bottom of her dress, I started by punching a 1" circle out of chocolate and then punched a 1 1/4" scallop circle around the hole.  I attached the vest to it and cut off any overhang.  All pieces of her are attached together using a 2 way glue pen and liquid glue.  The finished girl is  attached to the card using dimensionals.  

Now I know I did not go over all the instructions for making these little people so if you have questions, please feel free to ask.  I know sometimes things can be confusing.  They really are simple to make once you get the hang of it.

Well I am off to work in my craft room once again.  Wonder what I should make today?  I am sure I will think of something.  I thank you for stopping by today and will be back with another share tomorrow (if you guess that it will be the card I made for my husband, you may be right - I guess you will have to return to see if you are).  Have a wonderful day and I will see you all tomorrow!!


Thursday, November 24, 2011

Happy Thanksgiving

Happy Thanksgiving everyone!!  I wish you all a wonderful day filled with family, friends, and good food.  Remember all you are thankful for today.  If you are like me, you will be watching the Macy's Thanksgiving Day Parade, football games, and cooking, cooking, cooking!!  Then comes the eating!!  I can hardly wait.  Today I am simply showing cards that were already posted but fit the day.


I wish you all a day filled with blessings.  Please come back tomorrow for a new card.  I am off to fix all the food!!  Thanks for stopping by today.


Friday, October 14, 2011

The Pilgrims Have Arrived

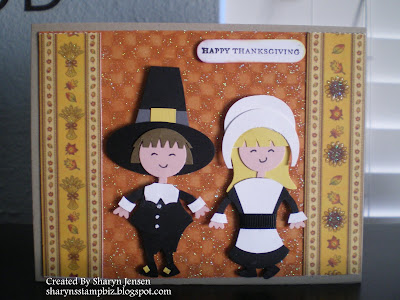
Staying in the Thanksgiving theme, I really wanted to do a card with some pilgrim people on it.  My problem was I did not know exactly what to do to make them.  So I turned to my punch art sample board for some inspiration.  I had almost given up hope when I came across my little girl who looks like she is from the 1960's.  For some reason, I could visualize taking the basic pieces of her and making them into pilgrims.  It took some trial and error attempts before I got the look I really wanted but I was pretty pleased with the results.  I will tell you the base card is Crumb Cake and the greeting is from the Teen Tiny Wishes stamp set.  All punches used are from SU! as well as the card stock for the pilgrims.  The dsp used is not a SU! product.  I got a pack of dsp at a local craft store that I loved for this holiday and used it.  So let's start by looking at the pilgrims individually.


Here is my pilgrim boy.  I actually went on the internet, found a picture of pilgrims that I liked and used it as my guide for dressing them.  The hat is the large oval and 1" square punch cut to the shape I want.  The band and buckle are scraps cut to fit.  The head is a 3/4" circle while the hair is from a 1" circle.  I punched a 3/4" circle from black and then punched the 1" circle around it.  I cut it into 4 pieces to make his legs and arms.  The top, collar of top, and pants are the vest from the owl punch.  His shoes are the small hearts from the owl builder punch.  For the buckles on the shoes, I used itty bitty pieces of Daffodil Delight.  The cuffs of the sleeves are from the ring punched around a  1" circle using the 1 1/4" circle punch in white.  You will only use a small bit of it so save the rest for another pilgrim.  The neck is again made like the arms and legs using Blushing Bride card stock.  Again save the extra for another pilgrim.  The hands are actually the feet off the owl. 


Here is the little girl pilgrim.  She is made almost the same as the boy except you will use more vests for her.  Her dress is made from 2 black vests.  The apron is also 2 white vests trimmed to fit as I chose.  I put a piece of black 1/4" grosgrain ribbon around her waist.  Her cuffs, head, bangs,hands and feet are made the same as the boy.  The back part of her hair is the owl punch turned upside down as is the bonnet.  The front piece of the bonnet is a 1 1/4" circle punched off a 1" circle hole.  In other words punch the 1" first and then using your 1 1/4" circle punch, off set it, and punch.  Trim the ends to the length you want.  

Here is the whole card put together.  I am pretty proud of these little people.  I enjoyed making them and was so excited to see it all come together.  I hope you enjoyed seeing the card too.
Well, we have reached the end of another week.  I wish you all a wonderful weekend and will return on Monday with another project to share.  Thanks for stopping in today.

Tuesday, September 20, 2011

So Sorry

This past weekend I was informed that a couple of my blogs were missing pictures.  So I logged into my blog, found the 2 cards, and reloaded the pictures.  All day Saturday and Sunday I checked to see if the pictures were still there and they were.  Then on Monday, they mysteriously disappeared again.  I truly apologize for this.  I cannot figure out what happened to them.  More than likely, I will delete both blog entries and redo them for you so that hopefully you can see the wonderful pictures. 

Now lets move on to a happier topic.  My card for today is a Happy Harvest card.  Now I know this may sound silly but every time I work with the phrase Happy Harvest, I think of the Judy Garland movie called Summer Stock.  She goes into town to get a tractor and as she drives it home, she sings a song with that phrase in it.  I have to admit it is one of my favorite movies and I love to sing along with her.  So let's look at the card now.


I used the color Always Artichoke for my base card.  There is only one layer on the card mainly because I wanted to create a scene.  I took a piece of Whisper White and using my handy pastels, I chalked the sky first and then the ground.  Again, this is my favorite way to make backgrounds for my cards.  My choice for my stamp sets for this one are Loads of Love and the Loads of Love Accessories sets.   I stamped the truck onto the background using StazOn ink.  I did this after chalking the background on.  Since I would be paper piecing the truck, I did not worry about the chalk showing through the truck.  I then stamped a tree on each side of the truck.  For my greeting I stamped it on Whisper White, edged it with Always Artichoke ink and snipped on end to make a flag type tail.  In my mind I can see a plane flying through the sky with this behind it.  So on my card you just can't see the plane.  


Here you can see my little truck.  I colored the tires with black marker knowing it would cover the chalk.  I then chose a piece of designer paper, non SU! I'm afraid.  I started by stamping the truck onto it and then cut it out.  I made sure to cut the windshield off and then cut out the window.  I adhered this to the truck frame on the card creating the cute green truck you see.  I also cut out the hubcaps for the wheels and attached them.   Grabbing a piece of scrap white card stock, I stamped the pumpkins and the lady with StazOn ink.  I then used my handy SU! markers to color them, cut them out, and adhered them to the truck to complete my picture.  Not bad if I do say so myself.

Well, I guess it is time to head into my craft room to start my next project.  I have been busily decorating my house for Halloween and need to make a few items to complete the look.  Maybe I will share these with you too.  Thanks for dropping in today and please come back tomorrow.  See you then.
 

Monday, September 19, 2011

Turkey from a Peacock?

Okay so I know that must sound a little weird.  You are probably thinking I have lost my mind.  However, let me explain what my title means.  A while back I showed you my punch samples that I display in my craft room.  One of the animals was a beautiful peacock.  He was inspired by another demonstrator and I just love him.  He is easy to make and so vivid.  Well, I was in the shower the other morning thinking about what type of card I would make for today.  My peacock came to mind but a funny thing happened.  I started thinking about taking the basic body of the peacock and changing the plumage to make a turkey.  I immediately knew what punches I would use and how I would assemble him. 


So here he is in all his glory.  For the base card I used garden green.  I took a piece of whisper white card stock to layer on it.  Using fall colors, I cut out leaves with my Leaves #2 die for the big shot.  My fall colors are cajun craze, tangerine tango, cherry cobbler, and daffodil delight.  I attached the leaves to the white and then ran it through the big shot using the Houndstooth impression folder.  I love the way the leaves become one with the base card stock by doing this.  It is such a cool technique.  I sponged the edges of this with the fall colors and attached it to the green card.


For my turkey I used all Stampin' Up! punches to make him.  His head is a 1 1/4" circle. It is attached to the body by a word window which serves as the neck.  The body is the ornament punch with the hook part cut off.  The wings come from the bird builder punch.  All of these are punched out of chocolate chip card stock.  His feet are one of the flowers from the boho blossom punch.  You need 2, one for each foot.  They are tangerine tango.  For the eyes, I turned to my handy owl builder punch.  The beach is a prong off of a star.  It is the small star punch which is retired but you can improvise by doing it free handed or use the heart from the owl builder punch.  For his gobbler (is that what it is called?) I punched a flower out using the triple layer flower punch.  When you do this, you get these nifty little pieces shaped like a raindrop left over.  I used one of these for this part and it is out of cherry cobbler paper.  That just leaves his lovely feathers.  They are all from the blossom builder punch.  I used the large petal with scallops for all of them.  They are punched out of the fall colors I mentioned above and layered on to make a lovely fan of feathers.  He is attached using dimensionals.


For the greeting, I turned to my Teeny Tiny Wishes stamp set.  I stamped the greeting on whisper white and punched it out with the word window.  I then sponged the edges using the fall colors.  It was layered onto a garden green modern label.   I attached it to the card with dimensionals.


For the inside saying, I used a stamp not from SU!.  I know I know.  How dare I stray from my wonderful SU!.  However, I love this saying and wanted to use it.  It is stamped on white, sponged with the fall colors around the edge, and attached to the green card with runner adhesive.  Pretty nice looking if you ask me.
Well, I really want to thank all of you who brought to my attention the fact that a few pictures on my blog were not showing up.  I do not know what happened.  One minute they were part of my photo album and the next they disappeared.  Last I checked they are still there now.  Please feel free to let me know anytime something like this happens.  

I wish you all a marvelous Monday.  Thanks for taking time to stop by and visit.  I will see you again tomorrow. 


Wednesday, August 31, 2011

Happy Thanksgiving Day 2

Now before I get started on the card of the day I wanted to remind you that I did state on Tuesday that I might make another card that would resemble Tuesday's card.  I did change it up in a few ways but the theme is the same.  The idea for the front of this card came from (brace yourself) my husband.  I know.   I can hardly believe it myself.    I was sharing the card from yesterday with him and he asked me a few questions about it.  As we were discussing these, an idea began to form in my tiny brain.  I jumped up out of my chair (which shocked him), ran over to my cards for sale, and found one with the right shape I knew he was indicating to me.  So this morning, I sat down and made the card.  Now he has not seen it yet because he is at work.  But I will share it with him as soon as he comes home.


For this card, I thought the top note die for the big shot would form the perfect shape.  Usually when I cut the card stock with this die, I use the center piece on my cards.  This time, I used the frame.  I cut a piece of Very Vanilla card stock cut at 4" x 5 1/4".  I centered it on the die and ran it through the big shot.  I placed the center piece to the side and took the frame with me to use on my card.  I used the same leaf stamp from the Confetti stamp set and stamped it with VersaMark ink.  I then heat embossed it using the harvest embossing powder.  I then went to my Debbie Mumm paper pack and selected another piece of designer paper to use.  I cut it at 3 7/8" x 5 3/8".  I adhered it to the back of the top note frame.  I placed both of these on to a pumpkin pie card.  

For the center greeting, I used a stamp from the retired stamp set Holiday Best.  I inked it with VersaMark ink and then pumpkin pie ink on top of that and stamped it on Very Vanilla.  By doing this, I was able to heat emboss it using the harvest embossing powder.  The pumpkin pie ink provides the rich orange color while the VersaMark allows the embossing powder to stick.  I punch it out with the Decorative Label punch and edged it with pumpkin ink.  I then punched out 2 more decorative labels in Soft Suede to make a frame for the greeting.  This was attached to the card using dimensionals.  


Once again I used the stamp from Stampabilities for the inside greeting.  I stamped it the same way as I did the one on the front.  I inked it with VersaMark and then pumpkin pie ink, stamped it on Very Vanilla, and heat embossed it with the Harvest powder.  I edged the Vanilla with the pumpkin ink.   I then cut a piece of Always Artichoke to be about a 1/4" wider on each side.  I used the leaf stamp from the Confetti set again and made a watermark of it on the piece of card stock.  Creating a watermark is easy to make.  You ink the stamp with VersaMark ink, stamp the image on the card stock, and let it dry.  That's all there is to it.  

So what do you think?  Do you like this one better than Tuesday's or do you like them equally?  I like both equally.  They are just different enough that I think both are unique and beautiful.  Leave me a comment with what you think.  I value your opinion.  

That's all for today.  Not sure what I will be working on for tomorrow.  Inspiration will come I am sure.  Thanks for stopping by today and please come by tomorrow.  See you then!
 

Tuesday, August 30, 2011

Happy Harvest Time

Well I have been posting Halloween and Christmas cards for a while now.  Since I do not want to neglect Thanksgiving, I thought I would work on a card for that today.  I mean who doesn't like Thanksgiving?  It is a wonderful time to reflect with family and friends on all the things in your life you are thankful for.  And the food!!  It has to be my favorite meal of the year and believe it or not, I actually cook the entire meal for my family.  Growing up, I watched my mom do this for years.  I guess I inherited my joy of preparing this meal from her.  Now onto the card!!


When I think of harvest time, pumpkins always come to mind along with all the colors of autumn.  I am afraid you may be a little disappointed because not all my products used on this one come from Stampin' Up!.  Now don't get me wrong, I prefer SU! items and use them whenever I can, but I do have quite a stash of other paper and stamps from my days prior to SU!.  The base card is always artichoke from SU!.  The first layer is very vanilla as well as the piece the pumpkins are stamped on.  The layer under the pumpkins is soft suede, and the pumpkins and the inside greeting are stamped using the pumpkin pie ink.  I used the SU! markers to color the pumpkins, and the ink to edge the paper.  The leaves on the first layer of vanilla are from the Confetti stamp set. They are stamped using the VersaMark ink pad and then heat embossed.  These are all the SU! products I used on the card.

The embossing powder I used on this is called Harvest and is one I picked up at a stamp convention a few years ago.  I also used it on the leaves of the pumpkins.  The designer paper is from a Debbie Mumm paper pack I got years ago at one of the local craft stores.  As for the pumpkin stamp, it is another item I picked up at a stamp convention.  It is made by Denami Design.  


Here is a closer look at the little pumpkins.  I stamped the image using pumpkin pie ink.  Using my SU! markers, I traced the vines with garden green, colored the stems with soft suede, and colored the pumpkin with pumpkin pie.  For the leaves, I used my VersaMark marker to color them in, sprinkled the Harvest embossing powder and heat embossed it.  

The inside greeting is a stamp I picked up on clearance at a craft store.  It is made by Stampabilities.  I don't know about you, but for me finding stamps with good verses on them is always a challenge.  So when I come across one I tend to pick it up.  I have been known to make my own verses by either typing them into the computer to print out or by handwriting them myself.  I love to receive handwritten greeting sometimes.  In many ways it feels like it was written especially for me and that makes it a little more sentimental.  In scrapbooks, I love to include my own handwriting knowing that down the road future family will be able to see what my handwriting looked like and know that the sentiment expressed was truly my own.  
Tomorrow, I will post another Thanksgiving card made with similar products as this one.  However, the overall look will be a little different.  I hope you enjoyed this card and are inspired to be creative today.  Thanks for dropping by and I will see you tomorrow.


Tuesday, July 12, 2011

It's Turkey Time

As I was looking through the pictures of cards I have been sharing with all of you.  I saw the white kitty dressed as a witch for Halloween and my stain glass Christmas designs.  I had all sorts of card but no Thanksgiving.  Now how can I pass by a day that celebrates all our blessings, all we are thankful for, and all that great food!! 

So I decide to change that by making a Thanksgiving card.  I found a cool turkey stamp that I had and went to work.  Now my glittering fingers were itching to use all that sparkly stuff.  So what better way to do that then by making my turkey a stain glass turkey!!  I must say I was thrilled with my revelation.   So I found colors of glitter that would work well for fall and set to work.


Isn't he cute in his top hat?  As you can see, I used a chocolate brown, sand, and 2 harvest colors of glitter for his body.  The base card is a green called Always Artichoke ( I love the names Stampin' Up! gives their papers and inks!!).  The layer on top of it is Cajan Craze.  I ran it through the big shot using a new Houndstooth impression folder from the 2011-2012 Idea Book and Catalog.  The turkey is on acetate and is attached to a square of whisper white using glue dots and a nice corner punch (not from SU!, sorry).  


Here is a little closer look at Mr. Turkey.  I know it is difficult to see all the colors and details on him.  Let me assure you in person, he looks magnificent!  I did sponge the edges of the square with Cajun Craze ink just to allow it to blend in subtly with the background.  


This is the inside of the card.  This is a greeting stamp I found on clearance on day in my local craft store.  Because the outside of the card has so much shimmer to it, I wanted to bring a little of that inside too.  I used a harvest blend of glittery embossing powder and heat embossed it.  First, I stamped it with VersaMark ink on whisper white card stock.  Next, sprinkle your embossing powder over the stamped area of the paper.  Shake of the excess and use your heat tool to bring the powder to life.  I used the ticket corner punch for the corners of the whisper white and inked the edges with Cajun Craze ink.  It is layered on a piece of Cajun Craze card stock.  

All in all, I am pleased with the turn out of the entire card.  I cannot wait to make more.  Let me know what you think by leaving me a comment.  Don't forget to stop by my store to see what's new.  Thanks for dropping by today.  See you tomorrow!