CARDS FOR SALE

Most cards you see on this site are available for purchase. Simply click the Pay Now button at the bottom of the post of an available card to purchase the card. You will be linked to PayPal for payment. It will come up as "greensnaggletooth@cox.net" which is the name of my internet company. Price is $5.00 unless otherwise stated and includes shipping. Your card will come with an envelope also. Email me with any questions or requests at: sharynsstampbiz@gmail.com
Thanks for taking a look at my creations!!

Showing posts with label watercolor. Show all posts

Monday, July 9, 2012

Poor Little Penguin

Happy Monday everyone.  I hope you all had a wonderful weekend.  I spent part of mine working on ideas for my Christmas cards!  Yes it is once again time to plan and start working on those.  I have to admit, I have not sent many out in the last 2 years.  When my brother passed away, I kind of gave up on everything for a while.  It has taken me until this year to feel really motivated to make and celebrate anything to do with the holidays.  But before I could work on any ideas, I had to make a get well card for my husband's charity he is in charge of so I wanted to share it with you.


I started with a base card of Elegant Eggplant cut at 5 1/2" x 8 1/2", scored at 4 1/4".  I added a layer of Whisper White which was cut to be the length of the card and trimmed one edge with the retired eyelet border punch.  I then added a layer of a designer series paper I picked up at a craft store making it once again the length of the card and edging it with the retired eyelet border punch.  The layers were all attached to the base using a runner adhesive.  


For the focal point of the card front, I started with a piece of Whisper White card stock measuring 2 1/2" x 3 3/4".  I pulled out a Stampin' Up! stamp set which is from years ago and therefore is retired to use for this one.  I do not know the name of this set as it was given to me used and the name was not on it.  I just call it my get well penguin set.  I stamped the saying using Basic Black ink onto the top part of the card stock and then stamped the penguin using StazOn ink on the bottom half.  I used the StazOn because I wanted to water color my penguin and needed an ink that dried quickly and would not smear.  I pulled out Pumpkin Pie, Daffodil Delight, Elegant Eggplant, Melon Mambo and Tempting Turquoise ink pads.  Using my blender pens, I colored in the areas of the design I wanted to add a little color too.  Once this was completed and dry, I edged the white with the eggplant ink and attached it to the card using runner adhesive.


For the inside, I stuck with the same stamp set.  I started by stamping the saying in Basic Black on Whisper White card stock, cut it down to a size I liked and adhered it using runner adhesive.  Next I stamped the band-aid using the retired Creamy Caramel ink onto retired Creamy Caramel card stock.  I cut the band-aid out and used my Real Red marker to color in the heart.  You can use the Crumb Cake card stock and ink for this.  It works well too.

Well that is all for today.  I am off to ponder Christmas cards once again.  I promise to share some of my ideas with you along my journey and to keep making other cards as well.  I will be back tomorrow with another card to share.  Until then, thanks for dropping by today!!


Friday, May 25, 2012

Another Card For Dad

Happy Friday Everyone!!

Hard to believe we have reached the end of another week, and we are heading into a holiday weekend!!  Now if you think about it, in my life one daughter works for AAA which is open holidays and one works in retail which is open holidays.  My husband being a firefighter sometimes will be scheduled on holidays.  So really you would think I would not be excited about this.  However, at least my hubby is off this year so we get to spend some time together.  Due to that fact, I will not be posting on Monday.  I hope all of you will be too busy having fun to miss the post.  I will be back Tuesday though.  With that said, let's get on with the share of today.

  I wanted to continue with the theme of Father's Day.  Like I shared yesterday, I think masculine cards are the most difficult so if wanted to give you another idea.  So let me show you what I came up with to show.


I went with a dark color scheme.  For some reason those colors just seem manly to me.  I used Cherry Cobbler for the base card.  It is cut at 5 1/2" x 8 1/2", scored at 4 1/4".  Once it was scored and folded, I pulled out the retired stamp set called Voila to Go.  I took out the hot dog stamp and stamped it all over the front of the card with VersaMark ink.  I then heat embossed it with clear embossing powder.  

I took a piece of Basic Black card stock measuring 4" x 5 1/4" and ran it through my big shot using the Top Note die.  Once the shape was cut out, I ran it through again using the impression folder called Houndstooth.  I knew I wanted to use this vertically on the card so I added an antique looking brad and added one to each side.  It is adhered to the card using runner adhesive.  


For my image, I turned to the retired stamp set King of the Grill.  I remember when this set came out.  I thought it was perfect for many of the men in my life who want to be kings of the grill.  I started with a piece of Whisper White card stock.  I chalked a sky background over the entire piece.  I then used StazOn ink to stamp my image onto the piece.  I used my aqua painters and ink pads to watercolor the image and the ground.  This helped to make him stand out against the background.  Once it was dry,  I attached it the the top note using runner adhesive.  


You can really see the embossed hot dogs in this picture.  They really turned out nice.  The greeting for the front of the card is also from the King of the Grill stamp set.  I stamped it on Whisper White using Cherry Cobbler ink and punched it out with the word window punch.  I then sponged the edges of it with the Cherry ink.  I used a scrap of Basic Black to punch out a modern label.  I layered the saying onto it using runner adhesive and attached the greeting to the card using the same runner adhesive.


For the inside greeting, I used another retired stamp set called Eight Great Greetings.  This is really a card that showcases a lot of retired stamps.  I stamped it on Whisper White with Cherry Cobbler ink and layered it onto a piece of Basic Black using runner adhesive.  I then attached the entire saying with runner adhesive to the card.

While you would have to use other stamps unless you happen to have these, I think this is a doable design for a card.  I may stick with this theme for some of next week but am not sure right now.  I will have to see what inspired me.  

Remember I will not be posting on Monday but will return Tuesday with something new to show you.  I wish you all a wonderful Memorial Day weekend.  Please be safe this weekend.  I want to see all of you back here on Tuesday.  Thanks for stopping by today.  Happy Stamping!!


Tuesday, November 1, 2011

Do You Recognize This Guy?

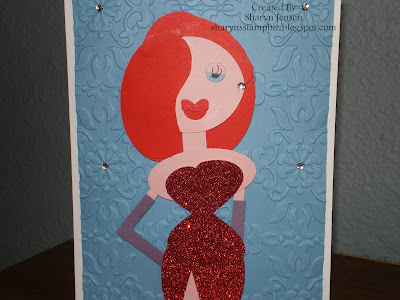
A few months ago, I posted a card with a punch art Jessica Rabbit on my blog.  I had a thought of how to make her and decided to give it a try.  Let me show you the card again before we go on.


The idea of which punches to use was pretty easy.  I remember in that post saying I wanted to try to make Roger Rabbit at some time.  Well, the time has finally come.  Now I was a little nervous to do him because he is one character with a lot of personality.  I am hoping you will leave me feedback so that I will know what you think of him.  So let's start with the star of the card himself.


Well, what do you think?  For a first attempt I thought it was pretty good.  The colors of card stock  used are whisper white, real red, pacific point, marina mist, bashful blue, daffodil delight, pumpkin pie and pretty in pink.  I am going list the punches I used to make him because it will be easier:
Ears - word window; ; punch in white and then punch only 3/4 of a word window on the card stock edge horizontally in red;  I then cut them at an angle after I layered the red on white and adhered them together so I could bend the ears; add a small piece of pink to highlight the ears
Hair - blossom builder punch; cut small piece out to make it look like hair
Head - Retired small oval; you could use the new small oval and trim it so it is not so wide
Cheeks -  wide heart from the heart to heart punch; cut in half and angle them out
Eyes - owl builder; you will need to trim the large and medium circles to layer them together; use the small circles just as they are
Nose - punched corner of card stock using the word window; trim to shape you want;  it is layered on a word window that I punched then reinserted  and punched again to make it shorter; then trim it to smaller size if you want
Tooth - piece of scrap paper
Tongue - small heart punch
Bowtie - smallest heart on the heart to heart punch with medium circle from the owl builder in the center; dots are the smallest circle of the owl builder
Arms - heart to heart punch; use the hole made when you punched the one for the cheeks; offset punch from where you punched the cheeks out and punch for an arm then repeat to make second arm
Hands - boho blossom punch; I trimmed the flower to form the wrist
Feet -  small oval punch punched on edge of card stock; repeat for second foot
Body/Overalls - petite pennant punch; punch one in red and one in white; I used the one with scalloped edges and trimmed the scallops off; with the white one, I trimmed it so it would fit behind the red but stick up above the red just a little for his body as well as a place to attach the cheeks; you will need to cut the top off the red one about 1/4" for the overalls
Overall Straps -  retired horizontal slot punch and owl builder punch; use scraps of red if you do not have the slot punch; buttons are the small circles from the owl builder

As for the black dots in his eyes, his eyebrows, the whiskers, and the separation of toes, fingers, and pants, I used a fine tip black marker.  I also added highlights with a white gel pen to his ears, eyes, nose and buttons.  To make sure Roger stood out on the card, I adhered him to a piece of basic black card stock.  I then trimmed around him to add that highlight look to him.  He is then attached to the card using dimensionals.


The greeting I chose is from the stamp set Curly Cute.  I used my SU! markers to color the letters so I could get the rainbow effect.  It is stamped on whisper white and edged with pacific point ink.  I then layered it on basic black and used my 1" square punch to punch the ends of the black.  I also curled it using a pen so in person it looks wavy.  


The base card for this one is done with pacific point.  The layer on top is whisper white and has been run through the big shot using a non-SU! impression folder.  I like the grouping of the circles.  I chose to watercolor them using my blender pens and a variety of colors (daffodil delight, real red, pacific point, marina mist, pumpkin pie, melon mambo, garden green and wisteria wonder).  I love the completed look of this one.  

Please leave me some feedback to let me know what you think of this one.  I really want to know your thoughts.  I look forward to reading your comments.

Thanks for stopping by today and please come back tomorrow!!


Friday, October 28, 2011

A Special Day

Hello everyone.  We have reached the end of another week.  But today is a special day, a sad day for me and my family.  You see today marks the 1 year anniversary of my brother's death.  Not a day goes by that I do not think about him and miss him terribly.  It was my honor to be at his side during the last 16 months of his life and help to care for him.  He was truly the best big brother a girl could ever have.  I have always been told that anniversaries like these become less painful as the years go on.  Not this year.  The feelings are still as real as when it happened and my heart is broken knowing he is no longer here.  I should have known it would be like this.  After all, my mom passed away 4 years ago and I miss her every single day. 

My share for today is unique because I had my brother in mind when I made it.  It is just a card front which means there is no back panel.  I make this type of card to usually trade with other card makers.  This one is going in my sample book and will be around for me to view whenever I want to. 


My color scheme for this card is Whisper White and Bashful Blue.  Now these are important colors in my family.  Being from North Carolina, we are truly UNC Tarheels fans.  My brother went to UNC and followed the basketball team every year.  He was a fanatic about March Madness and charted the teams as they advanced to the playoffs.  I enjoyed watching some of the games with him.  He was an expert in the game and is the reason why I like basketball games today.  I embossed the white card stock using the big shot and the impression folder Elegant Bouquet and then watercolored the flowers and greenery.  I used Garden Green ink, Daffodil Delight ink, Bashful Blue ink and my blender pens to do the coloring.  I like the soft look of the card.  The clouds were punched out of Bashful Blue card stock using the Cupcake builder punch.  It is the top of the cupcake, but don't you agree that it makes a wonderful cloud?!


The stamp comes from the set Ain't Love Grand.  When I chose the balloon stamp, I did it with a purpose.  You see today around 5:30 pm Arizona time, my brother's children and grandchildren will be releasing balloons with messages on them.  I felt the "sending love your way" saying was truly appropriate.  I know I will be sending loving thoughts his way.  I chose to color the balloon in a rainbow fashion as well as the hearts for a specific reason too.  You see we were taught from the time we were little that rainbows represented God's promise to all of us.  During my brother's illness, rainbows were a sign that God was watching and was with us.  My brother and the entire family knew that no matter what the outcome, God would be there.  It was truly amazing how many friends and family members would send pictures of rainbows to my brother and his wife.  I know I did.  On Wednesday afternoon this week, we happened to have a little bit of rain here.  I decided to walk out into the back yard when it had stopped and was amazed to see not a single, but a double rainbow.  I had been thinking of my brother and knew it was a sign that God is still with me and is caring for my brother.  What a comforting thought that is.

If you live in the Phoenix or Anthem area, be sure to meet at the Anthem park this Saturday for Hands Across Anthem.  All proceeds will be going to help a young girl who has stage 4 lung and bone cancer.  I hope lots of people will come and help this family out.  

Have a wonderful weekend and I will see you Monday!!  Don't forget to get your candy for all the trick or treaters that night.  Monday is Halloween.  Wonder what I will make to show you.  Be sure to stop by to see.  Thanks for stopping in today.

Monday, May 2, 2011

Rainy Day Fun

One of the down sides to living in Arizona, especially Phoenix, is we do not get a lot of rainy days.  Personally, I love rainy days.  I enjoy the sound of the rain on my rooftop, and the rhythm of the rain coming down.  Whenever we travel in our RV, I always hope for a rainy day because the rain really makes a cool sound on the RV roof.  Silly I know but when most of your year if filled with beautiful, sunny days, you learn to appreciate the rain.

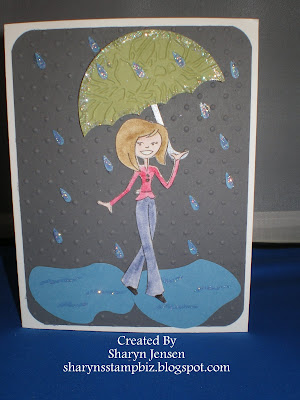
Last Friday I shared with you the new triple punches offered in the Summer Mini from Stampin' Up!.  When I shared the Blossom punch, I told you I would show you a way to use the pieces left when you punch the triple setting and the petals are actually punched out.  The shape you are left with is a teardrop.  Now I had used Marina Mist, and when I looked at those pieces, they reminded me of rain.


This card immediately popped into my head.  I knew the Totally Tess stamp set would be fun to use.  This was a simple card to make and was also time friendly as it went together very quickly.  Let me show you a closer look at Tess and those raindrops.

It only seemed fitting to watercolor Tess since she is walking in the rain.  I did add glitter to this card.  I could not help myself.  The umbrella is trimmed in it, the puddles have a little, and of course, those cute raindrops received a little too.  By the way, if you are wondering how I made the puddles, I used the wide oval punch, punched out 2 of them, and then took my paper snips (scissors) and trimmed them to look like puddles.  
This was the first idea I had for using those little pieces.  I am currently working on several cards and ideas, including other ways to put these small pieces to work.  I really love it when I can use every scrap I have.  

I want to thank all my friends who came to the Crop Party I held this past Saturday.  I had such a good time seeing everyone and crafting the day away.  It is always fun to be with friends.  I hope you all had as wonderful of a weekend as I did.

Let me know if you need a Summer Mini catalog and I will get one for you.  Please email me if you have any questions or leave me a comment.  I would love to hear from you.  Thanks for stopping by today, and I'll see you tomorrow.

Thursday, April 28, 2011

More Sneak Peeks

Today I wanted to continue to share some more items from the Summer Mini Catalog which goes live on Sunday, May 1st.  I found so many cute items in it.  I had a hard time deciding which ones to order.  So I decided as far as stamps, I would stick with one theme: summer fun.

Yesterday I shared the surf boards from the Summer Splash set.  Today, lets take a look at another stamp set called Sunny Fun.  This set contains 5 stamps: 2 sayings and 3 summer theme stamps (flip flops, frozen treats, and tubing children).  I chose to work with the tubing children for today mainly because it reminds me of my family.  My husband and oldest daughter, Heather, love to go tubing down the Salt Lake River.  Heather and her friends seem to go almost every year.  My husband not as much, but he loves it.  So this reminded me of them.


Of course, in reality the only child in this group who is positioned right to tube the river is the first boy with star glasses.  The river is not deep enough for the other ways.  Don't they just look like they are having the best time?  This stamp made me smile when I saw it.  The little saying "fun in the sun!" is one of the sayings from this stamp set.  I used  Marina Mist for my base card, with a layer of Crumb Cake on top of it.  I ran the Crumb Cake through my crimper to give it some texture before adhering it.  The kids are trimmed with Cajun Craze which had been punched on each side with the Scallop Edge Border punch.  The flowers are also from a new punch in the Summer Mini.  They are punched in Daffodil Delight, Marina Mist, and Pear Pizzazz.  I bet you might be wondering what the new punch is called.  Well, I am going to leave that for tomorrow.  It is a really cool punch and does so much.  It is one of 2 of this new type and I will share both tomorrow.  Now lets look at how I colored the kiddos.


I decided to go to one of my favorite ways to add color to bring this stamp to life:  watercoloring.  Now there are several ways you can do this:  you can use the watercolor crayons or pencils, use the aqua painters with your ink pads, or use the blender pens with your ink pads.  My prefered method is the blender pens.  To start, you stamp the image in Staz-On ink so there will be no bleeding when the water touches it.  I realize the paper resembles the Very Vanilla cardstock which I did use to stamp the saying on, but it is actually Watercolor Paper.  You can use regular cardstock to do this method.  I simply like the high quality of the watercolor paper and the final look you get with it.  Now the thing that probably surprises you the most about this card is the fact that there is no glitter on it!  Can you believe it?  I will have to rethink this design.  I am sure glitter would fit in somewhere!  All the supplies for this card are from Stampin' Up!, including the brads.  I love their products!!
Tomorrow I will show you the new punches.  I hope you enjoyed this card today.  With temperatures in the 90's we here in Arizona are all ready to play in the pool!  Thanks for coming by today.