CARDS FOR SALE

Most cards you see on this site are available for purchase. Simply click the Pay Now button at the bottom of the post of an available card to purchase the card. You will be linked to PayPal for payment. It will come up as "greensnaggletooth@cox.net" which is the name of my internet company. Price is $5.00 unless otherwise stated and includes shipping. Your card will come with an envelope also. Email me with any questions or requests at: sharynsstampbiz@gmail.com
Thanks for taking a look at my creations!!

Showing posts with label birthday. Show all posts

Monday, January 6, 2014

It's A New Year!!!!!!!!

Hi everyone and happy new year to you!!!!  I hope you all had a wonderful holiday season.

I must say this was a very special Christmas for us.  Our youngest daughter, Kaitlyn, was proposed to on Christmas morning by her boyfriend, Robert.  I am happy to say she accepted his proposal.  She has already started the wedding planning.  While no date is set yet, she is working to ensure the details will be exactly what she wants.  I could not be more happy for her.  Robert is a wonderful young man and we are looking forward to having him as a son-in-law.

Our oldest daughter, Heather, also had wonderful news to share with us.  She has gone back to school and made a 4.0 gpa for this past semester!  She received a formal letter of congratulations from the school.  We are so proud of her achievement!!

As promised, I am going to share with you a birthday card I made for Robert's birthday.  I took lots of photos of this card and am going to share it with you for a few days in order to break down the components.  Now as I am typing this for you, I am also preparing to begin keeping my nephew once again as his mommy goes back to teaching.  I am going to try to get 2 to 3 blogs in per week so it may take a week or so to show you all the components of this card.  Let's begin, shall we.


I think last year was my year for tri-fold cards.  I made quite a few of them for my relatives.  This one has to be one of my favorites.  I love the Minions and since Robert is a fan of the Avengers, I chose to pair them together in this awesome card.  The color scheme I went with is Real Red, Night of Navy and Whisper White.  To start this card, you will need a 5 1/2" x 12" piece of red card stock.  You will need to score it from top to bottom at 2", 4", 8" and 10".  Then you will turn it lengthwise.  You will measure 1 1/2" from each side and mark it on the 2" score line and the 10" score line.  Using a ruler to help you, take your craft knife an cut from the 2" to the 10" line.  This is what creates the panels for you to fold.  The panels were made using the navy and white card stock.  I measure the panels one by one and then cut my card stock.  The panels were run through my big shot using the honeycomb textured impression folder.  Panels are attached with runner adhesive.  


Here's a top view of the card.  I love how this one looks when it is open.  Whoever came up with this nifty fold is a genius!!


Here is a flat view of the card.  I forgot to take a photo of it folded up but I think that's okay.  I know I took folded ones of some of the other tri-fold cards.   

In my next blog, I will share the words on the cards and one of the Minion characters with you.  I hope you will return to see them.  Thanks for stopping by today and I hope you will continue to visit with me throughout this year.   See you next time!!!!

Wednesday, September 25, 2013

Happy Birthday to my Sweet Heather!!!!

Today I am celebrating my daughter Heather's birthday.  She is turning 25.  I can hardly believe it.  Where does the time go?  I hope she has a wonderful day and spends it laughing and doing things she loves.

Well by now you probably have been wondering if I fell off the Earth completely.  I entered the month of September with high hopes of crafting and blogging.  I had no idea what was waiting around the corner.  I ended up coming down with a throat virus.  Now I have had sore throats over the years but nothing like this one.  It felt like someone had taken sand paper and scratched my throat all up.  Since it was a virus, there was nothing the doctors could do to help.  It kept me in bed for a while and the overall tiredness was horrible.  Then my hubby got a sinus infection.  He has suffered with sinus problems all his life and has had 4 surgeries on his sinuses over the years.  When he gets sick with an infection he really gets sick.  The first round of antibiotics did nothing to help.  He is currently taking a second round and we are hoping for the best. 

While all the illness was going on, I did manage to do a couple of special order cards and of course the birthday card I made for my daughter.  Therefore, I am happy to say I am going to be sharing these with you finally.


Since her favorite Disney princess is Cinderella, I decided to make a card with her dress on it.  I started with a base card of Daffodil Delight cut at 5 1/2" x 8 1/2", scored at 4 1/4".  I added a layer of Night of Navy measuring 4 1/8" x 5 3/8" using runner adhesive.  For the final layer I used a piece of Whisper White cut to be 4" x 5 1/4".  I ran this through my big shot using the Beautifully Brocade impression folder.  Once it was impressed, I attached it using the same runner adhesive.


To begin the dress, I first cut out a dress mannequin using Basic Gray and the dress up framelits set.  Now I wanted to get as close as I could to the color of Cinderella's dress.  I chose to use the retired Bashful Blue card stock to make it.  I cut a dress using the same framelits set.  I cut out the one with the little sleeves.  I attached it to the dress form using runner adhesive.  Next I used the retired build a blossom punch and punched out 2 of the smallest petals.  I added those at the top of the dress with the tips meeting in the middle.  I then punched out two 3/4" circles and two 1/2" circles.  I flattened one side of the 1/2" circles and attached them to the back of the 3/4" circles using a 2 way glue pen.  I then attached the 3/4" circle to the dress with the same 2 way glue pen to make the sleeves.  Pearls for the necklace and blue rhinestones at the center of the dress top complete the look.


The bottom half of the dress is made using the retired build a blossom punch and the wide oval punch.  You will also need to use the oval framelits set for the inside piece of the skirt.  I first cut the oval using the framelits out of Bashful Blue and vellum.  I glued the vellum to the blue using a glue stick.  I attached this to the bottom portion of the dress and built the rest of the skirt onto it.  I punched out 10 wide ovals.  4 of them are layered across the bottom of the dress.  The other 6 makes up the sides of the skirt.  I started at the bottom and went up being sure to have the top 2 meet in the middle.  I added the small wide petals to this to form the waist. Again I added blue rhinestones to the waist of the dress to enhance it.  

I will tell you that I started this dress by punching all my pieces and sponging the edges using Bashful Blue ink.  It gives the dress a depth but is not necessary.  I attached all the skirt pieces using runner adhesive.  The completed dress is attached to the card using dimensionals. 


The greeting for this comes from the Create A Cupcake stamp set.  I stamped it using Night of Navy ink onto Whisper White card stock.  I punched it out using the word window punch.  I layered this onto a Night of Navy modern label punch using runner adhesive.  I added a blue rhinestone to the ends of the greeting as well as one to the letter "i".  The completed greeting is attached using dimensionals.  

Once I had the greeting and the dress attached, I sprayed the card lightly with my champagne shimmer spray.  You can kind of see the sparkle to the dress in the photos.  I also added blue rhinestones to the white background of the card.  

I truly appreciate your patience and the fact that you have continued to come by to see if I am breathing or not.  I have started a new schedule with my favorite little man, Jackson, and will be seeing him several times a week while mommy and daddy are at work.  I cannot promise to post every day but I am hoping to post more than once a week.  

Thanks again for stopping by to visit.  I will have another post up on Friday so drop in to see it.  See you all later!

Monday, September 9, 2013

Why Are Weekends So Busy????

Hi everyone and happy Monday.  I hope you had a relaxing weekend.  If it was like mine, you were busy but still did some fun things.  I spent the first part of mine working on tickets for the charity banquet my hubby is hosting at the end of this month.  These tickets are for the VIP's who will be attending.  I also spent some time with my sister who has been super busy lately.  It was so nice to see her and have lunch with her.  Sunday was my mother in law's birthday.  We went to lunch with her and had a chance to just visit and catch up.  Sometimes you really just need that time to talk and catch up.  Life goes by so fast.


Since the tickets took up most of my time, I thought I would show you what they look like.


The bottom layer is a 2 1/2" x 6" piece of Night of Navy card stock.  I added a 2 1/4" x 5 3/4" layer of Real Red to this.  The top layer is a 2" x 5 1/2" piece of Whisper White.  I punched the 4 corners of each piece with my ticket corner punch and attached them together using runner adhesive.  I added the logo for the charity which was punched out using the decorative label punch and framed with the same punch to the ticket.  I cut the letters for ADMIT 2 out using my Cricut machine and a Storybook cartridge.  The rest of the information I wrote by hand using the Night of Navy and Real Red markers.  Usually I would print this info out on my printer but my printer decided not to work so I improvised.   All in all I think they turned out fairly nice.


This is the card I gave my mother in law for her birthday.  I have posted it before so I will not bore you with the details again.

Well that's it for today.  Thanks for stopping by to visit.  Be sure to come back and see what I have next.  See you all later!


Friday, September 6, 2013

The Owl League Strikes Again!!

It's Friday!!!!!!  For me, Friday's are also my afternoons with Jackson.  I just love spending time with him. 

The card I am sharing today is one I made for my daughter's boyfriend's birthday.  I don't like to post these until after they are delivered to the person so that's why it is being posted now.  Anyway, let's get started. 


I started with a base card of Read Red card stock cut at 5 1/2" x 8 1/2", scored by 4 1/4".   I added a layer of Basic Black card stock to this with runner adhesive.  The  black was cut at 4 1/8" x 5 1/4".  I then added a layer of Night of Navy card stock cut at 4" x 5".  I ran this through the big shot using the star impression folder.  Once it was embossed, I attached it to the base card with runner adhesive.


The sunburst look of the background was made using a scrap piece of Sahara Sand (not visible) cut at 2 3/4" x 5".  This served as the base the sunburst would be built on top of for the card.  I took strips of Real Red and Whisper White card stock which measured 1 1/2" x 4" and embossed them using impression folders and the big shot.  The red were embossed with the houndstooth impression folder and the white were embossed with the argyle impression folder.  Once embossed, I cut each of these strips diagonally using my paper cutter.  I took the piece of Sahara Sand and marked the center of it with a pencil on each side.  I then layered the strips of embossed red and white onto this using a glue stick.  Be sure to cover your corners of the sahara and once all pieces are attached, trim off the excess that overhangs the sides.  This finished sunburst was then attached to the piece of navy on the card using runner adhesive.


The black strip that goes across the card where the sunburst and card meet is a 3/4" x 5" piece.  I attached it using runner adhesive.  The greeting is from the stamp set Teeny Tiny Wishes.  I stamped it using Night of Navy ink onto Whisper White and punched it out using the retired small oval punch.  It is layered onto a large oval punch from Real Red card stock with runner adhesive.  The finished greeting is attached to the card using dimensionals.


All the characters on here were made using the owl builder punch.  I will introduce each one and list colors used for them.  This first one is Spider Owl.  I used Real Red, Pacific Point, Whisper White and Basic Black card stock for this guy.  The spider web and spider were drawn on by hand using a fine tip black marker.  


Next we have Super Owl.  I used Pacific Point, Real Red, Basic Black, Whisper White and Daffodil Delights card stock to make him.  His hair is an owl vest cut down.  The emblem on his chest was hand cut by me and the letter "s" was drawn on using a red fine tip marker.  I also added white get pen to his eyes.  The black lines on the belt were made using the fine tip black marker.


Last but not least we have Bat Owl.  To make him, I used Basic Black, Whisper White, Daffodil Delight and Basic Gray card stock.  I did use one extra punch on this one.   I used my handheld 1/8" circle puch to make the openings for the eyes in the mask.  For his emblem, I drew the bat by hand with a fine tip black marker and cut out the oval with by hand also.  I added lines to the belt with the black fine tip marker too.  

All pieces of each character were adhered together using a 2 way glue pen.  Once complete, the characters were attached to the card using dimensionals.

I hope you enjoyed my card today.  I wish you all a wonderful weekend.  Stop by next week to see what I have to share with you.  Thanks for dropping by today!!

Tuesday, August 27, 2013

1st Birthday Already!!!!!!

Hi everyone.  We are ending the month of August with great speed and September will be here in just a few days.  In our family, we have several birthdays in the month of September.  There's mine, my oldest daughter's, my nephew named Daniel, my mother in law, my brother Chris, my aunt and our newest family member Jackson.  Yes little Jackson will be turning 1 on September 2nd.  It is hard to remember our family without him as a part of it but it is just as hard to believe that he is turning 1 already.  We will be celebrating his birthday with him on the first.  I can hardly wait. 

My daughter and I went shopping for his presents this past weekend.  His mom asked that instead of cards which tend to get tossed aside that we all bring him a book instead.  I was so excited to shop for books for him.  I love to read and think it is great that his mom is already teaching him about the joy of reading.  Now being a card enthusiast, this was also kind of hard for me.  So instead of a card I decided I would make a tag for his present.  Ready to see what I made?  Here we go!!!!


It's Elmo!!!!!  One of our favorite shows to watch when Jackson comes over is Sesame Street.  He loves Elmo.  So I thought this cute little guy would be perfect for a tag.  Of course I also got wrapping paper that will go with it.  It started as a piece of Pacific Point cut at 5 1/2" x 5 1/2".  Yes that is a bit large for a tag but Elmo's head had to fit!


For the "Happy Birthday" down the side of the tag, I used an alphabet stamp set that I have.  I stamped the letters using VersaMark ink and then heat embossed it using Gumball Green embossing powder.  While you can see it on the tag, it did not show up in the photo as well as it could have.  


To make his name, I used my big shot and an alphabet set of sizzlit dies.  I cut all the letters out of Basic Black and Gumball Green card stock.  This alphabet set has a shadow piece to go with each letter which helps those letters to stand out.  I attached the green letters to the black using a 2 way glue pen.  The finished letters were attached to the card using the same 2 way glue pen.  I added dots of a blue glitter glue to the attached letters.


Now for the star of the tag.  To make his face, I started by sketching on a piece of white paper.  I did this for a while until I was finally happy.  I then cut out the shape to use as a template.   I traced this onto my Real Red card stock and cut it out.  Next, I used a Sharpie marker and drew the mouth onto the face.  The eyes were made using Whisper White and Basic Black card stock.  I punched out 2 white circles using the 1 3/4" circle punch.  Next I punched 2 black circles using the 3/4" punch.  Using the 2 way glue pen, I added black glitter to the black of the eyes.  I then attached the white to the face with a liquid glue and then attached the black with the same liquid glue.  For the nose, I chose Tangerine Tango card stock.  I punched out a 1 3/4" circle and trimmed the sides down to make it more of an oval.  Now I could have used the large oval for this but when I tried it, the nose was too long.  I could have just cut off and rounded an end of it but the circle seemed easier to me.  I added orange glitter to it with the 2 way glue pen and attached it to the card with liquid glue.  

I added dots of glitter glue all around the letters and the face using a blue and a green glitter glue.  It just completed the look.  

I hope my niece and her husband get a kick out of the tag.  I do believe she is scrapbooking Jackson's life and the tag could be used an the scrapbook page if she would like to use it.  I can't wait until the party!!!!

That is all I have for you today.  I will return with another share so please stop by to visit again!!  See you later!!

Monday, June 24, 2013

Should A Birthday Card Ever Be Despicable?

Hi everyone and happy Monday.  I hope you all had a nice weekend.  I tried to get a bit of rest myself.  I woke up Saturday feeling a little bit odd.  I felt feverish and like I was coming down with something.  I decided to rest as much as possible so that I hopefully would not get sick.  Thankfully I feel better now.

As for my question about the birthday cards, my answer is yes.  In fact I made my sister's birthday card a bit despicable.  Want to see it?  Here we go.


How's this for despicable?  Yes it's the minions from Despicable Me.  I am so excited to go see the second one coming out next month.  I really think the minions are hysterical.  But let's talk about the card shall we?

I started with a piece of Daffodil Delight cut at 5" x 10", scored at 5",  I ran this through the big shot using the largest framelit from the floral framelits set.  As you can see, the top two petals are flat.  This is where I kept the fold of the card off the framelit so that it would not be cut all the way through.  I then added a second layer using the 2nd largest framelit from that set.  I made this one out of Night of Navy.  I actually cut 2 of these.  The other one is used inside the card. (You will see that in a minute.)  To add sparkle and decoration to the front  I added some blue and yellow rhinestones to the flower points.  The minions themselves are on another flower cut using the 2nd smallest framelit from the floral set.  I cut these 2 out of Whisper White card stock.  I ran these through the big shot using the cloudy day impression folder.  I then edged both of these using Daffodil Delight and Night of Navy ink with my sponges.  Both the navy and white layers are attached using runner adhesive. 


Here is my first minion.  Since both were made using the same punches, I will just describe the process once.  The only difference is that this one has only one eye while the other has two.


Here the second minion.  To make these guys, you will need the following:

card stock:  Daffodil Delight, Night of Navy, Basic Black, Whisper White and Shimmery Silver
punches:  owl builder, 1/4" and 1/2" circle punches
accessories:  2 way glue pen, fine tip black marker and white gel pen

Now I used the retired horizontal slot punch for the straps of the overall but you can just use a scrap of card stock to make these.  I used a scrap of daffodil to make the arms.  The finished minions are attached to the card using dimensionals.  I am not spending a lot of time going through every step because they are kind of self explanatory.  However, if you have questions please contact me.


For the inside of the card, I put the 2nd navy flower in here using runner adhesive.  I then used a birthday stamp I have and stamped the greeting onto Whisper White.  Using the 3rd largest flower from the framelits set to cut this out.  I sponged the edges with the daffodil and navy ink.  I used my colored pencils and colored in the greeting.  Once colored, I attached it using the runner adhesive also.  I added pearls to the navy and the same blue and yellow rhinestones to the white that were used on the front.  

Well that's all I have for today.  I hope you enjoyed this card.  I had a lot of fun making it and my sister loved it.  I will do my best to come up with something cute to share for tomorrow.  I do hope you drop in to see me then.  Thanks for stopping by today!!! 

Shipping Location

Monday, June 10, 2013

Playing Dress Up Once Again

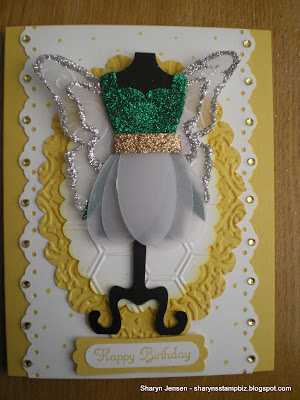
HAPPY 21st BIRTHDAY KAITLYN!!!!!!!

Hi everyone and happy Monday.  Well today is the day.  It's my daughter's 21st birthday.  It's hard to believe 21 years have gone by so fast.  I am tremendously proud of the young woman she has become.  She is absolutely wonderful.

Now even though today is her actual birthday, I will not be spending it with her.  Instead, we are going to spend the entire day Wednesday celebrating with her and her boyfriend.  Of course, that means that I cannot share her card with you just yet.  So I decided to go with another Disney star and share her dress, well kind of a dress.  Since she is actually a fairy, I am not sure if her outfit is a dress or not.  Oh well. Here we go.


I started with a base card of Daffodil Delight cut at 5 1/2" x 8 1/2", scored at 4 1/4".  To this base I added a piece of Whisper White.  It is cut at 4 1/4" x 5 1/2".  I then used my eyelet lace punch to punch each side of the white.  It is attached to the center of the card front using runner adhesive.  I then added dots to the front of this using the Daffodil Delight marker.  I also added small yellow rhinestones to the center hole of each eyelet scallop.  


To begin the dress, I first used my dress up framelits and cut out the dress form from Basic Black.  Next, I took a piece of Garden Green card stock and cut out the sundress using the same framelits.  I cut the dress short using my scissors.  I then added green glitter to the entire dress using my 2 way glue pen.  I then took a piece of vellum paper and punched out 5 large ovals.  I cut a strip off of a piece of Champagne shimmer card stock for the belt and glued the ovals to it.  This was then attached to the dress as the belt.  Finally I cut out the butterfly wings from vellum paper using my big shot and the beautiful butterflies die.  I ran these through the big shot using a swirl impression folder and then edged them with silver glitter.  The glitter is attached using TomBow glue.  I set these aside to dry and worked on the background.

I started by taking out a set of scallop oval framelits I have and cut one out of Daffodil Delight and one size smaller out of Whisper White.  I ran each of these through the big shot using a couple of impression folders - the daffodil went through using an oval shaped folder while the white used the honeycomb folder.  I attached both the ovals to the card using runner adhesive.

By now the wings were dry so I attached them to the back of the dress form using glue dots.  I added dimensionals to the back of the dress form and attached it to the card.    


Finally it was time to add the greeting.  I used my Create a Cupcake stamp set and stamped the greeting using Daffodil Delight ink onto Whisper White card stock.  I punched this out using the word window.  I then punched a modern label out of Daffodil Delight card stock.  I attached the white greeting to it using runner adhesive and attached the entire greeting to the card using dimensionals.

Now I am off to finish a few things for my daughter's birthday.  I am not sure if I will share her card with you on Wednesday or Thursday but it will be one of those.  I just want her to see it first.  

I hope your week if off to a wonderful start.  I am so glad you stopped by to see me today.  I will be back tomorrow with another share for you.  Thanks for visiting.  
 

Tuesday, April 23, 2013

Another Punch Art Friend

Happy Tuesday everyone!!!!  My week was off to a jump start yesterday, literally!  My daughter's boyfriend called in need of a jump start for his car.  So I was out the door before 7 am.  Once his car started, I headed home but made a few stops first.  A trip to the gas station, the grocery store, Target and the bank were in order and I figured I might as well take care of all of them while I was out.  I did manage to get back home before 10 so I felt really good.  Have you ever noticed that when you get home from the grocery store there is always work to do?  I cleaned all the produce and put all the groceries away and then had to take out trash and start laundry.  I was exhausted but still wanted to work on a card. 

The card I worked on was an easy one to make because it is patterned after a card I made last week.  Do you remember Mario from last week?  Well when my daughter came over and saw him she thought he was too cute and said I needed to make a Luigi to go with him.  That's exactly what I did!!


I started with a base card of Crumb Cake cut at 5 1/2" x 8 1/2", scored at 4 1/4".  I added a layer of Blushing Bride which is retired (but might reappear again soon!!) to the top of the Crumb Cake.  It is cut at 4" x 5 1/4" and attached using runner adhesive.  


To make the hat portion, I used Whisper White and Garden Green card stock.  I cut a piece of green to measure 2 1/2" x 4" and adhered it to the top of the Blushing Bride using runner adhesive.  I used the retired decorative strip called Billboard and cut out the letter "L".  It is adhered to a white 1 1/4" circle using liquid glue.  The circle is then adhered to the hat with runner adhesive.  The brim of the hat is the 3rd smallest oval from the oval framelits collection.  I cut it out using the big shot and then cut it a little larger than half.  I attached a large oval with the greeting on it to the brim with runner adhesive.  The greeting is from the retired Stamp Set called King of the Grill.  It is stamped in Garden Green ink.  Once it was attached to the brim, I attached the brim to the hat with dimensionals.


To make the face, I used Whisper White, Basic Black, Pacific Point and retired Blushing Bride card stock.  The eyes were made using the wide oval for the white, the large oval for the pacific and the retired small oval for the black.  I layered these together using runner adhesive and attached the completed eyes to the face with the same adhesive.  The moustache was made using the wide oval punch.  I punched 2 of these ovals, ran then through the big shot using the woodgrain impression folder and cut each one to be a little larger than half.  They are attached to the face with runner adhesive.  The nose is a wide oval and is attached using dimensionals.  I added a bit of white gel pen to the nose and eyes for looks.  I also sponged the edges of the nose with Blushing Bride ink for depth.


Here are the brother together.  The main difference other than the letter on their hats and the color of the hats is the moustaches.   Mario has a wavy one which is why I used 2 sizes of circle to make it while Luigi has a pretty straight one.  The wide oval worked really well for his.  

Well that's it for today.  Wonder what I should make for tomorrow?  I guess I had better get to thinking about that so I can get to work.  I hope you all have a terrific day and will come by to visit with me tomorrow.  Thanks for dropping by today!!

Friday, April 19, 2013

A Video Game Friend

Hi everyone and it's Friday!!!!!!!!  We have reached the end of another week.  I will be taking my sister to her doctor this afternoon for her follow up appointment.  When they did the surgery, they only put a half cast on her foot to allow for any swelling that would occur.  Today, they will remove that cast and put her in a full cast.  I hope it will be easier for her to move around.


Today is my day to spend the entire morning with little Jackson.  I was thinking about him yesterday when I sat down to make my card for today.  I really was thinking how I need to get more boy themed cards to have on hand.  I remembered a card I found on Pinterest a few weeks ago made by Leena Girsa.  I decided to give it a try myself so let me show you the card.


Now for any of you out there who love video games or have children who love video games I am sure your recognize Mario.  My daughters still play video games with him in them.  I started with a 5 1/2" x 8 1/2" Pacific Point piece of card stock.  I scored it at 4 1/4".  I then cut a piece of the retired Blushing Bride (which by the way will be making a come back soon) cut at 4" x 5 1/4".  This would be the first layer of my card and serve as the main part of the face.  It is attached with runner adhesive.  I added a 2 1/2" x 4" piece of Real Red card stock to the top for the hat.  It is also attached with runner adhesive.   I punched a 1 1/4" circle from Whisper White and attached it at the top of the hat with runner adhesive also.  Next I used the retired Billboard decorative strip die and cut out a red "M" to put on the circle.  The hat brim was made using the Oval framelits collection.  I used the third smallest oval and cut it in half (actually it is a little bigger than half).  I added a white large oval with the greeting stamped on it.  The greeting is from the Teeny Tiny Wishes stamp set and is stamped in Real Red ink.  The oval is attached to the brim using runner adhesive and the brim piece is attached to the hat with dimensionals.


Mario does have beautiful eyes doesn't he?  I used Whisper White wide ovals, Pacific Point large ovals, and Basic Black retired small ovals to make these.  They are layered together with runner adhesive and attached to the card using the same adhesive.  I added a little white gel pen to the eyes.


The nose is made using the wide oval punch and Blushing Bride card stock.  It is attached to the card using dimensionals (do this after the mustache is attached).  The mustache is Basic Black card stock.  I punched out a 1 1/4" circle and a 1 3/4" circle from this.  I cut these in half and ran them through the big shot using the woodgrain impression folder to add texture.  The circles are layered together and attached to the card with runner adhesive.

To be fair, I encourage you to check out Leena's site by clicking here .  Her's is really cool.  I am pretty proud of how mine turned out too.

Well that's it for today.  I am going to catch up on the inside of some of my cards this weekend but do plan on making something to share on Monday.  I wish you all a wonderful weekend.  I will see you Monday.  Thanks for dropping by today to visit!!!!!!

Wednesday, April 17, 2013

Owl Punch Strikes Again?!!!!

Hi everyone and welcome to Wednesday.  My sister is doing pretty well.  Once the numbing medication wore off, she experienced a little more pain (okay so it was a lot) but luckily, we were able to somewhat control it with her pain medication.  The only bad thing about the medicine is it makes her super tired and itchy.  She takes a benedryl to help with the itchiness but that makes her more tired.  Basically, she just needs a lot of rest and naps.  Good thing the move for my daughter happened last week and not this week.

My card I made to share with you today is one that uses the wonderful owl punch once again.  It's funny but when I went into my craft room and saw this punch, I knew I had to use it.  I guess it had been too long since I used it last.  Anyway, let me show you the card and we'll get started.


The base card for this one is Melon Mambo card stock measuring 4 1/4" x 11".  I scored it at 5 1/2".  I added a layer of 4" x 5 1/4" Whisper White.  I ran this through my big shot using the music note impression folder and sponged the edges with Daffodil Delight ink.  I attached it to the card using runner adhesive.


For my greeting, I used an alphabet stamp set and scrap pieces of Daffodil Delight, Melon Mambo and Tempting Turquoise.  I stamped the letters using VersaMark ink and heat embossed them with black embossing powder.  I made sure when I stamped the letters that I did it in the pattern I wanted to use.  Once the heat embossing was done I punched the letters out using my 1/2" circle punch.  I attached them to the card using dimensionals.  


For my character on this card, I wanted to make a little chef.  Now I have made chef guy several times and I thought it was time to make chef girl this time.  The only punch used to create her is the owl builder punch.   I used Whisper White, Melon Mambo, Basic Black and Early Espresso card stock to make her.  The chef hat, jacket, pants and face are the vest from the punch.  the back of the hair is the owl body minus the feet.  I used the feet to make the bangs on the chef.  The arms and feet are the heart from the punch, and the eyes and nose are the smallest circle from it.   I used a fine tip black marker to add the flap and buttons to the jacket as well as the dots in the eyes.  The mouth is drawn on using a fine tip magenta marker.  I added circles to the pants and hats using the smallest circle from the owl punch and then added glitter glue to the dots to make them sparkle.  All pieces were assembled using liquid glue and the finished chef is attached to the card using dimensionals.


The only other punch used on this card is the cupcake builder punch.  I used all my glittery card stocks on this one.  Now the frosting is Shimmer White card stock.  I added dots of Melon Mambo and Tempting Turquoise.  Once they were attached I added glitter glue to them for some shine.  the candle is the Champagne Glimmer card stock with a Daffodil Delight flame.  I did add glitter glue to this flame also.  The cherry is Red Glimmer card stock and the cup is Silver Glimmer card stock.  All pieces of this were adhered together with liquid glue and the finished cupcake is attached using dimensionals.  I added some of the glitter glue to the background just for a little more shine.

Well I am off to help my sister again.  I want to be sure she takes her meds and gets a good nap today.  I do plan on crafting though so stop by tomorrow to see what I make.  Thanks for dropping by today!!

Tuesday, April 2, 2013

Yes I Am Really Back Today!!!!!!

Hi everybody.  Welcome to Tuesday and to the month of April and a great big HAPPY BIRTHDAY AUNT BARBARA!!!!!!!!  I wish you a day of happiness and a year full of joy!!!

  I hope your April Fool's Day was a good one and that no one played any mean jokes on you.  I cannot believe that Easter has come and gone already.  Did you get lots of nice treats from the Easter Bunny?  We had a really quiet Easter at my home.  Both my girls went to their grandmother's so it was just the hubby and me at the house.  That was probably a good thing since I still felt run down from the nasty old flu.  We played games and watched Easter Parade (one of my all time favorite movies!).  Our dinner was grilled ham and 4 cheese sandwiches made by yours truly.  I enjoyed the quiet and time with my hubby as I knew April was beginning to stack up with things to do.  I hope to find a little down time but who knows!

The card I made to share with you today is a very simple one.  I think that is why I like it so much.  It takes a minimum amount of time to make and is cute.  Let me show you the card and we will get started. 


Circles, circles everywhere!!  I love the circles don't you.  We will as always begin at the beginning.  I started with a base card of Melon Mambo measuring 5 1/2" x 8 1/2", scored at 4 1/4".  I added a layer of Elegant Eggplant cut at 4" x 5 1/4" to this using runner adhesive.  The top layer is a piece of 3 3/4" x 5" Whisper White that was attached after being decorated and embossed with the runner adhesive.


The greeting for this one is from the stamp set called Pretty Petites.  This set was part of the Sale-a-bration catalog and is no longer available.  I stamped it using Melon Mambo ink onto Whisper White card stock and punched it out using the small curly label punch.  Next I punched out a regular curly label in Basic Black.  I layered the white onto the black with runner adhesive.  I added a rhinestone to the candle and pearls around the edges of the black.  It is attached to the card using dimensionals.


To make the white front for the card, start by cutting the white to 3 3/4" x 5".  Set this piece aside while you prepare all you circles to attach to it.  I grabbed scrap pieces of Melon Mambo, Elegant Eggplant, Tempting Turquoise, Old Olive and Daffodil Delight card stock.  I then grabbed my 1 1/4", 1" and 3/4" circle punches.  Punch one of each size out of each of the colors.  Place them randomly on your white card stock and attach them using runner adhesive.   Once you have attached all your circles down, trim off any excess that hangs over the sides of the white.  Finally run the piece through your big shot using an impression folder.  I chose to use the Honeycomb folder for mine.  I attached this to the card with runner adhesive and added rhinestones to each circle.  

Easy don't you think?  I made this card while waiting for our exterminator to come spray the house.  I knew I would be out all afternoon but this was a card that could be accomplished in a small amount of time.  

Well that's it for today.  I hope you all have a wonderful day and come back to see me tomorrow.  Thanks for dropping in today!!

Tuesday, March 19, 2013

New Big Shot Toys

Happy Tuesday everyone.  I hope you week is off to a good start.  It is one of those weeks where my hubby has to work a lot so I am missing spending time with him.  I guess I will just have to craft more to fill the void.

I ordered a new set of dies for the big shot last week from Stampin' Up!.  I had looked at these in the Spring catalog for  a couple of months and just could not decide if I wanted to order them or not.  Then I happened to come across a how to video about these dies and watched it.  It showed me how to use these as they are and how to use them for other types of projects.  I was so excited about the products, I could not wait to order them.  Today's card is a sample of using the dies as they are designed to use without really changing anything.  Ready to see  it?


Here you can see the front of the card.  I used a base card of Primrose Petals card stock cut at 4 1/4" x 11", scored at 5 1/2".  Prior to folding it on the score line, I ran it through the big shot using the new Card Base Pop n' Cuts die.  This die is unique in that it has an open area where you can insert another die to create something special.  I will show that in a minute.  It also cuts the rounded design on the edge of on end and the slits on the edge of the other.  This allows you to tuck in the flaps which holds the card closed.  I added a layer to the front in Whisper White.  I cut this to be 4" x 4 1/2".  I ran it through the big shot using the Lacy Brocade impression folder and attached it with runner adhesive.  I then added a layer of Baja Breeze to this measuring 3 5/8" x 4 1/8".  This piece was put through the big shot using the Cloudy Day impression folder.  I colored in the clouds using a white colored pencil.  It was then attached to the base card with runner adhesive.


For the center piece of the front, I used a couple of stamp sets from Stampin' Up!.  The first is the Four Seasons which is a hostess set.  I stamped the large floral image onto a piece of Whisper White using So Saffron ink and punched it out using the 2 3/8" scallop circle.  I then used the set called A Fitting Occasion and stamped the circle saying in Baja Breeze.  I then stamped the scissor image from the same set in the center of the circle of words using Primrose Petal ink.  I then punched this out with the 1" circle punch.  I attached it to the center of the floral image with runner adhesive.  The finished design is attached to the card with dimensionals.


I wanted to show you a close up of the edge.  This photo allows you to see the curve in the edge that is created by the die as well as the slits that the corners slide into for closure.  


My inside greeting is a simple one.  I stamped this saying from the stamp set called Perfect Punches onto Whisper White card stock using the Primrose ink and punched it out using the wide oval punch.  It is attached to the inside using runner adhesive.


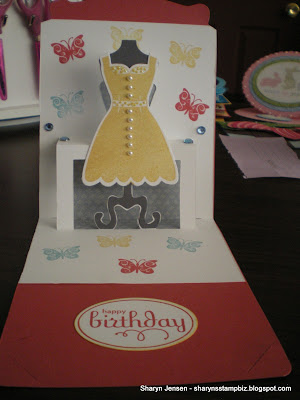
Here is what makes this die so fabulous - it can be used to make a pop up card.  I took a 5 1/2" x 8 1/2" piece of Whisper White card stock and set it aside to run through my big shot.  I then grabbed the Pop n' Cuts die and placed the Dress Form die inside the opening.  I placed the white sheet on top and ran it through the big shot.  It cut out the pop up dress form for me to use.  I took a butterfly stamp from the Four Seasons stamp set and stamped it randomly on this piece using the Saffron, Baja and Primrose ink.  I folded the score lines to make the dress for stand up.  I took a piece of retired designer series paper and cut it at 4" x 6".  I attached this to the back of my white pop up so the color would show through the openings in the white.  It is attached using runner adhesive.  I then trimmed the top of the white piece to fit like I wanted it to fit, added the runner adhesive to the back and attached it to the base card.  

The really neat thing about this set is there is a coordinating set of framelits and a stamp set to use with this.  So I took a piece of Basic Gray and using the framelits, I cut out a dress stand.  I attached it to the white piece using my 2 way glue pen.  Next I used the All Dressed Up stamp set and stamped my dress in So Saffron ink onto Whisper White.  I used the matching dress framelit and cut out the dress.  I added pearls to the buttons and a little yellow glitter to the top and belt of the dress.  It is adhered to the form with runner adhesive.  A couple of blue rhinestones added to the table finished it off.


Here is the side view of this card so you can see the pop up clearly.


Finally here is the card opened up completely.  If you have made pop up cards before, you will appreciate the slits that hold the card closed.

I do want to show you a step by step tutorial on this card.  I think it may be a lot of steps and I will probably split it into 2 days.  On day one, we will make the basic card and pop up insert.  Day 2 will focus on decorating your dress form.  I have an idea for a dress to go inside for a special occasion so maybe I will try it with you.  

I am so glad you stopped by today to visit.  I hope you come back tomorrow and see me again.  I am not sure I will have the tutorial by then but we will see what happens.  Thanks for dropping in!!!

Monday, March 18, 2013

Another Easel Card For A Boy

Happy Monday to you all!!  I hope you had a wonderful weekend and a happy St. Patrick's Day.  I seemed to have a busy weekend.  It always seems to be busier than I expect but at least it was fun.   I did take a few minutes to craft something for you.

I had one more of my Tempting Turquoise easel cards left and I decided to complete it.  I did not decorate this one as much as some of the other ones but it is still cute. 


This is a photo of the card flatten to go into the envelope.  As you can see it is the oval easel card I made last week on the tutorial.  I did not want any of these to go to waste so I decided to use them.  


The card was themed to be for a boy.  That is one of the main reasons I did not over embellish it.  I used a stamp set called Dinoroar from Stampin' Up!  I love this set.  I wanted to do the stain glass technique on this so the dinosaurs are stamped onto acetate using StazOn Black Ink.  I then selected my glitter colors and using a liquid glue that dries clear, I added the glitter to the dinosaurs starting with my darkest color and working towards the lightest one.  I then took a piece of Whisper White card stock and used the second largest oval from the oval collection of framelits to cut an oval out.  I then used the same oval framelit on a piece of Basic Black card stock.  This time I placed the oval on it and then placed the third largest one inside of it so it would cut out a ring.  I used a little chalk on the white oval to add a hint of blue and stamped the word "roar" on it with Pacific Point ink.  I then attached the acetate to the black ring with runner adhesive and attached that to the white oval with the same runner adhesive.  The completed oval was attached to the card with runner adhesive.  


The greeting for the inside is also from the Dinoroar stamp set.  I stamped it in Pacific Point ink onto Whisper White card stock.  I cut it out using one of the framelits from the Apothecary framelits set.  Now I knew the framelit I was cutting it out with was a little too big so I trimmed it down.  I then sponged the edges with the Pacific Point ink.  I attached it to the inside of the card using dimensionals so that I would hold the easel up when the card is opened.


Finally here is the card all set up.  These dinosaurs just make me smile.  I hope you have enjoyed seeing these cards and I hope I have not bored you with them.  I shall be back tomorrow with another card to share with you all so please come back by to see me.  Thanks for dropping in today!!