CARDS FOR SALE

Most cards you see on this site are available for purchase. Simply click the Pay Now button at the bottom of the post of an available card to purchase the card. You will be linked to PayPal for payment. It will come up as "greensnaggletooth@cox.net" which is the name of my internet company. Price is $5.00 unless otherwise stated and includes shipping. Your card will come with an envelope also. Email me with any questions or requests at: sharynsstampbiz@gmail.com
Thanks for taking a look at my creations!!

Showing posts with label triple layer punch. Show all posts

Tuesday, July 17, 2012

Another Phineas and Ferb Character

Happy Tuesday to you all!!  I am happy to report my internet is working very well and I actually have a card to show you today.  It is really hard to be upset about the internet going in and out when it rains because we do not get a lot of rain here and it is a very welcomed thing as far as I am concerned.  I was just sad I could not get my photos uploaded so I could share with you yesterday.  But today is a new day and I my photos uploaded just like they should.  I am ready to get started so let's go.

A couple of weeks ago, I posted a card featuring Phineas from the Disney cartoon Phineas and Ferb.  I have been wanting to work on some of the other characters but had not taken time to do so.  Well I rectified that this weekend.  I took out my stickers of the characters and one jumped right out at me as if to say "pick me pick me".  So I did.  Anyway, let me show you the card and introduce the character.


This is Isabella.  She has a huge crush on Phineas and yet he never seems to understand that.  Oh well, we are here to talk about the card aren't we?  I started with a base card of Melon Mambo cut at 5 1/2" x 8 1/2", scored at 4 1/4".  I only added one layer to the front of this card.  It is a piece of Whisper White cut at 4" x 5".  I took scrap pieces of Tempting Turquoise, Melon Mambo, Tangerine Tango, Daffodil Delight, and Gumball Green and punched out 1", 3/4" and 1/2" circles.  I added them to the piece of Whisper White using a runner adhesive.  I then punched out music notes in the same colors and added them using a liquid glue.  Once all pieces were secured onto the white, I ran it through my big shot using my Spots & Dots impression folder.  I then attached the finished piece to the base card using runner adhesive.  The pattern on it reminded me of those psychedelic colors associated with the 60's.  On one of the episode of Phineas and Ferb, these colors are used and Isabella gets frizzy hair.  It is one of my favorite episodes and when I was thinking of her and what to make as her base card, this idea came to mind first.  


The greeting is from the stamp set Curly Cute and is stamped using Melon Mambo ink onto Whisper White card stock.  I cut it out by hand and layered it onto a scrap piece of Basic Black.  I cut it out free hand once more making sure I left the black border showing.  I added a couple of music notes with liquid glue and added the finished greeting to the card with dimensionals.  


Now onto the star!!  Isabella is one of my own creations.  I have not seen her made as punch art before but she was actually fairly simple to make.  I used retired Blushing Bride, Melon Mambo, Basic Black, Rose Red and Whisper White as my card stock colors.  Let me list the punches I used:

Hair - wide oval punch cut flat on one end
Bangs - 1/2" circle cut in half
Bow - 1/4" circle punch and prongs off of a star punch in the Merry Minis punch pack that will be available in the Holiday Catalog beginning August 1st.
Face - 1" circle cut flat on one side
Eyes - itty bitty punch pack circle trimmed down for the white and the tear drop throw aways from the retired blossom bouquet triple layer punch for the black
Neck - 1/2" of a word window punch; I punched it along the edge of the card stock
Shirt - 1/2" circle cut flat on one side and a word window punched along the edge of the card stock and cut in 1/2 for the sleeves
Jumper - retired horizontal slot for the straps and a large oval trimmed for the dress
Belt - scrap of Rose Red card stock and the itty bitty punch pack circle for the buckle
Arms and Legs - word windows punched along the edge of the card stock
Socks - word window punched along the edge of the card stock and trimmed for length I wanted
Shoes - little labels punch pack - I used the one that looks like the decorative label; I trimmed them for look

I drew her nose and mouth on with a fine tip black marker and added white gel to the eyes and shoes.  All pieces were assembled together using a liquid glue and the finished Isabella was attached to the card using dimensionals.  She is just too cute!

I want to thank you for your understanding yesterday and for stopping by to see what I came up with today. I hope you enjoyed the card.  Please come back tomorrow to see what I come up with next.  Until the, be creative and let your imagination run wild.  See you all tomorrow.

Wednesday, April 11, 2012

Same Man Different Job

I have really been on a punch art kick this week and my owl punch has become my best friend.  I made those cute little chefs using it and loved the result.  So when I was in the shower, it came to me -  why not use the same basic pattern for a man but give him a different profession.  Of course a few things would need to be tweaked but overall I felt pretty confident I could pull this off.  All I needed to do was choose the profession.  Well that was easy for me.  I chose to do my favorite husband's job - a fireman.  So are you ready to see the result?  Here we go. 


I had a lot of fun making this card.  I started with a base card of Pacific Point card stock measuring 4 1/4" x 11", scored at 5 1/2".  Using my beautiful pastels, I chalked a sky background onto a piece of Whisper White card stock cut at 4" x 5 1/4".  A torn strip of Wild Wasabi card stock serves as the grass area.  I adhered it to the white with runner adhesive and then adhered the white to the pacific using runner adhesive again.  Now let's move on to the really fun stuff!!


To make the fireman, you use the owl punch most of the time.  The owl vest makes the face, the jacket, the sleeves, the pants, and the back of the helmet.  The heart of the owl makes the hands.  I trimmed one side to make the thumb of each hand.  For the feet, I used the smallest heart on the heart to heart punch.  The small oval made the top of the hat while the word window is the brim.  I free hand drew the shield on the helmet and cut it out.  The nose is the circle from the owl and the mustache is a 1/2" circle punched around the itty bitty circle punch hole.  The hair is the owl's feet.  I chose to make the fireman suit out of So Saffron.  I used Basic Black, Whisper White and Blushing Bride as the other colors.  I attached him to the card using dimensionals.

Since you can see the hose I may as well go ahead and explain it.  I used Soft Suede as the main hose color.  I punched a 1 3/8" circle out and then punched a 1 3/4" circle around it.  I ended up using 2 1/2 circles to complete my hose.  I bent the paper to make the folds in it.  For the nozzle, I used a piece of brushed gold for one end and then added a strip of brushed silver for the rest of the nozzle with a horizontal slot piece for the end. (The horizontal slot punch is retired.  A small strip would work too.)  For the water coming out, I punched a modern label out of Pacific Point card stock.  I cut one end off and trimmed it down to be the size I wanted and to have the taper look I wanted.  I turned to my blossom bouquet triple layer punch and punched a few flowers out of the pacific card stock so I could use the inner petal pieces as the spray of water.  The hose and spray were attached using a liquid glue.   


Here you can really see the spray.  I had a lot of fun making this one! The fireman had to have a reason to be there so I made him a little fire.  I punched petals out from the blossom petal builder punch.  I used Daffodil Delight card stock for this and dabbed some Tangerine Tango ink onto each petal with my sponge dauber.  The logs for my fire are just small strips of Chocolate Chip card stock.  For the puffs of smoke, I used the small scallop flower punch from the itty bitty punch pack and Basic Gray card stock.  

This is a card I would use to send to a boy for a special day.  I did not use glitter on this one.  I did not feel the card needed it.  I know can you believe I said that?  Knowing how my husband feels about glitter it just seemed like the right choice.  

I really love to work with my punches.  I cannot wait to see what I can make next.  I am so glad you decided to stop by today.  I hope you enjoyed my little fireman.  Please come back by tomorrow.  I promise to come up with another share.  Thanks for looking today and I will see you tomorrow.


Thursday, February 23, 2012

Another Wedding Card

My daughter has a friend who is getting married soon and came to ask me to make a wedding card.  So I thought why not share it with you too.  After all, I love sharing my creations and hope you enjoy seeing them.  So let's get started working on this now.


I spent quite a bit of time trying to decide my color scheme for this one.  I decided to start with a Shimmer White card stock base.  I cut it at 4 1/4" x 11", scored at 5 1/2".  I then added a layer of Basic Black card stock measuring 4 1/8" x 5 3/8".  I then took a piece of Brushed Silver card stock measuring 4" x 5 1/4" and ran it through the big shot using the Vintage Wallpaper impression folder.  I love the elegant look you get from this.  I then layered all 3 of these together using runner adhesive.  For the main design on top, I turned to my handy Blossom Bouquet Triple Layer Punch.  I punched flowers in Shimmer White and Basic Black.  Using the outer ring of the flower, I created this interlocking pattern to lay on the silver.  I used a liquid glue to adhere these together and to then lay them onto the silver.  


Here is a closer look at the interlocking flower rings as well as the flowers themselves.  I added a few white flowers into some black rings and some black flowers into white rings.  I adhered them with a glue dot in the center of the flower and liquid glue on the rest of the back.  I wanted to be sure they stayed put.  I then took out a pack of black and white pearls that I have and added white pearls to the black flowers and black pearls to the white flowers to make the centers really pop.  I liked the simple elegant look of the finished card.  But because she is my daughter, she decided she wanted some glitter added to it.  (Guess I raised her right!)


I chose to use my Stickles glitter glue in Silver to do the glittering of this one.  I was concerned that if I used the glue and loose glitter, it might get into areas I did not want.  This was a nice way to add just one color of glitter to the card and not worry about the clean look of it.  

So what do you think?  My daughter is out right now and has not seen the final product so I will have to let you know if she liked it or not.  Tomorrow, I am going back to more Easter punch art.  I can't wait to share this one with you!!  It is so cute!

Thanks for dropping by today and visiting.  Please come back tomorrow.  I will see you then!!


Wednesday, February 22, 2012

Splish Splash

I am working on several Easter cards right now hoping to teach a punch art class featuring these.  So I will have at least two more to share with you this week.  Hopefully I will be able to schedule a class in March.  It has been a while since I had one here and I am looking forward to doing it again. 

Today's card features a critter who would love to go Splish Splash.  This design actually came to me in the shower so I guess it really fits the title.  This is also a card that could be for Easter or just for a spring time card for a birthday or whatever.  So let's get started.


Now I hope you can recognize that this is a duck.  I could not help myself with this little guy.  He is just too cute to me.  My base card is Tangerine Tango card stock cut at 5 1/2" x 8 1/2", scored at 4 1/4".   The first layer on top of that is a Basic Black piece of card stock cut at 4 1/8" x 5 3/8".   Next I cut a piece of Whisper White at 4" x 5 1/4".  I used my pastels to chalk a sky with a gray chalk.  Using a scrap piece of Soft Suede and tore a couple of pieces to use as the ground.  I attached them using runner adhesive and then added dazzling diamond glitter to the edges.  For my puddles, I used a scrap of Pacific Point card stock and punched out 2 wide ovals.  I trimmed them to a shape I like, adhered them with runner adhesive and of course added some glitter.  To make my water drops, I turned to the Blossom Bouquet Triple Layer Punch.  When you punch out the flower, you get these perfect tear drop shaped pieces that work wonderfully for the drops of water.  I saved the flowers for another time.  These were made out of Pacific Point.  I used a liquid glue to adhere them and again turned to my glitter to embellish them.  


I turned to my handy big shot and my Billboard sizzlit decorative strip die.  I cut these out of Basic Black card stock, adhered them with liquid adhesive and then added black glitter to them.  Next time I would add the glitter to the letters first.  I feel it would have a much cleaner look.


Now for the duck.  I used Daffodil Delight, Tangerine Tango, Basic Black, Whisper White, and Pacific Point card stock on him.  His head and body are made using the ornament punch.  His hair is the small flower from the boho blossom punch.  His bill is a large oval punch and his eyes come from the owl builder punch.  I used the largest circles from it for the white and used the medium ones for the blue and black part of the eyes.  For the tail, I attached the medium heart from the heart to heart punch.  His wings are a 1 3/4" scallop circle punch cut in half.  For his little feet, I started by punching 1 3/4" scallop circles.  I then used a large oval punch and traced it to get the size foot I wanted.  I cut them out and added them to him.  I also cut an extra one to use as a template in the future.  White gel pen was used to highlight certain areas.

Well we have once again made it to Wednesday.  I wish all of you a wonderful day and thank you so much for stopping by.  I hope you come back tomorrow.  See you then.
 

Monday, October 17, 2011

Santa's Helper

Happy Monday.  We are off to a new week.  I am going to pray for one with no illness and no migraine!!  I hope everyone had a great weekend.  My sister and I attended a shopping extravaganza this weekend to raise money for charities.  We had a lot of fun even though we did not buy much.  It was for a good cause and since my husband was involved with it I wanted to go to show my support. 

While I was at home the other day, I sat in my craft room looking at all the Halloween lights we have in the house and found myself dreaming of my Christmas decorations.  My daughter and I even bought a couple of ornaments the other day.  Remember, Christmas is my favorite holiday.  I get so excited to decorate and celebrate the birth of Jesus.  So as I was day dreaming about all I love about Christmas, I decided I would make another card with that theme. 

This one was inspired by a couple of cards I saw online a few weeks ago.  I did not remember the sites they were on or who did them, but the concept stuck with me.  I pulled out all my punches and set to work.  Here is what I came up with:


The design and full view of the elf is my own idea.  I do know that the punches used were inspired by the pictures I saw online.  Let's start at the beginning of the card.  The base card is Cherry Cobbler.  On top of it is a layer of Soft Suede that has been run through the big shot using the Snow Burst impression folder.  The present is from a scrap of left over dsp from a few years ago so it is not available any more.  The current paper is cute and would work too.  The ribbon on the front of the present says "Let It Snow" and is one I picked up at a local craft store a few years ago.  The bow on the present is the Silver Glimmer paper currently available in the Holiday Mini Catalog. (I hope they keep it around after the catalog expires!!)  It was punched out using the Blossom Bouquet Triple Layer Punch.  Now for the elf.

I used quite a few punches on him.  His face is the ornament punch with the top cut off.  The ears are the wing from the bird builder punch.  Eyes and nose come from the owl punch as do the buttons on the front of his outfit.  His collar is the scallop oval and his body is the wide oval.  Arms and legs are from the word window punch.  For the bent arm, you cut the piece at an angle in half and reposition it.  The cuffs for the sleeves and shoes are from the large flower of the boho blossom punch.  His hands are the midsized flower from the boho blossom punch.  The brim of his hat is a large oval and the top piece of the hat is the large scallop flower from the blossom builder punch.  For the shoes, I used the small oval punch and the 1/2" circle punch.  I started by punching the 1/2" circle at the edge of black card stock, then positioned the small oval over it until I had it lined up to make the shoe.  You will see it when you put it over the 1/2" opening.  I added the 6mm jingle bells to the toes of his shoes.  These are in the Holiday Mini also.  The pom pom on his hat is from the local craft store.  My outfit is from Garden Green and Whisper White.  The face, ears and hands are Blushing Bride.  I added dazzling diamond glitter to the collar, hat brim and sleeve cuffs for dazzle.  White gel pen is added to the eyes and the mouth is drawn on with a fine tip black marker.

Overall, I was pleased with the look of the elf and the card.  It was fun to make since it was a challenge for me.  I like trying new punch art ideas.  It helps to keep my brain working.  

Well, that's it for today.  I wish you all a wonderful day and will be back tomorrow.  Thanks for dropping in today!!

Monday, September 19, 2011

Turkey from a Peacock?

Okay so I know that must sound a little weird.  You are probably thinking I have lost my mind.  However, let me explain what my title means.  A while back I showed you my punch samples that I display in my craft room.  One of the animals was a beautiful peacock.  He was inspired by another demonstrator and I just love him.  He is easy to make and so vivid.  Well, I was in the shower the other morning thinking about what type of card I would make for today.  My peacock came to mind but a funny thing happened.  I started thinking about taking the basic body of the peacock and changing the plumage to make a turkey.  I immediately knew what punches I would use and how I would assemble him. 


So here he is in all his glory.  For the base card I used garden green.  I took a piece of whisper white card stock to layer on it.  Using fall colors, I cut out leaves with my Leaves #2 die for the big shot.  My fall colors are cajun craze, tangerine tango, cherry cobbler, and daffodil delight.  I attached the leaves to the white and then ran it through the big shot using the Houndstooth impression folder.  I love the way the leaves become one with the base card stock by doing this.  It is such a cool technique.  I sponged the edges of this with the fall colors and attached it to the green card.


For my turkey I used all Stampin' Up! punches to make him.  His head is a 1 1/4" circle. It is attached to the body by a word window which serves as the neck.  The body is the ornament punch with the hook part cut off.  The wings come from the bird builder punch.  All of these are punched out of chocolate chip card stock.  His feet are one of the flowers from the boho blossom punch.  You need 2, one for each foot.  They are tangerine tango.  For the eyes, I turned to my handy owl builder punch.  The beach is a prong off of a star.  It is the small star punch which is retired but you can improvise by doing it free handed or use the heart from the owl builder punch.  For his gobbler (is that what it is called?) I punched a flower out using the triple layer flower punch.  When you do this, you get these nifty little pieces shaped like a raindrop left over.  I used one of these for this part and it is out of cherry cobbler paper.  That just leaves his lovely feathers.  They are all from the blossom builder punch.  I used the large petal with scallops for all of them.  They are punched out of the fall colors I mentioned above and layered on to make a lovely fan of feathers.  He is attached using dimensionals.


For the greeting, I turned to my Teeny Tiny Wishes stamp set.  I stamped the greeting on whisper white and punched it out with the word window.  I then sponged the edges using the fall colors.  It was layered onto a garden green modern label.   I attached it to the card with dimensionals.


For the inside saying, I used a stamp not from SU!.  I know I know.  How dare I stray from my wonderful SU!.  However, I love this saying and wanted to use it.  It is stamped on white, sponged with the fall colors around the edge, and attached to the green card with runner adhesive.  Pretty nice looking if you ask me.
Well, I really want to thank all of you who brought to my attention the fact that a few pictures on my blog were not showing up.  I do not know what happened.  One minute they were part of my photo album and the next they disappeared.  Last I checked they are still there now.  Please feel free to let me know anytime something like this happens.  

I wish you all a marvelous Monday.  Thanks for taking time to stop by and visit.  I will see you again tomorrow. 


Monday, May 9, 2011

Triple Layer Blossom Punch

Happy Monday!  I hope you all had a wonderful weekend, especially all you mom's out there.  I had a nice time with my girls.  Due to their work schedules, I celebrated with each of them seperately.  It was like having 2 Mother's Days in one.  Of course, I would have liked to have spent the day with both but since my youngest works in retail, you have to be willing to make adjustments.  I am one proud mom.  My girls are fabulous.  Yes they have had there moments over the years.  I mean all children go through times of growth and trying to find their way in life.  As with all moms, I had the times of wanting to pull my hair out, but the rewards of seeing them now, the young women they have become and the choices they have made in their own lives, I could not be happier.  Let's face it, there is no tougher job than being a mom.

I had the best mom in the universe.  I guess a lot of people feel that way about their mom.  For me, it is just a true statement.  I lost her 4 years ago to Alzheimer's.  She had been ill for several years.  It was my honor to be her full time care giver for the last 3 years of her life.  She was my best friend, my teacher, my spiritual guide, and my mom.  There is not a day that goes by that I do not think of her and miss her greatly.  She was a very religious person,  devoted to her faith in God.  She taught me who Jesus was and how a real Christian should act.  She always turned the other cheek.  Even when others treated her meanly or disrespectfully, she would treat them with kindness.  I cannot stand when people go around proclaiming their "Christian values" yet they do not treat others kindly, exclude others due to something that happened years ago, and harbor resentment.  That is not Christian.  I have had people who were not always nice to me in my life and still do.  Thanks to my mom, I learned that while I may not forget what others say and do, I can forgive, move on, and treat them nicely.  After all, ill feelings toward others only makes us age faster and holds us in place instead of moving us forward.  So thanks mom for all you taught me and helping me to be a better person today because of who you were ( and still are).

Okay off my soapbox now.  Here is a Mother's Day card I made this year for my husband's mom:


As you can see, I used the new triple layer punch to make the flowers.  I really do like these punches.  I used a stamp set called Bold Blossom.  It too is in the Summer Mini catalog.  The stem stamp and the little butterfly stamp are from this set.  Yes the butterfly is glittered.  I had to fit in glitter somehow.  The "wonderful mother" came from the set Well Scripted, which is retired.  On this inside I put a simple saying:


The saying is also from the Bold Blossom set.  The "happy mother's day" is from the Teeny Tiny Wishes stamp set.  I use this set all the time.  It fits nicely with a lot of the punches and has every saying I could possibly need.  Overall, a simple card but I really like the end result of it.  
Well on to more stamping now.  Thanks for dropping in and I will see you tomorrow.

Monday, May 2, 2011

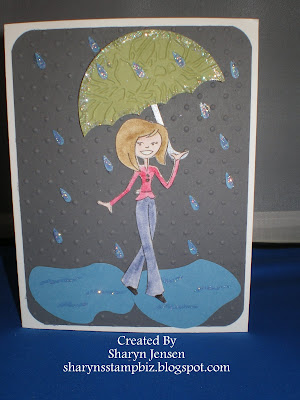
Rainy Day Fun

One of the down sides to living in Arizona, especially Phoenix, is we do not get a lot of rainy days.  Personally, I love rainy days.  I enjoy the sound of the rain on my rooftop, and the rhythm of the rain coming down.  Whenever we travel in our RV, I always hope for a rainy day because the rain really makes a cool sound on the RV roof.  Silly I know but when most of your year if filled with beautiful, sunny days, you learn to appreciate the rain.

Last Friday I shared with you the new triple punches offered in the Summer Mini from Stampin' Up!.  When I shared the Blossom punch, I told you I would show you a way to use the pieces left when you punch the triple setting and the petals are actually punched out.  The shape you are left with is a teardrop.  Now I had used Marina Mist, and when I looked at those pieces, they reminded me of rain.


This card immediately popped into my head.  I knew the Totally Tess stamp set would be fun to use.  This was a simple card to make and was also time friendly as it went together very quickly.  Let me show you a closer look at Tess and those raindrops.

It only seemed fitting to watercolor Tess since she is walking in the rain.  I did add glitter to this card.  I could not help myself.  The umbrella is trimmed in it, the puddles have a little, and of course, those cute raindrops received a little too.  By the way, if you are wondering how I made the puddles, I used the wide oval punch, punched out 2 of them, and then took my paper snips (scissors) and trimmed them to look like puddles.  
This was the first idea I had for using those little pieces.  I am currently working on several cards and ideas, including other ways to put these small pieces to work.  I really love it when I can use every scrap I have.  

I want to thank all my friends who came to the Crop Party I held this past Saturday.  I had such a good time seeing everyone and crafting the day away.  It is always fun to be with friends.  I hope you all had as wonderful of a weekend as I did.

Let me know if you need a Summer Mini catalog and I will get one for you.  Please email me if you have any questions or leave me a comment.  I would love to hear from you.  Thanks for stopping by today, and I'll see you tomorrow.

Friday, April 29, 2011

New Punches

Yesterday I shared a card that had these cute blossoms on it.  I told you I would share the new punch from the Summer Mini that I used to create it.  It is called the Blossom Bouquet Triple Layer Punch.  There is also another one called the Doily Triple Layer Punch.  Here they are:


What makes these special is that each one will do three different punches.

The sliding button on the back makes this possible.  To store the punch in the closed position, the button needs to be all the way to the right as shown above.  Once the punch is open, you can move the button to any of the 3 positions to achieve whichever punch you need.  Let's start with the Blossom Bouquet.

In the far left position, you get a solid blossom when it punches.  Once you move it to the center, you can punch another piece of paper and get the outer ring of the blossom.  Although I forgot to include it in the picture, you will also get the center flower which is solid.  It is the same size as the final punch, just solid.  When punching the ring, you will hear the punch punch twice.  The final punch gives you the small flower with the teardrop shapes out of it.  You will also get the outer ring (again I forgot to include it).  The punch will punch three times as you press it down.  I love this because I can save the extra solid flower and ring to use on another project.  You can even save the teardrops.  I will share a card soon that uses them.  Now for the Doily.

Again to store the punch, the button needs to be all the way to the right.  Once open, you can slide it to the left to get a solid doily.  The middle position will give you the same doily but with the outer portion of it punched with a design.  Again, it will punch twice as you press on it to achieve this.  The far right position gives you the same size doily but this time the design is on the outer and inner parts of it.  It also reminds me of a snowflake.  Just as the blossom, it will punch three times as you press down.  
While these do cost more than other punches offered by Stampin' Up! (they are $23.95 each), it is like getting 3 punches in one.  I absolutely love these.  When I first saw them in the Summer Mini, I was unsure as to whether or not I would like them.  I went ahead and ordered them anyway so that I could share them with my customers.  Boy am I glad I did.  They are wonderful!

Well, no card for today.  I wanted to be share these with you so you could see all they will do.  I wish you all a great weekend, and I will be back Monday.  Thanks for stopping in today.