CARDS FOR SALE

Most cards you see on this site are available for purchase. Simply click the Pay Now button at the bottom of the post of an available card to purchase the card. You will be linked to PayPal for payment. It will come up as "greensnaggletooth@cox.net" which is the name of my internet company. Price is $5.00 unless otherwise stated and includes shipping. Your card will come with an envelope also. Email me with any questions or requests at: sharynsstampbiz@gmail.com
Thanks for taking a look at my creations!!

Showing posts with label chalk. Show all posts

Tuesday, June 25, 2013

How About A Day At The Beach?!!

Hi everybody!!!  It's another hot and sunny day here in Arizona.  I cannot tell you how grateful I am that we bought our small inflatable pool to lounge in.  It really does help you deal with the heat better.  I don't know why but the older I get the less I enjoy the extreme heat.  I guess it is just another thing about getting older.

Just the other day I was thinking about how much fun it is to go to the beach.  Now personally, I am not a huge person on swimming in the ocean but I enjoy the waves, the breeze and the smell of salt water.  I guess thinking of all that is the inspiration I used for today's card.  So let us just get started.


Do those owls rock those bikinis or what?!!!  I started with a base card of Tangerine Tango cut at 5 1/2" x 8 1/2", scored at 4 1/4".  I added only one layer to this card.  It is a piece of Whisper White measuring 4" x 5 1/4". 

 To design my background, I turned to one of my favorite mediums - chalk.  I don't know why it appeals to me so much but it does.  I have several sets of chalks to use as well as stencils that were designed to work with the chalk also.  That is where all the textures come from on my background.  I made a blue sky full of puffy clouds using one stencil.  I then pulled out another one and made the ocean waves (you cannot really see them - sorry).  I used a simple circle for the sun and a sandcastle stencil for the castle.  The sand I just did by hand.   


The greeting I used for this card is from a retired set called Sunny Fun (I think that's the name).  I stamped it using Pacific Point ink onto Whisper White.  I cut it out using the bitty banners framelits and my big shot.  I edged the banner with a sponge and Pacific Point ink.  It is attached to the card using dimensionals.


This is bathing beauty owl number one.  She has lovely Wild Wasabi eyes.  Her body is from Soft Suede.  I am sure you can see the Basic Black and white used in the eyes.  Her swim suit is from some designer series paper I had left over.  


Here is bathing beauty owl number two.  She has Soft Sky eyes.  Her body is from Chocolate Chip card stock.  Again, I also used black and white and her bikini is from left over dsp.

All pieces of the owls are from the owl builder punch.  That's all you need.  The pieces are put together using a 2 way glue pen and the finished owls are attached to the card with dimensionals.

Tomorrow marks the middle of the week already.  I can't believe it.  I am so glad you chose to stop by today.  I will be back tomorrow with another share for you so please visit again.  Thanks for stopping by today.

Thursday, September 27, 2012

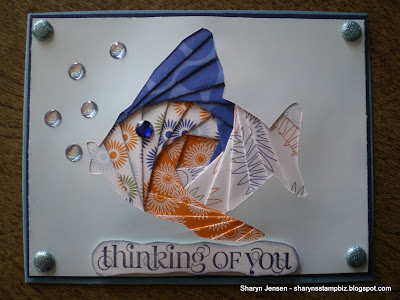
Iris Fold Fish Card

Hi everyone and welcome to Thursday.  I hope your week is moving right along with few problems to disrupt your days.  So far so good at my house.

Today I wanted to share with you the card I made using the iris fold fish I showed you how to make yesterday.  I could have shown this to you yesterday but I had not had a chance to finish it so you had to wait.  Today my fish is ready so let's get started.


I started with a 5 1/2" x 8 1/2" base card of Marina Mist and scored it at 4 1/4".   I took my iris folded fish and layered it onto a piece of Night of Navy card stock cut at 4 1/8" x 5 3/8".  I attached it using runner adhesive and glittery brads.  Once it was securely on the Night of Navy, I attached the entire piece to the base card by placing a glue dot in each corner and runner adhesive all over the rest.  I wanted to be sure it would be nice and secure.  One thing I did not mention yesterday is when I cut my Whisper White card stock to 4" x 5 1/4" I chalked the side that would be the front of the card with a light blue chalk and then turned it over to trace the fish and proceed with the iris fold process.  You do not have to do this.  It was just the look I wanted to have for my finished card.


Here is my little fishy up close.  As you can see, I added a blue rhinestone to mine for an eye.  After all, fish have eyes too.  Then I wanted to add a few bubbles that my fish could be blowing.  I chose to use these light blue sticker dots that I picked up at a local store.  I like them because they have that "wet" look and fit in nicely with a water setting.  If you missed my blog yesterday and want to learn to make the fish, please refer to the blog posted on September 26, 2012 and I will take you step by step through the iris folding process.


Finally, for the greeting I chose my Curly Cute stamp set and selected the "thinking of you" stamp.  I stamped it using Night of Navy ink onto Whisper White and cut it out free hand.  Once cut, I brushed the edges with Night of Navy ink and attached it to my card with dimensionals.  I chose to leave the inside of this card blank.  I did put a piece of Whisper White cut at 3" x 4" with edges sponged with Night of Navy ink in the card to either write on or add a stamp to at a future date.  This card can be used for many different occasions and who knows what I will choose to use it for when the time comes.

Well that's it for today.  I will be back with one more share for this week tomorrow.  I appreciate you spending some time with me today and taking a look at my fishy.  Thanks for dropping by and I will see you tomorrow.

Wednesday, August 8, 2012

Beach Fun!

Living here in Arizona, you get use to the fact that it is going to be hot hot hot.  We do not usually expect any relief from the heat until November.  Sad.  So every now and then, I like to play my sound CD which has ocean sounds on it.  I close my eyes and escape to a cool place on a beautiful beach.  Well today was one of the days I needed that escape.  While I was visiting this place in my mind, I came up with an idea for my card that I wanted to make for you.  So let's get started.


I used a base card of Gumball Green cut at 5 1/2" x 8 1/2", scored at 4 1/4".  The only layer I added is a piece of Whisper White measuring 4" x 5 1/4".  I colored a sky and sand using my pastels.  I do so love working with these.  Once it was all colored, I attached it to the base card using runner adhesive.  


The greeting I chose comes from the retired stamp set called Occasional Quotes.  I stamped it using Pacific Point ink directly onto the card stock.  I wanted to have a sun on my card because I think of the sunshine when I think of the beach.  The beach in my mind is one I visit only at sunset but I went with the sun being up instead.  I punched out the large flower from the boho blossom punch.  I used Tangerine Tango and Daffodil Delight card stock.  I edged the daffodil one using the tangerine ink and then layered it onto the tangerine one using liquid glue.  I attached it to the card with a dimensional.  I then added some yellow glitter glue to the sun.  I did not realize until I finished adding it that it kind of looks like a starfish.  I was impressed with my skill to incorporate this into the card.  Just kidding!!


I first made this little car back in March for my anniversary card for my husband.  I made 2 of them so there would be a boy and a girl car and used a larger card.  Today, I wanted to make just one.  Here is a list of the punches I used:

Roof/Lower Body - wide oval
Hood - wide oval trimmed and placed long ways on the body
Windshield - large oval
Fenders - large oval trimmed just a little on one end
Rear view Mirror - retired horizontal slot
Headlights - 1/2" circle layered onto a 3/4" circle
Side Bumpers - word window, cut in half
Front Bumper - decorative label
Tires - modern label, cut in half
License Plate - modern label end punched on edge of card stock
Flowers - small scallop flower from the itty bitty punch pack

The colors of card stock used for the car are:  Gumball Green, Basic Black, Whisper White, Brushed Silver, Tangerine Tango, Tempting Turquoise, Daffodil Delight, Melon Mambo and Vellum Paper.  All pieces were assembled using a liquid glue.  I wrote "FUN" on the license plate with a black marker.  I also added yellow, orange, pink and turquoise glitter glue to the flowers on the car.

To make my surfboards, I took a piece of Whisper White card stock and drew my own.  I then cut them out using my scissors.  I brushed the edges of these with Crumb Cake ink.  For the stripes on them, I pulled out scraps of Melon Mambo, Daffodil Delight, Real Red and Pacific Point card stock and cut strips.  I attached them to the surfboards using liquid glue and attached the finished boards to the car with the same liquid glue.

Once the boards and car were complete and dried, I attach it to the card using dimensionals.  

I hope this little car gives you images of fun on the beach.  I personally do not surf but I always enjoy watching others.  

Thanks for stopping by today and I will see you back here tomorrow!!  Have a wonderful Wednesday!


Wednesday, July 18, 2012

Deep Sea Diver?

My husband and I both love the ocean.  Now we have different reasons but trips to either the Atlantic or Pacific are always welcomed.  I am not an overly adventurous person and swimming in the ocean is not that important to me.  I love to watch and listen to the waves as they come in and just relax.  My husband enjoys taking a swim in the ocean and thinks observing the sea life up close is fun too.  I guess you could say his love of the sea inspired the card I made today.  Well kind of.  I happen to think of the theme on my own but realized he would love to be diving just like the character on my card.  Are you ready to see it?  Let's get started.


I started this card with a base of Pacific Point card stock cut at 5 1/2" x 8 1/2", scored at 4 1/4".  I added a layer of Basic Black to this using runner adhesive.  I cut it to measure 4 1/8" x 5 3/8".  Last, I added a layer of Whisper White cut at 4" x 5 1/4".  Before attaching it to the card, I used my pastels to chalk in an ocean background.  I think I needed to make it darker but I will try that next time.  I also added some sand at the bottom for the ocean floor.  Once the chalk was finished, I attached it with the runner adhesive to the rest of the card.


Here is my deep see diving dog.  Okay so he is really snorkeling but he went a little too far under the water.  The colors I chose for him were Whisper White, Black Basic and Pacific Point.  Here is a list of punches I used to make him:

Head/Body - owl builder punch; I used the body of the owl for both with the ears and feet cut off
Ears/Neck/Legs - word window trimmed to how I wanted it to look
Arms - little labels punch pack; use the one that looks similar to the decorative label punch and trim
Flippers - large oval; I used the 1/2" circle punch to make the tops of the flippers
Snorkel - word window trimmed to look as I wanted and the 3/4" circle punch punched offset from a 3/4" circle hole;  you can use the large oval for this and offset it from a large oval hole.  It would be easier than what I did.
Mask - curly label punch; use less than half of it and I used a standard hole punch to punch out the window
Nose - circle from the itty bitty punch pack trimmed to size

I used a fine tip black marker to draw the lines on the snorkel and flippers as well as to make the spots, eyes and mouth on the doggy.  All pieces of the dog were assembled using a liquid glue and the completed pup was attached using dimensionals.

The bubbles are circles made with the circle punch from the itty bitty punch pack.  I attached them to the card using liquid glue.  I then added Crystal Effects to them to make then puffy and glossy.


The inspiration for my crab comes from a retired stamp set called Crab & Company.  I love this set and still own it.  At first I was going to stamp the crab, color him and cut him out.  But then I thought maybe I should make him using punches so I did.  The colors of card stock used for this guy are Real Red, Whisper White and Basic Black.  Here are the punches I used:

Legs/Arms - retired bat punch; I offset the punch from a bat hole and punched several out
Body - large oval
Claws - small ovals cut to shape you like
Eyes - owl builder punch medium circles for the white and 1/4" circles for the black; I used scraps of red to raise them up

Add some white gel pen to the eyes and a big smile with your black marker and there you have a perfect crab.  All of his pieces were assembled using liquid glue.  He is attached to the card using the same liquid glue.  

This was a really fun card to make.  I thoroughly enjoyed the time it took me to do this one.  I hope you enjoyed it too.  You can use this one for any occasion you would like.

I shall return tomorrow with another card for you to see.  I do hope you will come and visit me then.  Thanks for dropping in today!!


Friday, July 13, 2012

A Famous Dinosaur

Happy Friday everyone!!  It sure has been a crazy week.  We welcomed home my daughter's boyfriend who had been training in Florida for 2 months and the weather actually brought us a little rain.  My husband's work schedule also changed this week so we are all trying to get use to the new routine.  I am ready for some relaxation time!

Yesterday, I shared a cute little dinosaur with you.  I showed him to my daughter and she really liked most of him.  Notice I said most not all.  She did not like the round head.  She felt I should have made it with an oval instead.  I must say that after sitting and looking at him and placing an oval over the circle, I have to agree with her.  So I knew this would be a change I would make on my next one.  I also must tell you that when I looked at him with an oval head, I immediately thought of a famous dinosaur that I love - Dino from the Flintstones.  Since I have made a Wilma and Fred as well as Betty and Barney, I thought why not give Dino a try.  Please keep in mind this is my first attempt and there will be some flaws.  Overall though I think he is pretty good.


I started with a base card of Rose Red cut at 4 1/4" x 11" scored at 5 1/2".  I added a layer of Basic Black on top of that cut at 4 1/8" x 5 3/8" and attached it with runner adhesive.  For my top layer, I started with a piece of Whisper White cut at 4" x 5 1/4".  I took out my pastels and chalked a sky background on it.  Next I cut a strip of Garden Green to be 1 1/2" x 5 1/4" and attached it to the sky with runner adhesive.  I then cut a piece of Whisper White 1" x 5 1/4" and ran it through my big shot using a Mosaic impression folder.  I wanted it to have the look of stones and this folder was the closest I could get. I added some gray chalk to it also.   I attached it to the grass and sky using runner adhesive.  For the house, I used my big shot and the retired ovals die.  I cut out the largest oval on that die and flattened one side for the base of the house.  I cut this out of Whisper White and then chalked it with a gray pastel.  I drew the window, door and spots on using my Stampin' Up! markers.  For the stone pathway, I punched out 1/2" circles and itty bitty punch pack circles and trimmed them.  They also have a little gray chalk on them and the dots were added with the markers.  The house and stone pathway were attached to the card using a liquid glue.  


The greeting comes from the Itty Bitty Banners stamp set and was cut out using my big shot and the Bitty Banners framelits set.  I started by inking my stamp with VersaMark ink and then added Rose Red ink on the stamp too.  Then I stamped it onto Whisper White card stock.  By having the VersaMark ink to the stamp, it allows me to add a clear embossing powder to this and heat emboss it.  Once it was embossed and cooled, I cut it out with the framelits set and attached it to the card using dimensionals.


Now for the star of the card.  The card stock colors I used for Dino are Rose Red, Blushing Bride, Basic Black, Tempting Turquoise, More Mustard and Whisper White.  Here is a list of the punches I used for him:

Body - 2 1/2" circle trimmed to what I wanted 
Neck/Tail - re punch the 2 1/2" circle offset from the body hole twice for these
Arms - retired photo corner punch; use the smaller of the corners and punch one out and re punch it a little offset twice
Legs - large oval cut in half and trimmed
Hands - feet of the owl from the owl builder punch
Feet - boho blossom punch
Head/Muzzle - large oval punch; for the muzzle you punch it out and then trim it to the size you want
Nostrils - owl builder punch; use the smallest circles
Eyes - small heart from the retired heart to heart punch
Spots - 1/2" circle and circle from itty bitty punch pack trimmed to the shape I wanted
Tag - 1/4" circle 

The collar is a scrap of turquoise and the hair are leftover scraps from when I trimmed the spots down.  I added some Blushing Bride marker around the nostrils and used it to draw the smile on.  I added white gel to the eyes and some Rose Red marker to the legs.  The muzzle of the face looks bumpy because silly me forgot to attach the eyes before attaching the muzzle.  Of course this meant that I had to pry up the edge of the muzzle to get the eyes under it.  Silly me.  I also added Crystal Effects to the spots and the tag.  I love the puffy, shiny look!!  I think next time I will outline some of the body parts with black marker just to highlight them.  Thepieces of Dino are adhered together using liquid glue and the completed Dino is attached to the card using dimensionals.

I am so glad you took time to stop by today.  I wish all of you a wonderful weekend.  Please come back Monday and see what I come up with next.  Until then, keep stamping and creating!!


Tuesday, June 19, 2012

New Stamp Set

Welcome to Tuesday's blog everyone.  I hope you are all well and ready to stamp.  Today I wanted to share one of the new stamp sets with you called Road to Happiness.  It is in the new 2012-2013 Stampin' Up! catalog.  Do you remember the set called Loads of Love?  It had a cute little truck in it and all kinds of items to put in the bed of the truck.  When it retired at the end of May this year, I was truly sad to see it go.  It really is one of my favorite sets.  While I will continue to use it for my own cards, I can no longer use it for any classes.  Well, this set, Road to Happiness, is just as much fun.  Let me show you the card I made using it and let's see what you think.


I started with a base card of Pacific Point card stock cut at 4 1/4" x 11", scored at 5 1/2".  I thought about adding a layer before the top one but decided not to so that the items on the top would shine.  I started with  a piece of Whisper White card stock measuring 4" x 5 1/4".  I used my pastels and chalked a background of the sky all over the piece.  Next I took a piece of Basic Black card stock.  I angled it on my paper trimmer and cut it at a diagonal.  I attached the black to the sky using runner adhesive.  Next I took a stencil of a tree that I happen to have and used my pastels once again to make the trees along the roadway.  I added white gel pen to the black as the stripes in the road.  It is attached to the card with the runner adhesive. 


The greeting used on this card comes from the Road to Happiness stamp set.  I stamped it using Pacific Point ink onto Whisper White card stock and punched it out using the modern label punch.  I used a sponge and edged it with Pacific Point.  Then I punched another modern label out of Pacific Point.  Using my runner adhesive, I offset the two labels and then attached them to the card using dimensionals.


I wanted to have more than one car on the road so I made 2.  I stamped the first car from the Road to Happiness stamp set onto Whisper White card stock using VersaMark ink.  I used Tangerine Tango embossing powder and heat embossed it.  Since I only needed the back end, I trimmed out the car, placed it on the road, and cut off the excess.  It is attached using dimensionals.


For the second car and the main one of the card, I again started by stamping it using VersaMark ink onto Whisper White card stock.  It was heat embossed using Tempting Turquoise ink and then cut out .  Directly on the card, I stamped the flowers that would fill the car.  I laid the car down and used my stamp-a-ma-jig to get the exact placement I wanted.  I stamped them using Basic Black ink and then used my Stampin' Up! markers to color them in.  Once that was done, I attached the car using dimensionals.  

The stamp set has flowers, balloons, presents, hearts and beach gear that can be stamped for the inside of the car.  There is also a bride and groom you can stamp in the front seat and cans to attach to the back.  It has several sayings in it also making it easy to use for different occasions.  I am hoping they might add an accessory set to this one next year!!

Well that's it for today.  I hope you all have a wonderful day.  Thanks for dropping by and I will see you tomorrow.


Tuesday, June 12, 2012

Happy Tuesday

Hello everyone!!  I am so glad to be up and running again with my computer.  I missed being able to share a card with you yesterday.  As promised I am going to share the birthday card I made for our youngest daughter.  It is so hard for me to believe she is 20 years old.  Where does the time go?  She had a terrific weekend full of celebrating.  She was fortunate enough to spend time with her family and boyfriend and she loved all her gifts.

Making cards is always a challenge when it comes to my girls.  I always have lots of ideas but do not want to repeat one I have already made.  For the most part, I simply try to use new colors and new stamps and it always seems to work.  Anyway, let me show you her card for this year.


Every little girl always seems to have a favorite Disney princess and my daughters are no exception.  For my youngest it is Sleeping Beauty.  I started with a base card cut at 4 1/4" x 11", scored at 5 1/2".  I chose to use Raspberry Ripple for this because it seemed to match her dress beautifully.  Next, I took a piece of Basic Black and cut it to measure 4" x 5 3/8".  I used the retired eyelet border punch and punched along the edge to make the border.  Once it was completed, I ran it through the big shot using the new Fancy Fan impression folder.  Unfortunately, you cannot really see it in this photo.  I attached it to the base card using runner adhesive.  I lined it up at the top of the base card to place it.  I then took a piece of Whisper White and cut it at 4" x 4 1/2".  I used my pastels to chalk the sky background.  Then I took a piece of Gumball Green card stock, tore a couple of strips off and adhered them to the white with runner adhesive.  I added Dazzling Diamond glitter to the edges of it.  


For the scene on the front of the card, I used a sticker set I picked up at a local craft store.  I used the 2 rose stickers and the Princess for the front and have 2 other sticker inside the card.  I think it is so cute that they included rose stickers since the fairies named her Rose. There is no shame in using a set like this to create a card.  They are usually nicely put together and add personality to whatever you are making.


Another of my daughter's favorite things are pearls.  She loves pearl necklaces.  So it seemed natural to me to add little pearls to the eyelet border.  You can sort of see the impression from the Fancy Fan impression folder on the black in this photo.  For the greeting, I turned to my Teeny Tiny Wishes stamp set.  I stamped the greeting using Raspberry Ripple ink onto Whisper White.  I punched it out using the word window punch.  I then punched a modern label out of Basic Black.  I edged the white with the same ink and attached it to the modern label using runner adhesive.  I added a pearl to each end and attached it to the card using dimensionals.  


For the inside, I used a piece of Whisper White cut at 3 1/2" x 4 ".  I edged it using Raspberry Ripple ink.  Next I used the Word Play stamp set and stamped the "wish BIG" using the same ink.  I took my Basic Black ink pad and stamped the image of Sleeping Beauty onto the white.  The heart and flower are the 2 other stickers from the sticker set.  I added a rhinestone to 2 of the corners of the piece and a larger one to the "i" in wish.  Once I had given the black ink time to set, I used my colored pencils to color in Sleeping Beauty.  This stamp is from a set I picked up at a local craft store.  The set has some of the other princesses as well so I know I will use it a lot!!  

I will tell you our daughter loved her card.  She has an area in her room where she had Sleeping Beauty items she has collected over the years.  She added her card to her collection.  I am so pleased she likes it.

Well that's it for today.  Hopefully all the computer issues are over.  I am planning on being back tomorrow to share another card with you.  I hope you will all return to see what I come up with.  Until then, thanks for stopping by and happy stamping!!


Tuesday, June 5, 2012

A New Little Dog

Have you placed an order from the new catalog yet?  If not, what are you waiting for?!!  I placed mine last Friday when the catalog went live.  It shipped on Monday so I am hoping to see it arrive by the end of Wednesday or Thursday at the latest.  Then I will have all kinds of new items to play with and share with you.

My husband has an aunt who lives about 5 minutes away from us.  Now you would think we would see her a lot but unfortunately with all of our crazy lives, we do not see each other nearly enough.  When I do get to go over to visit her, I also get to spend time with her 4 adorable dogs.  They are all Shitzu's.  They are too cute for words and each has its own unique personality.  So the other day when I saw this card on a demonstrator site, I just had to make it.  I believe the original was created by Ashley Sokal.  Between the photo of the card and my aunt's dogs, I was too inspired not to do it.  Ready?  Here we go!!


Isn't she just too cute?!   I wanted to incorporate some of the new colors on this card so that you would get something from the new catalog to look at.  The base card is Raspberry Ripple cut at 4 1/4" x 11", scored at 5 1/2".  I added a layer of Basic Black cut at 4 1/8" x 5 3/8".  I adhered it to the base card using runner adhesive.    I bet without even telling you what I did for the top layer you already know.  You're right.  I took a piece of Whisper White cut at 4" x 5 1/4" and chalked my own background using my pastels.  I know I do this technique a lot but I just love the effect on the card and the calmness of working with the chalks.  I think I really learned to do this when my brother was very ill and I was caring for him.  I use to work on cards at his home and he would watch me.  It gave us both something to do and think about other than his illness.  Now back to the card.  Once the sky was complete, I took a few strips of Gumball Green, tore the tops of them and layered them onto the white for grass.  Once they were attached using runner adhesive, I added some Dazzling Diamond glitter to the edges for sparkle.  I happen to have a few butterflies left over from another card and added them using glue dots.  The entire piece was then attached to the base using runner adhesive.  Once the card was completed inside and out, I added some Stickles Glitter Glue to each butterfly for more sparkle.  By the way the butterflies were originally cut out using the embosslit Beautiful Wings and the big shot.  


For the greeting, I turned to my handy stamp set called Curly Cute.  It is one of my favorite sets.  I stamped the greeting directly onto the card using Raspberry Ripple ink.  Now let's get to the star of the card.


My aunt has 3 females and 1 male Shitzu.  This little girl doggy reminds me mostly of 2 of the females:  Roxy and Chanel.  They are both light in color with some browns mixed in.  Roxy is the oldest.  She is just so sweet.  The other dogs do run her over sometimes, but I always make sure she get her turn for lots of attention.  Chanel on the other hand is the smallest of the dogs.  She thinks she is a princess and you should always be at her beckon call.  She loves to be held and to have her tummy rubbed so I have to be sure to give her lots of time for both.  

To make this dog, I started by choosing the colors of Whisper White, Soft Suede and Basic Black.  Her face was made using a 1 3/8" circle punch for the head.  I trimmed it down just a little to give it a slight oval shape.  The muzzle is the small oval.  The eyes are the large circles from the owl builder punch and the nose is the heart of the owl builder.  For her ears, I punched a full heart, cut it in half and reshaped the ends to round them.  I added a little Very Vanilla ink to the inner ears.  White gel was added to the eyes and nose and the mouth was drawn on with a fine tip black marker.  The body is a wide oval.  For the hind leg, I used another small oval and made the feet from the modern label punch.  The tail is a 1 3/8" circle punched around the hole from a 1 1/4" circle.  All pieces except the black were edged using Soft Suede ink.  I used the matching marker to draw the front leg onto the body.   I wanted her to have a bow so I punched 2 of the small hearts from the retired heart to heart punch out and used a 1/4" circle for the center of the bow.  All parts of the dog and bow were put together using a liquid glue.  Once complete, I attached the dog to the card using dimensionals.  The last thing I did after she was attached was add some crystal effects to the bow.  


The inside of the card is fairly simple.  I stamped the saying using Raspberry Ripple ink onto Whisper White.  The saying is from the stamp set Create A Cupcake.  I punched it out using the 2 3/8" scallop circle punch and brushed the edges with a sponge and Raspberry Ripple ink.  It is attached using runner adhesive.  

I have noticed that a lot of my cards have the same overall pattern to them.  I guess I like the look of it.  Have no fear though for I will have new items to play with soon and will hopefully come up with some new patterns too.  Also believe it or not it is almost holiday card making time!!  Yes for all of you who make Halloween, Thanksgiving, and Christmas cards it is just about time to get started on them.  I know I will have some to share with you soon.

I am so glad you took time to drop in today.  I hope you return tomorrow to see if I come up with a new idea.  Thanks so much for stopping by.  Until tomorrow, happy stamping!!!


Tuesday, May 29, 2012

A Daddy Day Dapper Dog

How's that for a mouthful?  I wasn't going for a tongue twister but I think I created one.  Oh well.  I think it's a great way to start the week!!

I hope all of you had a nice Memorial Day weekend.  I tried to do a little crafting and to get some rest.  I did not have much luck sleeping last week while my hubby was out of town so it was nice to have him home. 

Today's share is another card for dad.  June is really creeping up on us.  I know I better get prepared or I will not be ready for all the special days the month ahead holds.  Anyway, I saw the main figure on this card on Pintrest.  I really loved him when I saw him.  He was created by Cindy McGurk.  While hers was more of a birthday card, I chose to change mine up so that it would fit Father's Day.  So let's take a look at it.


He looks so dashing!  I started with a base card of Midnight Muse, one of the new in-colors, measuring 5 1/2" x 8 1/2" scored at 4 1/4".  I added a layer of Basic Black on top of that measuring 4 1/8" x 5 3/8".  My final layer is a piece of Whisper White cut at 4" x 5 1/4".  Before attaching it to the card, I chalked the background with my pastels creating the sky and grass.  Then I could attach it to the black with runner adhesive.  Now let's move on to the star!!


We will work our way from the top down.  I made him a top hat out of Basic Black card stock.  I punched a 1 3/8" square and trimmed it to form the hat.  Next, I used Early Espresso and Crumb Cake card stock to start punching the parts of the dog.  The ears are the large oval punch.  For his head, I used a 1 3/4" circle punch while his jowls are the full heart punch turned upside down.  For the nose, I used the smallest heart on the heart to heart punch (this one retires on Thursday).  For the eyebrows, I used the retired horizontal slot punch.  You could make these using scraps that you have.  The eyes come from the owl builder punch.  I used my usual Whisper White and Basic Black for these.  I added a Gumball Green hat band to my top hat and added crystal effects to it to give it the shiny look you see.  I added white gel pen to the eyes and nose and used a fine tip black marker to draw the line and dots on the jowls.  The jowls are attached to the head with dimensionals.


For the main part of the body, I punched a wide oval and layered a large oval on top of it.   The arms of the dapper dog are the wide heart from the heart to heart punch, while the feet are 3/4" circles that were punched and flattened to make the paws.  I added the toes with fine tip black marker.  The tie was cut free hand from a retired designer series paper and the cane is just a scrap of black.  All parts of the dog were attached to each other and the card using a liquid glue, except for the jowls.  They were attached to the head and card with dimensionals.  


The inside greeting was made using 2 stamp sets.  The "d" comes from the retired set called Eight Great Greetings and is stamped in Midnight Muse ink.  The "Happy Father's Day" is from the Teeny Tiny Wishes stamp set.  It is stamped using Gumball Green ink.  I cut this out using the big shot and the labels framelits collection.  Once it was cut out, I sponged the top half with Gumball green on the edges and the bottom half with Midnight Muse ink.  It is attached with runner adhesive.

I will tell you it was a lot of fun making this dog.  I am definitely going to do him again.  I will be back tomorrow with another share for all of you.  I hope you come by to visit.  Thanks for dropping in today.


Monday, April 30, 2012

Has Your Prince Come Along Yet?

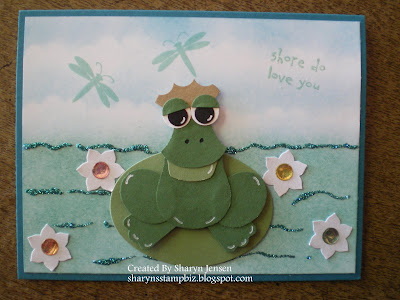
All little girls dream of being a princess and of course they wait for the day that Prince Charming comes along.  Sometimes, we encounter those frogs that we think might be the prince but in actuality is just a frog.  Been there done that.  But if we wait long enough our prince will come.  Remember all princes start as frogs.  It is how they grow and mature that either keeps them a frog or turns them into a prince. 

Now what does all of this have to do with my share for this fine Monday?  Well, I bet you can guess there is a frog involved and you would be right.  Once again, I was sitting at my craft table trying to get inspired to make something.  I happened to look up and saw my punch art sample board.  For some reason this frog stood out to me.  He is another punch art I made for the board but never used on a card.  So it was his turn to be used today!!  Here we go on a froggy adventure!!


It is a relaxing day at the pond for this frog.  I started with a base card of Island Indigo cut at 5 1/2" x 8 1/2", scored at 4 1/4".  For the top layer, I cut a piece of Whisper White to be 4" x 5 1/4".  I used my pastels and created a sky look for the top half of the card and a water look for the bottom.  To enhance the water color, I used a glitter I picked up at a stamp convention called Ocean Spray.  Using my liquid glue, I made little lines for the ripples.  Allow this to dry completely before you put any of the details on it.  Adhere it to the card using runner adhesive.  For the dragonflies in the sky, I used a stamp I happen to get at a stamp convention.  It is stamped using Pool Party ink.  I really had to look around to find my greeting for this one.  I ended up using a stamp from the retired stamp set called Crab & Company.  I inked it first with VersaMark ink and then immediately with Pool Party ink.  This way once I stamped it I could sprinkle clear embossing powder on the words and heat emboss them.  


For the flowers floating in the water, I used my boho blossom punch and punched out the pointy petal flower from Shimmer White card stock.  These were adhered down using liquid glue and have a sparkly sticker added to the center of each.  


Now for the star of the card.  His color scheme is Garden Green, Wild Wasabi, Brushed Gold, Whisper White and Basic Black.   I used a total of 4 punches to make this guy.  His legs were made with the small oval punch.   For the feet, I used the modern label punch and cut the punched piece in half.  I now turned to my owl builder punch for the main components of Mr. Froggy.  The actual owl makes up his body.  I trimmed the ears and feet off of it.  For the face and the "ribbit pouch" under it (afraid I don't know the technical name), I used the vest from the owl punch.  I trimmed the pouch to be smaller than the face.  The nostrils were drawn on with a fine tip black marker.  The eyes and eyelids are pretty self explanatory.  For the crown, I started by punching a vest out of it.  Then I used the circle from the itty bitty punch pack and punched out small pieces of the bottom of the vest to get the points of the crown.  It is glued upside down, but I bet you knew that.  All pieces of the frog were adhered with liquid glue.  The lily pad is an oval cut out from the Ovals die using the big shot.  It is the middle sized one on the die.  I glued the lily pad down with liquid glue.  I added white gel pen to the various parts of froggy to enhance them.  The frog was added to the pad and card using dimensionals.  

I left the inside of this one blank by adding a piece of white cut at 3 1/2" x 4".  It is edged with Pool Party ink.  This way you can use the card for whatever you want to by adding your own stamp or writing your own message.  

If you have any questions about this frog please feel free to drop me a line.  I would be happy to hear from you.  I hope you come back tomorrow and visit again.  Thanks for dropping by today!!


Thursday, April 26, 2012

One Smart Dog

Hello fellow stampers and welcome to my Thursday blog.  I wasn't sure this one was going to get done.  We spent yesterday morning at the doctor for my husband's follow up appointment and then spent the afternoon running some errands.  I thought I would never get home and see my craft room again.  It's funny how much I miss being in it even when just running errands.  But I am happy to report we arrived back at home in time for me to make a card and post the blog about it.  Yeah!

First I want to be sure to tell you that the retired accessories list is up from Stampin' Up!.  There are several punches that are being retired.  Be sure to check the list out and order anything you want quickly as these items go fast.  Once they are gone you are out of luck. 

Now let's get back to my card.  Yesterday I shared a sad little dog with you who was not feeling so well.  Today, I thought I would continue with the dog theme.  This time my little dog is a smart dog out for a walk.  Let's get going on this one!


Just look at him, out for a stroll.  I started with a base card of Night of Navy measuring 4 1/4" x 11", scored at 5 1/2".  I added a layer of Whisper White measuring 4" x 5 1/4".  I chalked the sky background onto it using my pastels and then added torn strips of Garden Green to it for the grass.  I added some dazzling diamond glitter to the edge of the grass just to give it a little sparkle.  I attached it to the base using runner adhesive.


I learned to make this little guy from the punch queen herself, Ellen Kemper.  Her name for him is Smart Mutt.  I am so glad to see she is back to posting again.  I have really missed her.  Anyway, you can visit her blog to get the instructions on how to put him together.  I first made this little guy to put on my sample punch art board I keep for others to see what types of things I make.  I had never made another one to use on a card.  So it was about time I got around to using this guy.  The colors I used for him are Basic Gray, Whisper White, Basic Black and Real Red.  Once he was completed I attached him to the card using dimensionals.


For my greeting, I used a stamp that came in a little set I picked up at a local craft store.  I stamped it directly to the sky using Night of Navy ink.  The butterflies are a punch made by Fiskers.  It was part of a set a friend gave to me.  I punched one in each of the following colors:  Rich Razzleberry, Melon Mambo, Daffodil Delight, Tangerine Tango and Marina Mist.  I adhered them to the card using a liquid glue and added a small rhinestone to the center of each.  

I do realize this post is a little short but after all I am blessed to have gotten it done in time for you to see.   Now I have another full day of activities going on so I will once again do my best to find time to escape to my craft room and create another card.  Please come back tomorrow to see if I succeed!  Thanks for dropping by today!!!


Friday, April 13, 2012

The Owl Punch In Action Again!

Happy Friday everyone!  As promised I am finishing out this week using my owl punch.  I must tell you though that I still have more ideas for it so it may be back next week.  Today card is a combination of different materials and techniques.  I have used the punch art and pastel technique before but the new material on this comes from scrapbook packs and stickers.  I have been doing cards and some scrapbooks for a long time.  I have quite the collection of stickers and scrapbook packs in my home.  For the card I am going to share today, I turned to some of these for help.  How about I show you the card and you can see how I incorporated these into it. 


Today we find mod girl doing the job of a teacher.  The base card is once again Real Red cut at 5 1/2" x 8 1/2", scored at 4 1/4".  I added a layer of Basic Black on top of that using runner adhesive.  It measures 4 1/8" x 5 3/8".   Next came the Whisper White layer cut at 4" x 5 1/4".  I used my handy pastels to created the sky scene on it and adhered it using runner adhesive to the card.  I wanted to have a little grass so I took a scrap of Garden Green measuring 4" wide and tore a strip.  Again the runner adhesive was used to attach it.  

When you go to your local craft store, you can find themed pack of paper and cutout that can be used in a scrapbook.  That is where I found my school house.  Since I use to be a teacher, I have a couple of scrapbooks I made using that theme.  This piece was a left over.  As all good crafters know, you always keep your left overs.  It is a textured piece that give a nice look to the card.  It has no adhesive of its own so I used the same runner adhesive to attach it down.  I made sure to tuck it under the edge of the grass giving the appearance that the grass grew in front of it.  


Here you get a better look at the teacher herself.  As you can see, she is a product of the owl punch.  I am not going to bore you with the detail of making her since they are listed in previous postings.  The texture I created on her dress and headband were completely an accident.  I had put cute little glitter glue dots on both and set her aside to dry.  Well apparently I did not sit her far enough away from me.  I went to pick up my tweezers and brushed against the dots of the headband.  I knew I could not just redo the dots so I took my finger and spread out all the dots.  I kind of liked the look so I thought why not do that to her dress too.  So I did.  I am not sure if I like the dress as much as the headband.  Next time maybe I will leave the dots.  She is attached to the card using dimensionals.

The only 2 accessories she has are the glasses and her bell.  The bell was part of a sticker pack that was 3 dimensional.  I placed it under her hand and actually glued it into place on the hand.  The main part of the bell has a dimensional on it making it easy to attach.   For her glasses, I decided to once again use my Everyday Paper Doll cartridge and my Cricut machine.  It is a lot easier making it this way than trying to do it on my own.  

I left this card blank on the inside.  You could stamp a phrase if you want or write a note.  This is perfect for a teacher at the beginning of the year or the end of the year.  It is also perfect for a new teacher who is graduating and entering the education work force.  

I certainly hope all of you have a wonderful weekend.  I will probably be playing with my owl punch some more.  If you don't have one of these think about getting one.  You can visit my Stampin' Up! demonstrator site by clicking on the link in the side bar on the right under "Other Places to Find Me".  The punch can be ordered there.  I am so glad you decided to drop by today.  I will see you all on Monday.  Happy stamping!


Friday, March 30, 2012

ROAR!! - Did I Scare You?

More then likely, I could not scare a fly.  So I know my title for today's blog most certainly does not scare you.  I finally found time late yesterday to sit down and actually make a card.  It was difficult though.  The inspiration did not come for a while.  We received word that our nephew in California is doing well.  The tests show that they were able to get the entire tumor removed which is good news.  However, the pathology test showed that it was indeed cancer so chemo will be necessary.  He is a trooper though.  When he went into surgery, he took 3 stuffed lions with him.  He is the inspiration for my card today.  So let's get started.


This was the first lion I have made like this.  I saw a lion head done in a similar  way by a demonstrator named Cathy Dubreuil.   I changed it up just a little, added a body and now have my own lion.  The base card for this is done with Pacific Point card stock cut at 4 1/4" x 11", scored at 5 1/2".  The top layer is a piece of Whisper White measuring 4" x 5 1/4".  I used the pastels (chalk) to created the sky.  Then I took a scrap of Wild Wasabi card stock and tore strips from it.  I adhered these to the white using runner adhesive.  Using a glue pen, I added dazzling diamond glitter to the edges of the paper.  The flowers were made with Daffodil Delight and Tangerine Tango card stock using one of the punches from the itty bitty punch pack.  I placed a pearl in the center to give it a little more design.  They are adhered to the card using a liquid glue.  My greeting came from the stamp set "Look Who's Turning".  I stamped it using Pacific Point ink directly onto the sky.


I chose to use So Saffron and Chocolate Chip for the main colors of my lion.  The tongue is Rose Red while the muzzle is Crumb Cake.  For the eyes I used Basic Black and Whisper White.  I started by punching a 2 3/8" scallop circle for the mane.  Next I used the owl builder punch and punched the head, the eyes, the nose and the tongue.  The hair on his forehead is from the large flower of the boho blossom punch.  The muzzle is the small heart while the feet come from the heart to heart punch.  For the tail, I used the branch from the bird builder punch.  His body is the only part not from a punch.  It was cut out using my big shot and the ovals die.  It is the medium sized oval from the die.  I added white gel pen to the eyes and nose to highlight them.  The whiskers, freckles and toes were added using a fine tip black marker.  And that is how you create a lion.  He is attached to the card using dimensionals. 


The inside greeting is a stamp I have had for years.  It is not from Stampin' Up! but I love to use it.  I stamped it using Pacific Point ink onto Whisper White.  I punched the corners of the white with the ticket corner punch and then brushed the edges with the Pacific Point ink.  Next I took my markers and colored in the stars with Tangerine Tango and Daffodil Delight.  The circle were filled with Pacific Point.  It is attached to the card using runner adhesive.  

Well that's it for today.  I am certainly hoping all of you have a wonderful weekend and I am praying for a better week next week for my family.  I must admit I am exhausted!   Hopefully I can get a little rest this weekend.  So with that thought I thank you for stopping by today and I will return on Monday with another share.  Have a terrific weekend.


Wednesday, March 28, 2012

Birthday Bug

I must tell you this has been a trying week for my family.  Here we are only at Wednesday and I have already been to several doctors with family members and have a nephew in California who has been in the hospital.  I pray the week gets better.  If you ask me what I think about 2012 so far, I would tell you it has been filled with the kinds of events you would rather avoid.

A few weeks ago, I shared a card front with you I had made with a cute little dragonfly on it.  It did start out as a card but if you recall I stamped the greeting upside down and had to add a piece to it to correct that.  So I kept it as a sample.  So the other day, I ran across a 2nd dragonfly I had made but had not added to a card.  I decided I would give a card a try again and hope for the best.  This time it all worked out.  So let me share this one with you.


 I was thrilled this card worked out without my making a boo boo again.  The base card is a piece of Tempting Turquoise card stock cut at 4 1/4" x 11", scored at 5 1/2".  I added a layer to the front of Basic Black measuring 4 1/8" x 5 3/8" using runner adhesive to adhere it.  Next I took a piece of Whisper White card stock and cut it to be 4" x 5 1/4".   I pulled out my pastels (chalk) and created the sky background you see on the card.  Now you can probably find designer paper at your local craft store that has a sky pattern on it.  If you don't want to make your own, I would certainly suggest looking for this.  For me, I love creating my own.


For the greeting, I used a stamp from the stamp set Curly Cute.  It is stamped using Pacific Point ink directly onto the card stock.  I did this after I had chalked the sky and placed my dragonfly.  I love the loopy loops of this stamp set!


Last but not least, we come to the star of the card - the dragonfly.  I used Certainly Celery, Wild Wasabi, Basic Black. Whisper White and Bashful Blue card stock as well as Vellum Paper to make him.  His head is a 1" circle.  His body and wings are from the large oval punch.  His tail is made up of 1/2" circles as is his nose.  For the nose, I trimmed it to the shape I wanted.  The eyes are from the owl builder punch.  His legs come from the bird builder punch.  I added white gel pen to highlight various areas of the bug.  I added dazzling diamond glitter to the edges of the wings and dazzling details glitter glue dots to the wings.  He is attached to the card using dimensionals.  Once he was placed, I added the little pearls to the sky to give it a little jazz..

Well that finishes today's card.  I hope you all like it.  I will be back tomorrow with another item to share with you.  Thanks for dropping by today.


Monday, March 12, 2012

It's Easter Time!

Hey everyone.  Happy Monday.  I hope you all had a wonderful weekend.  I want to thank all of you who attended my punch class and/or crop this past Saturday.  We had a lot of fun and made some really neat things.  I taught 4 spring critters - a bunny, a duck, a dragonfly, and a butterfly.  Everyone seems to enjoy learning how to make them.  As always, my mind goes a mile a minute as I am teaching and I seem to always get inspired to make another card.  So the one I am going to share with you today is one I thought of as my students were making one of the critters.  It involved using the owl builder punch.  This card just popped into my head as I was looking at the punch.  Ready to start?


I started by using Daffodil Delight card stock to make my base card.  It is cut at 5 1/2" x 8 1/2", scored at 4 1/4".  I then took a piece of  Whisper White card stock and cut it to be 4" x 5 1/4".  Using my pastels (chalks) I created a sky background.  Then I grabbed a scrap piece of Wild Wasabi card stock and tore pieces off.  I attached them to the sky background using runner adhesive.  I then attached the white to the daffodil using the same adhesive.  Using a glue pen, I added glue to the edges of the "grass" and sprinkled them with Dazzling Diamond glitter.  I love the sparkle.  I turned to my handy Teeny Tiny Wishes stamp set for the greeting on this one.  I stamped it using Melon Mambo ink onto white card stock and punched it out using the retired small oval punch.  I then punched a large oval out of Basic Black card stock and layered the white onto it with adhesive.  Finally, I used a scrap of Melon Mambo card stock and punched a scallop oval to make the bottom layer of the greeting.  Once it was finished, I took some pink rhinestones I had and added one to each side of the greeting.   It is attached to the card using dimensionals.  Now let's see how the animals are made.


Here is my cute little chick.  The body, eyes, and beak come from the owl builder punch.  I used Daffodil Delight, Tangerine Tango, Basic Black, and Whisper White card stock for this little guy.  To make his hair, I turned to the Boho Blossom punch and used the 6 petal flower from it.  Only 3 of the petals stick up for you to see.  For the wings, I punched a 1 3/4" scallop circle and cut it in half.  I then cut the half in half again and trimmed off the scallop piece I cut in half to do this.  Add a piece to each side and there you have him.  I added some white gel pen to highlight his various features and give him a little character.  I attached him to the card using dimensionals.


For the bunny, I used the owl builder punch once again for the body and eyes.  I then punched the nose using the circle from the itty bitty punch pack.  His ears are made using petals from the blossom petals builder punch.  I used  Basic Gray, Pink Pirouette, Basic Black, and Whisper White card stock for his color scheme.  I added white gel pen to highlight his features and drew on whiskers using a fine tip black marker.  You could also draw a mouth on this guy if you would like to.  He is also attached to the card with dimensionals. 


I wanted to add an Easter Basket to this card so I decided to start by punching a white tag using the  large tag punch (it use to be called the small tag in past catalogs).  I cut the tag in half so my basket would look like a basket and ran it through the big shot using the square lattice impression folder.  I then punched a small oval using the retired small oval punch.  I took the  large oval punch and punched it around the hole of the small on creating the handle for the basket.  Now my basket would not be complete without some eggs so I had to make some.  I started with a strip of silver glimmer card stock.  I took my Melon Mambo, Tangerine Tango, Marina Mist, and Wild Wasabi ink pads and using my sponges I colored the silver card stock.  Next, I turned it upside down and drew freehand my eggs (that's why they all look different).  Once drawn, I cut them apart and attached the basket and eggs to the card using a liquid glue.  I love love love the sparkle on this card.

Well, that's all I have for today.  I hope you are inspired to make a card of your own with lots of sparkle.  I will be back tomorrow with another card to share.  Until then, thanks for dropping by today!