CARDS FOR SALE

Most cards you see on this site are available for purchase. Simply click the Pay Now button at the bottom of the post of an available card to purchase the card. You will be linked to PayPal for payment. It will come up as "greensnaggletooth@cox.net" which is the name of my internet company. Price is $5.00 unless otherwise stated and includes shipping. Your card will come with an envelope also. Email me with any questions or requests at: sharynsstampbiz@gmail.com
Thanks for taking a look at my creations!!

Showing posts with label Masculine. Show all posts

Monday, January 7, 2013

Finally Finished!!

Hi everybody!   And a gigantic Happy Birthday to my Dad.  Love you lots and hope your day is terrific!!

I hope you all had a wonderful weekend.  I spent mine packing up Christmas.  I am happy to say I finished it all.  It looks so empty in my house now and I miss sitting an watching the lights on the tree.  I feel like this every year.  Oh well, I am sure it will pass and the nice thing is now I can get back into my craft room and just play with all my stuff.

Today's card is one I made for a friend.  He is a member of my husband's crew and has known us for a long time.  I wanted to make him a card that featured things that represent him.  Ready to see what I made?  Let's get started.


Ta da!!  Now I did not realize this photo was blurry when I took the photo and of course the card is already on its way so I could not retake it.  For that I am sorry.  Now let me focus on the card.

I started with a base card of Cajun Craze cut at 5 1/2" x 8 1/2", scored at 4 1/4".  I added a layer of Night of Navy measuring 4 1/8" x 5 3/8" and attached it to the base using runner adhesive.  For the top layer I started with a 4" x 5 1/4" piece of Whisper White and ran it through my big shot using the new Cloudy Day impression folder and my big shot.  Aren't the clouds cute?!  I wanted to add a light color to this so I used my sponge and Marina Mist ink and sponged over the entire piece.  I attached it with the runner adhesive.  For a final touch, I added a couple of torn pieces of Garden Green card stock for some grass.  It is also attached with runner adhesive.


Now I have made this fireman before so if he looks familiar that's why.  I learned to make him from the punch guru Ellen Kemper.  Instead of me trying to tell you how to make him, I am going to refer you to her blog for the instructions.  Click here to get the instructions.

The colors of card stock I used my him are as follows:

Helmet, coat, pants - Daffodil Delights
Shirt - Night of Navy
Eyes - Whisper White and Marina Mist
Shield, gloves, boots - Basic Black
Face, nose, ears - retired Blushing Bride
Mustache, eyebrows - Crumb Cake

This photo shows the top half of the fireman.


Here is the bottom half.  I will tell you there are a couple of punches that were used are retired but I am sure you can come up with alternatives.  An example would be the boots.  It used the retired butterfly punch.  You could use a 1" circle and trim it to be the boots.

The rifle was made using the modern label punch, the word window punch and the 1/4" circle punch.  I used Early Espresso and Brushed Silver card stock.  

All pieces of the fireman and rifle were attached using a 2 way glue pen.  I attached the rifle to the fireman using glue dots and the finished fireman to the card with dimensionals.


For the inside of the card, I could not find a stamp with a saying that I wanted to use.  So I sat at my computer and did some searching.   Finally I found a saying I liked.  I could have type it or written it out by hand but I decided to stamp it.  I used an alphabet set of stamps to do this.  I stamped the words using the Night of Navy ink onto Whisper White card stock.  I then cut the phrases out and mounted them onto Night of Navy card stock.  They are attached using runner adhesive.  As you can see, it used the entire space so we wrote our message and signed our names on the inside cover.  

Well that's it for today.  I will be back tomorrow with another birthday card to share.  Thanks for stopping by today.  See you all later!!

Friday, November 9, 2012

Back to Manly Cards

If you are anything like me you know it is extremely difficult to come up with ideas for cards that are more on the masculine side.  I do pretty well and usually make a few at a time but find that I run out of those faster than anything else.  So the other day I needed a card to mail to my father in law for his birthday.  I did have one ready for him but realized that it really depleted my man stash.  Of course that means it is time to start making a few of these again.

I decided to turn to some of the punch art I have come to love for inspiration.  I went with a character straight out of Looney Toons and I really hope you can identify who it is.  I learned to make this guy from the former punch queen Ellen Kemper.  I say former only because she is no longer punching right now and is not sure if she will ever go back to it.  I was truly sad to hear this.  She has been a real inspiration to me.  Anyway let's get on to my card shall we?!


Please tell me you recognize him?  Well if not, I will reveal his identity in a few minutes.  But first we must start as always at the beginning.  The base card for this one is a 5 1/2" x 8 1/2" card made from Crumb Cake card stock.  It is scored at 4 1/4". Second, I added a layer of Night of Navy card stock measuring 4 1/8" x 5 3/8".  Next I added a layer of Whisper White which was cut to be 4" x 5 1/4".  I ran it through the big shot using the stripes impression folder and then sponged a little Crumb Cake ink onto the raised stripes so the white was not so bright.  All the layers are attached to the base using runner adhesive.


I wanted to put something in the background of the card and a cactus just seemed perfect.   This is so easy to make.  All you need is your large oval punch.  I used Always Artichoke card stock and punched several ovals.  I ran the ovals through the big shot using the perfect polka dots impression folder and then layered them together using liquid glue.  I attached it to the card with the same liquid glue.  For a nice highlighting touch, I added Always Artichoke ink to the dots using my Stampin' Up! marker of that color.  It just helped you to be able to see them better. 


For the greeting, I searched and searched through my stamps and could not find one that I wanted to use.  So I decided to create my own.  I used the set of alphabet letter stamps I bought years ago and stamped the individual letters using Night of Navy ink onto Whisper White card stock.  I punched these out using the circle from the itty bitty punch pack.  I then took a scrap of Night of Navy card stock and punched out 1/2" circles.  I layered these together using liquid glue and then attached them to the card using glue dots.  


Finally we come to the main character, Yosemite Sam.  Did you guess right?  Of course you did.  As I said I learned to make him from Ellen Kemper.  I will try to make this as easy as possible for you to understand so that you can make him yourself if you choose.  The colors of card stock I used are Crumb Cake, Tangerine Tango, Whisper White, Basic Black, So Saffron, Cherry Cobbler, Soft Suede, Brushed Silver,  Night of Navy and the retired Blushing Bride.

Now I am going to link you to Ellen's blog but I will also list the stamps below.  Click here to visit her blog or you can follow the list of punches to make your own:

 
Hat - 2.5 inch circle trimmed
Head - black 1 inch circle
Eyebrows - narrow Heart to Heart (retired punch)
Eye - plus sign from the itty bitty punch pack - trimmed
Moustache - part of Full Heart
Nose - word window re-trimmed to make shorter
Ears - small Heart to Heart (retire punch) cut in half
Body - Full Heart  - trimmed
Arms - Wide oval offset from a wide oval hole
Hands - 1/2 circle at ends of modern label
Legs - 1 3/8 circle near 1 inch circle hole
belt - large oval near a large oval hole - trimmed
buckle - scrap of card stock
kerchief - standard hole punch (1/4" circle), small Heart to Heart (retired punch) cut in half
boots are the smallest Heart to Heart (retired punch) - trimmed
 
I used Ellen's list but made sure to indicate anything different that I used such as for the arms as well as indicated if a punch is now retired.  To add even more to him, you could make guns for him to hold.  I did not feel that I needed them for my card.

Well that's it for this week.  I want to wish all the veterans out there a very happy Veteran's Day.  Since Monday is a holiday, I will not be posting but I will be back on Tuesday!!  I hope you will stop by to see me then.  Have a terrific weekend everyone!!!

Tuesday, August 21, 2012

A Super Hero Birthday Card

Yesterday I mentioned in my blog that my daughter's boyfriend celebrated his birthday over the weekend.  He is a huge Batman fan.  What is funny about that is my husband and my other daughter's boyfriend are both huge Batman fans too.  I guess it is a guy thing at my house.  Anyway, I decided to talk his love of Batman and put it into a birthday card for him.  I thought I would share it with you today.


This card was a lot of fun to make.  I first saw a card similar to this one made by Marie Shaughnessy.  Click here to see her card.  I started with a base card of Not Quite Navy card stock cut at 4 1/4" x 11", scored at 5 1/2".  I added a layer to the top of Basic Black cut to be 4 1/8" x 5 3/8".  I used runner adhesive to do this.  For the top layer, I cut another piece of Not Quite Navy at 4" x 5 1/4".  I decorated it before I layered it on with runner adhesive.  


I main portion of the front is devoted to the buildings.  I used Basic Gray and Basic Black card stock for these.  I cut one of each color to be 1 3/8" wide and one of each to be 1 5/8" wide.  The heights were not exact measurements.  I just staggered them. I angled the top of two of the building freehand.  I also added an antenna to the tallest one using a scrap strip of Brushed Silver and a 1/8" circle of Brushed Silver.   I added some Whisper White craft ink to the edges of the buildings using a sponge.  I then adhered the buildings using a repositional adhesive so that I could manipulate them to add the other pieces of the scene.  Once all pieces were added, I adhered them with a permanent runner adhesive.  

For the windows, I drew vertical lines and horizontal lines on 2 using a white gel pen.  I then added small squares on the other 2 with the white gel pen.  Just pack your patience because this does take time but the overall look is terrific.


To make the Bat signal, I started with a piece of vellum.  There are no measurements for this one.  I just cut and placed and cut and placed until it looked like I wanted.  I then colored the vellum using Daffodil Delight ink and a Q-Tip.  I punched a large oval out of Basic Gray card stock and trimmed the edges to give it the clould look.  Now my husband asked why I did not make this yellow instead of gray.  The answer was simple.  The signal always appeared on a cloud in the sky and the sky was always dark.  I have never seen a yellow cloud so I went with gray. I added a little Basic Black ink to it using a sponge.   I adhered the vellum to the card using a glue stick and then attached the building permanently to the card.  The cloud is attached at the top of the vellum using runner adhesive.  I then took the retired bat punch and punched out a Basic Black bat.  I added black glitter to the bat and attached him to the cloud using dimensionals.  


To complete the final look, I punched out large ovals and small ovals using Basic Gray card stock.  I trimmed the edges of these to give the cloud feel to them and attached them to the card using runner adhesive.  I finished it by using Basic Black ink and my sponge and adding ink to the clouds and sky.  I wanted it to have a dark night feel.

This card was easy to make and fun to do.  I think lots of boys and men would love a Batman themed card.  Take at look at Marie's and give one a try if you feel the urge.  

Well, my sister in law will be having her back surgery tomorrow.  I will be keeping my nieces and nephew so it should be a busy day.  I will do my best to get a card made to share with you.  Come back tomorrow to see if I am successful.  Thanks for dropping by today!!


Thursday, July 12, 2012

A Card For A Boy

Today I wanted to share with you a card I made that I think would be perfect for a boy.  Now you can give this to a girl too but since I always run short of boy cards I think I will reserve it for that.  Anyway, I went into my craft room yesterday having absolutely no idea what I wanted to make.  Then for some reason I started thinking about my youngest daughter's love of dinosaurs.  She has always liked them and that is why I said this card could be for a girl too.  So I pulled out a dinosaur stamp I have and using it as my guide I chose punches I thought would work to make this dinosaur.  Here is what I came up with:


Isn't he cute?!  I started with a base card of Always Artichoke.  It measures 4 1/4" x 11" and is scored at 5 1/2".  I added a layer on top of this measuring 4 1/8" x 5 3/8".  I chose to make this layer out of Soft Suede and attached it using a runner adhesive.  For the final layer, I took a 4" x 5 1/4" piece of Whisper White and using my pastels I created a sky and ground background.  I attached this to the Soft Suede using the runner adhesive again.  


For the greeting, I pulled out my Perfect Punches stamp set and chose the birthday saying.  Before stamping it, I took a scrap piece of Whisper White and chalked the sky background onto it.  I then stamped the greeting using Pacific Point ink onto the chalked piece and punched it out using the wide oval punch.  I attached it to the card using dimensionals.    


My dinosaur came together fairly easily.  I started with my 2 1/2" circle punch.  I punched one out of Always Artichoke for the body. I used Always Artichoke card stock for the entire body.   After it was punched out I flattened one side of it and set it aside.  Next I took the 2 1/2" circle punch again and placed it around the hole left for the body.  I offset it and punched and then repeated this.  One of these curved pieces was used for the neck while the other was used for the tail.  For the legs, I punched out a large oval.  I cut it in half thus making 2 legs.  His head is a 1 3/8" circle.  I used Whisper white and Basic Black for the eyes and nostrils.  The white of the eyes is the circle punch from the itty bitty punch pack.  The black of the eyes and the nostrils are from the owl builder punch.  I drew the mouth on using a fine tip black marker.  To make the toes, I used my 1/4" hand held circle punch and Very Vanilla card stock.  I attached the toes to the legs and trimmed off any excess hanging over the edge. The spots and spines are made using Soft Suede card stock. The spots on the tail and on the body are from the circle punch of the itty bitty punch pack.  Again I trimmed off any excess from the tail.  For the spines I used the retired 5 petal flower punch.  I only punched one flower and trimmed off all the petals.  They as well as all the other pieces of the dinosaur are attached to one another using a liquid glue.  I attached the finished dinosaur to the card using dimensionals.  


The inside greeting comes from the stamp set Dinoroar.  I stamped it using Always Artichoke ink onto Whisper White card stock and trimmed it using my paper trimmer.  Once it was the size I wanted, I used my corner rounder punch to round the corners and edged the saying with Soft Suede ink.  It is attached to the inside using runner adhesive.  

Well I am off the make tea and see if the inspiration bug is around to inspire me on a card for tomorrow.  I am so glad you stopped by to see my dinosaur.  Please come back tomorrow to see what I have for you next.  See you all then!


Wednesday, June 27, 2012

A Perfect Boy's Card

It always seems to me that I never have enough male oriented cards on hand.  When I started making the Peanuts characters, I realized the opportunity to make cards for boys was great.  So today I want to share another character with you that I themed the card for a boy.  Let's get started.


It's Charlie Brown himself.  I started with a base card of Old Olive cut at 5 1/2" x 8 1/2", scored at 4 1/4".  I added a layer of Basic Black cut at 4 1/8" x 5 3/8".  I attached it with runner adhesive.  Next I chose the color of Cajun Craze and cut it to be 4" x 5 1/4".  I wanted to added something to the background of this card that would go along with the theme so I chose a football.  I used Soft Suede card stock to make these. I punched out 3/4" circles and then reinserted them into the punch and punched again.  This gave each circle the football shape.  I added the black marker lines to make the stitching to each ball and adhered them to the Cajun using runner adhesive.  Next I took this piece and ran it through my big shot using the Argyle impression folder.  You might remember I used this one on the Schroder card Monday.  However, I used the opposite side of the impression.  For some reason this texture just reminds me of boys.  I adhered the Cajun piece to the base using runner adhesive.  


To make my version of Charlie Brown I started by finding an image of him on the internet that I liked.  I used this as my guide for most of him.  Let's focus on the upper half right now.  The card stock colors used to make him are Blushing Bride (retired), Daffodil Delight, Basic Black, and Soft Suede.  The head was punched using a 1 3/4" circle.  For the ears, I punched out a word window and cut it in half.  That way the ears would be seen.  The neck is a word window.  For the shirt, I started with the wide oval punch and trimmed off the top and bottom.  Don't get rid of these pieces!  Keep at least one of them.  This little piece will be used to make the collar of the shirt.  Simply snip it in half and you now have a collar!!  The sleeves were made with the retired small oval punch.  I punched one only and cut it in half.  Although you can only see one arm I did make two.  I used the wide heart from the retired heart to heart punch for these.  They worked perfectly for bent arms.  The hands are the scalloped flower from the boho blossom punch trimmed to make them the way I want them.  The football is a 1 1/4" circle punched and then reinserted and punched again using the same punch to get the foot ball shape.  I drew the face and laces with a fine tip black marker. For the zigzag on his shirt, you can cut this free hand if you like.  I used the retired large star punch and punched just one point all the way across a piece of Basic Black, then turned the piece to the other side and repeated the punching.  


His shorts are a 1 1/4" square punch.  For the legs, I punched word windows to use for the legs and socks.  Then I used the small oval punch for the shoes.  Once the ovals were punched, I flattened one side of the sole of the shoes and trimmed the top to a shape I liked.  I added laces with the black marker.  All of the pieces assemble to make him are attached using a liquid glue.  I then attached the finished Charlie Brown to the card using dimensionals.  

I chose not to put a greeting on this one yet.  I thought I would wait to see who I want to give it to and what the occasion is.  I like the way he turned out.  I think it is pretty good for a first attempt.  

Sorry for the short post today but I seem to be a busy beaver this week.  I will be back tomorrow with another card to share with you.  Thanks for stopping by today!


Thursday, May 24, 2012

It's Almost Dad's Day

Why is it that every time I have to make masculine cards, I get stumped?  Making a card for any man seems almost impossible.  I say almost because I always seem to come up with something.  That frustration of finding the right idea is what I was dealing with today.  I decided that since June is only a week away, I had better get started working on some Father's Day cards.  I have one to share today and one for tomorrow.  So let's get started shall we?


I think a good name for this card is Tools and More Tools.  Now personally, I do not know how to use many of the tools out in my husband's shed.  He has a lot of tools let me tell you.  Yet somehow he always seems to need more.  I guess it is like my card making habit.  I always find something new that I want to get.  

I started with a base card of Garden Green measuring 4 1/4" x 11", scored at 5 1/2".  Next I cut a piece of More Mustard card stock to be 4" x 5 1/4".  I ran it through my big shot using the Stripes impression folder.  I sponged the edges with More Mustard ink and even sponged the front of the piece a little.  I adhered it to the green base using runner adhesive.  


Next I took a piece of Basic Black card stock and ran it through the big shot to cut out the Top Note shape.  I used the same die and cut out a Basic Gray one too.  On the gray one, I followed the perforation  the is around the edge and cut it off.  Then I ran the top note through the big shot using an impression folder called Diamond Plate.  Once impressed, I layered it inside the black top note using runner adhesive and attached it to the mustard with runner adhesive too. 

Then came the tools.  I used a stamp set that is retiring at the end of May (next week) that is called Totally Tool.  I use this set a lot for men.  I stamped the little tools onto Whisper White card stock using StazOn ink.  I then colored them in using my colored pencils.  Then came the hard part.  I cut each one out including holes in the handles.  They are attached to the gray diamond plate using liquid glue.  

For the greeting, I used a stamp from a retired set called King of the Grill.  I stamped the message in Garden Green ink and punched it out with the modern label punch.  Next I sponged the edges with green ink and added a black brad to each side of the saying.  I adhered it to the card using dimensionals.


For my inside greeting I went back to the Totally Tool stamp set.  The tools are each attached to a saying so when I stamped them for the front I just ignored the sayings.  This one with the screwdriver is my favorite saying of the set so I chose it for the inside.  I stamped it using Garden Green ink and sponged the edges of it with the same.  I adhered it to a piece of Basic Black to highlight it.  I then attached the entire piece to the card using runner adhesive. 

Well that's it for today!  I hope you feel a little inspired.  Remember you can still order this set through next Thursday if you like it.  I will return tomorrow with another card for Father's Day.  I hope to see you all then.  Thanks for dropping by today!!

Wednesday, April 11, 2012

Same Man Different Job

I have really been on a punch art kick this week and my owl punch has become my best friend.  I made those cute little chefs using it and loved the result.  So when I was in the shower, it came to me -  why not use the same basic pattern for a man but give him a different profession.  Of course a few things would need to be tweaked but overall I felt pretty confident I could pull this off.  All I needed to do was choose the profession.  Well that was easy for me.  I chose to do my favorite husband's job - a fireman.  So are you ready to see the result?  Here we go. 


I had a lot of fun making this card.  I started with a base card of Pacific Point card stock measuring 4 1/4" x 11", scored at 5 1/2".  Using my beautiful pastels, I chalked a sky background onto a piece of Whisper White card stock cut at 4" x 5 1/4".  A torn strip of Wild Wasabi card stock serves as the grass area.  I adhered it to the white with runner adhesive and then adhered the white to the pacific using runner adhesive again.  Now let's move on to the really fun stuff!!


To make the fireman, you use the owl punch most of the time.  The owl vest makes the face, the jacket, the sleeves, the pants, and the back of the helmet.  The heart of the owl makes the hands.  I trimmed one side to make the thumb of each hand.  For the feet, I used the smallest heart on the heart to heart punch.  The small oval made the top of the hat while the word window is the brim.  I free hand drew the shield on the helmet and cut it out.  The nose is the circle from the owl and the mustache is a 1/2" circle punched around the itty bitty circle punch hole.  The hair is the owl's feet.  I chose to make the fireman suit out of So Saffron.  I used Basic Black, Whisper White and Blushing Bride as the other colors.  I attached him to the card using dimensionals.

Since you can see the hose I may as well go ahead and explain it.  I used Soft Suede as the main hose color.  I punched a 1 3/8" circle out and then punched a 1 3/4" circle around it.  I ended up using 2 1/2 circles to complete my hose.  I bent the paper to make the folds in it.  For the nozzle, I used a piece of brushed gold for one end and then added a strip of brushed silver for the rest of the nozzle with a horizontal slot piece for the end. (The horizontal slot punch is retired.  A small strip would work too.)  For the water coming out, I punched a modern label out of Pacific Point card stock.  I cut one end off and trimmed it down to be the size I wanted and to have the taper look I wanted.  I turned to my blossom bouquet triple layer punch and punched a few flowers out of the pacific card stock so I could use the inner petal pieces as the spray of water.  The hose and spray were attached using a liquid glue.   


Here you can really see the spray.  I had a lot of fun making this one! The fireman had to have a reason to be there so I made him a little fire.  I punched petals out from the blossom petal builder punch.  I used Daffodil Delight card stock for this and dabbed some Tangerine Tango ink onto each petal with my sponge dauber.  The logs for my fire are just small strips of Chocolate Chip card stock.  For the puffs of smoke, I used the small scallop flower punch from the itty bitty punch pack and Basic Gray card stock.  

This is a card I would use to send to a boy for a special day.  I did not use glitter on this one.  I did not feel the card needed it.  I know can you believe I said that?  Knowing how my husband feels about glitter it just seemed like the right choice.  

I really love to work with my punches.  I cannot wait to see what I can make next.  I am so glad you decided to stop by today.  I hope you enjoyed my little fireman.  Please come back by tomorrow.  I promise to come up with another share.  Thanks for looking today and I will see you tomorrow.


Tuesday, January 10, 2012

Neutral Cards

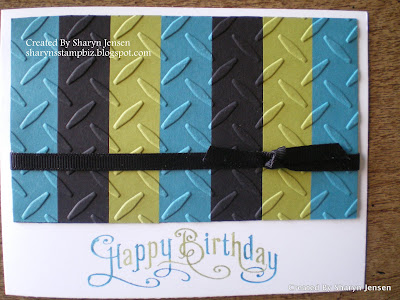
Yesterday, I went with the masculine theme to hopefully inspire you when you need to make a man's card.  Today I thought I would share what I call neutral cards.  These are cards that could be used for a man or a woman.  Most of the time, I only need to change the color scheme of the card to fit it for a man or for a woman.  I think it is important to have a few of these on hand so you are not caught off guard.  So let's get to the card.


I started this card using a Whisper White piece of card stock.  I try to stick to neutral colors for the base card of these so that it will fit the person no matter what.  There is a simplistic elegance to it that just seems to come across to me.  I hope it does to you.  Let's break down the 2 main components of this card.

Starting with the top piece, I used a piece of Basic Black card stock cut at 3" x 5 1/8" .  I then chose my color pattern to work with for my stripes.  For this card it is Island Indigo, Basic Black, and Lucky Limeade.  I cut strips of each color at 3/4" x 3".  I then decide on my pattern for this card.  I placed runner adhesive all over my black backing and carefully placed my strips on it.  Once the strips were all on, I placed the piece into the Diamond Plate impression folder and ran it through the big shot.  I then took a piece of 1/4" grosgrain ribbon and tied a simple not around it.  


The greeting comes from the stamp set Perfectly Penned.   I wanted it to fit in with the color scheme so I decided to used my Stampin' Up! markers to ink the stamp.  This allowed me to use both Island Indigo and Lucky Limeade to color the letters on the stamp.  Use the brush tip end of the markers to do this and be patient.  You need to do this carefully so you get the look you want.  I always mouth breathe a warm breath of air onto the stamp to re moisten any part of the ink that may have started to dry.  Stamp it down and see how beautiful it looks.


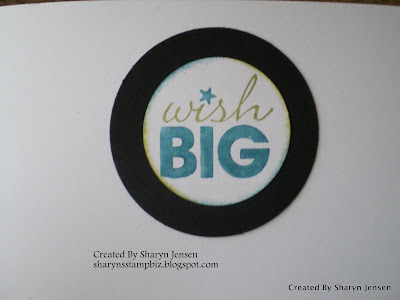
For the inside, I turned to my stamp set called Word Play.  I used the same 2 colors of ink to color the words here too.  Again use the brush tip of the marker to apply the ink to the rubber.  I punched it out using my 1 3/4" circle punch.  I took my sponges and edges the circle using the Indigo and Limeade ink to make it pop.  I then layered the white circle onto a Basic Black circle punched out with my 2 1/2" circle punch.  The colors really stood out then!!
To change the feel of this card to be more feminine, simply choose colors that make it feel that way to you.  For me, I turn to pinks or purples or bright colors.  Give this one a try.  It is such a simple card to make but looks great when finished.  

Hopefully your Tuesday is going well.  I will be back tomorrow with another card to share with you.  Please come by to see it.  Thanks for dropping in today!


Monday, January 9, 2012

Difficult Cards

Happy Monday everyone.  I hope you all had a wonderful weekend.  I tried to get a few chores done as well as rest a little bit along the way.   Now it is time to jump into a new week and see what it has in store for me. 

From the title, you might be thinking that our theme today is sympathy.  While I do find those cards difficult to make at times it is more because of why I have to make it and not the actual design.  The most difficult type of cards for me to make are masculine cards.  I just do not come up easily with ideas for these.  I will sit and look through sample after sample hoping to be inspired but it always takes a while.  So I have decided to challenge myself with the task of making some of these cards.  I am going to try to have one per week but no promises.  Today I do have one to share.  It has some of my husbands favorite things on it. 


TOOLS!!!!  What man does not like tools?  This card was pretty fun to make and I made extra tools for a few other cards too.  The base card is Chocolate Chip card stock.  I stamped the from of it with the Woodgrain stamp just to add a textured look to it.  This stamp is from SU!.  It is quite large so it will cover the entire front of the card at one time.  I then took a piece of Crumb Cake and cut it to the size I wanted.  I ran it through the big shot using an impression folder from Cuttlebug called Diamond Plate.  I like this folder for manly cards.  It actually caught my attention because it reminded me of the bumper on my husband's ladder truck.  I edged the Crumb Cake with Chocolate Chip ink to darken the edges.  It is attached using runner adhesive.  The greeting is from the Look Who's Turning stamp set.  It is stamped with Chocolate Chip ink on Very Vanilla card stock and punched out using the word window punch.  I layered it on a piece of Crumb Cake punched with the modern label punch.  It is attached to the card using dimensionals.


 To make the tools, I started by taking my Totally Tool stamp set and stamping each tool using StazOn ink.  I then used my colored pencils and colored all the tools.  Once colored, you just need to cut them out.  I think the measuring tape is the hardest to cut out.  I have seen people attach these to the card using brads, giving the appearance of pegs on a board.  I chose not to do this.  I simply randomly placed the tools on the Diamond Plate until I was happy with the look and attached them using Tombo Liquid glue.  


This is a shot of the inside of my card.  I chose the screwdriver because I loved the saying.  I am positive it fits lots of guys out there.  It is stamped on Very Vanilla using Chocolate Chip ink, layered on a piece of Crumb Cake and attached using runner adhesive.  I did not want to color the tool inside.  I thought it looked good just as it was.  After all, most men don't really care about bling.  They are looking at the overall concept.
Well that's it for today.  I hope your Monday is a good one.  Take time to stamp today and be creative.  It always helps you have a good day!  Thanks for stopping by!


Friday, July 22, 2011

There's A Monster On My Card!!

Well I guess that it would be better to have one on a card than under your bed.  Ever since I saw Disney's Monster Inc. years ago, I have a new found affection for these creatures.  When the 2010-2011 SU! catalog came out last summer, it had a stamp set in it called Make A Monster .  Needless to say, I ordered it rather quickly and could not wait to play with it.  I will admit that other things did become more important and I completely forgot I even had the set for a while.  When I saw it on my shelf the other day, I knew it was time to play. 


Sorry about the lighting of these pictures.  One of the bulbs in my lamp went out and I cannot seem to find the right one anywhere.  
Back to the card, these little creatures just make me laugh.  The stamp set comes with 3 bodies, 5 sets of eyes, 4 mouths, and 3 head toppers ( I say that because they are not all hair).  I stamped my bodies first and then added the eyes and hair and mouth.  Yes I know the green one does not have a mouth.  My daughter pointed that out to me repeatedly.  However, I did not want to put his mouth on his body so I left it off.  I colored them using my colored pencils.  The little circles stamped in the background on the white and pacific point are actually another set of the eyes from the set.  


The "Happy birthday" comes from the stamp set called curly cute.  I stamped it in versamark ink and heat embossed it using the tangerine tango embossing powder.  I love this stuff.  The color really popped and the effect is so cool.

Here is a closeup of the little monsters.  I don't know if you can see the background very well on the tangerine tango piece of card stock, but I ran it through the big shot using the new Stripes impression folder from the 2011-2012 catalog.  I added a little texture but did not take away from the overall monster look.  I can't wait to make more of these little guys!!
Well, that is all for today.  Time to run a few errands.  Hopefully there will be stamp time later.  Thanks for stopping by today and have a wonderful weekend.  See you Monday.

Thursday, July 14, 2011

A Card For Your Favorite Guy

Hello everyone.  I hope your week is moving along smoothly.  I cannot believe it is already Thursday.  Where does the time go? 

Today, I thought I would talk about the most difficult cards for me to make - masculine cards.  I don't know why but I can sit all day and create cards for any occasion, for any female or child, but when it comes to the cards for men, I just always seem to struggle.  I guess I am always attracted to the cute stamps and as my husband has repeatedly pointed out, men do not necessarily like cute.  So when Stampin' Up! came out with the Totally Tool stamp set, I bought it as quick as I could.  Of course, I did not do anything with it for awhile but at least I had it.  I have slowly started making a few cards with it and wanted to share a pretty simple one with you today.


As you can see this really is a simple card.  One of my husband's favorite things is his peg board in his shed where he can store tools and they are always within easy reach.  So I thought why not create a peg board on a card.  I started by stamping the tools I wanted on brushed silver card stock.  Then I cut these out and using my handy SU! markers, I colored the handle of the hammer and the saw.  I then took a piece of Crumb Cake card stock and cut it to be 4" x 5 1/4" and ran it through the Big Shot using the Perfect Polka Dots impression folder.  I then laid out my tools on the polka dotted piece and decided where I wanted them placed.  I used my adhesive runner and attached them to the card.  Now you could use glue dots or dimensionals if you like for this.  It your choice how you want to do it.  Then I took my paper piercing tool and made the holes for the brads.  Put your brads on and attach it to a Early Espresso base card.  The "happy birthday" is from the Teen Tiny Wishes stamp set.   I stamped it using Early Espresso ink, punched it out using the word window punch and then layered it onto the modern label punched piece.  Okay, so it has no glitter and is not that fancy, but in my opinion most men do not look for the shimmer or fanciness on cards that women do so I think it is fine.

I wanted to wish all my fellow demonstrators who are attending convention this weekend a very fun filled time.  I know there will be lots of excitement.  

Give this easy card a try and let me know how you do.  Be sure to come by tomorrow and see what I come up with.  Thanks for stopping by today.