CARDS FOR SALE

Most cards you see on this site are available for purchase. Simply click the Pay Now button at the bottom of the post of an available card to purchase the card. You will be linked to PayPal for payment. It will come up as "greensnaggletooth@cox.net" which is the name of my internet company. Price is $5.00 unless otherwise stated and includes shipping. Your card will come with an envelope also. Email me with any questions or requests at: sharynsstampbiz@gmail.com
Thanks for taking a look at my creations!!

Showing posts with label boxes. Show all posts

Wednesday, March 6, 2013

Bunny Boxes Revisited

Hi everyone.  I hope your Wednesday is going well.  I wanted to do a special blog today to revisit these cute little boxes I made for Easter treats.  I tend to make these each year to use so I felt they deserved to be shared again.  This will be a short blog as I need to get back to house cleaning.  Am I the only one who thinks the house should just stay clean so that you don't have to do this every week?  I think cleaning is over rated but I guess it is also necessary.  Oh well back to bunny boxes.  Here they are:

My original blog featuring these appeared on April 22, 2011.  I am not going to bore you with all the instruction detail again.  To get the instruction on how to make these you can visit the original posting called Here Comes The Easter Bunny by clicking here.  I like to make these in a variety of colors.  I tend to use colors that could represent actual bunnies but get as crazy as you want with these.


Here is a closer look at one of the rabbits.  They are just too cute for words.


Last is a side view.  The box is not huge which is good because it will allow you to add a few fun items and treats but you will not over do it.  I always add a cotton ball for the tail.  I think it makes the whole bunny complete.

As I said it is a short blog but the house with all its dust will wait no more to be cleaned!!  I sound a little too happy about that.  Oh well.  Thanks for stopping by and I will see you tomorrow.

Wednesday, October 19, 2011

Treats For You

Now this may seem silly to some of you out there, but I love to make special treat holders for my kids at the holidays.  For example, for Easter, I made them all Bunny Boxes filled with silly toys and candy.  The reason this might be strange is because my girls are 19 and 23.  But who doesn't like treats?  I make each of my girls a box as well as their significant others.  Of course, with Halloween coming I thought I would once again make a box for each of them and I wanted to share this with you.


This is how my project started out.  As you can see, I have cut out 4 of the Bags w/Scallops and 14 top notes using my handy Big Shot.  I took 6 of the top notes and ran them through again twice to cut out the small pieces to layer the front of my pumpkin with.   Once all those pieces were cut, I sponged the edges with pumpkin pie ink.  Did I forget to mention I used pumpkin pie card stock?  Silly me.  Using garden green card stock, cut out 2 leaves for each pumpkin with the big shot and the Leaves #2 die.  You can use any of the leaves you would like.  Use the pennant punch with soft suede card stock, you can punch out the non-scallop pennant (4 of them) for the stem.  I always assemble the front piece of the pumpkin before they are attached to the boxes.


Here are the assembled boxes.  I use sticky strip to assemble these to make sure they hold.  Now usually you would fold in the sides and the scallop would be the lid for the bag.  However, for this project, you will actually cut off the scallop lid and leave the box open.  I put sticky strip on the front and back of these without removing the top red strip.  You do not want to remove this until you are ready to adhere the top note front and back.  Also, be sure to only do one side at a time.  But for these pumpkins, I needed to add a little something to them before assembling them.  Then I attached the front and back.  Are you ready for the final product?


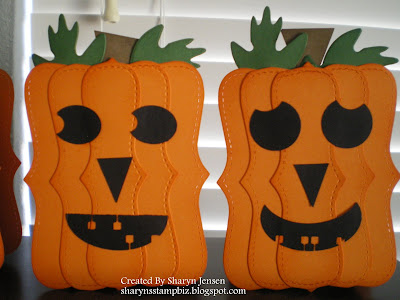
Since it's Halloween my pumpkins needed faces!!!!!

Here is a close up of the first 2.

And here are the other 2 close up.  I think these are adorable.  I cannot wait to fill them and give them to my kids on Pumpkin Carving day.  That's right.  In our family, we schedule a day to carve pumpkins.  It's messy but fun!
I hope you enjoyed seeing these.  Have a wonderful rest of your Wednesday.  Thanks for dropping in and I will see you tomorrow.


Wednesday, October 5, 2011

Another Halloween Box

It's Wonderful Wednesday!!  At least I hope it will be wonderful.  Yesterday was a terrific day here in sunny Phoenix.  It was actually overcast and breezy.  I was able to turn my air conditioning off for a while and open the windows and doors.  I think our little dog Sadie enjoyed it the most.  She does not like to be out in the heat during summer so this was a real treat for her.

I came across another Halloween box that I made 2 years ago as I was cleaning out some things.  While the designer paper I used is retired as well as the stamp set, the box could easily be made using current dsp and stamps.  So I thought why not share it with you.  It is a project I did for a stamp camp held by a fellow demonstrator.  Although she was not my upline, she asked if I would participate and teach a project so I did.  It was a lot of fun believe me.  Anyway let's get back to my box.


I wanted to start by showing you the side view of the box.  As you can see, you actually make 2 boxes, one in basic black and one in pumpkin pie.  Usually you would fold the tops down to close the box.  However for this project, you will assemble the box, fold the side flaps inside the box adhering them with sticky strip, and leave the top open all the way.  These boxes were made using the Box #2 die for the big shot.  When it cuts the box out, it also scores the fold lines for you.  You simply do not fold on the score lines for the lid of the box.  Once you have both boxes assembled, place them back to back and adhere them together with sticky strip.  I placed my sticky strip around the edges and on the actual box part.  Do not put it across the mid section of the lid because as you will see in the next picture you need room to punch.


Here you can see the basic black side of the box.  Notice that I used my wide oval punch to punch out a section of the lids to create a handle.  Because you are punching through 2 pieces of card stock, it will take a bit of strength to punch it completely.  Good way to build up your muscles though!  I cannot remember the name of the dsp but I chose a pattern, cut it to fit the side and adhered it with my runner adhesive.   I wanted a little border at the bottom so I used old olive card stock and cut a piece to fit the dsp.  The pumpkins are from the retired stamp set called Pumpkin Patch.  I stamped them using pumpkin pie, basic black, and old olive inks.  Once stamped, they were cut out.  The 2 oval side pumpkins are adhered using my runner adhesive while the middle one is attached using a dimensional.  A piece of 1/4" grosgrain ribbon was added for a little color to the handle and I was ready to move on to the other side.


Here is the pumpkin pie side.  Again, I attached a piece of dsp to the box first.  Then using my big shot, I cut out 2 old olive swirls using the sizzlits die called Scribbles Swirls.  I attached those to the dsp using the tombo glue.  The greeting is from the Pumpkin Patch stamp set and was stamped on whisper white using basic black ink.  I then punched it out with my large oval.  Taking a scrap piece of basic black, I punched out a scallop oval and layered the large oval white greeting onto it.  I then attached it to the box using a dimensional.  

You could easily duplicate this box for Halloween using the current papers and stamp set available.  You can also make them for other holidays by changing the colors, dsp and stamps to fit whatever holiday it is.  

I hope you have a wonderful day and I will return tomorrow and show you another stain glass card I worked on recently.  Until then, thanks for dropping by today.  See you tomorrow!!


Friday, April 22, 2011

Here Comes the Easter Bunny

First and foremost, I wish all of you a glorious Good Friday.  I know for myself and my family, this is a day of reflection and of honoring Jesus for the sacrifice that was made to pave the way for all of us.  Be sure to spend time with your family and to be thankful for all you have.  I know I will.

With Easter just a few days away, I thought I would share with you the cute Bunny Boxes I made this year.


As you can see, I made 4 different ones: Basic Grey, Whisper White, Soft Suede and Basic Black.  The Bunny face and back were made using the Top Note Die for my Big Shot.  They are attached to a Bigz XL Fancy Favor box.  That is another die for the big shot for those who are not familiar with all the dies.  What is nice about this box is not only does the big shot cut out the box, it also scores all the lines which will need to be folded making assembly super easy.   Now onto the Bunny itself.


The ears and feet are the Wide Oval punch.  You need two for the ears.  Then punch 2 large ovals (1 3/4" x 7/8") out of Pretty in Pink for the inside of the ears.  I chose to make each rabbit have colored eyes.  These are made from the 1" circle punch.  The black of the eyes is a 3/4" circle punch.  The cheeks are 1 1/4" circles, dotted using a black fine tip marker.  Now on the black one, I dotted the cheeks with the white gel pen.  The nose is the Small Heart punch in Melon Mambo.  I drew a little mouth on (see it just under the green from the carrot) with the black pen.  Again, use the white gel for the black bunny.  The "hands" were made using a scallop circle, then using the 1" circle punch to punch out 3 scallops to for hands.  1 scallop circle will do both hands.  On his little feet, I used the 3/4" circle punch and 3 circles from the itty bitty punch pack to make the toes.  The carrot is a small oval   (1 3/8" x 5/8") in Pumpkin Pie.  I drew the rings on using the Pumpkin Pie marker.  The leaves are from the Snowflake punch.  One snowflake in Garden Green can be cut in half to make leaves for 2 carrots.   Of course there is one more things this little guy needs:

That's right - a cotton tail.  Pretty simple to make.  They go together quickly.  You may find it hard to believe, but these are actually for my girls and their beaus.  Even though the ages range from 19 - 24, who would not want to get a bunny filled with goodies.  Oh well, I like them.  
I want to wish all of you an Easter full of God's grace and blessings.  Remember to let go of the past and always look to God for the future.  Thanks for stopping by today and I will be back Monday.  HAPPY EASTER!