CARDS FOR SALE

Most cards you see on this site are available for purchase. Simply click the Pay Now button at the bottom of the post of an available card to purchase the card. You will be linked to PayPal for payment. It will come up as "greensnaggletooth@cox.net" which is the name of my internet company. Price is $5.00 unless otherwise stated and includes shipping. Your card will come with an envelope also. Email me with any questions or requests at: sharynsstampbiz@gmail.com
Thanks for taking a look at my creations!!

Showing posts with label flowers. Show all posts

Tuesday, July 9, 2013

Complicated Is Not Necessarily Better

Today I thought I would return to a simple card design.  Sometimes it is just nice to do something that looks pretty when finished but is not so hard to complete.  I don't know about you but I don't always have a lot of time to sit down to work on a card so I turn to some of the simple ones so that I can complete my task easily.  I hope you can find some inspiration from this one.


Isn't it pretty?!!!!  Now I know I poppies are red but I decided to make them blue.  It's a nice and easy card to make that requires few supplies.  So let me share with you what I used to make this one.

I started with a base card of Gumball Green cut at 5 1/2" x 8 1/2", scored at 4 1/4".  I added a layer of 4 1/8" x 5 3/8" Midnight Muse and attached it to the base using runner adhesive.  For the final top layer, I took a piece of Whisper White and cut it at 4" x 5 1/4".  Using the Pleasant Poppies stamp, I stamped the image onto the white using Midnight Muse ink.  I then pulled out my favorite colored pencils and colored in the stems and flowers.  Once they were colored, I attached the white piece to the base card with the runner adhesive.


I wanted to add a little something more to my card and chose to add butterflies.  I used the Beautiful Wings embosslit and my big shot.  I cut butterflies out using all of the 2012-2014 in colors:  Gumball Green, Midnight Muse, Primrose Petals, Raspberry Ripple, and Summer Starfruit.  I used only the ones with the polka dots on them.  They are attached to the card using glue dots.  I then add rhinestones to form their bodies and added one to each wing also.  To the flowers whose centers showed, I added a yellow rhinestone.

I did not put a greeting on this one yet.  I will when I decide who is receiving it and for what occasion.  I do hope the ease of making this card came through to you.  I know there are lots of samples that are intricate and take lots of time.  Trust me I do some of those too.  They are beautiful but the more simple ones are beautiful too.  

I hope you all have a terrific Tuesday.  I plan on spending some much needed time with my husband.  He has been working a lot lately and I have been missing him.  I will be back with a new share for you though so be sure to stop by to see me tomorrow.  Thanks for visiting today!!!!

Thursday, April 4, 2013

My Flower Card

Hi everyone.  It's Thursday!!!!  I am so glad you decided to stop by today.  As promised, I am going to share with you the card I made using the lily flowers from yesterday.  Let's just jump in and get started.


I started with a base card of Lucky Limeade card stock measuring 4 1/4" x 11", scored at 5 1/2".   I wanted to add a little bit of background decoration to the card so I stamped the base card with my Pleasant Poppies stamp using Lucky Limeade ink.  It allows the image to be seen but not detract from the rest of the card front.  


Here is a closer look at the background.  To add a little pizzazz to it, I added a bit of white gel pen to some of the flowers.  It highlighted them and added a bit of color.  I also added 3 pearls up in the corner just because I wanted to!


The focal point of the card is my flowers.  To make this area, I started with a piece of Daffodil Delight and Whisper White card stock.  I ran the Daffodil through the big shot using the Labels Collection of framelits.  I cut this out and then ran it through one more time, turning the framelit to lie crossways on the cut label.  This cuts the final shape you see in the photo.  Okay I realize while typing this that it sounds a bit confusing so I will post a tutorial on how to do this for you soon.  I then ran the final shape through the big shot with the Vine Street impression folder from the Sale-a-Bration catalog (no longer available).  The edges were sponged using Daffodil Delight ink and it was attached to the base using runner adhesive.

Next, I took my Whisper White and ran it through the big shot using the same framelits, just one size smaller.  Once it was cut into the shape, I ran it through with the Perfect Polka Dots impression folder.  I sponged the edges with Lucky Limeade ink and ran the sponge lightly over the top of the dots to highlight them too.  It was attached to the Daffodil shape using the runner adhesive.

The only item I added to my lilies is the cut little yellow button at the bottom of each one.  To learn to make these, visit the blog from yesterday.  I attached the flowers to the card with dimensionals.  


For my greeting, I turned to a Sale-a-Bration stamp set called Bloomin' Marvelous.  Just like the impression folder, this is no longer available.  Anyway, I stamped it onto Whisper White card stock with Lucky Limeade ink and punched it out using the scallop oval punch.  I sponged the edges with Daffodil Delight ink and attached the greeting to the card using dimensionals.  

That brings me to the end of my blog for today.  I will be back tomorrow with another blog to share with you.  I think I will show you the step by step tutorial of how to make the center of the card I did today.  So please come by to see it if you are interested.   I will try to make another card with the ones I make to show you too.

Thanks for stopping by today to visit!

Monday, August 13, 2012

Another Flower for the Holidays

Happy Monday everyone!!  I am sending wishes to all of you for a wonderful week.  I am starting my with a little cleaning in my craft room.  Believe me, it is needed.  I do not know how I get so much stuff out of place!!  Even things that are where they are suppose to be are forgotten because I have not used them in a while.  So a thorough cleaning is called for in this case.

I hope you all had a wonderful weekend.  My youngest daughter, Kaitlyn, was bitten by a bug on her hand on Saturday.  Since it happened when she was sleeping we do not know what type of bug bite it is.  Poor little Kate has been taking benedryl and doing ice compresses to help with the swelling of the bite.  It is about a quarter size around and raised up.  You can tell there is fluid behind it.  I am hoping we will see improvement soon.  Other than it itching and hurting a little, she is doing okay.

I did have a chance to work on a fairly simple card this weekend.  I will tell you it is very easy to make and therefore, this will be a very short post.  So let me get started so I can get to cleaning.


The base card for this one is Real Red cut at 4 1/4" x 11", scored at 5 1/2".  Next I added a layer of Shimmer White card stock cut at 4 1/8" x 5 3/8".  I attached it using runner adhesive.  For the final full layer, I went with a piece of Garden Green measuring 4" x 5 1/4".  I ran this piece through my big shot using an impression folder called Evergreen.  I placed it in my color catcher and sprayed it with my champagne shimmer spray.  I then attached it to the white using the runner adhesive.  I added those cute little glitter dots I picked up at a local craft store to each corner of the green using glue dots to make them stick.  For the final layer on the front, I cut a piece of Shimmer White to be 3 3/8" x 3 3/8".  I rounded the corners using my corner rounder and then brushed the edges using a sponge with Real Red ink.  I attached it to the green using dimensionals.  


The only other component for the front of the card is the flower itself.  I started by cutting 4 sets of leaves out.  I did this using my big shot and a sizzlet die called Little Leaves.  I glued these to the white using a liquid glue.  I made sure one leaf was pointing at each corner.  Next I took a piece of Real Red card stock and ran it through my big shot using the retired Daisies #2 die.  This die was so popular when it first came out that it was on back order forever.  I was lucky enough to get mine quickly since I am a demonstrator.  It is my favorite flower to make and even though it is retired, I have no plans to stop using it.  When you cut the flowers, you get a small, medium and large daisy.  You will use all three.  It will also cut the center circle out. Just set these to the side.  Next I ran a piece of Whisper White through the big shot using the same die.  Set the centers of these flowers aside also.  Then it is time to layer.  I like to layer the matching sizes together first - small on small, medium on medium, and large on large. I offset the petals when doing this.   I chose to layer white on top of red but you can do it however you choose.  Once the sizes are layered, I then layer the medium set onto the large followed by the small set onto the medium.  If you look at my flower, you will see that I offset the petals so that the colors show up easily - try to put the red on white and white onto red.  I do all my layering using a glue pen so that I can really control where the glue goes.  Once all the sizes are layered together, you will want to cover the center hole.  Since my top flower was white, I wanted to use a red center.  I went with the one from the medium size flower.  I glued it on with my glue pen.  To add some sparkle to the center, I used one of those glitter dots and attached it to the middle using a glue dot.  

This is a fairly simple card but it does look really pretty when completed.  I love making these flowers.  I used them on a lot of my projects.  

Well that's it for today.  I am off to go through my stuff.  I wish you all a wonderful day.  I will be back tomorrow to share with you again.  Until then, thanks for stopping by.   


Tuesday, June 19, 2012

New Stamp Set

Welcome to Tuesday's blog everyone.  I hope you are all well and ready to stamp.  Today I wanted to share one of the new stamp sets with you called Road to Happiness.  It is in the new 2012-2013 Stampin' Up! catalog.  Do you remember the set called Loads of Love?  It had a cute little truck in it and all kinds of items to put in the bed of the truck.  When it retired at the end of May this year, I was truly sad to see it go.  It really is one of my favorite sets.  While I will continue to use it for my own cards, I can no longer use it for any classes.  Well, this set, Road to Happiness, is just as much fun.  Let me show you the card I made using it and let's see what you think.


I started with a base card of Pacific Point card stock cut at 4 1/4" x 11", scored at 5 1/2".  I thought about adding a layer before the top one but decided not to so that the items on the top would shine.  I started with  a piece of Whisper White card stock measuring 4" x 5 1/4".  I used my pastels and chalked a background of the sky all over the piece.  Next I took a piece of Basic Black card stock.  I angled it on my paper trimmer and cut it at a diagonal.  I attached the black to the sky using runner adhesive.  Next I took a stencil of a tree that I happen to have and used my pastels once again to make the trees along the roadway.  I added white gel pen to the black as the stripes in the road.  It is attached to the card with the runner adhesive. 


The greeting used on this card comes from the Road to Happiness stamp set.  I stamped it using Pacific Point ink onto Whisper White card stock and punched it out using the modern label punch.  I used a sponge and edged it with Pacific Point.  Then I punched another modern label out of Pacific Point.  Using my runner adhesive, I offset the two labels and then attached them to the card using dimensionals.


I wanted to have more than one car on the road so I made 2.  I stamped the first car from the Road to Happiness stamp set onto Whisper White card stock using VersaMark ink.  I used Tangerine Tango embossing powder and heat embossed it.  Since I only needed the back end, I trimmed out the car, placed it on the road, and cut off the excess.  It is attached using dimensionals.


For the second car and the main one of the card, I again started by stamping it using VersaMark ink onto Whisper White card stock.  It was heat embossed using Tempting Turquoise ink and then cut out .  Directly on the card, I stamped the flowers that would fill the car.  I laid the car down and used my stamp-a-ma-jig to get the exact placement I wanted.  I stamped them using Basic Black ink and then used my Stampin' Up! markers to color them in.  Once that was done, I attached the car using dimensionals.  

The stamp set has flowers, balloons, presents, hearts and beach gear that can be stamped for the inside of the car.  There is also a bride and groom you can stamp in the front seat and cans to attach to the back.  It has several sayings in it also making it easy to use for different occasions.  I am hoping they might add an accessory set to this one next year!!

Well that's it for today.  I hope you all have a wonderful day.  Thanks for dropping by and I will see you tomorrow.


Wednesday, May 16, 2012

New Colors!!!!

Well today is the day.  Today you will get to see the new in-colors coming out in the 2012-2012 Stampin' Up! catalog.  In-Colors stay around for 2 years.  So in the new catty, you will still be able to order the 5 that were introduced last year for one more year.  The one I will show you today will be introduced this year and available until the 2014-2015 catalog comes out.  Anyway, I sat down today and made a card using the new in-colors so you could take a look at them.  Are you ready?  Here we go!


My base card for this one is not a new color.  It is Very Vanilla card stock measuring 5 1/2" x 8 1/2".  I scored it at 4 1/4".  The layer on top of it is one of the new in-colors.  It is called Midnight Muse.  It is a beautiful dark blue.  I love the richness of it.  I cut this piece to be 4" x 5 1/4".  I ran it through my big shot machine using an impression folder called D'Vine Swirl.  I spritzed it with a champagne glitter spray and attached it to the base card with runner adhesive.  Next I ran another piece of the vanilla through my big shot using the Doily large sizzlit die.  I attached it to my card with liquid glue.  

The butterflies are cut with the big shot using an embosslit which cuts and embosses the card stock.  This embosslit is called Beautiful Wings.  I used 2 more of the new in-colors to make these.  The colors are Primrose Petals and Summer Starfruit.  The leaves behind the flower are also from a sizzlit die called Little Leaves.  I chose the 4th new in-color called Gumdrop Green to make these.  The butterflies are attached with glue dots.  I added Dazzling Diamond glitter to them.


In this close up of the flower, you can see the Summer Starfruit and Gumdrop Green colors really well.  I punched 2 of the Blossom flowers out.  The first punched blossom is the bottom flower is from the 5th and final in-color being introduced this year, Raspberry Ripple.  To create the top flower, I took a piece of Very Vanilla and punched my second blossom.  I them took the Raspberry Ripple and Gumdrop Green ink and sponged it onto the flower.  I let it dry for a minute and then added VersaMark ink to the top of this by stamping with the pad itself all over the flower.  I then heat embossed it using clear embossing powder.  I layered the 2 together using glue dots and attached it to the center of the doily with glue dots.  Next I added a yellow glitter to the center with liquid glue to add some dazzle. 


The greeting comes from the stamp set Curly Cute.  I stamped it using Midnight Muse ink and sponged the edges with the same ink.  I rounded the corners of the greeting using the corner rounder punch prior to sponging.  It is attached using glue dots.

Well what do you think of the new colors?  I love them all.  I will try to use something else new for tomorrow's card.  I think I will stick to the new colors also.  

I do appreciate you stopping by today.  Please come back by tomorrow and see what I have for you next.  Happy crafting to you all!!


Monday, April 30, 2012

Has Your Prince Come Along Yet?

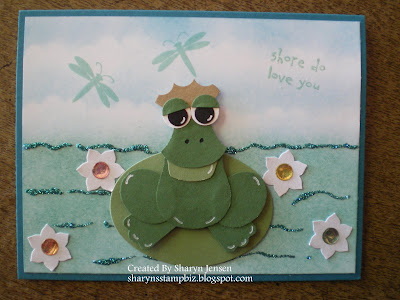
All little girls dream of being a princess and of course they wait for the day that Prince Charming comes along.  Sometimes, we encounter those frogs that we think might be the prince but in actuality is just a frog.  Been there done that.  But if we wait long enough our prince will come.  Remember all princes start as frogs.  It is how they grow and mature that either keeps them a frog or turns them into a prince. 

Now what does all of this have to do with my share for this fine Monday?  Well, I bet you can guess there is a frog involved and you would be right.  Once again, I was sitting at my craft table trying to get inspired to make something.  I happened to look up and saw my punch art sample board.  For some reason this frog stood out to me.  He is another punch art I made for the board but never used on a card.  So it was his turn to be used today!!  Here we go on a froggy adventure!!


It is a relaxing day at the pond for this frog.  I started with a base card of Island Indigo cut at 5 1/2" x 8 1/2", scored at 4 1/4".  For the top layer, I cut a piece of Whisper White to be 4" x 5 1/4".  I used my pastels and created a sky look for the top half of the card and a water look for the bottom.  To enhance the water color, I used a glitter I picked up at a stamp convention called Ocean Spray.  Using my liquid glue, I made little lines for the ripples.  Allow this to dry completely before you put any of the details on it.  Adhere it to the card using runner adhesive.  For the dragonflies in the sky, I used a stamp I happen to get at a stamp convention.  It is stamped using Pool Party ink.  I really had to look around to find my greeting for this one.  I ended up using a stamp from the retired stamp set called Crab & Company.  I inked it first with VersaMark ink and then immediately with Pool Party ink.  This way once I stamped it I could sprinkle clear embossing powder on the words and heat emboss them.  


For the flowers floating in the water, I used my boho blossom punch and punched out the pointy petal flower from Shimmer White card stock.  These were adhered down using liquid glue and have a sparkly sticker added to the center of each.  


Now for the star of the card.  His color scheme is Garden Green, Wild Wasabi, Brushed Gold, Whisper White and Basic Black.   I used a total of 4 punches to make this guy.  His legs were made with the small oval punch.   For the feet, I used the modern label punch and cut the punched piece in half.  I now turned to my owl builder punch for the main components of Mr. Froggy.  The actual owl makes up his body.  I trimmed the ears and feet off of it.  For the face and the "ribbit pouch" under it (afraid I don't know the technical name), I used the vest from the owl punch.  I trimmed the pouch to be smaller than the face.  The nostrils were drawn on with a fine tip black marker.  The eyes and eyelids are pretty self explanatory.  For the crown, I started by punching a vest out of it.  Then I used the circle from the itty bitty punch pack and punched out small pieces of the bottom of the vest to get the points of the crown.  It is glued upside down, but I bet you knew that.  All pieces of the frog were adhered with liquid glue.  The lily pad is an oval cut out from the Ovals die using the big shot.  It is the middle sized one on the die.  I glued the lily pad down with liquid glue.  I added white gel pen to the various parts of froggy to enhance them.  The frog was added to the pad and card using dimensionals.  

I left the inside of this one blank by adding a piece of white cut at 3 1/2" x 4".  It is edged with Pool Party ink.  This way you can use the card for whatever you want to by adding your own stamp or writing your own message.  

If you have any questions about this frog please feel free to drop me a line.  I would be happy to hear from you.  I hope you come back tomorrow and visit again.  Thanks for dropping by today!!


Friday, March 30, 2012

ROAR!! - Did I Scare You?

More then likely, I could not scare a fly.  So I know my title for today's blog most certainly does not scare you.  I finally found time late yesterday to sit down and actually make a card.  It was difficult though.  The inspiration did not come for a while.  We received word that our nephew in California is doing well.  The tests show that they were able to get the entire tumor removed which is good news.  However, the pathology test showed that it was indeed cancer so chemo will be necessary.  He is a trooper though.  When he went into surgery, he took 3 stuffed lions with him.  He is the inspiration for my card today.  So let's get started.


This was the first lion I have made like this.  I saw a lion head done in a similar  way by a demonstrator named Cathy Dubreuil.   I changed it up just a little, added a body and now have my own lion.  The base card for this is done with Pacific Point card stock cut at 4 1/4" x 11", scored at 5 1/2".  The top layer is a piece of Whisper White measuring 4" x 5 1/4".  I used the pastels (chalk) to created the sky.  Then I took a scrap of Wild Wasabi card stock and tore strips from it.  I adhered these to the white using runner adhesive.  Using a glue pen, I added dazzling diamond glitter to the edges of the paper.  The flowers were made with Daffodil Delight and Tangerine Tango card stock using one of the punches from the itty bitty punch pack.  I placed a pearl in the center to give it a little more design.  They are adhered to the card using a liquid glue.  My greeting came from the stamp set "Look Who's Turning".  I stamped it using Pacific Point ink directly onto the sky.


I chose to use So Saffron and Chocolate Chip for the main colors of my lion.  The tongue is Rose Red while the muzzle is Crumb Cake.  For the eyes I used Basic Black and Whisper White.  I started by punching a 2 3/8" scallop circle for the mane.  Next I used the owl builder punch and punched the head, the eyes, the nose and the tongue.  The hair on his forehead is from the large flower of the boho blossom punch.  The muzzle is the small heart while the feet come from the heart to heart punch.  For the tail, I used the branch from the bird builder punch.  His body is the only part not from a punch.  It was cut out using my big shot and the ovals die.  It is the medium sized oval from the die.  I added white gel pen to the eyes and nose to highlight them.  The whiskers, freckles and toes were added using a fine tip black marker.  And that is how you create a lion.  He is attached to the card using dimensionals. 


The inside greeting is a stamp I have had for years.  It is not from Stampin' Up! but I love to use it.  I stamped it using Pacific Point ink onto Whisper White.  I punched the corners of the white with the ticket corner punch and then brushed the edges with the Pacific Point ink.  Next I took my markers and colored in the stars with Tangerine Tango and Daffodil Delight.  The circle were filled with Pacific Point.  It is attached to the card using runner adhesive.  

Well that's it for today.  I am certainly hoping all of you have a wonderful weekend and I am praying for a better week next week for my family.  I must admit I am exhausted!   Hopefully I can get a little rest this weekend.  So with that thought I thank you for stopping by today and I will return on Monday with another share.  Have a terrific weekend.


Tuesday, March 6, 2012

Daisies - The Friendly Flower

Have you ever seen the movie "You've Got Mail" with Meg Ryan and Tom Hanks?  In the movie, the character Meg Ryan plays loves daisies and she calls them the friendly flower.  I guess I can see her point.  When they are in bloom, they always make me smile.  So for today's share, I turned to a stamp I picked up at a craft store a few years ago.  This little stamp has been used every spring for the past few years.  Well let's get started shall we.


This card starts with a base card of Pink Pirouette cut at 5 1/2" x 8 1/2", scored at 4 1/4".  Next I cut a piece of acetate at 4" x 5 1/4".  I took my little daisy stamp and stamped it onto the acetate in a random pattern.  Now as you know when working with acetate, you need to use an ink like StazOn because it dries immediately and does not smear.  From the picture, I bet you can see that there is no black ink used on this.  However, all the inks are by StazOn.  I used a pink, purple, green, and blue StazOn ink to give the flowers borders of color.  For some reason the colored inks do not dry immediately so to avoid a smear, I used my heat tool and heat set the ink after I stamped all the flowers.  I also let it sit for 30 to 45 minutes.  Once I was sure it was all dry, I glittered the center of all the flowers with a sunshine yellow glitter by adding a glue that would dry clear and then sprinkling the glitter.  Shake off the excess.  Next go by the colors and glitter your flowers in the same way.   Sit this aside to dry completely.  You will know its dry when you look at the other side and no longer see glue.  You only see the glitter.  I adhered this to my base card once it was dry using glue dots.  To cover the dots, I punched photo corners using the retired photo corner punch.  I ran the photo corners through the big shot using the Square Lattice die, then attached them with glue dots.


For the greeting, I first punched a 2 1/2" scallop circle in Whisper White.  Next I punched a 1 3/4" scallop circle in Pink Pirouette.  I took a scrap piece of vellum paper and stamped my greeting which comes from the stamp set Word Play.  I used the pink StazOn ink and heat set it so it would match the flowers.  I then punched it out using the 1 3/4" scallop circle.   I glued the vellum onto top of the pink one and then layered that on top of the white scallop.  Just to jazz it up a little, I added some Stickles glitter glue to each scallop.  I attached this to the finished card using dimensionals.  The nice thing about this card is it could be used for a birthday or a graduation or any occasion where wishing big would be appropriate.  All in all, I do like the background of flowers and will try this again at some point.

That's all I have for this terrific Tuesday.  I hope all of you have a wonderful day.  Thanks for stopping by today.  See you tomorrow.

Monday, March 5, 2012

Mama's Roses

Happy Monday to everyone.  I hope you all had a nice weekend.  I will admit it was a tough one for me.  Yesterday marked the 5th anniversary of my mom's death.  I can't believe it has been 5 years already.  I miss her terribly and still find myself wanting to pick up the phone to call her.  To help me get through yesterday, I decided to make a card for her.  Now I only did a card front but after all this is more for me than anyone else.  My colors were easy to choose as she always looked so pretty in pink and purple.  I can remember growing up that she always had rose bushes and I know she loved roses.  The card actually came to together rather easily.  So let's take a look at it.


I started with a piece of Pink Pirouette card stock cut at 4 1/4" x 5 1/2".  I ran it through the big shot using the Finial Press impression folder.  I also took a piece of Whisper White Card Stock and punched out photo corners using the retired punch to do it.  I also ran these through the big shot using the Finial Press impression folder.  


For the greeting, I turned to the retired stamp set called Well Scripted.  I love the look of the writing.  I stamped my greeting onto a piece of Pink Pirouette card stock using Rose Red ink.  I then ran it through the big shot using the smallest frame from the Labels Collection framelits set.  I then edged it using Rose Red ink.  Now usually, I would use the next size up in the framelit set for the background.  However this would have been too large for the card.  So I cut out 2 Whisper White frames using the same size as the pink and made my own frame.  It is adhered after the roses are finished being glittered and drying using dimensionals.


The flowers were made using the stain glass technique.  I started by cutting a piece of acetate to measure 3 3/4" x 5".  I then stamped my rose onto this using StazOn ink.  I stamped 2 of them so I could use both colors I wanted to use.  Next I filled in the stem and leaves with a glue that dries clear and sprinkled the green glitter on top of it.  Shake off the excess glitter.  Then I did the rose bud and rose bloom of one flower with the glue and pink glitter and the other one with purple.   Be sure to shake off the excess glitter after each color.  You will then need to let this dry completely.  You will know it is dry when you turn it over and no longer see the glue but are greeted with dazzling glitter.  I adhered it to the pink base once it was dried completely, glitter side down.  I did this using a glue dot in each corner.  I covered these glue dots by adding the photo corners.  

My mom would have loved this card.  I know she is watching.  Grief is one thing that each of us goes through differently.  For me, making cards even for those who have died is very comforting.  It helps to ground me and get me back on track.  

I hope you enjoyed my card today.  Give the stain glass technique a try.  I know it may seem hard but it is really fairly simple and the result is beautiful.  Thanks for dropping by today.  See you tomorrow.


Friday, February 17, 2012

Who Is That Masked Creature?

Well once again we have reached the end of the week.  I am happy to say my head is doing much better today so I am looking forward to the weekend.  For once I do not seem to have any plans which means I can relax!!  It is always nice to have that down time. 

Today's share has a cute little masked critter on it.  I bet you know what kind of animal it is already.  If you guessed a raccoon, you are right! 


The base card is a 5 1/2" x 8 1/2" piece of Calypso Coral card stock, scored at 4 1/4".  I took a stamp from the retired stamp set called Sprinkles to stamp all over the Coral.  I used the VersaMark ink to do this.  I then sprinkled clear embossing powder all over it and heat embossed it.  Next I pulled out a set of framelits dies called Labels Collection.  This set is in the Occasions Mini catalog.  Using my big shot, I ran a piece of Daffodil Delight card stock through using the 2nd largest framelit.  Remember, you use tab 1 on the platform to do this due to the thinness of the die.  Next, I took the size just under the 1st frame and ran it through the big shot using Baja Breeze card stock.  Once these were cut out, I ran each one through the big shot again using tab 2 of the platform.  I used an impressions folder from Cuttlebug called Flowers to add texture to them.I added Stickles glitter glue in dots to the background on the Coral and on the Baja Breeze in the center of the flowers.  


Here you can see the background a little better so you can see the glitter glue dots.  I just wanted to be sure you could see the details of it.  You can use any impression folder you have to make your texture.


Finally we come to the star of the card - the raccoon himself.  He is made completely from punches.  He is just so cute.  I used Basic Gray, Whisper White, Basic Black, and Pink Pirouette card stock to make him.For the arms and feet I used the word window punch.  His body is comprised of a gray wide oval punch and a white large oval punch.  The face is the ornament punch with the hook park cut off.  The white on his face is also from the ornament punch.  You trim it down to make the muzzle.  For the tail, I used the large petal from the Blossom Petal Builder punch.  I took another large oval and cut pieces off for the white rings on his tail.  The ears are also from the Blossom Petal Builder Punch.  Again I used the large petal in gray and layered the smallest petal of that punch in Basic Black on top.  His cute little nose is from the Owl Builder punch.  For the eyes, you start by layering white and black wings punched from the Bird Builder punch.  Then add the white circles from the Owl Builder as well as the teeny tiny circles to complete the eyes.  I added white gel pen to highlight various areas and black dots on his muzzle.  He needed a little something to hold so I chose a flower.  I chose to use the base colors to make this.  So I used Calypso Coral, Baja Breeze, and Daffodil Delight card stock.  I used the Boho Blossom punch and layered 2 of the flowers.  I put a circle from the Owl Builder punch on top and added the pearl to the center.  I also added glitter to the flower petals.

I love love love doing punch art!!  I think I may do some over the weekend so there may be another punch character on Monday for you to see.  I hope you all have a happy and safe weekend.  I will see you Monday.  Thanks for dropping by today!


Tuesday, January 31, 2012

Love is in Bloom

Who doesn't like to receive a beautiful bouquet of flowers on Valentine's Day?  At my home, most of my flowers that I have received are wooden.  That's right, wooden.  They are roses made out of wood and they last forever.  My husband doesn't like getting real flowers that will fade away in a few days.  He prefers to give me ones that will last.  Sweet, huh!

So I wanted to make a card with a cute bouquet of flowers for Valentine's Day.  I sat and thought long and hard and finally came up with an idea.  Off to work I went.  I have to tell you I was surprised at how easy it all seemed to come together.  Want to see it?  Here it is:


So what do you think?  I wanted to stick with a heart theme so I used my full heart punch and my small heart punch to do all the hearts for this.  My base card is made with Elegant Eggplant card stock.  The only layer I added to this one is a Whisper White layer edged with Elegant Eggplant ink.  Do not attach this to your base card until you have attached the vase to it.  To make the plant flourish, I turned to my Wedding Sweet stamp set.  I used the large stamp from it and used my stamp-a-ma-jig to line it up.  I stamped it in Wild Wasabi ink.  Then it was time to add the vase.

I used the full heart punch and my glimmer red card stock to make this.  I punched out the heart and adhered it to the card stock where I wanted it.  I then turned the white over and trimmed off the piece of the heart hanging over the edge.   I knew I would use the small heart punch and the glimmer red card stock to make some of the heart flowers, but I wanted more colors than just red.  I turned once again to the glimmer silver card stock and set out to make other colors.  


I took one square of the glimmer silver about 2" x 2" and added Melon Mambo ink to it using my sponge.  Remember, the more you add the darker the color.  I have found that I use the darker colors of ink for this so it will show up.  I also used another square same size of the silver and added Elegant Eggplant ink to it with a sponge.  Once they were colored with the ink, I took my small heart punch and punched several of each color:  Melon Mambo, Elegant Eggplant and Glimmer Red.  Once they were punched, I simply placed them on the flourish until I was happy with the look, then added adhesive and stuck them down.  Easy as pie to make and beautiful to look at.  
I wonder what I will make for tomorrow.  I guess I will find out as my day goes along.  I do promise to have something ready to share with you.  Thanks for dropping in today.  I will see you tomorrow.

Wednesday, November 9, 2011

Preparing For The Holidays

Yesterday I decided to start preparing for the holidays by practicing my dressing recipe.  I tweeked it just a little and made it homemade instead of buying the bread or prepared boxes.  I must say it turned out pretty well and even my daughter, one of my hardest critics, liked it.  It also really got me in the mood for turkey and all the trimmings having to smell it baking.  I also had to take all the Halloween decorations down to get ready to put my harvest ones up.  Needless to say, I did not have much time for crafting.  So no card to share for today.  However, I will share a couple of other items with you.

Last weekend my husband and I hosted a potluck dinner for his CERT group.  CERT stands for Community Emergency Response Team.  They are trained to help in times of disaster.  My husband and his partner, Paul, do all the training of them.  Anyway, one of the members brought along a treat for everyone.  I wanted to share it with you in case you are looking for something easy to make for a party or gift.


These are chocolate covered pretzel sticks.  We make these at my house every year.  These were made by Pat Turner.  She took the pretzels once they were solid and placed them in individual cellophane bags.  Cellophane bags like these are currently available in the holiday mini.  You get a package of 50 for $2.50.  Once they were in the bag, she chose a couple of colors of ribbon that were harvest looking and used an embellishment on each one.  Now for me, I do these for Christmas so I would more than likely use Real Red and Garden Green ribbon and make little owl Santas to embellish with on the package.  Easy to make and so cute to give to others.  (By the way, they tasted good too!!)


Here is a the other project I worked on yesterday.  I made a bunch of punch art Santas, elves, and poinsettias to use on Christmas cards.  I will be doing a class later this month and these are what we will be making.  I hope to do a couple of more designs like a reindeer head and Mrs. Santa Clause too.  I hope to have time in the next couple of days to work on those.  Anyway I have not just been sitting around eating those pretzels.  These little guys are so much fun to make!
Hopefully I will have a new card to share tomorrow.  My husband has a meeting tonight so maybe I will get time to craft.  Thanks for stopping by today and I will see you tomorrow.

Thursday, October 20, 2011

Christmas Flowers

My husband and I always enjoy seeing all the beautiful poinsettia plants around the holidays.  Last year, we actually bought one and have had it ever since.  While the flowers eventually faded and died, the greenery of it has not. It is still as green as it was.  Does anyone know when or if it will bloom again?  I know my husband will be very disappointed if it does not bloom this year.  I too am looking forward to it.  Oh well, we will have to wait and see. 

Just in case it does not bloom, I wanted to make one using punches.  Thanks to Dee Slater, a fellow demonstrator, I was able to learn how to make a really nice one.  Thanks for sharing that video Dee.  It is so easy you will love it.


What do you think?  This was a simple card to put together.  I started with a Wild Wasabi base card.  I took a piece of Whisper White and stamped little presents on it using VersaMark.  I know they are hard to see but they are there.  I heat embossed them using clear embossing powder.  I wish I could tell you the name of this stamp set that I got the present from but I honestly do not remember it.  I bought this set from SU! years ago before I was a demonstrator.  It has stamps for all different holidays.  The white was then spritzed with Frosted White mist (2oz. of alcohol with Frosted White shimmer paint).  I used  Wild Wasabi as the color of the leaves.  I cut out one that I like from the Leaves #2 die for the big shot.  I sponged the edges of them with matching ink and adhered them under the flower.  

For the flower, use Real Red card stock.  I used a 1 1/4" circle punch for the base of the flower to attach the petals to and the blossom builder punch for the petals.  Start by putting TomBow liquid glue on the circle.  You will need 14 petals to make this.  Lay 7 of the petals on the circle leaving a space between each petal.  Then take the other 7 petals and layer them on top of the first layer where the gaps are.  Once it is assembled, set it aside to dry completely.  Then place the flower in the Snow Burst impression folder and run it through the big shot.  This gives your flower a beautiful texture.  I then placed a 1/2" circle in Daffodil Delight in the center and adhered it using the same glue. Take a pencil and curl the top layer of petals, all 7, to add dimension.  Place your flower in a protected area and pray it with a Champagne Mist spray (this is 2 oz. of alcohol with drops of the Champagne shimmer paint in it; shaken well).  This gives it some shine. Attach the flower to the card using a dimensional.  Add some gold glitter in the center just for dazzle effect. 


 Here is a side view of the flower so that you can see the shimmer on it.   Sparkly!!!!


I used a stamp from the Perfect Punches stamp set for the greeting on this card.  I stamped it using VersaMark ink and heat embossed it with Red Tinsel embossing powder (not from SU!).  I then punched it out with the 1 3/4" scallop circle punch.   Attach using dimensionals.  Again not a hard card to make at all.

Let me know what you think of this card.  I value your opinion.  Thanks for stopping by today and I will see you tomorrow!!


Wednesday, October 12, 2011

Sympathy Card #2

Now let me clarify, no one else has passed away.  This sympathy card happens to be one I made in case I should need it in the future.  As much as I do not like having to use these cards, it is just a natural part of life.  Guess it's not a bad thing to be prepared.


This beautiful iris stamp is one I picked up at a stamp store several years ago.  The simpleness of it is what I was first attracted to with this one.  My base card is a retired color from Stampin' Up! called Pink Passion, or was it Passion Pink?  I am not sure right now but I know those 2 words were part of it.  Anyway, I attached a sheer ribbon around the card front, tying it in a not.  That is all the extra I did for this one.  Sometimes, I think simple elegance is the way to go with a card. 


As for my flower, I stamped it with StazOn ink and colored it in using Stampin' Up! markers.  I then used a glue I bought especially for glitter to out line the flowers.  Now you may be wondering how I got the lines so thin.  Well, this glue happened to have a tip you could by for it that allows you to draw extremely thin lines to add glue to.  It gave just a hint of added detail to the flower without going overboard.  The glitter I used is the Dazzling Diamond glitter from SU!.  Then inside simply has "With Deepest Sympathy" stamped on it.  I made sure to leave enough room so I could write a special note.
I do realize this post is kind of short.  I am hoping to have more time to blog tomorrow.  Honestly, I suffer from migraines and I have a big one today.  So now I am going to go take my medicine and lay down.  Thanks for dropping by today and I will see you tomorrow.  


Monday, October 3, 2011

Roses Are Red - No They're Pink

This weekend I got to do one of my favorite techniques - stain glass.  Yes I worked with glitter all weekend!!  It was the best!  Now my dog is probably tired of the glitter.  Since she is all black, it shows up well on her coat.  She shines for days.

I truly love the glitter from Stampin' Up!.  However, for my stain glass it is very limiting.  I like to have a broad spectrum to work with so that I have the right color for what I am doing.  This leads me to the glitter aisle at my local craft stores.  I happened to wander down one a few weeks ago and found the neatest set of glitter with 30 different colors.  Yes it was expensive but I also happen to have a 50% off coupon making the item much more affordable.  Believe me when I say I broke those glitter bottles in this weekend.  I started with one of my stamps that had a flower on it, a rose to be exact.


Just look at that sparkle.  I did rely on SU! for all my card stock for this one.  I framed the flower with the top note die for the big shot.  I ran a piece of whisper white through the big shot, cutting out the top note.  I then set the cut out aside for another card and used the frame.  I then placed the frame in the SU! Finial Press impression folder and ran it through the big shot just to add a little texture to the card.  The base card is perfect plum card stock.  When I placed my piece of stain glass next to it, it popped right out so I knew it was the one.  I used light pink rhinestones I found at the local craft store for the corners. 


Pink roses are very special to me.  They always remind me of my mom.  Even though she has been gone for 4 years, not a day goes by that I do not think of her.  As the holidays approach, I tend to miss her a lot.  So when I chose this stamp to work with, I knew the flowers would be pink.  I used an opaque glitter on this one.  However, since the pink is such a delicate one, I needed to help it a little to make sure the background color did not change its appearance.  Had I simply attached it to the plum, the purple would have made the pink look a little funny.  So my solution was to attach it to a piece of pretty in pink card stock thus enhancing the pink color.  The other colors were all dark enough that I knew the pink background would not effect them.  

In case you have forgotten, the stain glass technique begins with a piece of acetate, a stamp, and StazOn ink.  You stamp the image on acetate and let it set for a couple of minutes.  The nice thing about StazOn is it does not smear.  Once it has set for a couple of minutes, you are ready to start the stain glass part.  For that you will need a glue that dries clear and glitter.  You start by applying the glue to the area you want to begin working with and then sprinkle glitter all over the area.  Shake off the excess and then continue to the next area until all areas are complete.  One tip I will give you is glitter tends to always have a bit static to it.  So to help control this I rub a used dryer sheet over the side of the acetate with the image stamped on it.  While it is not perfect, it does help to allow the excess glitter to be shaken off without leaving a huge amount of it behind.  

I wish all of you a marvelous Monday and hope you enjoy each moment of your day.  I think I will play with more glitter myself.  Thanks for stopping by today and I will see you tomorrow.


Friday, September 9, 2011

More of those Rosettes!

I am really becoming addicted to making those cute rosette flowers.  I was going through some old dsp I have and came across a some from a few occasion mini catalogs back.  I thought wow this would make cute rosettes and of course I had to sit right down and make some.  Let me remind you what this flower looks like:


Remember these?  I knew if you saw them you would remember them.  You know unfortunately, dsp included in any catalog whether it is the yearly Idea book or one of the minis retires when the catalog retires.  I think this is kind of sad as I know lots of demonstrators who have left over paper but are no longer able to use them for classes or workshops because they retired.  However, they can still be used on our own projects or cards that we send out.  Thank goodness for that.

Here is the card I did.  The base card is Certainly Celery.  I then took a layer of Chocolate Chip and place a little more than half into the Stripes impression folder and sent it through the big shot.  Then I took a piece of Very Vanilla that is half as long as the Chocolate Chip and used the Vintage Wallpaper impression folder on it.  I adhered it to the unimpressed end of the Chocolate Chip.  I place a piece of Certainly Celery ribbon, which is also retired, along the edge where the two colors meet.  I could then place my flowers how I liked on the card.  I stamped the greeting from a retired stamp set called Well Scripted on a piece of Very Vanilla card stock using Chocolate Chip ink.  I punched it out with the decorative label punch and edged it with Certainly Celery ink.  I then made a Certainly Celery frame for the label and attached it to the card.

For the inside I used a stamp from the Word Play stamp set for my greeting.  It is stamped on Very Vanilla card stock using Chocolate Chip ink.  It too is punched with the decorative label punch, edged with Chocolate Chip ink, and layered on a Chocolate Chip frame.  I added the rhinestone to the "i" for a little bling.  I really like bling!!
I cannot believe another week has come and gone.  Where does the time go?  I hope your week was a good one.  I know mine was busy but in a good way.  Hopefully next week will bring more good things my way.  Thanks for dropping in today.  Have a great weekend and I will see you Monday!!

Wednesday, August 24, 2011

More Rosettes

Once again I find myself sitting at my craft table cutting strips of paper to score and fold into those cute rosette flowers.  I must admit, I am hooked.  I really enjoy making them.  Even my daughter likes them.  She of course thinks I am crazy as usual for making them but she likes them. 

As I was choosing my DSP to use for these, I came across a set of paper from last years holiday mini.  It is called Christmas Cocoa.  I used quite a bit last year but forgot I still had some left.  So instead of wasting it I decided to make some rosettes and add them to a Christmas card. 


For the base card, I used the color Crumb Cake.  I took a stamp from the retired set called Sparkly & Bright and stamped on the Crumb Cake with VersaMark ink.  I then added my clear embossing powder and heat embossed it for by background.  I took a strip from one of the DSP's in the set which has flocking on it (the white design on the red; you know flocking makes it fuzzy!)  and cut it at 1 1/2" by 5 1/2" so it would go from top to bottom on the card.  Before I adhered it, I also cut a piece of Whisper White at 1 1/2" x 5 1/2" and then used my eyelet lace border punch to punch along one side.  Then  I adhered this to the DSP and then attached all of it to the card.  I had already made my little rosettes and added pearls to the center so I thought why not add pearls to the eyelet lace too.  Pretty neat huh!!


I took a close up of one of the rosettes so you could see the fold of it.  Not sure how well you can see it but I hope you get the idea of what they look like.  You can also really see the embossed snowflakes.  I love the shiny look.  Heat embossing an image for the background of a card is one of the simplest ways to create a unique look for you special card.  
Now I am off to my crafting table to punch and punch and punch as I am preparing for my class tomorrow night.  I am so excited to see everyone and share some of the cute punch art animals I love to make with them.  Be sure to visit my online store next week.  I hope to have lots of new items uploaded to it.  I have been lazy lately and am a little behind.  Now I must work extra hard.  Stop by tomorrow for a sneak peak at some of the items I will be adding to my store.  I cannot wait to show you!!  Until then, thanks for stopping by today!!


Tuesday, August 23, 2011

Please Don't Eat the Daisies

Have you ever seen the movie called Please Don't Eat the Daisies?  You know the one with Doris Day?  Well I can remember watching it with my mom when I was younger.  She really loved all musicals and I must admit, I too am hooked on them now.  In face, I have a huge collection of movies from the 1930's to 1960's and most of them are musicals.  My collection does include this movie.  My oldest daughter loves the movie too and would go around for hours singing the theme song which might explain why my youngest cannot stand to watch that movie.  She would get so upset when her sister started singing the song over and over.  I can find humor in this now but at the time, I would separate them just so they could not fight over to sing or not to sing.  It was nuts.

Today I am going to share a card which has some daisies on it which is why I thought of the movie.  It will be a quick share today because I have a pretty busy week.  I am putting bundles of punch art together to sell in my online store as well as preparing for my punch class on Thursday evening.  I have to admit this is my favorite type of busy to be.  Now on to the card.


Ta Da!!!!!  These little daisies are so adorable yet so easy to make.  Start by punching out a 1 3/4" scallop circle.  Then take your favorite scissors and cut in between each scallop almost to the middle but make sure you do not detach any petals!  When you are done, you may put an embellishment in the center of each flower (I used a 1/2" circle with glitter) and you are done.  Easy right?  The greeting is from the teeny tiny wishes stamp set.  I used the eyelet border punch on a piece of whisper white card stock and put it across the bottom of the yellow piece of cardstock the flowers are adhered to.  It just dressed it up a little bit.  The nice thing about this card is it is very simple to make and can be used for various occasions, making it one of my go to designs when I am in a hurry. 

Give this card a try.  I think you will be very happy with the outcome.  I know this is a short post but I better get back to work on all my other projects.  I will have something to share with you tomorrow.  Thanks for stopping by today and I will see you tomorrow. 

Friday, August 12, 2011

Birthday Elegance

I finally decided yesterday to sit down and try to make a paper flower I have been seeing on various blogs over the past year.  I understood the basic technique for it but had never really tried it.  I mean I did once but I could not get it to fold the way I wanted and it ripped.  Then I was inspired by a website I was visiting to try to make one again.  I will share the flower first, then the card.

 Well, what do you think?  I started by cutting a strip of DSP 2" x 12".  I used my scallop border punch along one side of it.  This became the outer edge of the flower.  Then I used my new scoring tool that is coming out in the holiday mini catalog to score the strip between each scallop.  Then you accordion fold the paper, glue the ends together, and prepare to press the center down to make the flower.  That is really the hardest part of this entire technique and it is what caused me problems the first time I ever tried to make one of these.  Once I had it pressed down, I used a strong adhesive, my Tombo liquid glue, and attached it to a 1" circle.  Prepare your circle first.  I will tell you the one I attach first is on the back of my flower that way if it is off center, no one will see it.  Hold the flower down for a few seconds on the circle to make sure it adheres completely.  Once it is dry, I can then flip it over and attach my front decorations.  In this case it was another 1" circle layered on top by a 3/4" circle, and then I applied little pearls to decorate it.  


Here is the entire card.  It is very basic but the flower adds a lot pizzazz to it.  I could also have put pearls on the Very Vanilla ribbon at the sides of the flower.  I just forgot to get them out again.  I used a greeting from the retired set called Well Scripted.  It was stamped in Night of Navy ink on Very Vanilla card stock, edged with matching ink, and punch out with the decorative label punch.  I punch 2 more decorative label punches out of the Navy and cut them in half - one across the center and the other vertically up the center.  Trimming off the edges where the point comes out, I was then able to attach it to my greeting creating a mice matching border for it.  

I cannot believe another week has come and gone already.  I hope you all have a wonderful weekend and I will be back on Monday.  Thanks for dropping in today!!


Thursday, June 30, 2011

Christmas Is Coming

Is it really every too soon to start thinking about Christmas?  I don't think so.  I love everything about Christmas.  The lights, the decorations, the food, being with family and friends, the holiday movies, Santa and his elves, and most of all celebrating the birth of Christ.  Notice I did not say presents.  While they are always nice to receive, they are not what the holiday is all about.  So without a doubt, I look forward to working on my Christmas cards each year.  It puts me in the holiday spirit.

This year, I decided to try a few stain glass cards.  Today and tomorrow, I am going to share the 2 I have done so far.  So without further ado, let's get to it.


Today's card has a beautiful poinsettia as its centerpiece.  I used softer colors for the outer rim of the stain glass as well as for the snowy look on the window in order to really make the poinsettia pop.  I was very proud of this one.  I was even more excited when I found out I could use the 3 1/2" circle die for the Big Shot to cut the piece of backing for this as well as to cut the actual circle with the poinsettia out.  I simply lined up the acetate onto the die, glitter side away from the die, and ran it through.  I always worry when I free hand cut that it will not look right so this made me very excited.


Here is a closer look at the poinsettia.  I just love the shimmer.  The lovely DSP I used to layer this on is from a set called Christmas Cocoa.  Unfortunately, this set is not longer available.  Have no fear, there will be more holiday paper in the catalog as well as in the holiday mini I am sure.  I thought the snowflakes on it were a good match to the gold in the outer rim of the circle.  

The greeting I chose to use is from the set Four the Holidays.  This one is still available in the new catalog.  I stamped it directly onto the DSP with VersaMark ink.  Then using silver embossing powder, I heat embossed it to give it a little shine and raised texture.
All in all, I am pleased with the outcome of this card.  I hope you liked it.  Be sure to leave me a comment and let me know.  Thanks for dropping in today.