CARDS FOR SALE

Most cards you see on this site are available for purchase. Simply click the Pay Now button at the bottom of the post of an available card to purchase the card. You will be linked to PayPal for payment. It will come up as "greensnaggletooth@cox.net" which is the name of my internet company. Price is $5.00 unless otherwise stated and includes shipping. Your card will come with an envelope also. Email me with any questions or requests at: sharynsstampbiz@gmail.com
Thanks for taking a look at my creations!!

Showing posts with label pastels. Show all posts

Thursday, July 12, 2012

A Card For A Boy

Today I wanted to share with you a card I made that I think would be perfect for a boy.  Now you can give this to a girl too but since I always run short of boy cards I think I will reserve it for that.  Anyway, I went into my craft room yesterday having absolutely no idea what I wanted to make.  Then for some reason I started thinking about my youngest daughter's love of dinosaurs.  She has always liked them and that is why I said this card could be for a girl too.  So I pulled out a dinosaur stamp I have and using it as my guide I chose punches I thought would work to make this dinosaur.  Here is what I came up with:


Isn't he cute?!  I started with a base card of Always Artichoke.  It measures 4 1/4" x 11" and is scored at 5 1/2".  I added a layer on top of this measuring 4 1/8" x 5 3/8".  I chose to make this layer out of Soft Suede and attached it using a runner adhesive.  For the final layer, I took a 4" x 5 1/4" piece of Whisper White and using my pastels I created a sky and ground background.  I attached this to the Soft Suede using the runner adhesive again.  


For the greeting, I pulled out my Perfect Punches stamp set and chose the birthday saying.  Before stamping it, I took a scrap piece of Whisper White and chalked the sky background onto it.  I then stamped the greeting using Pacific Point ink onto the chalked piece and punched it out using the wide oval punch.  I attached it to the card using dimensionals.    


My dinosaur came together fairly easily.  I started with my 2 1/2" circle punch.  I punched one out of Always Artichoke for the body. I used Always Artichoke card stock for the entire body.   After it was punched out I flattened one side of it and set it aside.  Next I took the 2 1/2" circle punch again and placed it around the hole left for the body.  I offset it and punched and then repeated this.  One of these curved pieces was used for the neck while the other was used for the tail.  For the legs, I punched out a large oval.  I cut it in half thus making 2 legs.  His head is a 1 3/8" circle.  I used Whisper white and Basic Black for the eyes and nostrils.  The white of the eyes is the circle punch from the itty bitty punch pack.  The black of the eyes and the nostrils are from the owl builder punch.  I drew the mouth on using a fine tip black marker.  To make the toes, I used my 1/4" hand held circle punch and Very Vanilla card stock.  I attached the toes to the legs and trimmed off any excess hanging over the edge. The spots and spines are made using Soft Suede card stock. The spots on the tail and on the body are from the circle punch of the itty bitty punch pack.  Again I trimmed off any excess from the tail.  For the spines I used the retired 5 petal flower punch.  I only punched one flower and trimmed off all the petals.  They as well as all the other pieces of the dinosaur are attached to one another using a liquid glue.  I attached the finished dinosaur to the card using dimensionals.  


The inside greeting comes from the stamp set Dinoroar.  I stamped it using Always Artichoke ink onto Whisper White card stock and trimmed it using my paper trimmer.  Once it was the size I wanted, I used my corner rounder punch to round the corners and edged the saying with Soft Suede ink.  It is attached to the inside using runner adhesive.  

Well I am off the make tea and see if the inspiration bug is around to inspire me on a card for tomorrow.  I am so glad you stopped by to see my dinosaur.  Please come back tomorrow to see what I have for you next.  See you all then!


Tuesday, May 1, 2012

Little Mermaid

Did you ever see the Little Mermaid movie by Disney?  It came out around the time that my oldest daughter was born.  I watched that movie over and over with her and with my other daughter when she was born.  They loved all the characters and would just laugh at some of the antics they did.  For some reason, I happened to think of this movie today and decided I wanted to try my hand at making a mermaid.  So that's exactly what I did!


I was inspired by the water I did for the frog card I shared with you yesterday.  I really wanted to use something similar to it and this seemed to work.  I started with a base card of Island Indigo measuring 5 1/2" x 8 1/2", scored at 4 1/4".  I cut a piece of Whisper White to be 4" x 5 1/4" and used my pastels to chalk the sky and water for the background.  I used my liquid glue to make lines in the "water"and added the same glitter as before.  It is called Ocean Spray and is one I got at a stamp convention.  I decided where I wanted to position my mermaid and chose a greeting for this card.  I used one from the set Curly Cute.  It is stamped directly onto the card stock using Island Indigo ink.  I set this aside to dry and then once it was dry I attached it to the base card using my runner adhesive.


Let me start with the rock my mermaid is sitting on.  I used the ovals die for the big shot and cut out the largest oval on it from Basic Gray card stock.  Using my paper snips (scissors), I trimmed the bottom flat and shaped the rest of the rock into a shape I was happy with.  I used Basic Gray ink with a sponge dauber to add ink to the rock.  This gave a texture to the surface of it.  It is attached to the card using a liquid glue.

For my mermaid, I decided to create her face using my wonderful owl punch people as a guide.  I punched a 3/4" circle out of Blushing Bride and then punched a 1" circle around the open hole from the 3/4" circle.  I trimmed the ring into pieces to use for her neck and arms.  The 3/4" circle was used for her face.  I also punched the smallest circle from the owl punch for the nose and a vest for the top half of the body out of the Blushing Bride.  Next I punched the owl feet using the Blushing Bride card stock for her hands.  For her eyes, I punched 2 of the smallest circles from the owl punch out of Wild Wasabi.  Her hair is the owl punched out of Poppy Parade with the feet cut off.  For her bangs, I used the 1" circle punch, punched it out of Poppy Parade and cut it in half.  A lot of times, I snip out little pieces to give the bangs a more natural look.  This time I decided to cut it in a wavy pattern as I cut it in half.  Her "headband" is one of the flowers from the itty bitty punch pack.  I punched out 5 of these from Shimmer White card stock and added a colored rhinestone to the center of each.  I picked these rhinestones up at a local craft store.  For her top, I used the other flower punch from the itty bitty punch pack and Daffodil Delight card stock.  I added some Stickles glitter glue to the 2 pieces.  For her fin, I started with the large oval punch.  I cut one end to be flat.  You will need to trim the vest of the body to get it to fit with the oval fin.  The fin is Island Indigo card stock.  The tail of her is also Island Indigo and is punched using the 5 petal punch.  I used my liquid glue to draw "scales" on her fin and added another glitter called Sea Nymph that came from the same stamp convention I bought the other one at.  I added black dots to her eyes using a fine tip black marker and drew her mouth on with a fine tip red marker.  All pieces were assembled using a liquid glue and the entire mermaid was attached to the card using dimensionals when all glitter was dried.


This is the inside greeting for this card.  I used a saying from the stamp set called Create A Cupcake.  It is stamped with Island Indigo ink on Whisper White card stock and punched out using the decorative label punch.  I created the frame for it using Pool Party card stock and the decorative label punch again.  I assembled the entire saying and attached it to the card using runner adhesive.  

I hope this all makes sense.  If you catch mistakes, I apologize.  It is just another busy day for me and my brain is not working well.   Email me or leave a comment with any questions and I will happily answer them.  

I appreciate your stopping by to visit.  Please come back tomorrow and see what I have in store next.  See you all then!


Monday, April 30, 2012

Has Your Prince Come Along Yet?

All little girls dream of being a princess and of course they wait for the day that Prince Charming comes along.  Sometimes, we encounter those frogs that we think might be the prince but in actuality is just a frog.  Been there done that.  But if we wait long enough our prince will come.  Remember all princes start as frogs.  It is how they grow and mature that either keeps them a frog or turns them into a prince. 

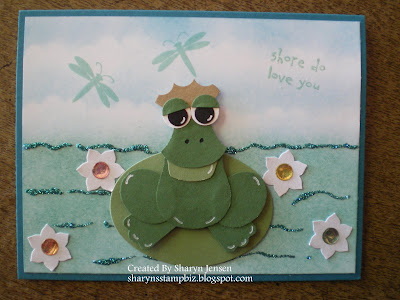
Now what does all of this have to do with my share for this fine Monday?  Well, I bet you can guess there is a frog involved and you would be right.  Once again, I was sitting at my craft table trying to get inspired to make something.  I happened to look up and saw my punch art sample board.  For some reason this frog stood out to me.  He is another punch art I made for the board but never used on a card.  So it was his turn to be used today!!  Here we go on a froggy adventure!!


It is a relaxing day at the pond for this frog.  I started with a base card of Island Indigo cut at 5 1/2" x 8 1/2", scored at 4 1/4".  For the top layer, I cut a piece of Whisper White to be 4" x 5 1/4".  I used my pastels and created a sky look for the top half of the card and a water look for the bottom.  To enhance the water color, I used a glitter I picked up at a stamp convention called Ocean Spray.  Using my liquid glue, I made little lines for the ripples.  Allow this to dry completely before you put any of the details on it.  Adhere it to the card using runner adhesive.  For the dragonflies in the sky, I used a stamp I happen to get at a stamp convention.  It is stamped using Pool Party ink.  I really had to look around to find my greeting for this one.  I ended up using a stamp from the retired stamp set called Crab & Company.  I inked it first with VersaMark ink and then immediately with Pool Party ink.  This way once I stamped it I could sprinkle clear embossing powder on the words and heat emboss them.  


For the flowers floating in the water, I used my boho blossom punch and punched out the pointy petal flower from Shimmer White card stock.  These were adhered down using liquid glue and have a sparkly sticker added to the center of each.  


Now for the star of the card.  His color scheme is Garden Green, Wild Wasabi, Brushed Gold, Whisper White and Basic Black.   I used a total of 4 punches to make this guy.  His legs were made with the small oval punch.   For the feet, I used the modern label punch and cut the punched piece in half.  I now turned to my owl builder punch for the main components of Mr. Froggy.  The actual owl makes up his body.  I trimmed the ears and feet off of it.  For the face and the "ribbit pouch" under it (afraid I don't know the technical name), I used the vest from the owl punch.  I trimmed the pouch to be smaller than the face.  The nostrils were drawn on with a fine tip black marker.  The eyes and eyelids are pretty self explanatory.  For the crown, I started by punching a vest out of it.  Then I used the circle from the itty bitty punch pack and punched out small pieces of the bottom of the vest to get the points of the crown.  It is glued upside down, but I bet you knew that.  All pieces of the frog were adhered with liquid glue.  The lily pad is an oval cut out from the Ovals die using the big shot.  It is the middle sized one on the die.  I glued the lily pad down with liquid glue.  I added white gel pen to the various parts of froggy to enhance them.  The frog was added to the pad and card using dimensionals.  

I left the inside of this one blank by adding a piece of white cut at 3 1/2" x 4".  It is edged with Pool Party ink.  This way you can use the card for whatever you want to by adding your own stamp or writing your own message.  

If you have any questions about this frog please feel free to drop me a line.  I would be happy to hear from you.  I hope you come back tomorrow and visit again.  Thanks for dropping by today!!


Friday, April 13, 2012

The Owl Punch In Action Again!

Happy Friday everyone!  As promised I am finishing out this week using my owl punch.  I must tell you though that I still have more ideas for it so it may be back next week.  Today card is a combination of different materials and techniques.  I have used the punch art and pastel technique before but the new material on this comes from scrapbook packs and stickers.  I have been doing cards and some scrapbooks for a long time.  I have quite the collection of stickers and scrapbook packs in my home.  For the card I am going to share today, I turned to some of these for help.  How about I show you the card and you can see how I incorporated these into it. 


Today we find mod girl doing the job of a teacher.  The base card is once again Real Red cut at 5 1/2" x 8 1/2", scored at 4 1/4".  I added a layer of Basic Black on top of that using runner adhesive.  It measures 4 1/8" x 5 3/8".   Next came the Whisper White layer cut at 4" x 5 1/4".  I used my handy pastels to created the sky scene on it and adhered it using runner adhesive to the card.  I wanted to have a little grass so I took a scrap of Garden Green measuring 4" wide and tore a strip.  Again the runner adhesive was used to attach it.  

When you go to your local craft store, you can find themed pack of paper and cutout that can be used in a scrapbook.  That is where I found my school house.  Since I use to be a teacher, I have a couple of scrapbooks I made using that theme.  This piece was a left over.  As all good crafters know, you always keep your left overs.  It is a textured piece that give a nice look to the card.  It has no adhesive of its own so I used the same runner adhesive to attach it down.  I made sure to tuck it under the edge of the grass giving the appearance that the grass grew in front of it.  


Here you get a better look at the teacher herself.  As you can see, she is a product of the owl punch.  I am not going to bore you with the detail of making her since they are listed in previous postings.  The texture I created on her dress and headband were completely an accident.  I had put cute little glitter glue dots on both and set her aside to dry.  Well apparently I did not sit her far enough away from me.  I went to pick up my tweezers and brushed against the dots of the headband.  I knew I could not just redo the dots so I took my finger and spread out all the dots.  I kind of liked the look so I thought why not do that to her dress too.  So I did.  I am not sure if I like the dress as much as the headband.  Next time maybe I will leave the dots.  She is attached to the card using dimensionals.

The only 2 accessories she has are the glasses and her bell.  The bell was part of a sticker pack that was 3 dimensional.  I placed it under her hand and actually glued it into place on the hand.  The main part of the bell has a dimensional on it making it easy to attach.   For her glasses, I decided to once again use my Everyday Paper Doll cartridge and my Cricut machine.  It is a lot easier making it this way than trying to do it on my own.  

I left this card blank on the inside.  You could stamp a phrase if you want or write a note.  This is perfect for a teacher at the beginning of the year or the end of the year.  It is also perfect for a new teacher who is graduating and entering the education work force.  

I certainly hope all of you have a wonderful weekend.  I will probably be playing with my owl punch some more.  If you don't have one of these think about getting one.  You can visit my Stampin' Up! demonstrator site by clicking on the link in the side bar on the right under "Other Places to Find Me".  The punch can be ordered there.  I am so glad you decided to drop by today.  I will see you all on Monday.  Happy stamping!


Wednesday, April 11, 2012

Same Man Different Job

I have really been on a punch art kick this week and my owl punch has become my best friend.  I made those cute little chefs using it and loved the result.  So when I was in the shower, it came to me -  why not use the same basic pattern for a man but give him a different profession.  Of course a few things would need to be tweaked but overall I felt pretty confident I could pull this off.  All I needed to do was choose the profession.  Well that was easy for me.  I chose to do my favorite husband's job - a fireman.  So are you ready to see the result?  Here we go. 


I had a lot of fun making this card.  I started with a base card of Pacific Point card stock measuring 4 1/4" x 11", scored at 5 1/2".  Using my beautiful pastels, I chalked a sky background onto a piece of Whisper White card stock cut at 4" x 5 1/4".  A torn strip of Wild Wasabi card stock serves as the grass area.  I adhered it to the white with runner adhesive and then adhered the white to the pacific using runner adhesive again.  Now let's move on to the really fun stuff!!


To make the fireman, you use the owl punch most of the time.  The owl vest makes the face, the jacket, the sleeves, the pants, and the back of the helmet.  The heart of the owl makes the hands.  I trimmed one side to make the thumb of each hand.  For the feet, I used the smallest heart on the heart to heart punch.  The small oval made the top of the hat while the word window is the brim.  I free hand drew the shield on the helmet and cut it out.  The nose is the circle from the owl and the mustache is a 1/2" circle punched around the itty bitty circle punch hole.  The hair is the owl's feet.  I chose to make the fireman suit out of So Saffron.  I used Basic Black, Whisper White and Blushing Bride as the other colors.  I attached him to the card using dimensionals.

Since you can see the hose I may as well go ahead and explain it.  I used Soft Suede as the main hose color.  I punched a 1 3/8" circle out and then punched a 1 3/4" circle around it.  I ended up using 2 1/2 circles to complete my hose.  I bent the paper to make the folds in it.  For the nozzle, I used a piece of brushed gold for one end and then added a strip of brushed silver for the rest of the nozzle with a horizontal slot piece for the end. (The horizontal slot punch is retired.  A small strip would work too.)  For the water coming out, I punched a modern label out of Pacific Point card stock.  I cut one end off and trimmed it down to be the size I wanted and to have the taper look I wanted.  I turned to my blossom bouquet triple layer punch and punched a few flowers out of the pacific card stock so I could use the inner petal pieces as the spray of water.  The hose and spray were attached using a liquid glue.   


Here you can really see the spray.  I had a lot of fun making this one! The fireman had to have a reason to be there so I made him a little fire.  I punched petals out from the blossom petal builder punch.  I used Daffodil Delight card stock for this and dabbed some Tangerine Tango ink onto each petal with my sponge dauber.  The logs for my fire are just small strips of Chocolate Chip card stock.  For the puffs of smoke, I used the small scallop flower punch from the itty bitty punch pack and Basic Gray card stock.  

This is a card I would use to send to a boy for a special day.  I did not use glitter on this one.  I did not feel the card needed it.  I know can you believe I said that?  Knowing how my husband feels about glitter it just seemed like the right choice.  

I really love to work with my punches.  I cannot wait to see what I can make next.  I am so glad you decided to stop by today.  I hope you enjoyed my little fireman.  Please come back by tomorrow.  I promise to come up with another share.  Thanks for looking today and I will see you tomorrow.


Friday, March 2, 2012

Egg Pick-up

It's is once again fabulous Friday.  This week has just flown by.  I was pretty busy with a few appointments, errands and taking care of ill family.  Still it just seemed to go by so fast.  Maybe that is just a side effect of getting older.  Who knows.  It is just nice when things seem to slow down and you feel you have more time to enjoy them.

For today's share, I decided to do one of my favorite things - work with glitter!!  I love that sparkle you see when something is all glittered and shiny!  In choosing my topic for my card I decided to go with an Easter theme today.  So let's get started.


As you can see, I chose to use lots of pastels on this card.  I personally always associate these colors with Easter so they were a natural selection for me.  I started with a base card of Bashful Blue card stock cut at 5 1/2" x 8 1/2", scored at 4 1/4".  I used my Sprinkles stamp set to stamp small flowers onto the outer edges of the Bashful Blue using VersaMark ink.  I then sprinkled clear embossing powder onto the flowers and heat embossed them.   Next, I pulled out scrap pieces of Pretty in Pink, So Saffron, Certainly Celery, and Whisper White.  Using my big shot and the new Framelits Labels Collection from the Occasions Mini Catalog, I decided on the order of my colors and cut the labels to suit my needs.  I love these framelits.  They make decorating a lot of fun.  I wanted to add a little texture to each layer so I once again turned to the big shot for help.  The Pretty in Pink was run through the big shot using an impression folder called Plaid.  For the So Saffron, I ran it through using the impression folder called Houndstooth.  My Certainly Celery piece was also put through the big shot but instead of using an impression folder I used a texture plate called Harlequin.  These work very similarly to the impression folder.  For the Whisper White, I used my pastels to chalk a sky.  You cannot really see it in this picture but I promise it is there.  The layers were each sprayed using the Color Spritzer Tool and coordinating markers (again it is hard to see).  I adhered each layer to each other as well as to the base card using glue dots. 


When it came to the greeting, I used a stamp from the Loads of Love Accessories Stamp Set.  I stamped it using StazOn ink onto Whisper White and punched it out using the 1" square punch.  I then edged it using Perfect Plum ink.  Next I took a piece of scrap Perfect Plum card stock and punched it using the Postage Stamp punch.  I layered the two together and adhered it using dimensionals. 


For the center piece of the card, I used the Loads of Love stamp set for the truck and the Loads of Love Accessories stamp set for the eggs.  I stamped these on acetate using StazOn ink.  I first stamped the truck and then added the eggs using my stamp-a-ma-jig as a guide.  Next comes the glitter.  This is a stain glass truck so it was colored in the same manner as any other stain glass creation.  I started with my lighter glitter colors and worked towards the dark ones.  I added glue to the area I wanted a color in and then added the glitter.  Let it sit for a minute then you can add glue to the next area for your next color.  Continue this pattern until your image is completely glittered.  Let it dry completely.  I tend to leave mine to dry over night.  You do not want any part of it wet when you attach it.  I then used my small paper snips to cut the truck out.  You adhere it, glitter side down, using glue dots.  Just be patient.  I know it takes time to make these but the finished product is just gorgeous.  

I certainly hope you all have a wonderful weekend.  I am looking forward to one with everyone well.  I will be back on Monday with another card to share with you.  Be sure to stop and see what I come up with.  See you on Monday and thanks for stopping by today!!


Friday, October 21, 2011

Paper Dolls

Paper dolls were one of my favorite things to play with when I was little.  I will even admit that I still have a paper doll book of I Love Lucy.  Of course I have not cut any of them out and I do not play with them.  It is tempting though.  Anyway, when I got my Cricut machine, one of the first cartridges that I bought was Paper Doll Dress Up.  I had a blast making all kinds of little dolls and dressing them in outfit.  Well then Cricut came out with another cartridge called Everyday Paper Dolls.  Yes I bought that one too.  Now I will say that I do wait for them to go on sale so don't think I throw money around.  There is no money to throw.  Back to the dolls.  The newest cartridge is dedicated to all types of careers and sports that people do everyday (hence the title of it).  So when my aunt called me the other day and told me she needed a card for a special young lady in her life I was excited to make it.  It got even more thrilling for me when she said she wanted a basketball theme for it.  I was in paper doll heaven.  I couldn't wait to get my machine on, the cartridge loaded, and the pieces cut out.

All the card stock used for this is from Stampin' Up!.  I still say they have the best card stock.  The base card is Daffodil Delight.  The only layer on the front is Whisper White.  I designed the background by using pastels to make the basketball court floor and wall.  Let's start with the accessories on the card front.


Here is the hoop.  It is made by first cutting it in Brushed Silver, and then in Whisper White.  I cut the pole off the white one and layered the backboard onto the silver one.  The net was cut next out of Poppy Parade.  Then I made 2 small basketballs that would be just right to fit through the net.  Tangerine Tango was my color choice for these.  I outlined the black seams with a fine tip pen.

Here is my wonderful basketball player wearing her school colors.  I chose her number on the jersey for how old she was turning.  The jersey is Garden Green and her shorts are Daffodil Delight.  I made the hair using More Mustart and the body is from Blushing Bride.  Her eyes are Tempting Turquoise.  Now I used my handy dandy owl builder punch to make her eyes and nose.  It is the smallest circle on the punch.  While the Cricut does mark the eyes and nose, I have found they are too small for my taste so I go bigger.  These basketballs are larger than the others giving the impression the hoop and balls are off in the distance.  These were outlined with black glitter.  I used the new Dazzling Details glitter glue from Stampin' Up! to highlight her shoes and numbers.


A scoreboard completes my look for this one.  I chose numbers at random and freehand wrote the Home and Visitor signs.  All in all, I was pleased with how this one turned out.  Then I started looking for what to stamp inside as my greeting.  For some reason I was not having much luck.  But eventually I figured it out.

I chose a stamp from the set A Word for You.  It actually says "Happy Birthday with a cherry on top" but I changed it to fit the theme.  I cut out with the Cricut a basketball to fit over the word "cherry" so that it is now a "basketball on top".  I stamped it in Garden Green ink, punched it out with the decorative label punch, and highlighted the edges with the ink.  Then I grabbed my cupcake builder punch and the Create A Cupcake stamp set.  I stamped the wrapper using a retired silver ink and the frosting using Chocolate Chip ink.  I then punched them out and adhered them to the inside of the card.  I went back to the Cricut with the Tangerine card stock and cut 3 more basketballs in varying small sized.  These decorate my frosting and  I made sure one of them would go on top of the cake.

Hard to believe we are at the end of another week.  I have a busy weekend ahead of me.  Hopefully it will be a fun one.  I wish all of you a nice weekend and I will see you on Monday!!  Thanks for stopping by today.

Monday, June 20, 2011

A Very Happy Weekend

Happy Monday everyone.  First off I want to wish my sister Mary a HAPPY BIRTHDAY!!!!  I hope her day is filled with laughs and joy.  I know her office staff will probably do something special so have fun.

What a busy weekend this was.  It was once again errand weekend for me so that meant grocery shopping.  While it is not my favorite thing to do, it was certainly a lot cheaper since I got to go by myself.  Husbands and children are famous for finding that one extra item that turns into a dozen before you know it.  God bless them for I know they are just trying to make sure no one goes hungry. 

Now I will skip Saturday for a moment and go to Sunday.  My husband is a fire fighter.  Unfortunately that means we sometimes go without him for holidays.  This Father's Day was one of those days.  So my daughters and I took him out to dinner Friday night to celebrate.  Now anyone who knows or is related to a fire fighter knows that the crew he or she works on is a second family.  In family tradition, the boys at the station fixed a delicious meal and had all of the families come for dinner.  It was so nice to spend time with everyone and for my girls to get to be with daddy on his special day!!

Let's jump back to Saturday for a moment. (Don't worry there is a card coming after this!!)  This was such a special day.  My niece and her husband renewed their wedding vows on Saturday.  They were married by a justice of the peace 17 years ago but always wanted to be married in the church.  They had their dream become a reality on this special day.  The ceremony was beautiful and my niece, Michelle, was absolutely gorgeous.  This was such an important day for my family.  Now you may be thinking that 17 is an odd anniversary to renew your vows on but it seems so appropriate after the year my family has had.  The last time I was with all of my family as well as my nephew-in-law, Gus, and his family was at my brother's funeral.  While he was missed terribly and could not be there to walk his little girl down the aisle, I know he was there in spirit.  At the reception, Michelle made sure to include a dedication for her dad.  It was so touching to me.  That was the only time I had tears in my eyes.  If there is one thing I can say for my family and Gus' family, they know how to party and have a good time!!  We ate and drank and danced the night away.  Yes even my husband who does not dance got out on the dance floor with me and got his groove on. My favorite was slow dancing with him.   It was a blast.  I wish Michelle and Gus many more years of happy times and know there will be lots of laughter in their lives. 

Okay now to the card.  I made a similar one a while ago.  This has that adorable kitty on it again but instead of black, I used a white one.  The main color scheme for this card is Concord Crush and Whisper White. 


I really love this little guy.  I did chalk his nose with Regal Rose chalk from the Stampin' Pastels.  Again this card goes together very quickly so it can be made when you have forgotten to make a card ahead of time.  
Well, that is all for today.  I do appreciate you reading all my weekend adventures.  Stop by tomorrow for another card.  Thanks for dropping in today.

Thursday, April 21, 2011

Need A Little Pick Up?

Happy Thursday everyone.  I hope all of you are happy and healthy today.  The closer it gets to Easter, the more I truly appreciate all the small things in life.  What a wonderful gift was given to us -- eternal life.  Be sure to take a few moments to remember everything we celebrate Easter for.

As promised, I worked hard to complete a stain glass card to share today.  There are a few differences in this card.  For one, I cut out the stain glass object to attach to the card so you do not have all the acetate.  And two, this card was made using only products from Stampin' Up!.  As you know, I am a Stampin' Up! demonstrator.  While I must admit, I have a lot of products from other companies, I really love the SU! line of products.  Most of my other things came from before I was bitten by the SU! bug.  So it was very important to me to create a card with this technique that you could make using the high quality SU! products. Here it is:


I used a stamp set called Loads of Love for the truck and its cargo of hearts.  They were stamped onto the acetate, glittered, allowed to dry overnight and then trimmed out.  The sparkly hearts are the smallest heart on the Heart to Heart punch, punched out of Real Red and glittered.  They are not stain glass.  This card could be used to send to a friend or a love one just to send happy thoughts their way.  Of course, it would also be good for your sweetheart on Valentine's Day or an anniversary.  Just a change of saying is needed.  I embossed the background with the Big Shot impression folder Perfect Polka Dots.  The edge of the whisper white was punched with Scallop Trim order punch.  The layer for the truck is a 3 1/4" square, punched at the corners first with the Scallop Trim Corner punch, and then the loops connected with the Scallop Trim Border.  I then used the SU! pastels to make the sky and ground.  The saying was stamped and then punched out with the Scallop Square punch.  The then punch 2 more scallop squares in Real Red, cut them in half, trimmed the ends as needed, and layered the pieces around the saying to create the border.  My base card is 4 1/4" x 5 1/2" in Real Red.  Now I will let you see the truck a little closer.


As I am sure you can see, the heart cargo was stamped on the acetate so that it would be able to be cut with the truck.  You do not have to do it that way.  You can stamp them separate and layer them.  They were stamped using Staz-On ink.  The glue used is the 2-way glue pen from SU!.  Even all the glitter came from SU!.  The windshield and side window were glittered using Dazzling Diamond.  The red, silver, and black glitter used for the truck is from a glitter set called Fine Galaxy.  The hearts were done in rose pink and orchid glitter from the set called Fine Cosmo.  Now I have heard a lot of people say they thought that the $13.95 price for a set of glitter was a bit much.  However, you do get 5 colors in each set.  I know that when I have bought glitter from other stores, I usually pay $3 to $5 for one 1/4 oz. container.  So really the SU! price is right on target, and you know the colors will be true and beautiful as well as high quality.  To me, it is definitely worth it.  The truck it attached to the card stock with glue dots.

Next month begins the Summer Mini catalog.  Have you received yours in the mail yet?  If not, contact me and I will be sure to send one your way.  Don't miss out on all the cute items.  Want any of the products used on this card?  Simply let me know and I will get them ordered for you or go to my SU! website listed on this page and you can order online.  Be sure to list me as your demonstrator.

I will be back tomorrow.  Not sure what I will share.  Maybe another stain glass card or maybe a cute Easter box for treats.  Guess you will have to stop by to find out!  Thanks for visiting today.

Wednesday, March 30, 2011

Look Who Is Turning...

Well, I thought I would share with you a card I made for my other daughter's birthday since I share her sister's yesterday.  I don't want her to feel left out.  I love to try to come up with unique and quirky cards for my girls.  They love to see what mom has made and are always surprised.  I bought the stamp set called "Look Who's Turning" from Stampin' Up!.  It caught my attention because of the animals in the set.  There is a hippo, an octopus, and an ostrich.  I especially like the ostrich so I wanted to use it on her card.  Here is what I came up with:


This is a fun card that made my daughter laugh when she saw it.  The sky background was created using Stampin' Pastels which are chalks.  I enjoy working with these because I can created a sky as light or dark as I wish.  The tree trunks are just scraps of paper I cut to use.  The trees and bushes are from the scallop circle punch.  I glittered the edges of each one.  For the bushes I cut the circles in half, being sure to make one side larger than the other so I could stack them.  I added white gel pen doodle dots to them just because I wanted to.  The trees also have the doodle dots and "apples" which are 1/4" circles.  Since this punch is retired, you could use the circle from the itty bitty punch set. 

I stamped the ostrich a total of 3 times - 2 in crumb cake and 1 in chocolate chip.  For the one in the tree, you only use the neck and head, yes this means you have to cut it out after you stamp it.  The bottom ostrich uses a whole ostrich.  I cut out the entire crumb cake one and the body of the chocolate chip.  If you look carefully, you can see just a small piece of the body.  Of course you could position it so only the head will show or you could use your Stampin' Markers to color the stamp so your ostrich is the two toned color you want it when it hits the paper.  The birthday hat also comes in the stamp set.  I stamped it in 2 colors, cut them out, added glitter to them and attached them to the little heads.  

I have used this set to make cards for other people especially kids.  They love it.  If you do not have it, be sure to visit my Stampin' Up! site and check it out in the catalog.  Thanks for dropping by.