No one was more disappointed when the Hostess factory shut down than my hubby. He absolutely loved Twinkies. Now I did not go crazy like some who raided the shelves in stores buying all they could before supplies ran out. We had a box at home at the time and when it was gone, well it was gone. I am happy to say that we have discovered another treat similar to this that he seems to like just as much but there are some things about Twinkies that you just cannot replace. What does this have to do with my blog? Everything. My punch art character for today was inspired by these sweet treats. Let's see if you know him.
So do you know who he is? If you guessed Twinkie the Kid you would be right. Now I will show you my inspiration for him in just a minute. I used the oval easel card that I made yesterday during the turtorial. I am not going to go over how to make it again since it would be easier for you to read the tutorial. I added a layer of Whisper White with the 2nd largest oval from the oval framelits set. I did some paper piercing along the edges of it just for decoration and add a few Daffodil Delight circles punched out with the circle from the itty bitty punch pack. I attached these with liquid glue. The edges were sponged with Tempting Turquoise ink and then attached to the card with runner adhesive. I added some turquoise Stickles glitter glue dot to the scallops along the edge.
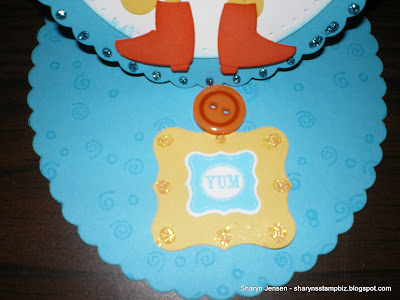
To add some decoration to the stand portion of my card, I used a retired stamp set called Fresh Fillers and stamped the swirls onto the base of the card using Tempting Turquoise ink. Next I used the same ink to stamp my greeting. I used a stamp set available only until the end of this month called Pretty Petites. It is from the Sale-a-bration collection. It is punched out using a punch also from this collection called the small curly label. I layered this piece using runner adhesive onto a Daffodil Delight curly label punch and added some yellow Stickles glitter glue dots to this. I attached the finished greeting to the card using runner adhesive. Since I did not raise this up with a dimensional I knew I would need to add something to right above it with a little depth to it. I chose a button. It is attached with glue dots.
Here is the inspiration for my Twinkie the Kid character. It is a container designed to hold a twinkie that my hubby had on his collection shelf. He took it down to clean and I just knew I wanted to make him. I am sure you can see why. His shapes are fairly common and can easily be replicated using punches. Ready to learn how? Let's go.
The colors of card stock I used when making him are Daffodil Delight, Pacific Point, Real Red, Whisper White, Basic Black and the retired Creamy Caramel. For his body, I used the 3rd largest oval from the framelits oval collection. I trimmed off the sides to give him the right shape and then I was ready to go. I think I will show you to bottom half of him and then list the punches I used to make him.
I attached all the pieces of him together with my 2 way glue pen and attached the finished one to my card using dimensionals. Here is a list of the punches used to create him:
Body - framelits oval collection for the big shot; trim down to get right shape
Hat - wide oval for the base and a 1 1/4" circle for the top and band; I cut the swoop in the brim; for the top I punched the circle for the hat and a half circle for the band; attach the band first and then attach it to the back of the base; cut the swoops in the top
Eyes - word window; I punched one out and then reinserted each end again and repunched to get the oval for them; the black of the eyes was added using a fine tip black marker; I also shaded the edges with the marker
Mouth - large oval punch; cut it down to the size you like; once attached, I drew on the edges the black with my marker and added the sides and nose with it too
Bandana - I used the pennant punch for this; I punched out 2 and cut them down to fit on him; the hearts are from the owl builder punch; I attached them prior to cutting these down
Arms/Legs - word window; I punched this along the edge of the card stock since they needed to be thinner that the entire window; insert the card stock only about half way to achieve this
Hands - boho blossom punch; use the scallop flower and trim them down
Boots - retired heart to heart punch; I used the wide heart from this for the main part of the boot; cut off one round for the top and then trim the other one to get the boot look; the heels of the boots are made using the smallest heart from this punch; you only need one; cut it in half and trim the round end flat
I had so much fun making this guy. I sure hope you like him. Now I just need to figure out what I want to make for tomorrow. Maybe I should go look at the shelves with out collections on them. Who knows - I might get inspired again. Thanks for stopping by today and I will see you all tomorrow.


No comments:
Post a Comment