Today's card is another fancy fold card. Once again, I will share with you my card and provide the website you can get a complete tutorial on how to make this one. There is even a video. As a bonus, this one is made by one of my favorite stampers in the world, Dawn Griffith. She is a fantastic and creative person. I have learned a lot from her. Ready to get started? Let's go!
Here is the card I made. This fold is called a Shadow Box. For this one, I started with a base of Garden Green. The difference between a regular card and this one is you need 2 pieces of the green, both measuring 4 1/4" x 5 1/2". You can see the score lines in the photo which indicate where the folds are. This one is another one that does flatten like in the photo so you can mail it to someone. I know it is hard to see inside but I used a piece of Real Red card stock cut at 3 1/4" x 4 ". I ran it through my big shot using the Snow Burst impression folder. I adhered it to the bottom piece of green using runner adhesive. Next I took a piece of Whisper White cut at 2 1/2" x 3 5/8". I stamped my tree using the Star Tree stamp from SU! using VersaMark ink and heat embossed it using a red tinsel embossing powder. I took the retired stamp set called Christmas Punch and used the snowflake stamp to stamp 2 large snowflakes, one on each side of the tree. These were stamped with VersaMark ink and heat embossed using an embossing powder called winter wonderland. I also stamped the smaller snowflakes on a piece of white card stock and heat embossed them too. They were punched out using the boho blossom punch and set them aside for use later. I took the top piece of green card stock and used my 3" circle die for the big shot to cut the circle in the center of the card. I then stamped the greeting using the retired stamp set called Four the Holidays using VersaMark ink and heat embossed it with the red tinsel powder. I cut the greeting out and set it aside. The tree was attached to the red with runner adhesive. I had done my score lines at 1/2" and 1" on each side prior to beginning the decorating and accordion folded them also. To connect the top piece of card to the bottom I used sticky strip. Once it was attached I added the greeting and small snowflakes to the front using runner adhesive.
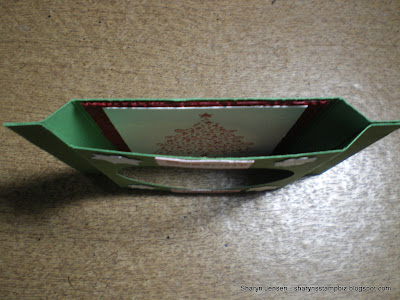
Once the card is completed it is ready to stand up. Here is a view from the top down so you can see how the shadow box looks when opened up and standing. I added depth to your card.
Last but not least, here is a view of the card standing up from the front. You can get the overall idea of the folds of this one by looking at the photo. Here is the link to go to for all instructions and a video: http://www.splitcoaststampers.com/resources/tutorials/shadow_box_card/
It is a very easy card. I will probably make another one for next week for you to see. I hope you will give this fold a try. You will love the outcome of the card.
I am so glad you stopped by to visit today. Please come back tomorrow for another Halloween card. I will look forward to seeing you all then! Have a great day and happy stamping!!


No comments:
Post a Comment