CARDS FOR SALE

Most cards you see on this site are available for purchase. Simply click the Pay Now button at the bottom of the post of an available card to purchase the card. You will be linked to PayPal for payment. It will come up as "greensnaggletooth@cox.net" which is the name of my internet company. Price is $5.00 unless otherwise stated and includes shipping. Your card will come with an envelope also. Email me with any questions or requests at: sharynsstampbiz@gmail.com
Thanks for taking a look at my creations!!

Monday, October 31, 2011

Happy Halloween

Welcome to a brand new week and a big HAPPY HALLOWEEN to all.  I hope you all had a nice weekend.  Mine was filled with a family dinner, lots of laundry, and a day of pumpkin carving.  It is tradition in our little family to carve pumpkins.  We select a day near Halloween, have both our girls and their boyfriends come over, carve pumpkins and eat a meal together.  It is a lot of fun and I enjoy the time with our daughters so much.

I sat down on Saturday this past weekend to work on a couple of cards and could not decide what to do for today.  I knew it would be Halloween but that's not going to be the theme of the card for today.  I wanted to completely go a different direction and do something cute to share.  So I decided to Iris Fold again.  You remember it is a paper folding technique.  Today's card would be perfect for someone who just had a new baby boy.  Subtle changes would easily make this a girl's card.  Here we go.


This card measures 5" x 7".  I used a white card as my base.  The water drop paper is from my local craft store.  I love the little button brads that I used to attach my little duck to the water drop paper.  By changing out the background paper to a pink and using pink buttons, this would become a little girl card.  Of course if you want to use it for a shower where you do not know if the baby is a boy or a girl, I would go with neutral colors like pastel green or yellow to make a gender neutral card.  As for the duck, it would stay the same.  Let's look at the duck for a minute.

Here is my little ducky close up.  I am hoping you can see that I started with a piece of shimmery white card stock.  Using my light box, I traced my duck pattern on the card stock.  Once the tracing was finished, I used my craft knife to cut the duck out.  My color choices for the duck were pretty easy.  I will admit I used non Stampin' Up! card stock to make this card.  I wanted to use a yellow that was a little softer than my SU! ones.  The orange is one I had in my stash of papers.  I love the look of the folds.  In a way, it reminds me of the feathers on a duck.  I used a blue brad for the eye simply because I liked it.  
Now it is time to get ready for all the trick or treaters!!  I hope you have your candy ready.  Remember to be careful out there tonight and keep you animals inside.  Have a Spook-tastic night.  Thanks for stopping by and I will see you tomorrow.

Friday, October 28, 2011

A Special Day

Hello everyone.  We have reached the end of another week.  But today is a special day, a sad day for me and my family.  You see today marks the 1 year anniversary of my brother's death.  Not a day goes by that I do not think about him and miss him terribly.  It was my honor to be at his side during the last 16 months of his life and help to care for him.  He was truly the best big brother a girl could ever have.  I have always been told that anniversaries like these become less painful as the years go on.  Not this year.  The feelings are still as real as when it happened and my heart is broken knowing he is no longer here.  I should have known it would be like this.  After all, my mom passed away 4 years ago and I miss her every single day. 

My share for today is unique because I had my brother in mind when I made it.  It is just a card front which means there is no back panel.  I make this type of card to usually trade with other card makers.  This one is going in my sample book and will be around for me to view whenever I want to. 


My color scheme for this card is Whisper White and Bashful Blue.  Now these are important colors in my family.  Being from North Carolina, we are truly UNC Tarheels fans.  My brother went to UNC and followed the basketball team every year.  He was a fanatic about March Madness and charted the teams as they advanced to the playoffs.  I enjoyed watching some of the games with him.  He was an expert in the game and is the reason why I like basketball games today.  I embossed the white card stock using the big shot and the impression folder Elegant Bouquet and then watercolored the flowers and greenery.  I used Garden Green ink, Daffodil Delight ink, Bashful Blue ink and my blender pens to do the coloring.  I like the soft look of the card.  The clouds were punched out of Bashful Blue card stock using the Cupcake builder punch.  It is the top of the cupcake, but don't you agree that it makes a wonderful cloud?!


The stamp comes from the set Ain't Love Grand.  When I chose the balloon stamp, I did it with a purpose.  You see today around 5:30 pm Arizona time, my brother's children and grandchildren will be releasing balloons with messages on them.  I felt the "sending love your way" saying was truly appropriate.  I know I will be sending loving thoughts his way.  I chose to color the balloon in a rainbow fashion as well as the hearts for a specific reason too.  You see we were taught from the time we were little that rainbows represented God's promise to all of us.  During my brother's illness, rainbows were a sign that God was watching and was with us.  My brother and the entire family knew that no matter what the outcome, God would be there.  It was truly amazing how many friends and family members would send pictures of rainbows to my brother and his wife.  I know I did.  On Wednesday afternoon this week, we happened to have a little bit of rain here.  I decided to walk out into the back yard when it had stopped and was amazed to see not a single, but a double rainbow.  I had been thinking of my brother and knew it was a sign that God is still with me and is caring for my brother.  What a comforting thought that is.

If you live in the Phoenix or Anthem area, be sure to meet at the Anthem park this Saturday for Hands Across Anthem.  All proceeds will be going to help a young girl who has stage 4 lung and bone cancer.  I hope lots of people will come and help this family out.  

Have a wonderful weekend and I will see you Monday!!  Don't forget to get your candy for all the trick or treaters that night.  Monday is Halloween.  Wonder what I will make to show you.  Be sure to stop by to see.  Thanks for stopping in today.

Thursday, October 27, 2011

Ice Cream Anyone!!

Welcome to Thursday everyone.  We are getting close to another weekend.  Where does the week go?  I always seem to have so much to do and no time to do it.  Before I know it the week is gone and my list still has items on it.  One item I crossed off is my class that was scheduled for tonight.  There was just not enough interest in it so I will have to try to reschedule for another time.  Oh well, guess I will get some other task done instead.

Today, I went back to a technique I have shown before but not for awhile.  It is called Iris Folding.  It is a form of paper folding used to create a design.  You begin with an outline of what you want to make, trace it onto the card stock and cut it out with a craft knife.  I use a light box to do my tracing.  It makes it much easier.  This particular card has been made for a birthday.


Now I will admit, all supplies for this card are non Stampin' Up! products.  I have a bin of paper from before I was a demonstrator and got my shiny card stock from a local craft store.  The cute little ice cream brads I used are an item I bought several years ago at the stamp convention (which by the way is coming up on Nov. 5th and 6th).  I really enjoy this technique.  The finished look is always so beautiful.  I love the way the cone looks.  I was lucky and found a scrap that had ice cream on it for my background layer.  This card is a 5" x 7".  Let's look at the cone a little closer.


The layering of the cone is my favorite part of this.  Finding the coordinating papers for the scoop part of this was the most difficult part of it.  Once I chose the paper the rest was easy.  The technique is simple paper folding which is layered in a spiral formation.  Some people choose to leave the center open while I prefer to cover it with a piece of the dsp.  

Well I know this is a short post but I really have a lot to do.  So off I go to work.  Thanks for dropping by today.  See you tomorrow.

Wednesday, October 26, 2011

Paper Doll Party Day 2

Happy Wednesday to you all!!  I am so glad to see that you came back for day 2 of the Paper Doll Party.  Today I will show you 8 dolls today, all different from yesterday.  That will make 17 total and if you have ever seen the Paper Doll Dress Up cartridge, you know that there really are hundreds of more you can make.  I love my Cricut machine!!  So here we go with today's share.


We begin today with these cute little aliens and cat girl.  My husband got the new Batman game for his XBox for his birthday so cat girl seemed like a good one to make.  Her outfit is simple and looks adorable on her.  The aliens make me laugh.  I think the pink one reminds me of Cousin It from the Aadams Family.  As for the green one, well I cannot think of any movie or show where I have seen him before but I am sure he would be a great character to build a story around.  

Here come the next 3.  My ballerina is one of my favorites.  I just love her shoes.  The pirate was done in honor of my oldest daughter who loves all those Pirate movies that Disney has been making.  She has seen them all, has board games designed after them, and has played the XBox games too.  I did cut off the hand of this doll so that he could have the hook for his hand.  Love the mustache.  Then there is the little mermaid.  To fit her tail on, you have to remove her legs so this is one that when I make sets for little girls to actually play with, I usually leave it out.  They get frustrated that her legs show but do not want you to cut them off.   I usually just make them a special mermaid doll instead.  The ripples in her hair remind me of waves on the ocean.  I bet you have a guess as to the last two I am about to shoe you just from looking at this picture.


It's a witch and a wizard!!  Did you guess them right?  I used gray for both of them for the hair but you could use whatever color you wanted.  Of course with any of the dolls I have shown you, you could used all kinds of color schemes to create them.  The wizard's robe and hat are cut out with the little circle in them.  So I cut a solid outfit in yellow (an option on the machine lets me do this) and layered the blue on top.  I then put glitter glue on the circles so that they would stand out.  He beard is out of this world.  The witch is complete with her pointy shoes and hat.  I added the band of green to the hat to give a little dazzle.

Well, that all for my Paper Doll Party.  Maybe I will have another one sometime.  After all, it is so much fun to make them.  Thanks for stopping by today and I will see you all tomorrow.


Tuesday, October 25, 2011

Paper Doll Party

Well, when I made that card last week of the little girl playing basketball, I must have released my inner paper doll monster.  I knew I wanted to share more of them with you so off I went to get them dressed up and ready to go.  Today I will share 9 with you and tomorrow I will have 8 more for you to see.  Don't get upset.  The cards will return on Thursday.  But for now, let's get started.


When  made these, I did not use my owl punch to make the eyes or nose.  I simply left these as they come out on the Cricut.  To add color to the eyes, I put a piece of colored card stock behind them to show through.  I used the Paper Doll Dress Up cartridge to make these.  I wanted to dress them in costumes since Halloween is less than a week away.  Here we have a cute clown, a genie, and a knight.  A lot of the details you see are added on with Stickles glitter glue.  Some like the gem on the genie's necklace and headband are actually outlined by the Cricut as they are cut.  I just added stickles to make them stand out.  You can see the lines on the face plate of the knight's helmet.  I love the clown's nose!!

Her we have the mummy, Frankenstein, and Bride of Frankenstein.  I love her hair!!  I made it silver so that it would really stand out.  I suppose I could have done white or gray and highlighted it with black glitter.  I just like this look better.   When the mummy is cut out, it leaves the lines of the wrapping showing.  They always look really light so I took a fine tip black marker and traced them so they would be visible. 


Here is the last set of dolls for today.  We have the cave boy, the cave girl, and the skeleton.  I know it is hard to tell it is a skeleton but really it is.  I used a gold glitter glue to highlight the bones.  In person, you could see them better.  I fashion the cave girl after Pebbles Flintstone.  I did use Bam Bam as inspiration but changed the hair to be black instead of blonde.  I love the necklace and hair bone for the cave girl.  I added the dots of black glitter to give her dress an animal print look just as I added the stripes to his for the same reason.  

I will return tomorrow with some more of these cute little dolls to share with you.  I appreciate you stopping by today.  Please come back tomorrow.  I look forward to seeing you then!

Monday, October 24, 2011

Who Had Fun This Weekend?

Well I did.  Friday night we went to my in-laws for dinner.  That is always fun because you never know what interesting stories you might hear and it's good to see everyone.  Saturday my husband and I were in a chili cook-off contest.  About 2 years ago, my husband started making chili here at home.  Last year he decided to enter a contest and wanted to do it again this year.  It is a lot of fun.  While he did not win any prize last year, he came in 3rd place this time!!!!  I am so proud of him.  As his prize, he received a gift certificate to a grocery store and a really cool trophy! It was a wonderful day and the turn out was phenomenal!

Sunday was my husband's birthday.  So HAPPY BIRTHDAY HONEY!!!!!!!!  The only downside of his birthday is that he had to work.  But no worries! We found time to celebrate.  His birthday card serves as my share for today.  Every year I try to come up with a unique card to give my hubby.  It always takes me a little bit of time to come up with an idea because I want to make it better than the year before.  This year, my idea came when I caught him watching cartoons.  So here we go.


My husband loves the Pink Panther so I thought why not make him.  Thank you Ellen Kemper for doing this first and providing such wonderful guidelines to do him!!  Let's start with the base card and work my way to him.  The base card is Marina Mist.  I added a layer of Crumb Cake on top of it that was embossed using the Houndstooth impression folder and my big shot.  Then I took a non - SU! sizzix die called Balloons and ran it through the big shot using Tangerine Tango, Night of Navy, Garden Green, and Daffodil Delight card stock.  I then put the balloons into several different impression folders (none are from SU!) to decorate them.  Now let's look at Mr. Panther a little closer.


He is surely one cool cat!  I just love him.  Now the list of punches is extremely long so I would suggest you visit Ellen's blog to get the instructions.   My colors for him are from SU!.  One is current and one is retired.  The current one is Pink Pirouette which is used for his muzzle and tummy.  The retired color is Pink Passion.  I just was not happy with any of the current pinks for him so I turned to my stack of retired colors for help.  He is truly adorable.  Thanks again Ellen!!


For the inside of the card, I chose to add some more balloons to decorate it.  The using the greeting from the Look Who's Turning stamp set, I stamped it in Marina Mist and punched it out using the modern label punch.  I did edge it in Marina Mist too.  Now you may be wondering why I only put "Happy Birthday" in the card.  Well, I always like to write my own special message for my husband so I want to be sure to have plenty of room to do it.  

Overall I was happy with what I came up with and he seemed to like it too.  We are off to the start of another week.  Let's hope its a good one.  Thanks for dropping by today and please come back tomorrow.  See you then.


Friday, October 21, 2011

Paper Dolls

Paper dolls were one of my favorite things to play with when I was little.  I will even admit that I still have a paper doll book of I Love Lucy.  Of course I have not cut any of them out and I do not play with them.  It is tempting though.  Anyway, when I got my Cricut machine, one of the first cartridges that I bought was Paper Doll Dress Up.  I had a blast making all kinds of little dolls and dressing them in outfit.  Well then Cricut came out with another cartridge called Everyday Paper Dolls.  Yes I bought that one too.  Now I will say that I do wait for them to go on sale so don't think I throw money around.  There is no money to throw.  Back to the dolls.  The newest cartridge is dedicated to all types of careers and sports that people do everyday (hence the title of it).  So when my aunt called me the other day and told me she needed a card for a special young lady in her life I was excited to make it.  It got even more thrilling for me when she said she wanted a basketball theme for it.  I was in paper doll heaven.  I couldn't wait to get my machine on, the cartridge loaded, and the pieces cut out.

All the card stock used for this is from Stampin' Up!.  I still say they have the best card stock.  The base card is Daffodil Delight.  The only layer on the front is Whisper White.  I designed the background by using pastels to make the basketball court floor and wall.  Let's start with the accessories on the card front.


Here is the hoop.  It is made by first cutting it in Brushed Silver, and then in Whisper White.  I cut the pole off the white one and layered the backboard onto the silver one.  The net was cut next out of Poppy Parade.  Then I made 2 small basketballs that would be just right to fit through the net.  Tangerine Tango was my color choice for these.  I outlined the black seams with a fine tip pen.

Here is my wonderful basketball player wearing her school colors.  I chose her number on the jersey for how old she was turning.  The jersey is Garden Green and her shorts are Daffodil Delight.  I made the hair using More Mustart and the body is from Blushing Bride.  Her eyes are Tempting Turquoise.  Now I used my handy dandy owl builder punch to make her eyes and nose.  It is the smallest circle on the punch.  While the Cricut does mark the eyes and nose, I have found they are too small for my taste so I go bigger.  These basketballs are larger than the others giving the impression the hoop and balls are off in the distance.  These were outlined with black glitter.  I used the new Dazzling Details glitter glue from Stampin' Up! to highlight her shoes and numbers.


A scoreboard completes my look for this one.  I chose numbers at random and freehand wrote the Home and Visitor signs.  All in all, I was pleased with how this one turned out.  Then I started looking for what to stamp inside as my greeting.  For some reason I was not having much luck.  But eventually I figured it out.

I chose a stamp from the set A Word for You.  It actually says "Happy Birthday with a cherry on top" but I changed it to fit the theme.  I cut out with the Cricut a basketball to fit over the word "cherry" so that it is now a "basketball on top".  I stamped it in Garden Green ink, punched it out with the decorative label punch, and highlighted the edges with the ink.  Then I grabbed my cupcake builder punch and the Create A Cupcake stamp set.  I stamped the wrapper using a retired silver ink and the frosting using Chocolate Chip ink.  I then punched them out and adhered them to the inside of the card.  I went back to the Cricut with the Tangerine card stock and cut 3 more basketballs in varying small sized.  These decorate my frosting and  I made sure one of them would go on top of the cake.

Hard to believe we are at the end of another week.  I have a busy weekend ahead of me.  Hopefully it will be a fun one.  I wish all of you a nice weekend and I will see you on Monday!!  Thanks for stopping by today.

Thursday, October 20, 2011

Christmas Flowers

My husband and I always enjoy seeing all the beautiful poinsettia plants around the holidays.  Last year, we actually bought one and have had it ever since.  While the flowers eventually faded and died, the greenery of it has not. It is still as green as it was.  Does anyone know when or if it will bloom again?  I know my husband will be very disappointed if it does not bloom this year.  I too am looking forward to it.  Oh well, we will have to wait and see. 

Just in case it does not bloom, I wanted to make one using punches.  Thanks to Dee Slater, a fellow demonstrator, I was able to learn how to make a really nice one.  Thanks for sharing that video Dee.  It is so easy you will love it.


What do you think?  This was a simple card to put together.  I started with a Wild Wasabi base card.  I took a piece of Whisper White and stamped little presents on it using VersaMark.  I know they are hard to see but they are there.  I heat embossed them using clear embossing powder.  I wish I could tell you the name of this stamp set that I got the present from but I honestly do not remember it.  I bought this set from SU! years ago before I was a demonstrator.  It has stamps for all different holidays.  The white was then spritzed with Frosted White mist (2oz. of alcohol with Frosted White shimmer paint).  I used  Wild Wasabi as the color of the leaves.  I cut out one that I like from the Leaves #2 die for the big shot.  I sponged the edges of them with matching ink and adhered them under the flower.  

For the flower, use Real Red card stock.  I used a 1 1/4" circle punch for the base of the flower to attach the petals to and the blossom builder punch for the petals.  Start by putting TomBow liquid glue on the circle.  You will need 14 petals to make this.  Lay 7 of the petals on the circle leaving a space between each petal.  Then take the other 7 petals and layer them on top of the first layer where the gaps are.  Once it is assembled, set it aside to dry completely.  Then place the flower in the Snow Burst impression folder and run it through the big shot.  This gives your flower a beautiful texture.  I then placed a 1/2" circle in Daffodil Delight in the center and adhered it using the same glue. Take a pencil and curl the top layer of petals, all 7, to add dimension.  Place your flower in a protected area and pray it with a Champagne Mist spray (this is 2 oz. of alcohol with drops of the Champagne shimmer paint in it; shaken well).  This gives it some shine. Attach the flower to the card using a dimensional.  Add some gold glitter in the center just for dazzle effect. 


 Here is a side view of the flower so that you can see the shimmer on it.   Sparkly!!!!


I used a stamp from the Perfect Punches stamp set for the greeting on this card.  I stamped it using VersaMark ink and heat embossed it with Red Tinsel embossing powder (not from SU!).  I then punched it out with the 1 3/4" scallop circle punch.   Attach using dimensionals.  Again not a hard card to make at all.

Let me know what you think of this card.  I value your opinion.  Thanks for stopping by today and I will see you tomorrow!!


Wednesday, October 19, 2011

Treats For You

Now this may seem silly to some of you out there, but I love to make special treat holders for my kids at the holidays.  For example, for Easter, I made them all Bunny Boxes filled with silly toys and candy.  The reason this might be strange is because my girls are 19 and 23.  But who doesn't like treats?  I make each of my girls a box as well as their significant others.  Of course, with Halloween coming I thought I would once again make a box for each of them and I wanted to share this with you.


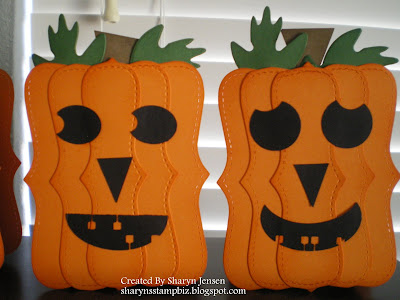
This is how my project started out.  As you can see, I have cut out 4 of the Bags w/Scallops and 14 top notes using my handy Big Shot.  I took 6 of the top notes and ran them through again twice to cut out the small pieces to layer the front of my pumpkin with.   Once all those pieces were cut, I sponged the edges with pumpkin pie ink.  Did I forget to mention I used pumpkin pie card stock?  Silly me.  Using garden green card stock, cut out 2 leaves for each pumpkin with the big shot and the Leaves #2 die.  You can use any of the leaves you would like.  Use the pennant punch with soft suede card stock, you can punch out the non-scallop pennant (4 of them) for the stem.  I always assemble the front piece of the pumpkin before they are attached to the boxes.


Here are the assembled boxes.  I use sticky strip to assemble these to make sure they hold.  Now usually you would fold in the sides and the scallop would be the lid for the bag.  However, for this project, you will actually cut off the scallop lid and leave the box open.  I put sticky strip on the front and back of these without removing the top red strip.  You do not want to remove this until you are ready to adhere the top note front and back.  Also, be sure to only do one side at a time.  But for these pumpkins, I needed to add a little something to them before assembling them.  Then I attached the front and back.  Are you ready for the final product?


Since it's Halloween my pumpkins needed faces!!!!!

Here is a close up of the first 2.

And here are the other 2 close up.  I think these are adorable.  I cannot wait to fill them and give them to my kids on Pumpkin Carving day.  That's right.  In our family, we schedule a day to carve pumpkins.  It's messy but fun!
I hope you enjoyed seeing these.  Have a wonderful rest of your Wednesday.  Thanks for dropping in and I will see you tomorrow.


Tuesday, October 18, 2011

Another Elf? Or Is It A Boy?

As I was organizing my Christmas cards I ran across one I made a couple of years ago with the cutest little elf on it.  Now when you see it, you may think it is a boy or a child and I guess it really could be.  You see, he does not have pointy ears.  So maybe I should refer to him as a child.  I will let you be the judge.


As you can see he is peeking over the present.  He is an easy one to make since you are only focused on his head and hands.  I used the ornament punch for the head and the hat.  To make the hat, you punch out an ornament in real red.  Then offset the punch a little from the hole and punch again.  A white pom pom ball finishes it off.  His nose is a 1/4" circle punch and his hands are from the boho blossom punch.  I decided for this one to draw on his eyes and mouth although you could use the owl builder punch for the eyes. 


Here is the entire card.  The base card is whisper white.  I folded a 5" x 11" piece in half, placed it on the clear scallop square die leaving the folder side below the blade so it would not be cut.  I ran it through the big shot and made a beautiful scallop card.  I then added a layer of old olive which had been run through the big shot in an impression folder.  This one is not from SU!.  It is a Cuttlebug folder with snowflakes all over it.  To complete my picture I took some scraps of Christmas paper that I bought at a craft store and cut them down to the sizes I wanted my presents to be.  Then I used some ribbon I had on hand to "wrap" around the presents.  Next it was time to stack them on the card front, attach the little hands or the edge of the top one, and place the face on the top too.  I did not cut off the top of the ornament for this one.  Instead, it is tucked under the present.  Any part of it you might see would simply look like the boys neck.  
I think he is pretty cute but I think I will call him a boy.  My elf with the pointy ears has him beat as an elf.  Oh well, punch and learn.  I am so happy you stopped by today to see this card.  I encourage you to return tomorrow.  Until then thanks for dropping by today.

Monday, October 17, 2011

Santa's Helper

Happy Monday.  We are off to a new week.  I am going to pray for one with no illness and no migraine!!  I hope everyone had a great weekend.  My sister and I attended a shopping extravaganza this weekend to raise money for charities.  We had a lot of fun even though we did not buy much.  It was for a good cause and since my husband was involved with it I wanted to go to show my support. 

While I was at home the other day, I sat in my craft room looking at all the Halloween lights we have in the house and found myself dreaming of my Christmas decorations.  My daughter and I even bought a couple of ornaments the other day.  Remember, Christmas is my favorite holiday.  I get so excited to decorate and celebrate the birth of Jesus.  So as I was day dreaming about all I love about Christmas, I decided I would make another card with that theme. 

This one was inspired by a couple of cards I saw online a few weeks ago.  I did not remember the sites they were on or who did them, but the concept stuck with me.  I pulled out all my punches and set to work.  Here is what I came up with:


The design and full view of the elf is my own idea.  I do know that the punches used were inspired by the pictures I saw online.  Let's start at the beginning of the card.  The base card is Cherry Cobbler.  On top of it is a layer of Soft Suede that has been run through the big shot using the Snow Burst impression folder.  The present is from a scrap of left over dsp from a few years ago so it is not available any more.  The current paper is cute and would work too.  The ribbon on the front of the present says "Let It Snow" and is one I picked up at a local craft store a few years ago.  The bow on the present is the Silver Glimmer paper currently available in the Holiday Mini Catalog. (I hope they keep it around after the catalog expires!!)  It was punched out using the Blossom Bouquet Triple Layer Punch.  Now for the elf.

I used quite a few punches on him.  His face is the ornament punch with the top cut off.  The ears are the wing from the bird builder punch.  Eyes and nose come from the owl punch as do the buttons on the front of his outfit.  His collar is the scallop oval and his body is the wide oval.  Arms and legs are from the word window punch.  For the bent arm, you cut the piece at an angle in half and reposition it.  The cuffs for the sleeves and shoes are from the large flower of the boho blossom punch.  His hands are the midsized flower from the boho blossom punch.  The brim of his hat is a large oval and the top piece of the hat is the large scallop flower from the blossom builder punch.  For the shoes, I used the small oval punch and the 1/2" circle punch.  I started by punching the 1/2" circle at the edge of black card stock, then positioned the small oval over it until I had it lined up to make the shoe.  You will see it when you put it over the 1/2" opening.  I added the 6mm jingle bells to the toes of his shoes.  These are in the Holiday Mini also.  The pom pom on his hat is from the local craft store.  My outfit is from Garden Green and Whisper White.  The face, ears and hands are Blushing Bride.  I added dazzling diamond glitter to the collar, hat brim and sleeve cuffs for dazzle.  White gel pen is added to the eyes and the mouth is drawn on with a fine tip black marker.

Overall, I was pleased with the look of the elf and the card.  It was fun to make since it was a challenge for me.  I like trying new punch art ideas.  It helps to keep my brain working.  

Well, that's it for today.  I wish you all a wonderful day and will be back tomorrow.  Thanks for dropping in today!!

Friday, October 14, 2011

The Pilgrims Have Arrived

Staying in the Thanksgiving theme, I really wanted to do a card with some pilgrim people on it.  My problem was I did not know exactly what to do to make them.  So I turned to my punch art sample board for some inspiration.  I had almost given up hope when I came across my little girl who looks like she is from the 1960's.  For some reason, I could visualize taking the basic pieces of her and making them into pilgrims.  It took some trial and error attempts before I got the look I really wanted but I was pretty pleased with the results.  I will tell you the base card is Crumb Cake and the greeting is from the Teen Tiny Wishes stamp set.  All punches used are from SU! as well as the card stock for the pilgrims.  The dsp used is not a SU! product.  I got a pack of dsp at a local craft store that I loved for this holiday and used it.  So let's start by looking at the pilgrims individually.


Here is my pilgrim boy.  I actually went on the internet, found a picture of pilgrims that I liked and used it as my guide for dressing them.  The hat is the large oval and 1" square punch cut to the shape I want.  The band and buckle are scraps cut to fit.  The head is a 3/4" circle while the hair is from a 1" circle.  I punched a 3/4" circle from black and then punched the 1" circle around it.  I cut it into 4 pieces to make his legs and arms.  The top, collar of top, and pants are the vest from the owl punch.  His shoes are the small hearts from the owl builder punch.  For the buckles on the shoes, I used itty bitty pieces of Daffodil Delight.  The cuffs of the sleeves are from the ring punched around a  1" circle using the 1 1/4" circle punch in white.  You will only use a small bit of it so save the rest for another pilgrim.  The neck is again made like the arms and legs using Blushing Bride card stock.  Again save the extra for another pilgrim.  The hands are actually the feet off the owl. 


Here is the little girl pilgrim.  She is made almost the same as the boy except you will use more vests for her.  Her dress is made from 2 black vests.  The apron is also 2 white vests trimmed to fit as I chose.  I put a piece of black 1/4" grosgrain ribbon around her waist.  Her cuffs, head, bangs,hands and feet are made the same as the boy.  The back part of her hair is the owl punch turned upside down as is the bonnet.  The front piece of the bonnet is a 1 1/4" circle punched off a 1" circle hole.  In other words punch the 1" first and then using your 1 1/4" circle punch, off set it, and punch.  Trim the ends to the length you want.  

Here is the whole card put together.  I am pretty proud of these little people.  I enjoyed making them and was so excited to see it all come together.  I hope you enjoyed seeing the card too.
Well, we have reached the end of another week.  I wish you all a wonderful weekend and will return on Monday with another project to share.  Thanks for stopping in today.

Thursday, October 13, 2011

Who Likes Turkey?

It is tradition at my home that I cook our Thanksgiving dinner every year.  As nieces and nephews have grown up, many have chosen to start doing their own meals at their homes.  However, for my husband and my girls, they still like me to do our dinner.  Now I really enjoy cooking it.  I love all the food and how it all smells as it cooks - especially the turkey.  Call me crazy but I hope to continue to be the cook for a long time.

This terrific turkey day leads into my card to share today.  A few weeks ago, I shared a turkey that I made using the ornament punch and the large petal from the blossom builder punch.  Today I want to show another turkey made with one of my favorite punches.


Yes it is once again the wonderful owl builder punch.  I do so love this punch.  My base card is a piece of Crumb Cake cut at 4 1/4" x 11", scored at 5 1/2".  I added a layer of Garden Green which I stamped with some fall stamps I happen to have using VersaMark ink and then heat embossed them with cleat embossing powder.  The greeting is from the Teeny Tiny Wishes set which I have used many times on cards.  I stamped it in black, punched it out with the word window punch, and layered it on a Crumb Cake modern label punch piece.  Now for the turkey.


I punched out my owl from Chocolate Chip cardstock.  I used the small heart from the owl punch for the beak, layering the eyes over the top of the heart.  For the gobbler, I punched out another heart in Cherry Cobbler, cut it in half and used just one half for it.  The feathers are from the blossom builder punch.  I used Daffodil Delight, Cherry Cobbler, and Tangering Tango as my feather colors.  I punched out several of each color, sponged the edges with matching ink and started alternating them.  The are attached with TomBo glue. 
I cannot believe we are almost to the end of the week again.  Time just flies by.  If you like the turkey and live in the area I do, watch for a posting on my SU! website for a class on making this one as well as the other one I showed before.  

I wish you all a great day and I will see you tomorrow.  Thanks for stopping by!!!

Wednesday, October 12, 2011

Sympathy Card #2

Now let me clarify, no one else has passed away.  This sympathy card happens to be one I made in case I should need it in the future.  As much as I do not like having to use these cards, it is just a natural part of life.  Guess it's not a bad thing to be prepared.


This beautiful iris stamp is one I picked up at a stamp store several years ago.  The simpleness of it is what I was first attracted to with this one.  My base card is a retired color from Stampin' Up! called Pink Passion, or was it Passion Pink?  I am not sure right now but I know those 2 words were part of it.  Anyway, I attached a sheer ribbon around the card front, tying it in a not.  That is all the extra I did for this one.  Sometimes, I think simple elegance is the way to go with a card. 


As for my flower, I stamped it with StazOn ink and colored it in using Stampin' Up! markers.  I then used a glue I bought especially for glitter to out line the flowers.  Now you may be wondering how I got the lines so thin.  Well, this glue happened to have a tip you could by for it that allows you to draw extremely thin lines to add glue to.  It gave just a hint of added detail to the flower without going overboard.  The glitter I used is the Dazzling Diamond glitter from SU!.  Then inside simply has "With Deepest Sympathy" stamped on it.  I made sure to leave enough room so I could write a special note.
I do realize this post is kind of short.  I am hoping to have more time to blog tomorrow.  Honestly, I suffer from migraines and I have a big one today.  So now I am going to go take my medicine and lay down.  Thanks for dropping by today and I will see you tomorrow.  


Tuesday, October 11, 2011

Christmas Ornament Card

I thought it was time to share another Christmas card with all of you.  Just thinking about Christmas brightens my day.  But sometimes, it can seem a bit overwhelming when you are trying to make your own cards to send out.  So the card for today is a nice, simple card to make.  That way your time will be freed up for all the other tasks you must do. 


The color scheme for this one is Real Red and Whisper White.  Start with a base card of Real Red cut at 5 1/2" x 8 1/2".   Score it at 4 1/4" .  Take a piece of Whisper White and cut it to be 4" x 5 1/4".  Using the Elegant Bouquet impression folder, run it through the big shot.  Then adhere it to the Red card.  You can now stamp your greeting on the front of the card.  For mine, I used the stamp set Four the Holidays and stamped in Real Red ink.  Now you are ready to work on your ornament.


Take a piece of Real Red scrap paper and punch out an ornament using what else -- the ornament punch.  Tie a piece of elastic cord around the top of the ornament and attach it to the card using dimensionals.  Using the white gel pen, color the centers of the flowers on the ornament.  Then take your Real Red SU! marker and color the center of the white flowers.  Easy as one, two, three you have a beautiful Christmas card.

For the inside, I used a stamp from a set called Home For Christmas which is retired.  I stamped it on a scrap piece of White card stock in Real Red ink and then cut it down to the size I wanted.  Using my corner rounder, I rounded all the corners of it, brushed the edges with Red ink, and adhere it to the inside of your card.
Well I hope this inspires you to work on Christmas cards.  I am looking for some inspiration myself right now.  Thank you so much for stopping by today and please come back tomorrow to see what I manage to come up with next.  Bye for now.

Monday, October 10, 2011

A Sad Day

Welcome to a brand new week.  I hope your weekend was filled with fun and family. 

Last Friday, one of my sister's coworkers who is a good friend lost her mom to cancer.  It was a very sad day.  I cannot help but think of my mom when something like this happens and offering our love and support is a must.  So I am afraid that this event is what my card for today is about.  As soon as my sister received the news, she called me and asked me to make a sympathy card.  Of course I said yes and set my self to work on it.


When I need to make a sympathy card I always start with a cross.  I have a very deep faith and turn to God in times like this so using the cross is just natural to me.  This cross was made using the lattice die for the big shot.  I ran a piece of Very Vanilla card stock through it for my cross and used the other half for my base card.  The 2 other colors I used on this were Rose Red and Pretty in Pink.  I used the corner rounder on this card to round all corners. Before attaching my Pretty in Pink layer to the Rose Red, I ran it through the big shot using the Finial Press impression folder.  Once layer on the Rose Red, I attached it all to the Vanilla base.  The stamped set using for this card is called Thanks for Caring and is unfortunately retired.  I bought this set to use for sympathy cards.  The sayings and designs are just beautiful.  I stamped the verse on a scrap of Vanilla using Rose Red ink, trimmed it down, rounded the corners, and layered it on a scrap piece of Rose Red.  It is attached using my runner adhesive.  I then stamped the butterfly on another piece of Vanilla using the Rose Red ink and cut it out.  


I used my glue pen and added glue to the open areas of the butterfly so dazzling diamond glitter could be added to that.  I then used some pink rhinestones I had for the body just to add a little more dimension to it.  Setting it aside, I punched a designer label out of Rose Red and added dazzling diamond glitter to the edges of it.  Next, I punched a 1" circle out of Pretty in Pink.  I started by attaching the designer label to the card using my runner adhesive.  Then the cross was added using dimensionals to the card.  You do have to cut the dimensionals down to make them fit on the cross.  I used my Tombo glue and attached the 1" circle to  the cross.  The butterfly was then attached with my glue.  

For the inside greeting, I used the one included in the Thanks for Caring stamp set.  It too is stamped in Rose Red ink on Vanilla card stock.  Then it is layered on a piece of Pretty in Pink and Rose Red.  Notice all the corners are rounded again to carry the theme through.  
We send out out thoughts and prayers to Cindy and her dad during this difficult time.  We are here for you if you need anything at all.  

Thanks for stopping by today and I will see you tomorrow.

Friday, October 7, 2011

A Scene Close to Home

Happy Friday everyone!!  We have made it through another week and at least this one was cooler!!  I am trying not to watch the forecasts for next week as the temperature are suppose to climb up once again.  I hope they are wrong.  Only time will tell.

Today's card is another stain glass card.  This one really reminds me of Arizona as it is a desert scene.  I picked this stamp up at a convention and really love the results I get with it.


Let's start with the basics for this one.  The base card which you cannot see is Old Olive.  I chose it because it matched my cactus pretty well.  For the front, I decided to frame the stain glass scene using the top note die for the big shot.   I ran a piece of Whisper White through the machine with the top note die.  I set the cut out part aside for future use and used the frame for this one.  I then placed the frame in the Perfect Polka Dots impression folder and put it through the big shot.  I just love the polka dots don't you?!!  The frame measures the same as the base card front which is 4 1/4" x 5 1/2".  

Here is a close up of the desert scene.  It could be either a sun rise or sun set.  I actually used a blended glitter called Arizona Sun for the sun and its rays.  Once again, the glitter is not from SU!.  I do feel bad for not using theirs but as I have said before I like to have a wide variety of colors to choose from.  Maybe SU! could look into making glitter for all their ink colors.  That would work for me!!
Well it is a short post today but I have a charity event to help my husband prepare for so I need to get going.  I wish all of you a great weekend and hope you will return on Monday for another share.  Thanks for stopping by today!!

Thursday, October 6, 2011

Up, Up and Away

Before we start for today, I have to tell you God has been so good to us this week with the weather.  It rained some on Tuesday night and the daytime temperatures are forecasted to be in the 70's and 80's!!  I am praying this trend continues.  After months of heat, it is so nice to be able to sit outside and enjoy it.  Of course, this means that I am not at my craft table when I am outside but I am pretty sure I can find time for both.

As I said yesterday, I went back to using my rainbow of glitter yesterday.  I wanted to work with a stamp I got at a convention a few years ago.  I had not used it in a while and thought it was time to see it again.  So I dug it out of my stamp stash and off to work I went.


This is a stamp I have used for graduations over the years with a reach for your dreams type of saying.  It could be used for any occasion  you would like to use it for.  It is such a neat balloon and it really lends itself to the stain glass technique.  Who could ask for more?  My base card is Marina Mist, with a layer of Cajun Craze on top of it.  All card stock is from Stampin' Up!.  I chose to do the outline of the left side and bottom using black glitter so that the balloon would stand out.  Let's take a closer look.

It is more difficult to take a close up of stain glass than other cards because of the shine.  I apologize for the slightly blurry look this has.  The basket of the balloon is colored in with a glitter called Sand.  I have to tell you though as far as I am concerned it is so close to gold, it could be called that.  I used a light blue glitter for my sky so the balloon is the centerpiece and the sky is just background as it should be.  The cloud was colored in with white glitter.  I probably do not need to tell you the glitter colors.  After all, you can see them for yourself.   None of the glitter used on this card is from Stmpin' Up!.  As I have said before, I love their glitters and use them often.  However, they do not have every color I need for doing my stain glass work.  I attached my stain glass balloon scene using glue dots.  If you place them on the dark glitter colors, they will not show through to the outside.  I trimmed this one down to leave absolutely no excess acetate on the edges after I glittered it.  I never know until I am ready to assemble my card if I will need the edge of acetate or not.  

Well, I think I will go enjoy the weather for a while now.  Mornings are especially nice right now!!  Thanks for stopping by today and please come back tomorrow!!

Wednesday, October 5, 2011

Another Halloween Box

It's Wonderful Wednesday!!  At least I hope it will be wonderful.  Yesterday was a terrific day here in sunny Phoenix.  It was actually overcast and breezy.  I was able to turn my air conditioning off for a while and open the windows and doors.  I think our little dog Sadie enjoyed it the most.  She does not like to be out in the heat during summer so this was a real treat for her.

I came across another Halloween box that I made 2 years ago as I was cleaning out some things.  While the designer paper I used is retired as well as the stamp set, the box could easily be made using current dsp and stamps.  So I thought why not share it with you.  It is a project I did for a stamp camp held by a fellow demonstrator.  Although she was not my upline, she asked if I would participate and teach a project so I did.  It was a lot of fun believe me.  Anyway let's get back to my box.


I wanted to start by showing you the side view of the box.  As you can see, you actually make 2 boxes, one in basic black and one in pumpkin pie.  Usually you would fold the tops down to close the box.  However for this project, you will assemble the box, fold the side flaps inside the box adhering them with sticky strip, and leave the top open all the way.  These boxes were made using the Box #2 die for the big shot.  When it cuts the box out, it also scores the fold lines for you.  You simply do not fold on the score lines for the lid of the box.  Once you have both boxes assembled, place them back to back and adhere them together with sticky strip.  I placed my sticky strip around the edges and on the actual box part.  Do not put it across the mid section of the lid because as you will see in the next picture you need room to punch.


Here you can see the basic black side of the box.  Notice that I used my wide oval punch to punch out a section of the lids to create a handle.  Because you are punching through 2 pieces of card stock, it will take a bit of strength to punch it completely.  Good way to build up your muscles though!  I cannot remember the name of the dsp but I chose a pattern, cut it to fit the side and adhered it with my runner adhesive.   I wanted a little border at the bottom so I used old olive card stock and cut a piece to fit the dsp.  The pumpkins are from the retired stamp set called Pumpkin Patch.  I stamped them using pumpkin pie, basic black, and old olive inks.  Once stamped, they were cut out.  The 2 oval side pumpkins are adhered using my runner adhesive while the middle one is attached using a dimensional.  A piece of 1/4" grosgrain ribbon was added for a little color to the handle and I was ready to move on to the other side.


Here is the pumpkin pie side.  Again, I attached a piece of dsp to the box first.  Then using my big shot, I cut out 2 old olive swirls using the sizzlits die called Scribbles Swirls.  I attached those to the dsp using the tombo glue.  The greeting is from the Pumpkin Patch stamp set and was stamped on whisper white using basic black ink.  I then punched it out with my large oval.  Taking a scrap piece of basic black, I punched out a scallop oval and layered the large oval white greeting onto it.  I then attached it to the box using a dimensional.  

You could easily duplicate this box for Halloween using the current papers and stamp set available.  You can also make them for other holidays by changing the colors, dsp and stamps to fit whatever holiday it is.  

I hope you have a wonderful day and I will return tomorrow and show you another stain glass card I worked on recently.  Until then, thanks for dropping by today.  See you tomorrow!!