CARDS FOR SALE

Most cards you see on this site are available for purchase. Simply click the Pay Now button at the bottom of the post of an available card to purchase the card. You will be linked to PayPal for payment. It will come up as "greensnaggletooth@cox.net" which is the name of my internet company. Price is $5.00 unless otherwise stated and includes shipping. Your card will come with an envelope also. Email me with any questions or requests at: sharynsstampbiz@gmail.com
Thanks for taking a look at my creations!!

Wednesday, August 31, 2011

Happy Thanksgiving Day 2

Now before I get started on the card of the day I wanted to remind you that I did state on Tuesday that I might make another card that would resemble Tuesday's card.  I did change it up in a few ways but the theme is the same.  The idea for the front of this card came from (brace yourself) my husband.  I know.   I can hardly believe it myself.    I was sharing the card from yesterday with him and he asked me a few questions about it.  As we were discussing these, an idea began to form in my tiny brain.  I jumped up out of my chair (which shocked him), ran over to my cards for sale, and found one with the right shape I knew he was indicating to me.  So this morning, I sat down and made the card.  Now he has not seen it yet because he is at work.  But I will share it with him as soon as he comes home.


For this card, I thought the top note die for the big shot would form the perfect shape.  Usually when I cut the card stock with this die, I use the center piece on my cards.  This time, I used the frame.  I cut a piece of Very Vanilla card stock cut at 4" x 5 1/4".  I centered it on the die and ran it through the big shot.  I placed the center piece to the side and took the frame with me to use on my card.  I used the same leaf stamp from the Confetti stamp set and stamped it with VersaMark ink.  I then heat embossed it using the harvest embossing powder.  I then went to my Debbie Mumm paper pack and selected another piece of designer paper to use.  I cut it at 3 7/8" x 5 3/8".  I adhered it to the back of the top note frame.  I placed both of these on to a pumpkin pie card.  

For the center greeting, I used a stamp from the retired stamp set Holiday Best.  I inked it with VersaMark ink and then pumpkin pie ink on top of that and stamped it on Very Vanilla.  By doing this, I was able to heat emboss it using the harvest embossing powder.  The pumpkin pie ink provides the rich orange color while the VersaMark allows the embossing powder to stick.  I punch it out with the Decorative Label punch and edged it with pumpkin ink.  I then punched out 2 more decorative labels in Soft Suede to make a frame for the greeting.  This was attached to the card using dimensionals.  


Once again I used the stamp from Stampabilities for the inside greeting.  I stamped it the same way as I did the one on the front.  I inked it with VersaMark and then pumpkin pie ink, stamped it on Very Vanilla, and heat embossed it with the Harvest powder.  I edged the Vanilla with the pumpkin ink.   I then cut a piece of Always Artichoke to be about a 1/4" wider on each side.  I used the leaf stamp from the Confetti set again and made a watermark of it on the piece of card stock.  Creating a watermark is easy to make.  You ink the stamp with VersaMark ink, stamp the image on the card stock, and let it dry.  That's all there is to it.  

So what do you think?  Do you like this one better than Tuesday's or do you like them equally?  I like both equally.  They are just different enough that I think both are unique and beautiful.  Leave me a comment with what you think.  I value your opinion.  

That's all for today.  Not sure what I will be working on for tomorrow.  Inspiration will come I am sure.  Thanks for stopping by today and please come by tomorrow.  See you then!
 

Tuesday, August 30, 2011

Happy Harvest Time

Well I have been posting Halloween and Christmas cards for a while now.  Since I do not want to neglect Thanksgiving, I thought I would work on a card for that today.  I mean who doesn't like Thanksgiving?  It is a wonderful time to reflect with family and friends on all the things in your life you are thankful for.  And the food!!  It has to be my favorite meal of the year and believe it or not, I actually cook the entire meal for my family.  Growing up, I watched my mom do this for years.  I guess I inherited my joy of preparing this meal from her.  Now onto the card!!


When I think of harvest time, pumpkins always come to mind along with all the colors of autumn.  I am afraid you may be a little disappointed because not all my products used on this one come from Stampin' Up!.  Now don't get me wrong, I prefer SU! items and use them whenever I can, but I do have quite a stash of other paper and stamps from my days prior to SU!.  The base card is always artichoke from SU!.  The first layer is very vanilla as well as the piece the pumpkins are stamped on.  The layer under the pumpkins is soft suede, and the pumpkins and the inside greeting are stamped using the pumpkin pie ink.  I used the SU! markers to color the pumpkins, and the ink to edge the paper.  The leaves on the first layer of vanilla are from the Confetti stamp set. They are stamped using the VersaMark ink pad and then heat embossed.  These are all the SU! products I used on the card.

The embossing powder I used on this is called Harvest and is one I picked up at a stamp convention a few years ago.  I also used it on the leaves of the pumpkins.  The designer paper is from a Debbie Mumm paper pack I got years ago at one of the local craft stores.  As for the pumpkin stamp, it is another item I picked up at a stamp convention.  It is made by Denami Design.  


Here is a closer look at the little pumpkins.  I stamped the image using pumpkin pie ink.  Using my SU! markers, I traced the vines with garden green, colored the stems with soft suede, and colored the pumpkin with pumpkin pie.  For the leaves, I used my VersaMark marker to color them in, sprinkled the Harvest embossing powder and heat embossed it.  

The inside greeting is a stamp I picked up on clearance at a craft store.  It is made by Stampabilities.  I don't know about you, but for me finding stamps with good verses on them is always a challenge.  So when I come across one I tend to pick it up.  I have been known to make my own verses by either typing them into the computer to print out or by handwriting them myself.  I love to receive handwritten greeting sometimes.  In many ways it feels like it was written especially for me and that makes it a little more sentimental.  In scrapbooks, I love to include my own handwriting knowing that down the road future family will be able to see what my handwriting looked like and know that the sentiment expressed was truly my own.  
Tomorrow, I will post another Thanksgiving card made with similar products as this one.  However, the overall look will be a little different.  I hope you enjoyed this card and are inspired to be creative today.  Thanks for dropping by and I will see you tomorrow.


Monday, August 29, 2011

A Cherry Cobbler Christmas

Now before your mouth starts watering at the thought of cherry cobbler, I had better explain that I am talking about the Stampin' Up! color of ink and card stock, not the food.  I know.  Big disappointment isn't it.  My husband loves cherry cobbler, cherry pie, cherry fritters, you get the idea.  So I know he would be in for a let down if he knew I was only talking about the color.

When Stampin' Up! introduced this deep red color, I fell in love with it.  The real red is happy and bright, the riding hood red is a soft red, and the cobbler is a rich deep color.  It really stood out to me when I looked through the color chart last year.   So I decided to make a Christmas Card using it.  Now if this card looks a little familiar, that is because I did a similar one using bashful blue as the base card.


I started by taking a piece of whisper white card stock cut at 4" x 5 1/4" and running it through the big shot using the Northern Flurry impression folder.  That put those beautiful snowflakes on my card.  I then took a few "diamonds" and placed them in the center of the snowflakes to add a little bling to it.  I edged the sides of the white with the cherry cobbler ink and adhered it to my 4 1/4" x 5 1/2" cherry cobbler card.  I then stamped the "Joy at Christmas" from the Perfect Punches stamp set using VersaMark ink and heat embossed it with cherry cobbler embossing powder.  As the name of the stamp set implies, the stamps coordinate perfectly with some of the punches.  In this case, I punched this one using the 1 3/4" scallop circle.  It is attached to the white using a dimensional.  

This is the inside.  I stamped a snowflake from the retired set Sparkly & Bright in VersaMark ink and heat embossed it using white embossing powder with some dazzling diamond glitter mixed into it.  The greeting I used is from the Holy Family stamp set which is also retired.  I stamped it in cherry cobbler ink and edged the paper with cherry ink too.  


Well I had better get back to my daily chores now.  Stop by tomorrow for another card idea.  Thanks for dropping in today.

Friday, August 26, 2011

Woo Hoo It's Friday!!

My week started off having to go to the doctor - not fun.  But it ended with a terrific class last night and that is a wonderful way to end.  We had a lot of fun and did enjoy seeing everyone who was able to come.  Some of the ladies I had not seen in a while and boy was it good to see them.  Now I must plan another class so that I can see you all again.

As promised I wanted to share with you the animals we made at our class.  We only did 4 because the class was only 2 hours long and I wanted them to not feel rushed trying to finish. 


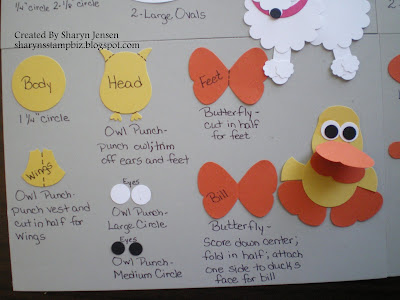
Here they are.  I made a sample animal for them to see and then created a half sheet of card stock that describe each piece, the punch used to create it, and  anything else they would need to know.  For the class, I had pre-punched the pieces but made the punches available for the class to see and try if they wanted to do so.  I gave each attendee enough pieces to make 2 of each animal.  That way they could do as I did and make one sample and the how to make it instructions (they were free to copy mine word for word), or they could make 2 complete animals.  For those who finished early, they were offered the opportunity to try the punches and could make more of these animals or just see which punches they enjoyed using and might want to purchase.  Now let's look at each individual animal so you can really see how cute they are.

 Here is that adorable elephant!!

This little kitty has been a favorite and is used a lot.

 My duck is one of my daughter's favorite punch animals.


I love this poodle!  So cute and easy to make.

We have reached the weekend again.  I think I will spend it creating some more punch sets to put in my store and getting a little rest too.  I hope you have a wonderful weekend too and that you will come back to visit on Monday.  Thanks for all your comments and the time you spend visiting.  I will be back Monday.  Thanks for dropping in today!!


Thursday, August 25, 2011

Coming Soon - New Items for Sale

I cannot tell you how excited I am about my punch class tonight.  This is the first one I have had in a long time.  I hope everyone who is coming has a wonderful time.  With that in mind, I had best get on with my post so that I can get my house clean!!

Today I thought I would share with you 3 new items that will be for sale in my store within the next couple of weeks.  Punch art is a passion of mine and while others do enjoy learning to make different punch art animals and people, they do not always have time to do it.  That is where I come in to help.  I have been taking a few orders for punch art from people who come to my crops and thought maybe the way to go would be to create sets for sale.  And that is just what I have done!


This is the Wild Animals 1 pack.  I had to show you front and back of this one because I could not fit all 4 animals on the front side.  As you can see, you get a lion, a hippo, a polar bear, and an elephant.  The elephant just would not play nice and go on the front.  He needed more room.  They are attached to a piece of card stock inside the package using repositional adhesive so that you can simply and carefully peel them off the card stock,  add your own adhesive, and apply to your card or scrapbook page.  The repositional adhesive will rub off easily with your finger or an eraser if you want to remove it completely before applying your own adhesive.  I posted a different elephant with some peanuts a few weeks ago.  He will be packaged with his peanuts and for sale also.  I just need time to get him ready.


Here are my Halloween Owls Set 1 and 2.  These are 2 separate sets and each contains 4 different creatures.  Set 1 has the witch, the black cat, a ghost and a bat.  Set 2 had Frankenstein, Dracula, the Mummy, and a little devil.  I love these guys.  They always make me laugh.  I will also be putting together a set of Christmas Owls soon.  
These sets will be available for order from my online store or you can email me directly.  They cost $2 per set plus shipping.  Just let me know if you want any and I will get them ready for you.  

Well time to clean my house.  I will be back tomorrow to show you the animals we made at the class.  Until then, have a wonderful day and thanks for stopping by.


Wednesday, August 24, 2011

More Rosettes

Once again I find myself sitting at my craft table cutting strips of paper to score and fold into those cute rosette flowers.  I must admit, I am hooked.  I really enjoy making them.  Even my daughter likes them.  She of course thinks I am crazy as usual for making them but she likes them. 

As I was choosing my DSP to use for these, I came across a set of paper from last years holiday mini.  It is called Christmas Cocoa.  I used quite a bit last year but forgot I still had some left.  So instead of wasting it I decided to make some rosettes and add them to a Christmas card. 


For the base card, I used the color Crumb Cake.  I took a stamp from the retired set called Sparkly & Bright and stamped on the Crumb Cake with VersaMark ink.  I then added my clear embossing powder and heat embossed it for by background.  I took a strip from one of the DSP's in the set which has flocking on it (the white design on the red; you know flocking makes it fuzzy!)  and cut it at 1 1/2" by 5 1/2" so it would go from top to bottom on the card.  Before I adhered it, I also cut a piece of Whisper White at 1 1/2" x 5 1/2" and then used my eyelet lace border punch to punch along one side.  Then  I adhered this to the DSP and then attached all of it to the card.  I had already made my little rosettes and added pearls to the center so I thought why not add pearls to the eyelet lace too.  Pretty neat huh!!


I took a close up of one of the rosettes so you could see the fold of it.  Not sure how well you can see it but I hope you get the idea of what they look like.  You can also really see the embossed snowflakes.  I love the shiny look.  Heat embossing an image for the background of a card is one of the simplest ways to create a unique look for you special card.  
Now I am off to my crafting table to punch and punch and punch as I am preparing for my class tomorrow night.  I am so excited to see everyone and share some of the cute punch art animals I love to make with them.  Be sure to visit my online store next week.  I hope to have lots of new items uploaded to it.  I have been lazy lately and am a little behind.  Now I must work extra hard.  Stop by tomorrow for a sneak peak at some of the items I will be adding to my store.  I cannot wait to show you!!  Until then, thanks for stopping by today!!


Tuesday, August 23, 2011

Please Don't Eat the Daisies

Have you ever seen the movie called Please Don't Eat the Daisies?  You know the one with Doris Day?  Well I can remember watching it with my mom when I was younger.  She really loved all musicals and I must admit, I too am hooked on them now.  In face, I have a huge collection of movies from the 1930's to 1960's and most of them are musicals.  My collection does include this movie.  My oldest daughter loves the movie too and would go around for hours singing the theme song which might explain why my youngest cannot stand to watch that movie.  She would get so upset when her sister started singing the song over and over.  I can find humor in this now but at the time, I would separate them just so they could not fight over to sing or not to sing.  It was nuts.

Today I am going to share a card which has some daisies on it which is why I thought of the movie.  It will be a quick share today because I have a pretty busy week.  I am putting bundles of punch art together to sell in my online store as well as preparing for my punch class on Thursday evening.  I have to admit this is my favorite type of busy to be.  Now on to the card.


Ta Da!!!!!  These little daisies are so adorable yet so easy to make.  Start by punching out a 1 3/4" scallop circle.  Then take your favorite scissors and cut in between each scallop almost to the middle but make sure you do not detach any petals!  When you are done, you may put an embellishment in the center of each flower (I used a 1/2" circle with glitter) and you are done.  Easy right?  The greeting is from the teeny tiny wishes stamp set.  I used the eyelet border punch on a piece of whisper white card stock and put it across the bottom of the yellow piece of cardstock the flowers are adhered to.  It just dressed it up a little bit.  The nice thing about this card is it is very simple to make and can be used for various occasions, making it one of my go to designs when I am in a hurry. 

Give this card a try.  I think you will be very happy with the outcome.  I know this is a short post but I better get back to work on all my other projects.  I will have something to share with you tomorrow.  Thanks for stopping by today and I will see you tomorrow. 

Monday, August 22, 2011

Happy Hippo

I was again playing with my 2-step owl punch the other day and made a cute little hippo. (Well I think he is cute.)  Anyway, my daughter happened to stop into my craft room and told me she wanted to see him put on a card.  Now I had several thoughts of what to put him on.  My first was a birthday card for a child or an invitation.  I still think this is a good option but I decided to go in a different direction.  I decided to make him a new baby card. 


Isn't he just the cutest little hippo?  I love him.  The greeting comes from the Tiny Tags set.  I have the clear mount set, which I absolutely love.  This allowed me to create this saying on one clear block.  You see the words "hello" and "baby" are actually 2 separate stamps.  If these were wood mount, I would have used my stamp-a-ma-jig to line the words up as I wanted.  Since mine are the clear mount, I was able to pull my clear block out and put both words on it as I wanted.  I punched the words out with the new 1" square punch (available September 1).  I edged it with pear pizzazz ink and layered it on a scallop square punch which had been run through the big shot with the perfect polka dots impression folder.   The background of the card is a piece of whisper white which was also put through the big shot using the houndstooth impression folder.  

This little guy is really easy to make.  Start with a 1 3/4" circle punch in basic gray.  Then punch the owl body out and trim the feet off.  This makes his face.  All the circles for his eyes and nostrils come from the owl punch also.  For the feet and teeth, I used the small flower from the boho blossom punch.  I did edge the body, face, and feet with the basic gray ink.  


This little pinwheel is a 2" x 2" square.  It is really easy to make and all you need is a square of DSP.  Any size square will work.  I will put a blog up that will show step by step how to do this.  I is a lot easier than you may think.  

This is the inside of the card.  The greeting is from a stamp set called A Word For You.  I stamped it in pear pizzazz ink and punched it out using the decorative label punch.  I edged the whole thing in pear pizzazz.  
Right now, no member of our family is expecting a baby but you never know when the need for a baby card might come up.  For now, I will try to get this one into my store online for someone to purchase.  

I hope your Monday is a great day.  Personally, I have to go to the doctor - not fun.  I will return tomorrow with another blog prepared for you.  Until then, thanks for stopping by today.


Friday, August 19, 2011

Tri Shutter Halloween Card

Hello everyone.  I have really been in a Halloween mood this week.  I guess it is because I was playing with my 2 step owl punch and created all these little Halloween guys.  I wanted to make a card that could showcase some of them and thought the tri-shutter fold card would work well for this one.  Let me show you the top view down of the card as a reminder of what it looks like.


 It has such a nice zig zag pattern.  I just love making these.  One of the best parts of this fold is you end up with lots of panels to decorate.  You can add more items to your card that a regular card (in my opinion).  Using the new Simply Scored Scoring Tool makes it really easy to get the score lines done and to cut the sections which need to be cut.  (Of course, if you have a Scor-Pal tool, that will work nicely too.)  If you do not have either of these, you can use your paper trimmer to score and cut.  Before I show you the card, I want to let you know all the card stock and adhesives used are from Stampin' Up!.  However, the designer paper used and the glitter glue are from another company.  It happened that I had a Halloween paper pack from a few years ago and decided to use some of it on this card.


This is the front panel and one of the inside sections.  I made the little devil and mummy using the 2 step owl punch.  The black card stock is embossed using the Spider Web impression folder and big shot.  I felt they were enough for the front.  You can see I put a designer piece on the inside panel.  The words above it and below it are "BOOOO".  They were part of the designer pack.  I added some Stickles glitter glue to the letters.


This is another look from the front to the back.  You can see the back panel and the cute little owl witch who is on it.  Of course, I added glitter glue on the dress and eyelids.  The greeting is "have a WICKED  halloween" from the Wicked Cool stamp set.  It is stamped in Elegant Eggplant ink, punched out with the scallop oval punch and edged with Elegant Eggplant ink.  Notice I did not put it straight on the card.  You can angle things however you like on your cards.  Remember they are your creations and not a cookie cutter card.  What you do on each one will always be unique.  Let me show you a different view so you can see the inside.


This photo is taken from the back to the front allowing you to see the cute owl ghosts who live inside the card.  The "BOOOO" words gave me the inspiration for these little guys to go in here.  I stamped the word "spooky" and the spider web on 2 of the panels with VersaMark ink and heat embossed them using black embossing party.  Now I know you can see my boo boo (no pun intended) with the glitter dots on my ghosts.  I had them perfect and accidently hit one with my hand.  So I cleaned it as best as I could and redid the dots.  It still shows but it is part of that uniqueness we talked about.  Hopefully you can see how having extra panels do not mean you have to come up with more ideas.  I used designer paper to decorate 4 panels.  Really I used it on 6 but 2 of them are the words.  I am already planning another Halloween card using the tri shutter.  I love it.

How do you like this fold?  Leave me a comment and let me know.  I enjoy hearing from you.  Have a terrific weekend.  Thanks for dropping in today and I will see you on Monday!


Thursday, August 18, 2011

Peek A Boo Halloween

As I was sitting at my craft table this morning, my Make A Monster stamp set seemed to be calling to me to play with it.  Now if it is calling me, I figure why not play.  So I grabbed it off the shelf and thought I should make a nice Halloween card.  While standing by all my stamp sets, I also grabbed one called Wicked Cool.  I really like this set and immediately I could see using the 2 sets together.  I was trying to decide what type of card I should make.  Those little monsters are so cute that I wanted to display them in a unique way.  All of a sudden it hit me --- I would make a card that allowed the monsters as well as some other eyes to be peeking out at you.  Away I went to my craft table and set to work.


I started with a 6 1/2" x 6 1/2" piece of pumpkin pie card stock, scored at 3 1/4".  This is the base card.  I then cut a basic black layer 3" x 6 1/4".  Last I cut a piece of elegant eggplant at 2 3/4" x 6".  This would be my top layer.  I used the bat stamp from the Wicked Cool set and stamped it in a random pattern using VersaMark ink.  Then I heat embossed it with black powder.  I pulled out a scrap piece of whisper white and stamped my monsters on it.  Using colored pencils, I colored them whatever color I wanted.  I punched out the 2 monsters using a 1 3/8" circle punch and punched the eyes using the 3/4" circle punch.  Then I took my piece of elegant eggplant with the bats on it and using my 1 1/4" circle punch, I punched 2 circles for the monsters to be looking out from.  The 1/2" circle provided the 3 circles for the eyes to be looking out.  I deliberately using a size larger that each hole to punch the monsters and eyes so that I could adhere them to the back of the purple.  This allowed me to line them up as I wanted.  I could have cut the monsters and eyes out of the whisper white and put them on basic black circles if I wanted but I like the look with the white.


This is just another picture of the front taken at a closer range.  I just wanted to be sure you got a good look at the little guys.  They are so adorable!!


For the inside I used a greeting from the Wicked Cool stamp set.  I first punched a small oval out of the white card stock, then I stamped the greeting underneath it, and punched it out using the new 1" square punch (from the upcoming Holiday Mini catalog).  I trimmed the top a little more with my snips and set it aside.  Using my VersaMark ink pad, I stamped the witches hat and her shoes.  I then heat embossed these using the black embossing powder.  Once that was done, I placed the greeting underneath the hat, lining up the rounded edge with the rounded brim.  It gave the inside some personality to put that witches hat and shoes in it.  
What do you think?  Please feel free to leave me a comment and let me know what you think of it.  Come back by tomorrow for another card.  Thanks for dropping by today.

Wednesday, August 17, 2011

You Know Dasher

Yes the wonderful Rudolph the Red Nosed Reindeer song starts with those very 3 words.  It is one of my favorite Christmas traditions to sing the song and watch the show.  Well, Stampin' Up! put out a reindeer stamp called Dasher a while ago.  It is still available in the catalog and I absolutely love it.  I was just playing around with it yesterday and this is what I came up with.


I started by taking a 4" x 5 1/4" piece of whisper white and running it through the big shot using the impression folder called Snow Burst which is in the Holiday Mini Catalog coming to you soon.  I then took some basic black card stock and punched 2 strips using the Lace Ribbon Border punch.  I added 1" circles of the glittery red paper behind the floral openings.  I then glued them crisscross on the white.  The center piece with Dasher on it is a piece of basic black cut at 3" x 3", glittery red cut at 2 3/4" x 2 3/4", and white cut at 2 1/2" x 2 1/2".  I did stamp Dasher first then trimmed the white piece down to the size I wanted.  


As for Dasher himself, I used the brush end of the Chocolate Chip SU! marker to color him and the brush end of a VersaMark marker to do the antlers.  This way I could add the silver embossing powder to the antlers and heat emboss them.  I used a silver ink pad I happen to have to brush the edges of the white before putting it on the red.   I used Sticky Strip to adhere Dasher to the glitter paper.  If I tried, I bet I could get him off but the Sticky Strip does hold better than anything else I have tried.

I want to thank you for stopping by today.  Please come back tomorrow to see what new idea I come up with.  See you then.


Tuesday, August 16, 2011

Hoping For A Terrific Tuesday

Ever had a bad day?  Everyone has.  Every day I wake up and say it will be a good day.  Lately, that is just not working out for me very well.  When I lost my brother 10 months ago, a huge part of my world ended.  The void left by his passing is still there and still painful.  It is hard to believe it has been 10 months.  Some days it feels like it just happened.  The emotions are truly raw and the darkness I feel surrounded by seems to close in.  Monday was just one of those dark days for me.  I did manage to do a little crafting but not much and I certainly did not finish any projects.  

So for today I thought I would share some of the money holder I made to put in my online store.  I used the same pattern as yesterday.  I will share 4 of them. 


First up, the dragonfly.  I made this one using the retired Bugs & Kisses stamp set.  I stamped both the dragonfly and the greeting in VersaMark ink and then heat embossed it using white embossing powder with dazzling diamond glitter.  This one could be used for a birthda, graduation, or any other "bug" occasion in someone's life. 


This money holder was created using the Crazy for Cupcakes stamp set.  This is still available in the current catalog.  It is one of my favorite sets to make cards with, especially birthday cards.  I used the SU! markers to color the cupcake wrapper, sprinkles, and candle.  Then I added Dazzling Diamond glitter to the "frosting".  The main color on the card is Ballet Blue, one of my favorites, which is retired now.  So sad.


This is one of my favorite money holders just because I love the little clam peeking at the crab.  The stamp set used is called Crab & Company and unfortunately is a retired set.  I chalked the background on the front of this one.  The crab and clam are colored using colored pencils.  I put the hat on the crab using a dimensional to pop it up.  I love the saying too.   


Last but certainly not least is this beautiful sunflower.  The greenery around the edges is from the same stamp set the flower is from.  It is called Touch of Nature.  Again, this one is retired.  Some sets you just have to keep using even though they retire them.  I used the SU! markers to color the flowers.  Then I added glitter to the 2 outer flowers.  I stamped one more flower on a separate piece of card stock, colored it, cut it out, added glitter and put it on top of the center flower using pop up glue dots.  This is definitely an any occasion money holder.  
Thanks for listening today.  I am hopeful that my Tuesday will be a better day than Monday.  Maybe I will even get a project done.  I am expecting an order to come today so I will have new punches to play with later.  I cannot wait!!!  Thanks for stopping by today.  I will see you tomorrow.


Monday, August 15, 2011

Money Holder WIthout Money?

Okay so I know the title is a little weird.  However, my share for today is a money holder I learned how to make from Dawn Griffith a few years ago.  I modified it just a little to have it fit in the small open end envelopes from SU!.  I made this particular one to use for a banquet we attended this past Saturday night for my husband's department.  We are the proud owners of an RV that we absolutely love to travel in.  Last year, we decided that we should offer others the opportunity to see what RV life is all about.  We started renting our RV to friends and they too seem to enjoy it.  So for the banquet, we offered to provide a gift certificate for a 3 day rental for the raffle that would be conducted.  Here is the front of the holder for you to see.


The holder measures 3 1/4" x 6 1/2".  I know you cannot really see the base card.  I used a piece of retired card stock called Handsome Hunter.  You know how it is.  Colors retire and you have all this card stock left over.  I figured why not use it.  I added a layer of Basic Black and then one of Very Vanilla.  I did emboss it with my big shot using an impression folder.  I do not remember the name of it but it is not from SU!.  A piece of Basic Black grosgrain ribbon is attached to the Vanilla for added color.  Now for the embellishment.
 

I chose the word "Adventure" because I know every time we travel, it is always an adventure.  I cut this out using my Cricut Expression first in Basic Black, then in Daffodil Delight, Tangerine Tango, and Pear Pizzazz.  I used only the leave from the Pear and the letters from the Tangerine and Daffodil.  I snipped the letters apart so that I could alternate the color.  Finally using my handy dandy Stickles glitter glue, I added dots to the letters and and lines to the leaves.  It gave just enough sparkle to make me happy.  (By the way, if you love glitter glue like I do, you will be very happy when the holiday mini catalog comes out!!!)


This is the inside of the money holder.  I stamped the "congratulations" from the Curly Cute stamp set in Handsome Hunter. (Yes I still have the ink pad too.)  I edged the piece of Vanilla with the same ink and then snipped the ends with my 1 1/4" square punch.  You can see the certificate tucked inside the holder.  Since I designed it, I just made sure it was the perfect size.  
I truly hope the winners of this prize enjoy the RV experience as much as we do.  I hope to be able to off into the sunset again soon.  I love to go.  

Hope you enjoyed seeing the money holder today.  Thanks so much for stopping by and I will be back tomorrow!!


Friday, August 12, 2011

Birthday Elegance

I finally decided yesterday to sit down and try to make a paper flower I have been seeing on various blogs over the past year.  I understood the basic technique for it but had never really tried it.  I mean I did once but I could not get it to fold the way I wanted and it ripped.  Then I was inspired by a website I was visiting to try to make one again.  I will share the flower first, then the card.

 Well, what do you think?  I started by cutting a strip of DSP 2" x 12".  I used my scallop border punch along one side of it.  This became the outer edge of the flower.  Then I used my new scoring tool that is coming out in the holiday mini catalog to score the strip between each scallop.  Then you accordion fold the paper, glue the ends together, and prepare to press the center down to make the flower.  That is really the hardest part of this entire technique and it is what caused me problems the first time I ever tried to make one of these.  Once I had it pressed down, I used a strong adhesive, my Tombo liquid glue, and attached it to a 1" circle.  Prepare your circle first.  I will tell you the one I attach first is on the back of my flower that way if it is off center, no one will see it.  Hold the flower down for a few seconds on the circle to make sure it adheres completely.  Once it is dry, I can then flip it over and attach my front decorations.  In this case it was another 1" circle layered on top by a 3/4" circle, and then I applied little pearls to decorate it.  


Here is the entire card.  It is very basic but the flower adds a lot pizzazz to it.  I could also have put pearls on the Very Vanilla ribbon at the sides of the flower.  I just forgot to get them out again.  I used a greeting from the retired set called Well Scripted.  It was stamped in Night of Navy ink on Very Vanilla card stock, edged with matching ink, and punch out with the decorative label punch.  I punch 2 more decorative label punches out of the Navy and cut them in half - one across the center and the other vertically up the center.  Trimming off the edges where the point comes out, I was then able to attach it to my greeting creating a mice matching border for it.  

I cannot believe another week has come and gone already.  I hope you all have a wonderful weekend and I will be back on Monday.  Thanks for dropping in today!!


Thursday, August 11, 2011

BOO! - Did I Scare You?

I am getting so excited that fall is coming.  I am praying for relief from the heat for all those people in the south east who have been suffering so much.  I am also looking forward to decorating season.  I love pulling out all of out decorations for each holiday and going through them all.  It is amazing how you forget some things you have.  If you are like me you also tend to pick up items on clearance so pulling those to actually use is always fun.  The first to come will be Halloween.  As I have said before, it is my husband's favorite holiday.  We always decorate and pass out candy.  However, we do not use any of the gory stuff.  I like to keep the holiday light and fun.  Evil has no place in my home.  Only happy, cute things get displayed.

When it comes to my Halloween cards, I also like fun ones that are just cute.  I made cards for all my little nieces and nephews last year.  I wanted them to have a fun surprise.  I made sure they were only fun.  So now I am madly coming up with light ideas again.  I thought I would share one of those cards with you today.


These little ghosts are floating about bringing happy haunting greetings to everyone.  I bet you can tell I used the owl builder punch to make these fun little guys.  The background of my card begins on a Whisper White base card.  The first layer is Pumpkin Pie.  Then I used the new lace ribbon border punch with pumpkin pie card stock to make the 2 strips you see.  I adhered them a piece of Basic Black and then ran it through the big shot using the perfect polka dots impression folder.  The greeting I used comes from a retired stamp set called Scary Skeleton.  I stamped it on Whisper White with VersaMark ink and used my Halloween embossing powder (same as yesterday's blog) to heat emboss it.  
This is the easiest ghost to make.  You punch out a white owl, cut the feet off, edge it using Bashful Blue ink, turn him upside down and put the eyes on it.  A little white gel pen to enhance the eyes and there you have him.  You can add a mouth if you like but I decided to go simple this time.  This will be one of the characters we will be making in my September punch art class.  I hope everyone likes him!!

I am so excited about the Holiday Mini Catalog coming out soon.  It will be available on September 1st.  There is a lot of neat new items in it.  Be sure to take a look.  If you would like a mini of your own, drop me a line and I will send one to you.  Now back to work I must go.  Thanks for stopping by today and I will see you tomorrow!!

Wednesday, August 10, 2011

It's A Beary Happy Halloween

Last year I make a Halloween card using the bear stamp from the Under the Stars stamp set.  He is one of my favorite stamps.  I stamped him, colored him, and then placed ovals I had punched out over him to make him a pumpkin costume.  He was so cute.  This year as I was playing with my punches, I thought I would make another bear dressed as a pumpkin but this time I would use only punches.  Since I knew how to make the costume for him, I set to work making the bear.  I punched various sizes of circles and played around until I came up with one I really liked and here he is.


Well, what do you think?  I used the extra large oval to make the pumpkin part of the costume.  The leaf trim is the 5 petal flower punch.  His hat is a 1 3/8" circle punch trimmed to be a hat and the leaf on top is another petal from the 5 petal flower punch that I trimmed down.  His head is a 1 3/8" circle with a muzzle of 3/4" and a nose of 1/2" and eyes that are 1/8".  His ears are 1/2" circles.  As for his arms and legs, I used the small oval.  His little shoes are a one inch punch cut in half.  I meant to sponge the edges of the pieces with matching ink but forgot to do it.  I guess I will have to make another.  I ran the pumpkin pieces through the big shot using the Stripes impression folder and then glittered the raised stripes.  White gel pen provided the shoelaces and accents.  

The greeting comes from the Teeny Tiny Wishes stamp set.  I stamped it on whisper white using VersaMark ink and heat embossed it using black embossing powder with orange glitter in it.  I punched it out with the word window and mounted it on a modern label.  The brads on the ends are really decoration only.  I adhered it using dimensionals.  

Here is the entire card.  The color scheme for this was basic black and pumpkin pie.  Garden green was used for the pumpkin leaves and shoes.  The bear is made from crumb cake.  I ran the black background through the bis shot using the  Spider Web impression folder.  All in all a very basic card but cute nonetheless.  

Leave me a comment and let me know what you think of him.  I will return tomorrow with another new project.  Thanks for stopping by today to visit.

Monday, August 8, 2011

Frosty - Better Than The 1st Snowman?

Last Friday, I shared 2 more face cards with you, the snowman and the elf.  I really liked both and so did my daughter.  My mistake was asking my husband for his opinion.  I really do value his thoughts but after working hard on something, I hate having it picked apart.  Let me refresh your memory of this snowman:


So here he is.  Now what my husband did not like was his nose.  He thought he looked more like a penguin that a snowman.  My daughter and I voted and declared him crazy.  Any sane person can see this is a snowman.  However, his thought was to have him be more like Frosty.   So I decided why not give it a try.


I have to admit this guy is really cute.  Secretly, I may like him a little more than the other one.  Think I will tell my husband?  No way.  I do not need the "I told you so".  If you remember from the song, Frosty had a corn cob pipe and a button nose, so I made sure to concentrate on those items.  His nose is so cute!!  Let's take a look at the corn cob pipe.


I used More Mustard card stock for the color.  I felt is was as close as I could get to a believable color.  I punched out a key tag using the retired SU! punch by that name and cut off part of it.  If you do not have the key tag punch do not worry.  You can use the wide oval, trimming off the bottom to round it so it is not so pointy or leave it pointy if you like.  I too works well.  Then I ran the piece through my big shot using the Square Lattice impression folder.  The other piece of the pipe is just a thin strip of More Mustard.  In order to have room for the mouth and pipe without it looking squished, I shortened the hat just a little.  


It still looks good.  Since the hat was shortened, I simply made the brim a little thinner to make it look proportional.  I used Basic Gray as my color for the hat this time.  I brushed the edges with Basic Gray ink.  I ran the top part of the hat through the big shot using the Stripes impression folder.  I ran the bottom piece through using the Perfect Polka Dots impression folder.  I left the Basic Black piece of the band smooth.  While Frosty had a flower on his hat, I chose to use a snowflake.  It is out of Whisper White, punched using the snowflake punch and has a silver brad in the center.  The only change I might make is either heat embossing the snowflake with white embossing powder with glitter in it or simply using Dazzling Diamond glitter on it just for that sparkle effect.  
So what do you think?  Do you like the first snowman with the carrot nose best?  Or did Frosty steal your heart?  Send me a comment and let me know which is your favorite.  I look forward to hearing from you.  That's it for today.  I will return tomorrow with another creation.  Thanks for stopping by today.


Friday, August 5, 2011

More Holiday Faces

Yesterday, I shared a cute Santa Face that I cased from another demonstrator online (sorry I cannot remember her name).  It is funny how when you make a card it sometimes leads to other designs that just pop into your mind.  That is exactly how I came up with the 2 I am going to show you today.  They are still face cards but of different characters.


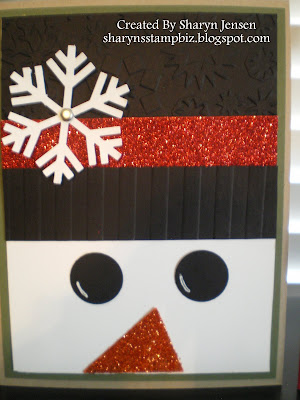
This first one as you can see is a snowman.  I used the red glitter paper from SU! for the hat band.  I happen to have a snowflake impression folder not from SU! to use for the top hat.  Then  I used the new Stripes impression folder from the 2011-2012 catalog.  I will tell you to check out the Holiday Mini when it comes out in September for an impression folder that would work for the top part!!  I added orange glitter to the "carrot" nose which I punched out of Tangerine Tango card stock using the pennant punch.  I wanted to give him a little something special just to dress him up so I added the snowflake to his hat.  Overall, I was pleased with the outcome.  I happen to share it with my daughter and she came up with the idea of the next face I would make.

The elf was her idea and she asked me to bring it to life.  Of course I accepted her challenge and went to work right away.  I used an impression folder not from SU! for the top of his hat.  I know I am not being faithful but you should see how much stuff I have at home.  I have to use it.  You could use an SU! folder.  It would work just as well.  For the brim of his hat, I cut a 1" strip of Garden Green.  I then punched out Real Red  pennants with the pennant punch and trimmed them down to 1" high.  This allowed me to make a nice pattern for the hat.  Then I ran the piece through the Big Shot using the Perfect Polka Dots impression folder.  The ears are the large petal from the Blossom Petals Builder punch.  I used the small oval for his nose and then added Blushing Bride ink to his cheeks.  His hair is a piece of Soft Suede card stock.  I free handed the scallop for the hair to make it look wavy.  When I showed my daughter what I had come up with, she was thrilled.  She thought he was cute.  Of course, I think he is cute too.

Once again the weekend is upon us.  I wish all of you a happy and safe weekend.  I will be back on Monday with another sample for you.  Until then, thanks for dropping in today!!