CARDS FOR SALE

Most cards you see on this site are available for purchase. Simply click the Pay Now button at the bottom of the post of an available card to purchase the card. You will be linked to PayPal for payment. It will come up as "greensnaggletooth@cox.net" which is the name of my internet company. Price is $5.00 unless otherwise stated and includes shipping. Your card will come with an envelope also. Email me with any questions or requests at: sharynsstampbiz@gmail.com
Thanks for taking a look at my creations!!

Thursday, June 7, 2012

Feelings, Feelings, Feelings

So I waited all day today to get my box delivered from the UPS guy.  It has all my new Stampin' Up! stuff in it and I really wanted to use some of it to created a card to share with you for today and tomorrow.  But alas, my box did not arrive until late in the day.  Now I did not waste my day but I also did  not get to spend it crafting.  It is that wonderful time of year when we have to fill out all new insurance forms for my husband's work.  This time they are changing out insurance carrier so we had a lot of paperwork to fill out as well as research to do about the company.  Not fun!!  Anyway, I did not get to play with the items today so you will just have to wait until tomorrow for me to show you a design using them.

We all go through times in our lives where different emotions play a role in our outlook on everything. I have this chart that asks at the top "How Are You Feeling Today?".  I love to look at it because some of the faces just make me laugh.  When I was thinking about what card I wanted to make for you today, this chart popped into my mind.  So I thought why not give it a try.  This is a card I would send to a friend who is stressed about life or possible ill.  Let me show it to you and see what you think.


I used all the new in-colors on this card.  The only card stock other than those was the retired Blushing Bride for the faces and the Basic Black.  The base card measures 4 1/4" x 11", scored at 5 1/2".  It is made using the Raspberry Ripple card stock.  Next I cut the Basic Black to be 4 1/8" x 5 3/8".  I ran it through the big shot using the impression folder called Houndstooth to emboss it.  Once it was finished I attached it to the base using runner adhesive.  I took out a scrap of Raspberry Ripple, Summer Starfruit, Midnight Muse, Primrose Petals and Gumball Green.  I punched out 2 squares of each using the 1 1/4" square punch.  (I chose the base card color based on the fact that I only used one of the Raspberry Ripple squares.)  I placed them all inside the Perfect Polka Dot impression folder and ran it through the big shot.  They are attached to the black using runner adhesive.  I really did not measure the spacing of the squares.  I just placed them until I was happy.  I used the 1" circle punch with the Blushing Bride card stock to make the faces.


For row one, I used expressions that said to me happy, sad/depressed and confident.  Now these expressions may say something different to you and you would be right.  I think this card is a representation of what we see in each face.  The faces were drawn on with pencil, traced over with black marker and colored in with colored pencils.  


Row two shows surprise, confusion and embarrassed.  Again, you may see something different in each one. I do not feel there are any wrong answers.  They were made the same way as row one.  


The final row's expressions say cautious, content and hopeful to me.  I wonder what you see in them?  I do hope some of you will let me know what you think of the expressions I chose and what they say to you. For now I have left the inside blank so I can use it for whatever I need.  When the right occasion pops up, I will either write or stamp something inside and send it off.  

I think the main reason this card popped into my mind is that I have had a flood of emotions over the last 24 hours:  frustration, depression, anger, despair and hopelessness.  Now these are not happy feelings and I do hope they change soon.  I think we all have times when we are overwhelmed with our emotions whether good or bad.  This card helps me to remember that we are all human and it is okay to feel however you need to in the moment.  

Now I have a box a goodies to go through after I get some cooking done.  Don't know why but my husband is under the impression his stomach is more important than my new Stampin' Up! box.  Go figure!!  

I will be back tomorrow with another card to share.  Until then, happy stamping and thanks for dropping by today.  See you soon!!


Wednesday, June 6, 2012

Do You Feel Green Today?

I certainly hope you do not feel green in terms of feeling ill today.  This green is a good one that is also very tasty.  Can you guess what it is?  I bet you can if you read my blog on Monday.  If you guessed it is another M&M character you would be right.  I felt bad that I had made Red, Yellow, Orange, Blue and Ms Brown but had yet to make a Miss Green.  So for today's card, I decided to correct this terrible error and make her.


Isn't she lovely?  My husband and youngest daughter will both tell you green is their favorite color.  I think they would be pleased with how this character turned out.  For this card I started with a piece of Melon Mambo card stock cut at 5 1/2" x 8 1/2", scored at 4 1/4".  Next I added a 4" x 5 1/4" layer of Basic Black card stock.  I ran it through my big shot using the Finial Press impression folder.  I wanted it to sparkle just a little so I sprayed it with my champagne shimmer spray and let it dry. For the top layer, I used a piece of So Saffron card stock.  I ran it through my big shot using a set of framelits I picked up at a local craft store called Scallop Ovals.  I then placed the oval inside the Manhattan Flower impression folder an ran it through the big shot.  I also sprayed this piece with a frosted shimmer spray.  I attached it to the black with runner adhesive.  I took a piece of white taffeta ribbon and place it around the black.  I tied it in a know on the front and trimmed the ends.  The entire black piece was then attached to the card using runner adhesive.  


To make Miss Green, I started by choosing the color Gumball Green to work with.  I punched out a 2 1/2" circle in this color.  Next I used the retired color of Blushing Bride and punched out 2 large ovals.  Once they were punched out I put them aside to use another time and took my wide oval punch and punched around both holes.  These would be cut in half lengthwise for the arms and legs.  Her hands are Whisper White punched using the boho blossom punch.  I used the small scallop flower from it, punched out 2, trimmed them to the size I wanted and added Dazzling Diamond glitter to them.  The whites of her eyes and her green eyelids are the large circle from the owl builder punch. The black part of the eyes was punched using the circle punch from the itty bitty punch pack and Basic Black card stock.   I added eyebrows and eyelashes using a black marker and added white gel to the black of the eyes.  For her mouth, I used my Gumball Green marker and drew it on, dividing the lips with a black marker.  I used the Billboard decorative strip and my big shot to cut the "m" out of white and added glitter to it also.  All piece of my character were attached together using a liquid glue.  Let's take a look at her shoes.


The boots were made out of Whisper White using the retired heart to heart punch.  The long skinny one was cut in half and trimmed for the heels.  I then used the wide heart and made the rest of the boot.  I attached them with a liquid glue and trimmed the heels and tops of the boots flat.  They were then attached to the legs using the same glue and had Dazzling Diamond glitter added to them.  Once she was all put together, I attached her to the card using dimensionals.

You can also see the greeting on the front that I chose to use.  It is from the Teeny Tiny Wishes stamp set.  I stamped it using VersaMark glue onto Melon Mambo and heat embossed it with white embossing powder.  I ran it through the big shot using the Bitty Banners framelits to cut it out and attached it to the ribbon with liquid glue.  


For both my saying and the Happy Birthday, I used the stamp set called Create A Cupcake.  I inked the stamps with VersaMark ink and then with Melon Mambo ink.  Once it was stamped onto the white card stock, I heat embossed it using clear embossing powder.  I trimmed the saying out with my paper trimmer and used my corner rounder punch on the ends.  For the Happy Birthday, I once again used the Bitty Banner framelits and cut it out with the big shot.  Both were then sponged around the edges with Melon Mambo ink and attached to the card using runner adhesive.  I will tell you about the little M&M's next.


Last but not least, I used my cupcake builder punch to make a cupcake in the corner.  I punched the bottom piece out of Chocolate Chip card stock and the top out of shimmer white.  I attached these to the card with runner adhesive.  I made dots on the bottom using my VersaMark marker and heat embossed them with clear embossing powder.  I punched sprinkles for the top of the cupcake as well as for around the saying using the cupcake builder punch and Pacific Point, Real Red and Gumball Green card stock.  I wrote the "m" on each one using a white gel pen.  They are attached using a liquid glue.

Well I feel much better now that I have made her too.  Now I can start doing more cards using any of the characters I would like.  I hope you have enjoyed seeing all of them and will give them a try.  They are really easy to make.  

That brings us to the end of today's share.  I hope you will return tomorrow to see what I do next.  Thanks for dropping by today and until next time - happy stamping!!


Tuesday, June 5, 2012

A New Little Dog

Have you placed an order from the new catalog yet?  If not, what are you waiting for?!!  I placed mine last Friday when the catalog went live.  It shipped on Monday so I am hoping to see it arrive by the end of Wednesday or Thursday at the latest.  Then I will have all kinds of new items to play with and share with you.

My husband has an aunt who lives about 5 minutes away from us.  Now you would think we would see her a lot but unfortunately with all of our crazy lives, we do not see each other nearly enough.  When I do get to go over to visit her, I also get to spend time with her 4 adorable dogs.  They are all Shitzu's.  They are too cute for words and each has its own unique personality.  So the other day when I saw this card on a demonstrator site, I just had to make it.  I believe the original was created by Ashley Sokal.  Between the photo of the card and my aunt's dogs, I was too inspired not to do it.  Ready?  Here we go!!


Isn't she just too cute?!   I wanted to incorporate some of the new colors on this card so that you would get something from the new catalog to look at.  The base card is Raspberry Ripple cut at 4 1/4" x 11", scored at 5 1/2".  I added a layer of Basic Black cut at 4 1/8" x 5 3/8".  I adhered it to the base card using runner adhesive.    I bet without even telling you what I did for the top layer you already know.  You're right.  I took a piece of Whisper White cut at 4" x 5 1/4" and chalked my own background using my pastels.  I know I do this technique a lot but I just love the effect on the card and the calmness of working with the chalks.  I think I really learned to do this when my brother was very ill and I was caring for him.  I use to work on cards at his home and he would watch me.  It gave us both something to do and think about other than his illness.  Now back to the card.  Once the sky was complete, I took a few strips of Gumball Green, tore the tops of them and layered them onto the white for grass.  Once they were attached using runner adhesive, I added some Dazzling Diamond glitter to the edges for sparkle.  I happen to have a few butterflies left over from another card and added them using glue dots.  The entire piece was then attached to the base using runner adhesive.  Once the card was completed inside and out, I added some Stickles Glitter Glue to each butterfly for more sparkle.  By the way the butterflies were originally cut out using the embosslit Beautiful Wings and the big shot.  


For the greeting, I turned to my handy stamp set called Curly Cute.  It is one of my favorite sets.  I stamped the greeting directly onto the card using Raspberry Ripple ink.  Now let's get to the star of the card.


My aunt has 3 females and 1 male Shitzu.  This little girl doggy reminds me mostly of 2 of the females:  Roxy and Chanel.  They are both light in color with some browns mixed in.  Roxy is the oldest.  She is just so sweet.  The other dogs do run her over sometimes, but I always make sure she get her turn for lots of attention.  Chanel on the other hand is the smallest of the dogs.  She thinks she is a princess and you should always be at her beckon call.  She loves to be held and to have her tummy rubbed so I have to be sure to give her lots of time for both.  

To make this dog, I started by choosing the colors of Whisper White, Soft Suede and Basic Black.  Her face was made using a 1 3/8" circle punch for the head.  I trimmed it down just a little to give it a slight oval shape.  The muzzle is the small oval.  The eyes are the large circles from the owl builder punch and the nose is the heart of the owl builder.  For her ears, I punched a full heart, cut it in half and reshaped the ends to round them.  I added a little Very Vanilla ink to the inner ears.  White gel was added to the eyes and nose and the mouth was drawn on with a fine tip black marker.  The body is a wide oval.  For the hind leg, I used another small oval and made the feet from the modern label punch.  The tail is a 1 3/8" circle punched around the hole from a 1 1/4" circle.  All pieces except the black were edged using Soft Suede ink.  I used the matching marker to draw the front leg onto the body.   I wanted her to have a bow so I punched 2 of the small hearts from the retired heart to heart punch out and used a 1/4" circle for the center of the bow.  All parts of the dog and bow were put together using a liquid glue.  Once complete, I attached the dog to the card using dimensionals.  The last thing I did after she was attached was add some crystal effects to the bow.  


The inside of the card is fairly simple.  I stamped the saying using Raspberry Ripple ink onto Whisper White.  The saying is from the stamp set Create A Cupcake.  I punched it out using the 2 3/8" scallop circle punch and brushed the edges with a sponge and Raspberry Ripple ink.  It is attached using runner adhesive.  

I have noticed that a lot of my cards have the same overall pattern to them.  I guess I like the look of it.  Have no fear though for I will have new items to play with soon and will hopefully come up with some new patterns too.  Also believe it or not it is almost holiday card making time!!  Yes for all of you who make Halloween, Thanksgiving, and Christmas cards it is just about time to get started on them.  I know I will have some to share with you soon.

I am so glad you took time to drop in today.  I hope you return tomorrow to see if I come up with a new idea.  Thanks so much for stopping by.  Until tomorrow, happy stamping!!!


Monday, June 4, 2012

More M&M Guys

Happy Monday everyone!!  I want to thank all of you who attended my catalog kick off crop this past Saturday.  I know some of you found new items you loved because orders have already been placed.  I really enjoyed seeing everyone and getting to spend time crafting with you.

If you don't know by now that I love the M&M characters, where have you been!  Those guys always bring a smile to my face whenever I see their commercials.  Even my mouse pad has the characters on it.  It just brightens my computer time.  I have made a card with the newest member of the group, Ms. Brown.  She brings a definite sophistication to the group.  I have also made one with Red and Yellow on it.  They seem to be best friends and just fit together well.  So when I sat down this past weekend at my crop, I wanted to make another card with one or more different characters on it.  I chose Blue and Orange.

Although these two have never been presented as friends, I like to think all the M&M's get along and like each other.  So I thought why not have them together.  The card is similar in some ways to other cards I made in the past so if you think you have seen an element on it before, you probably have.  Let's get started on this one shall we.


I think they look very good together.  I started with the base card of Pacific Point card stock.  It is cut at 4 1/4" x 11" and scored at 5 1/2".  Next I cut a piece of the new Gumball Green (quickly becoming one of my favorite colors) and cut it at 4" x 5 1/4".  Once I had it cut, I ran it through my big shot using the perfect polka dots impression folder.  I attached it to the base card using runner adhesive. Then I cut a piece of Daffodil Delight at 4" x 5".  I used my big shot and my Adorning Accents Edgelits to cut the scallop edge you see in the photo.  Then I used the coordinating impression edgelit folder to emboss the edge of it.  I attached it to the green card stock using runner adhesive.  I made the background for this piece by punching out Tangerine Tango, Pacific Point, Real Red and Gumball Green circles using the circle punch from the itty bitty punch pack.  I attached them with liquid glue and wrote "m" on each one.  The glitter glue dots were added after the characters were attached.  I used a Stickles glitter glue called Frosted Lace for this.  I used the stamp set Curly Cute for the greeting and stamped the words in Gumball Green.  I cut them out with the new itty bitty banner framelits and edged both using my sponge and Pacific Point ink.  They are attached to the card using dimensionals.


In a lot of the pictures I have seen of the blue guy, he usually has sunglasses and sometimes a saxaphone.  I chose not to have any of these accessories for him this time. The colors I chose to use are Pacific Point, Whisper White, Basic Black and the retired Blushing Bride. His eyes are from the owl punch and his body is the wide oval.  for the arms and legs, I started by punching a small oval using the retired small oval punch and then punched around the hole using the large oval punch.  I did this twice.  I cut one in half to use for the arms.  The other ring  I cut in have and set on half aside to use for the orange guy.  With the half I had for the blue, I cut it in half again and used the pieces for his legs.  His shoes are the 3/4" circle punch cut off to be flat and the retired horizontal slot punch for the shoe tops. The hands are from the boho blossom punch.  I used the billboard decorative strip and the big shot for the letter on his tummy and added dazzling diamond glitter to it.  The mouth is drawn on with a black marker and white gel was added to his eyes.


I used Tangerine Tango for the orange color.  His body is punched using the 1 3/4" circle punch.  Other than those two items, I made the rest of him using the same colors and punches as the blue.  The pieces of both are all attached to each other using a liquid glue and both guys are attached to the card using dimensionals.


Last but not least is the inside of the card.  I chose a saying from the retired stamp set Whimsical Words.  I stamped it using Gumball Green ink onto Whisper White and punch it out with the curly label punch.  The edges were sponged with Gumball Green ink.  

Now I know you have to have noticed that my watermark appears twice in all these photos.  That is because I forgot that I had set my photo album to automatically add it to each photo.  So I of course did it on my own and did not notice the double printing until I saw the last photo.  Please forgive my lack of memory for this.  I will try not to have it happen again.

I hope you enjoy seeing the M&M people.  I think I will have to make a Miss Green soon.  Thanks for dropping by today and please stop by tomorrow to see if I remember to leave the extra watermark off!!  Until then, happy stamping!


Friday, June 1, 2012

One More For Dad

Happy Friday everyone and Happy June!!  The big day has finally arrived!!  The new catalog is now available and can be ordered from.  I am so excited to get my first order in and play with my new products!!!!

I wanted to finish off this week with another card you could give to dad.  Now I did not put the words "Father's Day" anywhere on this card.  While it may be used for that purpose it may also be used for any other happy occasion you might want to use it for.  So let's get started!!


This poor little duck is being captured by aliens although he really does not seem to concerned about it.  I started this one with Not Quite Navy card stock measuring 4 1/4" x 11", scored at 5 1/2".  I then cut a piece of Basic Black to be 4" x 5 1/4".  I ran this piece through the big shot using the Perfect Polka Dots impression folder and attached it to the base card with runner adhesive.


My stamp image comes from the Rubber Ducks stamp set by My Heart Stamps For You.  I used this set for my Judge Duck on Wednesday.  I started by stamping the image on Whisper White card stock using VersaMark ink.  After it was stamped I sprinkled black embossing powder on the image and heat embossed it.  Using the Labels Collection framelits, I cut out the image by running it through the big shot.  Then it was time to add color.  Once again, I chose my colored pencils to use.  I colored in the image and its surroundings entirely.  I attached this to the card using runner adhesive.  I added some white gel pen to a few polka dots on the black to add a little color to the background.  


For the greeting, I used the one that came with the stamp set.  I stamped the greeting in VersaMark ink and heat embossed it with black embossing powder.  I cut out the greeting using the Apothecary Accents framelits and my big shot.  I sponged the edges with Not Quite Navy ink, added a silver brad to each end and attached it to the card using glue dots.  All I would do to this to give it to dad is either write or stamp Happy Father's Day.  If I wanted to use it for something else, I would either stamp or write in the card and send it off to a happy recipient.  

For those of you coming to the crop tomorrow afternoon, I will have new catalogs available for you to pick up.  I hope to see lots of you these.  If we run out for any reason, I will get more.  I wish everyone a very happy weekend.  Take some time to craft and spend time with your family.  I will see you all next Monday.  Thanks for stopping by today!


Thursday, May 31, 2012

Dapper Dog Gets A New Job

On Tuesday I introduced you to Mr. Dapper Dog.  I truly love this guy.  He is so easy to make and just fun to look at too.  So I was at lunch with my husband and showed him a picture of this guy.  While he liked him a lot, he asked me if I could do another one and make him into a bbq chef.  After all, don't all dads bbq?  Well they do at my house.  Of course, I could not resist the challenge so I set out to make him once again.  Ready to see how it turned out?  Here we go!


I started this card with a base card of Real Red card stock cut at 5 1/2" x 8 1/2", scored at 4 1/4".  I added a piece of Basic Black measuring 4 1/8" x 5 3/8".  I attached it using runner adhesive.  For the top layer, I bet you can tell what I did already but I will still write it.  I started with a piece of Whisper White measuring 4" x 5 1/4".  Using my pastels, I first chalked the sky and then the grass.  Working with chalk always relaxes me.  Once it was finished, I attached it using runner adhesive.


Since I gave you all the instructions for making him on Tuesday of this week, I am not going to bore you with those details again.  I will tell you how I made the hat.  I used a 1" square for the bottom part and the butterfly punch made the top.  I punched the butterfly out of Real Red and cut it in half.  I then placed the pieces behind the square and glued it with a liquid glue.  It is so sad that the butterfly punch is retired.  I will still use mine though.  


Again the bottom is the same as Tuesday's.  Only the apron was added.  Again the main part of the apron it the 1" square punch.  The ties are from the retired horizontal slot punch.  If you do not have one of these, a strip of card stock would work well too.  The spatula comes from my Cricut machine.  I used the Everyday Paper Doll cartridge for this one.  It is cut out of Brushed Silver card stock at adhered to the card with liquid glue.  I used a fine tip black marker and wrote the saying onto the apron.  


For the inside, I used a couple of stamps from the retired King of the Grill stamp set.  They were stamped using Real Red ink onto Whisper White card stock.  I used my paper trimmer to trim it out and brushed the edges with the red ink.  I layered it onto a piece of Basic Black card stock and attached it to the card using runner adhesive.  

Tomorrow is an important day as we welcome the new 2012 - 2013 Stampin' Up! catalog.  Visit my SU! site (link is on the side of my blog) and take a look at all the new goodies.  You can begin ordering item tomorrow.

Thanks for stopping by to see me today.  I will look forward to seeing you tomorrow.  Until then, happy stamping!!


Wednesday, May 30, 2012

Here Comes the Judge

I thought I would stay with the Father's Day theme once again today.  I happen to be going through some unmounted stamps that I have when I came across the one I used today.  I immediately could see it on a card for a dad so I sat down and got right to work.  This set is a 2003 set from a company called My Heart Stamps for You.  The name of the set is Rubber Duckies.  This is one I picked up while attending a stamp convention.


Does the title of the blog make sense now?  I thought this entire set of ducks was so funny when I first saw them.  Maybe I will use another one later in the week to create another card.  For now, let's focus on this one shall we?  I started with a base card of Always Artichoke measuring 4 1/4" x 11", scored at 5 1/2".  I added a layer of River Rock card stock measuring 4" x 5 1/4".  This is a color I always seem to forget about but it goes very nicely with the Artichoke.  I ran it through the big shot using the polka dots impression folder and then sponged the edges with Always Artichoke ink.  I adhered it to the base card with runner adhesive.  


I began my judge by stamping the image onto a piece of Whisper White card stock using VersaMark ink.  I sprinkled black embossing powder on it and heat embossed the image.  Once it cooled, I ran it through the big shot using the Labels Collection of framelits.  I found the size that fit around the image, put it through the machine to cut it out and I was ready to color.  I chose to use my colored pencils today.  I like the soft look they give the image.  Once the coloring was finished, I edged the frame with a sponge and Always Artichoke ink.  It is attached to the base card using runner adhesive.  


The greeting I chose to use for the front comes from the same stamp set as the image.  I stamped it onto Whisper White using VersaMark ink and heat embossed it with black embossing powder.  I cut the strip down and rounded the corners.  I then layered it onto a piece of Always Artichoke cut slightly larger than the saying and rounded those corners.  I used runner adhesive to layer this.  Once it was layered, I attached the entire greeting using dimensionals.  


I knew the saying I wanted to use for the inside but did not have it on a stamp.  So I started by stamping the Happy Father's Day from the Teeny Tiny Wishes set onto Whisper White using Always Artichoke ink.  I punched the saying out with the Modern Label punch.  I then sponged the edges with Always Artichoke ink.  I also punched a modern label out of River Rock, cut it in half and added it to the sides as a sort of frame with runner adhesive.  The only thing missing was the word "A".  To add it, I used my Always Artichoke marker and wrote it myself.  I then attached the saying to the card with runner adhesive.  

Tomorrow I will have another dad card so be sure to come back.  I am so glad you stopped by today.  I will see you all tomorrow!!  Happy stamping.  


Tuesday, May 29, 2012

A Daddy Day Dapper Dog

How's that for a mouthful?  I wasn't going for a tongue twister but I think I created one.  Oh well.  I think it's a great way to start the week!!

I hope all of you had a nice Memorial Day weekend.  I tried to do a little crafting and to get some rest.  I did not have much luck sleeping last week while my hubby was out of town so it was nice to have him home. 

Today's share is another card for dad.  June is really creeping up on us.  I know I better get prepared or I will not be ready for all the special days the month ahead holds.  Anyway, I saw the main figure on this card on Pintrest.  I really loved him when I saw him.  He was created by Cindy McGurk.  While hers was more of a birthday card, I chose to change mine up so that it would fit Father's Day.  So let's take a look at it.


He looks so dashing!  I started with a base card of Midnight Muse, one of the new in-colors, measuring 5 1/2" x 8 1/2" scored at 4 1/4".  I added a layer of Basic Black on top of that measuring 4 1/8" x 5 3/8".  My final layer is a piece of Whisper White cut at 4" x 5 1/4".  Before attaching it to the card, I chalked the background with my pastels creating the sky and grass.  Then I could attach it to the black with runner adhesive.  Now let's move on to the star!!


We will work our way from the top down.  I made him a top hat out of Basic Black card stock.  I punched a 1 3/8" square and trimmed it to form the hat.  Next, I used Early Espresso and Crumb Cake card stock to start punching the parts of the dog.  The ears are the large oval punch.  For his head, I used a 1 3/4" circle punch while his jowls are the full heart punch turned upside down.  For the nose, I used the smallest heart on the heart to heart punch (this one retires on Thursday).  For the eyebrows, I used the retired horizontal slot punch.  You could make these using scraps that you have.  The eyes come from the owl builder punch.  I used my usual Whisper White and Basic Black for these.  I added a Gumball Green hat band to my top hat and added crystal effects to it to give it the shiny look you see.  I added white gel pen to the eyes and nose and used a fine tip black marker to draw the line and dots on the jowls.  The jowls are attached to the head with dimensionals.


For the main part of the body, I punched a wide oval and layered a large oval on top of it.   The arms of the dapper dog are the wide heart from the heart to heart punch, while the feet are 3/4" circles that were punched and flattened to make the paws.  I added the toes with fine tip black marker.  The tie was cut free hand from a retired designer series paper and the cane is just a scrap of black.  All parts of the dog were attached to each other and the card using a liquid glue, except for the jowls.  They were attached to the head and card with dimensionals.  


The inside greeting was made using 2 stamp sets.  The "d" comes from the retired set called Eight Great Greetings and is stamped in Midnight Muse ink.  The "Happy Father's Day" is from the Teeny Tiny Wishes stamp set.  It is stamped using Gumball Green ink.  I cut this out using the big shot and the labels framelits collection.  Once it was cut out, I sponged the top half with Gumball green on the edges and the bottom half with Midnight Muse ink.  It is attached with runner adhesive.

I will tell you it was a lot of fun making this dog.  I am definitely going to do him again.  I will be back tomorrow with another share for all of you.  I hope you come by to visit.  Thanks for dropping in today.


Friday, May 25, 2012

Another Card For Dad

Happy Friday Everyone!!

Hard to believe we have reached the end of another week, and we are heading into a holiday weekend!!  Now if you think about it, in my life one daughter works for AAA which is open holidays and one works in retail which is open holidays.  My husband being a firefighter sometimes will be scheduled on holidays.  So really you would think I would not be excited about this.  However, at least my hubby is off this year so we get to spend some time together.  Due to that fact, I will not be posting on Monday.  I hope all of you will be too busy having fun to miss the post.  I will be back Tuesday though.  With that said, let's get on with the share of today.

  I wanted to continue with the theme of Father's Day.  Like I shared yesterday, I think masculine cards are the most difficult so if wanted to give you another idea.  So let me show you what I came up with to show.


I went with a dark color scheme.  For some reason those colors just seem manly to me.  I used Cherry Cobbler for the base card.  It is cut at 5 1/2" x 8 1/2", scored at 4 1/4".  Once it was scored and folded, I pulled out the retired stamp set called Voila to Go.  I took out the hot dog stamp and stamped it all over the front of the card with VersaMark ink.  I then heat embossed it with clear embossing powder.  

I took a piece of Basic Black card stock measuring 4" x 5 1/4" and ran it through my big shot using the Top Note die.  Once the shape was cut out, I ran it through again using the impression folder called Houndstooth.  I knew I wanted to use this vertically on the card so I added an antique looking brad and added one to each side.  It is adhered to the card using runner adhesive.  


For my image, I turned to the retired stamp set King of the Grill.  I remember when this set came out.  I thought it was perfect for many of the men in my life who want to be kings of the grill.  I started with a piece of Whisper White card stock.  I chalked a sky background over the entire piece.  I then used StazOn ink to stamp my image onto the piece.  I used my aqua painters and ink pads to watercolor the image and the ground.  This helped to make him stand out against the background.  Once it was dry,  I attached it the the top note using runner adhesive.  


You can really see the embossed hot dogs in this picture.  They really turned out nice.  The greeting for the front of the card is also from the King of the Grill stamp set.  I stamped it on Whisper White using Cherry Cobbler ink and punched it out with the word window punch.  I then sponged the edges of it with the Cherry ink.  I used a scrap of Basic Black to punch out a modern label.  I layered the saying onto it using runner adhesive and attached the greeting to the card using the same runner adhesive.


For the inside greeting, I used another retired stamp set called Eight Great Greetings.  This is really a card that showcases a lot of retired stamps.  I stamped it on Whisper White with Cherry Cobbler ink and layered it onto a piece of Basic Black using runner adhesive.  I then attached the entire saying with runner adhesive to the card.

While you would have to use other stamps unless you happen to have these, I think this is a doable design for a card.  I may stick with this theme for some of next week but am not sure right now.  I will have to see what inspired me.  

Remember I will not be posting on Monday but will return Tuesday with something new to show you.  I wish you all a wonderful Memorial Day weekend.  Please be safe this weekend.  I want to see all of you back here on Tuesday.  Thanks for stopping by today.  Happy Stamping!!


Thursday, May 24, 2012

It's Almost Dad's Day

Why is it that every time I have to make masculine cards, I get stumped?  Making a card for any man seems almost impossible.  I say almost because I always seem to come up with something.  That frustration of finding the right idea is what I was dealing with today.  I decided that since June is only a week away, I had better get started working on some Father's Day cards.  I have one to share today and one for tomorrow.  So let's get started shall we?


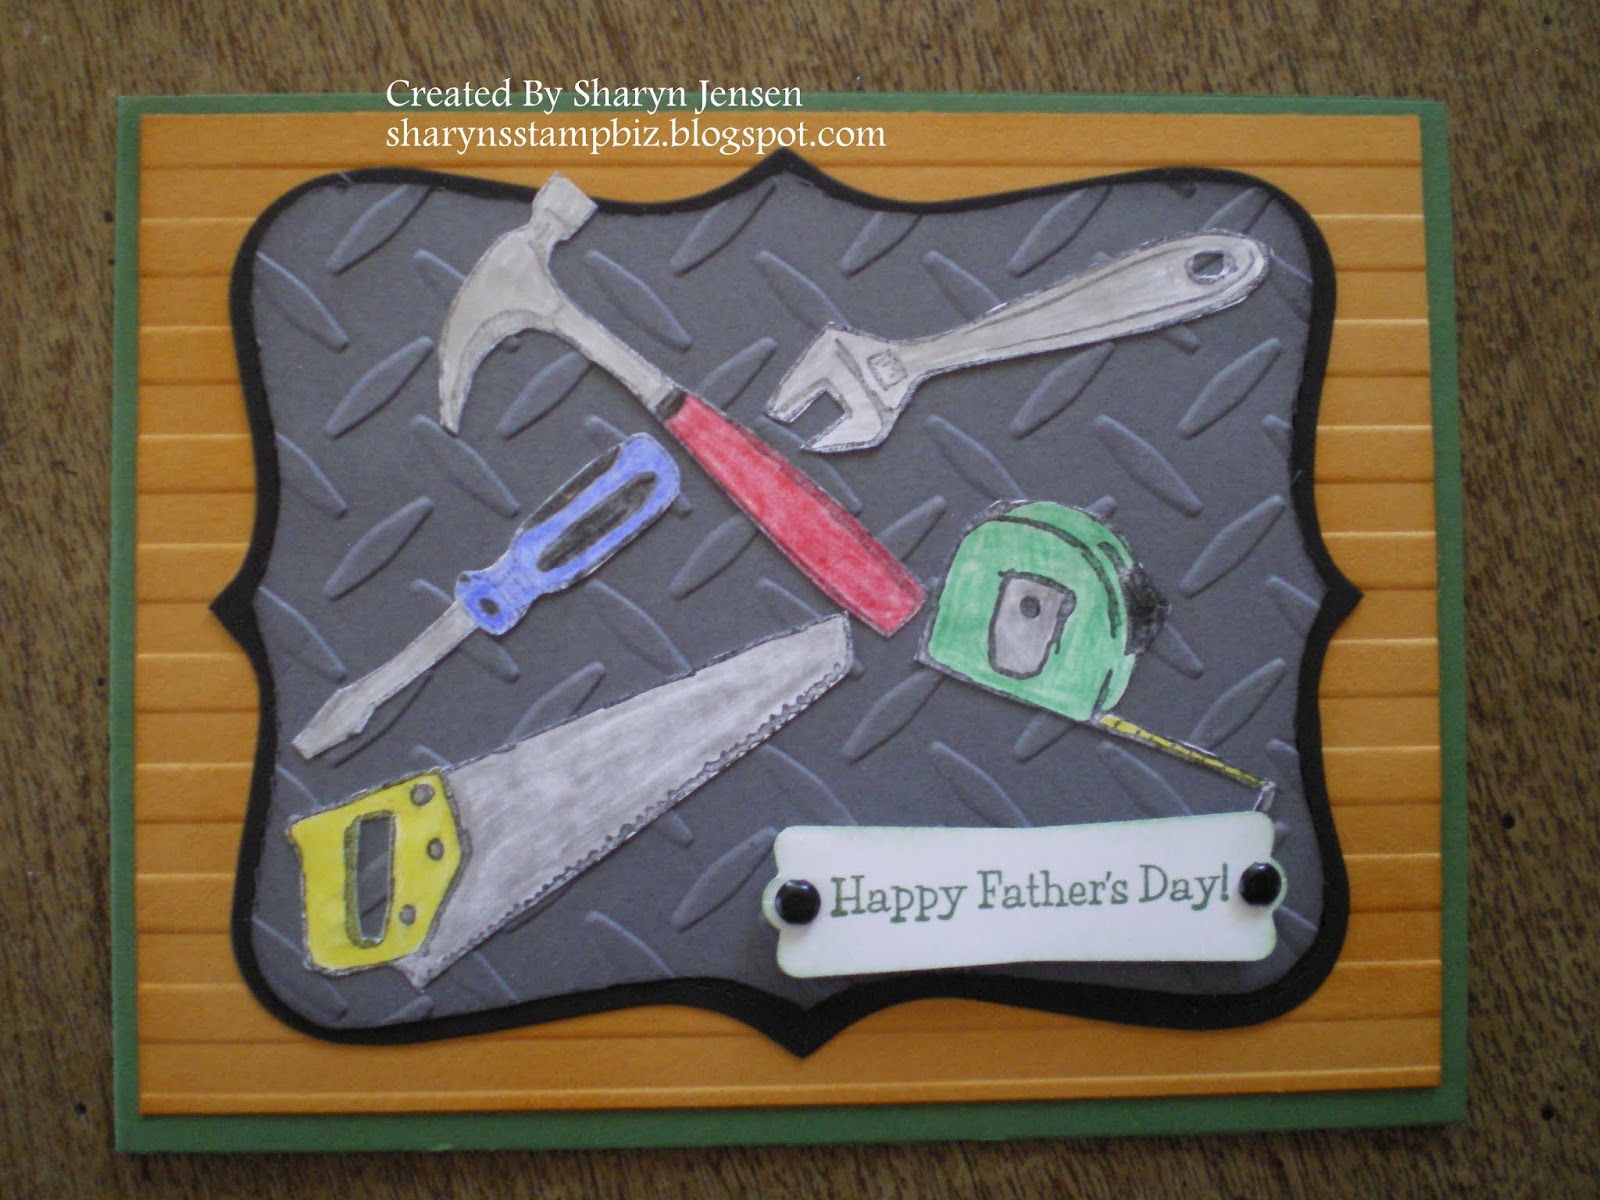
I think a good name for this card is Tools and More Tools.  Now personally, I do not know how to use many of the tools out in my husband's shed.  He has a lot of tools let me tell you.  Yet somehow he always seems to need more.  I guess it is like my card making habit.  I always find something new that I want to get.  

I started with a base card of Garden Green measuring 4 1/4" x 11", scored at 5 1/2".  Next I cut a piece of More Mustard card stock to be 4" x 5 1/4".  I ran it through my big shot using the Stripes impression folder.  I sponged the edges with More Mustard ink and even sponged the front of the piece a little.  I adhered it to the green base using runner adhesive.  


Next I took a piece of Basic Black card stock and ran it through the big shot to cut out the Top Note shape.  I used the same die and cut out a Basic Gray one too.  On the gray one, I followed the perforation  the is around the edge and cut it off.  Then I ran the top note through the big shot using an impression folder called Diamond Plate.  Once impressed, I layered it inside the black top note using runner adhesive and attached it to the mustard with runner adhesive too. 

Then came the tools.  I used a stamp set that is retiring at the end of May (next week) that is called Totally Tool.  I use this set a lot for men.  I stamped the little tools onto Whisper White card stock using StazOn ink.  I then colored them in using my colored pencils.  Then came the hard part.  I cut each one out including holes in the handles.  They are attached to the gray diamond plate using liquid glue.  

For the greeting, I used a stamp from a retired set called King of the Grill.  I stamped the message in Garden Green ink and punched it out with the modern label punch.  Next I sponged the edges with green ink and added a black brad to each side of the saying.  I adhered it to the card using dimensionals.


For my inside greeting I went back to the Totally Tool stamp set.  The tools are each attached to a saying so when I stamped them for the front I just ignored the sayings.  This one with the screwdriver is my favorite saying of the set so I chose it for the inside.  I stamped it using Garden Green ink and sponged the edges of it with the same.  I adhered it to a piece of Basic Black to highlight it.  I then attached the entire piece to the card using runner adhesive. 

Well that's it for today!  I hope you feel a little inspired.  Remember you can still order this set through next Thursday if you like it.  I will return tomorrow with another card for Father's Day.  I hope to see you all then.  Thanks for dropping by today!!