CARDS FOR SALE

Most cards you see on this site are available for purchase. Simply click the Pay Now button at the bottom of the post of an available card to purchase the card. You will be linked to PayPal for payment. It will come up as "greensnaggletooth@cox.net" which is the name of my internet company. Price is $5.00 unless otherwise stated and includes shipping. Your card will come with an envelope also. Email me with any questions or requests at: sharynsstampbiz@gmail.com
Thanks for taking a look at my creations!!

Friday, September 28, 2012

Red Hat Kind of Day

Happy Friday!!!!  Well we made it to the end of another week.  I am looking forward to my crop tomorrow here at my home.  I cannot wait to see everyone and to share some fun, food and crafting!!!  It should be a lot of fun.

Last week I got to go to lunch with one of my favorite people, my aunt.  She was in need of some birthday cards so I took a variety along for her to look at.  She chose several from my selection but could not find one that really fit her neighbor and good friend.  So we started talking about things this lady likes and it happened to come up that she is a member of the Red Hat Society.  Now I have never made a card with that theme but I told my aunt I would work on one.  Today I am going to share what I made with all of you.  Ready?  Here we go!!!!!


Ta Da!!!!  For a first attempt I am quite pleased with the turn out.  I had to make this card larger than my regular card to accommodate her height.  I started with a base of Real Red card stock cut at 7" x 10", scored at 5".  I added a layer of Elegant Eggplant to this which measured 4 3/4" x 6 3/4".  It is attached with runner adhesive.  For the final layer I used Whisper White card stock cut at 4 1/2" x 6 1/2".   I ran this piece through my big shot using the over-sized impression folder.  I attached it to the card using the same runner adhesive.


For the greeting, I pulled out a stamp I bought at a stamp convention.  It is by a company named DeNami.  I love this stamp because the greeting is vertical and it adds a little different look to the card.  I stamped this onto a piece of 1" x 5 1/4"  Whisper White card stock using Elegant Eggplant ink.  I sponged the edges with the same ink.  Next I took a piece of 1 1/4" x 5 1/2" Elegant Eggplant and 1 1/2" x  5 3/4" Real Red card stocks and ran them through the big shot with the same over-sized impression folder.  Once impressed, I layered them all using runner adhesive and attached them to the card using the same adhesive.  


Now we shall start on our lady.  I used Real Red, Elegant Eggplant, Going Gray and retired Blushing Bride card stocks for her.  Her face is the ornament punch trimmed so the chin is not pointy.  Her hair comes from 2 wide ovals.  I cut them to achieve the look I wanted.  For the hat, I used the wide oval for the brim and a 1 1/4" circle for the top of the hat.  I also punched a 1 1/4" circle from eggplant and cut a strip to make the hat band.  I added a feather I picked up at the craft store and purple glitter to add dazzle to the hat.   I also added white gel.  The nose is the small circle from the owl builder punch while the eyes and mouth are drawn on by hand.


Her arms and legs and sleeves are the word window punch.  I cut the windows for the arms in half to I could make them bend.  The top of the dress is a large oval trimmed on the sides to give her some shape.  For the skirt I used the large tag punch.  The shoes are the small oval punch trimmed to a shape I like and a scrap is added for the heels.  Once all pieces of the head and body were attached using liquid glue, I added stickles glitter glue to the top and skirt and red rhinestone to the top for buttons.  There are also purple rhinestones on the toe of each shoe.  The finished and dry lady is attached to the card using dimensionals.


This is the stamp I used inside the card.  Again I got this one at the convention and I really do not know who made it.  I stamped it on Whisper White card stock using Elegant Eggplant ink and sponged the edges with the same ink.  I layered this onto a piece of Elegant Eggplant card stock using runner adhesive and attached it to the card using the same runner adhesive.

Well that finishes up another week.  I can not believe how fast this one went.  I will be back Monday with another card to share with you.  Until then, thanks for stopping by today!!!!!!

Thursday, September 27, 2012

Iris Fold Fish Card

Hi everyone and welcome to Thursday.  I hope your week is moving right along with few problems to disrupt your days.  So far so good at my house.

Today I wanted to share with you the card I made using the iris fold fish I showed you how to make yesterday.  I could have shown this to you yesterday but I had not had a chance to finish it so you had to wait.  Today my fish is ready so let's get started.


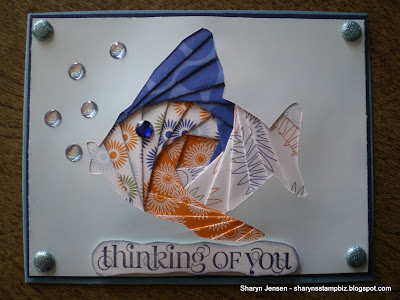
I started with a 5 1/2" x 8 1/2" base card of Marina Mist and scored it at 4 1/4".   I took my iris folded fish and layered it onto a piece of Night of Navy card stock cut at 4 1/8" x 5 3/8".  I attached it using runner adhesive and glittery brads.  Once it was securely on the Night of Navy, I attached the entire piece to the base card by placing a glue dot in each corner and runner adhesive all over the rest.  I wanted to be sure it would be nice and secure.  One thing I did not mention yesterday is when I cut my Whisper White card stock to 4" x 5 1/4" I chalked the side that would be the front of the card with a light blue chalk and then turned it over to trace the fish and proceed with the iris fold process.  You do not have to do this.  It was just the look I wanted to have for my finished card.


Here is my little fishy up close.  As you can see, I added a blue rhinestone to mine for an eye.  After all, fish have eyes too.  Then I wanted to add a few bubbles that my fish could be blowing.  I chose to use these light blue sticker dots that I picked up at a local store.  I like them because they have that "wet" look and fit in nicely with a water setting.  If you missed my blog yesterday and want to learn to make the fish, please refer to the blog posted on September 26, 2012 and I will take you step by step through the iris folding process.


Finally, for the greeting I chose my Curly Cute stamp set and selected the "thinking of you" stamp.  I stamped it using Night of Navy ink onto Whisper White and cut it out free hand.  Once cut, I brushed the edges with Night of Navy ink and attached it to my card with dimensionals.  I chose to leave the inside of this card blank.  I did put a piece of Whisper White cut at 3" x 4" with edges sponged with Night of Navy ink in the card to either write on or add a stamp to at a future date.  This card can be used for many different occasions and who knows what I will choose to use it for when the time comes.

Well that's it for today.  I will be back with one more share for this week tomorrow.  I appreciate you spending some time with me today and taking a look at my fishy.  Thanks for dropping by and I will see you tomorrow.

Wednesday, September 26, 2012

Learn to Iris Fold

Happy Wednesday to you all.  As promised yesterday, I will devoting my blog today to teaching you how to do the iris fold technique.  The card I shared with you yesterday was a beautiful dolphin.  For today's lesson, we will be making a cute little fish.  Let's get started shall we.


The first thing you will need is a pattern.  I have found most of the patterns I have through the internet.  I simply Googled Iris Folding Patterns and visited some of the site that came up.  Once I find a pattern, I print it out and add it to my stash. Sometimes when I go to use the pattern I find that it is a little larger than I need.  I simply place it on a copier and shrink the image.  In this case I made a second copy at 75% of the original so it would fit on my card.  The pattern has the numbers on it as well as the pattern guide.  The guide will indicate how many colors of paper you will need to use.  In this case, we will be using 4 colors as there is a color A, color B, color C and color D.  Listed with each color are the numbers you will use the color with.  Now that I have selected my pattern it is time to trace it.


I placed my pattern on top of a light box and turned the light on.  Next I put a piece of Whisper White card stock cut at 4" x 5 1/4" on top of the pattern and placed the image where I wanted it.  I then used a pencil and traced around the image. 


Once your image is traced it is time to cut it out.  I took out my cutting pad, my craft knife and some blue painters tape.  I will use a small piece of the tape at each corner to hold the image in place so it does not move while I am cutting.  Painters tape is the best to use because it will release from your card stock causing little to no damage at all.  Once your image is secured, use your craft knife to follow the lines and cut the image out.


Here is my fish once it is cut out.  As you can see, my lines are not always perfectly rounded as they seem like they will be.  Do not worry about this.  Your image does not have to be perfect.


Once your image is cut out, place it over your pattern sheet and secure it to the sheet using the painters tape if you wish to do so.  As you can see, you will be able to see the numbers through your image opening allowing you to easily follow the pattern.  What you cannot see is the pattern guide.


To make it easier for me, I take a scrap piece of paper and copy the guide onto it.  This way it is off to the side where I can easily see it and I will not have to lift my image.  I also like to do this because I can cross the numbers off as I go along.  Now it is time to choose my papers.


As the pattern guide indicated I would knew I would need 4 different patterns.  To make my selection easier, I tend to use the designer series papers from Stampin' Up!  This particular set is retired but as many crafters know sometimes you have not used all your paper by the time it retires.  I tend to store mine in baggies and label them with the colors they include.  Now you can go to your local craft store and select papers that compliment each other and I have done that before.  I would recommend you store them together to make future selections easier.  Now we have our paper so let's get folding.


I like to start by cutting my paper into strips wide enough to cover the widest area where a piece will be needed.   Once I have the strips cut, I will cut off a piece from the end and fold one edge down as shown in the photo.  


Looking at the first strip I cut, I am sure you can see it was too long for the spot where I was to place it.  Simply cut it down so it will cover the area.  Place the piece with the folded side towards the number line and tape it down.  There is no special tape for this.  I simply use plain old regular scotch tape.


You will continue with the cutting of strips, folding and taping down around your image following the numbers.  Do Not do all of one pattern color at a time because your iris will not look right.  You need to go in numerical order - 1,2,3, and so on.  If you are afraid you will confuse your patterns, write down which pattern goes with which set of numbers on your pattern guide.  If you have it off to the side, you will be able to refer to it any time you forget which pattern you are on.


Once you finish going around and around and have covered all the numbers, this is what you are left with.  Doesn't really look like a fish does it?  It always looks like a mess.  You will have the center section open as this is the iris of your image.  Carefully remove your painters tape. 


Once you turn your image over, you will be able to see your fish.  As you can see, you get a nice spiral effect using this technique.  Again you have to follow the numerical pattern number by number.  You can choose to leave the center of your iris open if you would like to do so.


Personally I prefer to cover my area up with a small piece of paper.  I usually look at my image from the front and decide which pattern will look best showing through.  All you have to do is flip the fish back over and tape the paper to it.  Sometimes I will add a rhinestone to this area instead of paper.  Other times I add both.  It just depends on my mood.

Well I hope this tutorial has been helpful.  I am pretty sure I covered all the steps.  If you have any questions, please feel free to ask.  I will do my best to answer you.  

If you want to see what I do with my fish you will have to come back tomorrow.  I will have a card made using this cute fishy.  I hope you will all come back to see him.  Thanks for stopping by today.

Tuesday, September 25, 2012

It's A Special Day

Happy Happy Birthday to my beautiful daughter Heather!!  I am so proud of the woman she has become and am sending lots of love and good wishes her way on her special day.  I made her a beautiful sunflower card that I shared with you last week as well as the recipe box.  So for today, I wanted to share a card that I made with her in mind.  She has always loved dolphins and I thought I would share a card with a dolphin today in her honor.


I chose to do the iris fold technique for this card.  I started with a base card of Tempting Turquoise cut at 5 1/2" x 8 1/2", scored at 4 1/4".  For my second layer I went with  Pacific Point card stock cut at 4 1/8" x 5 3/8".  The top layer is a piece of Whisper White cut at 4" x 5 1/4".  I added Stickles glitter glue dots in turquoise and bright green to the white for added detail after the dolphin was complete.  I attached the white to the pacific with runner adhesive and glitter brads in turquoise and green after the dolphin was done.  The pacific with the dolphin was attached to the base card using glue dots in the corners and runner adhesive all over the back to ensure it would hold tight to the base.  


Here is a close up of the dolphin.  As I said I used the iris folding technique which is a paper folding process.  You start with a pattern, cut out your shape and follow the numbers to place the folded strips of paper.  I know it sounds confusing so I have decided to show you the step by step process of doing this as I did with the stain glass technique.  I will share it with you tomorrow on my blog so please look for it.

The paper I chose to use for this is a retired set of designer series paper from Stampin' Up!.  It is several years old so I do not remember the name.  Since you want to have papers that coordinate, I tend to cut my dsp into 6" x 6" squares and store them together in a baggie.  That makes it easy for me to find paper that will work well together quickly.


For the greeting, I used the stamp set Create A Cupcake.  I stamped the greeting using Tempting Turquoise ink onto Whisper White card stock and punched it out using the word window punch.  I layered this on top of a turquoise modern label and added a rhinestone to each end.  I then attached it to the card using dimensionals.  

The nice thing about this technique is it provides a focal point on the front of the card and really does not need many more embellishments at all.  The actual folding of the paper and placement does not take long at all.  After you have done a few of these you will get faster and faster at it.  

Well that's it for today.  I will be back to teach you the technique tomorrow.  Please stop by to learn and give the technique a try.  Thanks for dropping by today!!

Monday, September 24, 2012

It's Nice To Be Thought Of

Welcome to a new week everyone.  I hope it is a good one for all of us.

Everyone likes to be thought of every now and then.  We all like to know someone out there cares about us and what we are going through.  Well today's card is a card for just that type of occasion.  My sister has a friend who is battling cancer and has been for quite some time.  She is nearing the end of the journey and it has been really hard on her to say goodbye to friends and coworkers.  So when my sister called and asked if I would create a card for her and some other friends to sign and send to this remarkable lady I jumped at the chance.  You see for myself and my sister we have been down this road before with our brother.  I know what it is like for the family and the person and if I can make a card that might brighten her day a little then I am more than happy to do it.  So let me share with you the card.


I started this one with a base card of Daffodil Delight cut at 7" x 10", scored at 5".  I wanted to make this card a little larger than my standard cards to provide more space for signatures.  I added a layer of Tempting Turquoise measuring 4 3/4" x 6 3/4".  It is attached using runner adhesive.  The final layer on the front is made using Whisper White card stock.  It is cut at 4 1/2" x 6 1/2".  Once it was cut, I ran it through my big shot using a larger size impression folder I found at a local craft store.  It was large enough to accommodate the white card stock.  I do not know the actual name of this one.  It came as part of a love type set.  It had hearts and birds and flowers on it.  It is a pretty design.  Once impressed I attached it to the card using runner adhesive. 


I wanted to add a vase of flowers on this card.  Now until I added it to the card and really looked at it I did not realize that it really looks like a pineapple.  All I needed to do was change the vase color and I would have one.  Maybe I will use that idea for another card.  Now back to this one.

I used Daffodil Delight, Garden Green and Tempting Turquoise card stock to make the vase and flowers.  For the vase I used the retired big shot die called ovals.  I cut out the largest oval on this die and trimmed off the top and bottom to flatten them.  I then ran this piece through the big shot again using the fancy fan impression folder.  

To make the flowers, I used the bird builder punch.  The wing serves as the petals of the flowers and the leaves on the branch are the stems.  I trimmed off excess leaves and left just the two that make a "v" shape.  You need 3 petals for each flower.  I started by sponging each petal with Daffodil Delight ink.  I then layered the petals using liquid glue and added the leaves and stems using the same glue.  I attached these to the vase with my 2 way glue pen.  Once all the flowers were adhered to the vase I attached it to the card front using dimensionals.  I added rhinestones to the vase for added bling.  I also added some turquoise rhinestones to the white background for added bling.


The greeting I chose for this one comes from the stamp set Curly Cute.  I stamped it using Tempting Turquoise ink onto Whisper White card stock and cut it out free hand.  I sponged the edges of this with matching ink and then layered it onto a piece of Daffodil Delight.  I trimmed free hand around the greeting leaving a daffodil border.  Once cut out I sponged the edges of that with the daffodil ink and attached the greeting using dimensionals.


For the inside, I wanted to use a stamp that expressed that she is definitely being thought of each and every day.  This saying comes from the stamp set called Word Play.  I stamped it using the Tempting Turquoise ink onto Whisper White.  I then used my big shot and my framelit set called Apothecary Accents to cut out the saying.  Once cut out, I sponged the edges with turquoise ink and attached it to the card with runner adhesive.  I added a light blue sticker dot to each end for added decoration.

My wish is for this card to bring a smile to her face, know she is thought of and know she is loved.  I am so humbled to make this card for her.  

Well, that's it for today.  I will be back tomorrow with another share.  I am not sure what it will be but I will have something.  Thanks for taking time out of your day to stop by and see me.  See you all tomorrow.

Friday, September 21, 2012

A Fancy Thank You

Happy Friday everyone!!  I hope your week has been a good one.  I know that for my sister it has been rough so I am sending wishes for a great weekend and a better week next week her way.  We all have those weeks and I guess it was just her turn.  I enjoyed many things about this week.  I got to go to lunch with one of my favorite aunts and had a wonderful time, and I got to be creative.  Thanks for all the special requests this week.  It was a great inspiration and got my mind back on track.

Today I want to share with you a thank you card I made for a dear friend to send to the host of a dinner party she had the pleasure of attending this week.  The only requirements she had for the card was to be sure it said thank you and she wanted 2 specific colors:  gold and black.  I had recently purchased a new stamp set from Stampin' Up! and it seemed like it would work perfectly with this card.


Fancy don't you think?  I started with a base card of Brushed Gold card stock cut at 5 1/2" x 8 1/2", scored at 4 1/4".  I then added a layer of Basic Black card stock cut to be 4" x 5 1/4".  I sprayed this piece with my champagne shimmer spray and then attached it to the gold using runner adhesive.  


The focal point of the card is this beautiful medallion made using the new stamp set Daydream Medallions and a framelit set called Floral Frames.  The medallion set consists of 5 sizes of medallions.  I only used 4 in my design here.  I started by stamping  2 of the medallions on the gold using Versa Mark ink and sprinkled  black embossing powder on them.  I then heat embossed these and set the gold card stock aside.  Next I took a piece of black card stock and stamped the 2 other medallions on it using the Versa Mark ink.  This time I used a gold ice embossing powder on it and heat embossed them.  I then pulled out my big shot and the floral frame framelits.  I found the correct size to fit around each medallion and ran these through the big shot to cut them out.  Once they were all cut out, I layered them on top of one another using runner adhesive and added a gold brad to the center of the stack.  It is attached to the card using runner adhesive.  I love love love this medallion!!!!


For my greeting, I turned to the stamp set called Perfectly Penned.  I stamped the greeting directly onto the black card stock using Versa Mark ink and used the gold ice embossing powder to heat emboss it.  Since it would be shiny, I did not feel it needed more to enhance the look of it so I left it alone once it was embossed.  


For my inside greeting, I used a simple saying from the retired stamp set Whimsical Words.  I stamped the greeting with Versa Mark ink on gold card stock and heat embossed it using black embossing powder.  I then used the same floral frame framelits and found one that would fit around the saying.  Once I chose it, I also took out the size above it.  I found the coordinating medallion stamps for these.  I stamped around the saying with the stamp using the Versa Mark ink and heat embossed it with black also.  Then I stamped the other medallion onto black card stock and heat embossed it with gold ice embossing powder.  Once these were embossed I cut them out with the big shot and floral frames.  I layered them on top of one another using runner adhesive and attached it to the card using the same adhesive.

I had never made a black and gold design before and I was truly pleased with how it came out.  I liked the overall elegance it seemed to have once completed.  I hope you like it too.

Well, that is it for today.  I hope you all have a wonderful and safe weekend.  I will return on Monday with another card to share with you.  Please come back to visit me then.  Thanks for dropping by today!!!!!

Thursday, September 20, 2012

A Change for the Go Go Girls

Hello everyone and happy Thursday.  I have been busy busy busy this week with card requests and am having a lot of fun making all of them.  I thought I would let you in on my fun by sharing some of the cards with you.  The one I am sharing today was made for my sister's friend.  My first thought was to use cupcakes on the card.  Well as all creative people have experienced, my thought took a slight turn and the design morphed into something else.  Ready to see it?


Ta Da!!!!  Aren't they cute?!  I was thinking about the go go girls while planning the card and was going to try to use one on it.  All of a sudden, this idea popped into my head.  But I don't want to get ahead of myself so let's start at the beginning.  

I started with a 5 1/2" x 8 1/2" base card of Elegant Eggplant.  It is scored at 4 1/4".  I added a layer of Basic Black onto it with runner adhesive.  This piece was cut to be 4 1/8" x 5 3/8".  For the top layer, I used a piece of Pink Pirouette card stock cut at 4" x 5 1/4".  I started this piece by using a swirl stamp and stamping it using VersaMark ink.  I then heat embossed it using clear embossing powder.  Once it cooled I ran it through the big shot using the music notes impression folder.  Now you would think I had done enough to this piece but no.  I had to spray it with my frosted shimmer spray.  Once dry, I attached it to the base using runner adhesive.  I added some pink and purple rhinestones to this piece after the girls and greeting were attached.


Now let's look at the go go girl who is now a cupcake girl.  I started by using my cupcake builder punch and punching out the pieces of the cupcake.  I used a designer paper I picked up for the bottom of the cake and ran it through my crimper.  I then punched out the frosting of the cake from shimmer white card stock.  I glued these together using liquid glue.  Next I punched the face out of the retired Blushing Bride card stock using the 3/4" circle punch.  I then punched a 1" circle around the 3/4" hole and cut it into 5 pieces for the neck, arms, and legs.  I also punched a 1" circle out of Soft Suede and cut it in half to use as the bangs for the girls.  The back of the hair is from the owl builder punch.  I punched it using the Soft Suede, cut the feet off and turned him upside down.  The nose also come from the owl builder as well as the boots and hands.  The headband is a 1" circle punched just offset from a 3/4" circle hole using the designer paper.  I then punched a glimmer red cherry out using the cupcake builder punch to top it off.  All pieces were assembled together using liquid glue and the finished girls are attached to the card using dimensionals.  I added pink and purple rhinestones to the frosting for decoration.


I wanted to be sure you got to see both girls but the focus of this photo is really the greeting.  This greeting is from the stamp set Perfect Punches.  I stamped it using Elegant Eggplant ink onto shimmer white card stock and punched it out with the wide oval.  I brushed the edges with a sponge and the eggplant ink.  It is attached to the card using dimensionals and of course it had to have rhinestones too.


For the inside I chose a stamp from the stamp set A Word For You.  I stamped it using the same Elegant Eggplant ink onto Whisper White card stock.  It is attached to the card using runner adhesive.  I then punched out several cherries from the glimmer red card stock with the cupcake builder punch.  I attached them around the saying using my 2 way glue pen.

Well I am off to start working on the next request.  I will have another card to share with you tomorrow so please come back by.  Thanks so much for stopping by today.

Wednesday, September 19, 2012

Back to Halloween

Happy Wednesday everyone.  I have spent the last two days sharing with you my daughter's birthday card and present.  I hope you enjoyed seeing them.  I sat down yesterday to make a new card to share and found myself faced with a creative block.  Has that ever happened to you?  I just could not figure out what I wanted to make.  I started several different projects and ended up throwing all of them out.  They just were not right.  I was so discouraged.  I thought I would be telling you I failed to get a card made.  However, as I was coming down the hall, I happened to see this flame-less Halloween candle that we bought.  It is orange and has a pumpkin totem pole on it.  Well as you can imagine, I was inspired by this and decided to make a card with my own pumpkin totem pole and that's just what I did.


How cool is this?!!  I really had fun making this one.  I started with a base card of Pumpkin Pie card stock cut at 4 1/4" x 11", scored at 5 1/2".  I added a layer of Basic Black card stock cut at 4 1/8" x 5 3/8" using runner adhesive.  For my top layer, I cut a piece of glossy white card stock (or photo paper) to measure 4" x 5 1/4".  I did the technique I showed a week or so ago with the sponges and ink.  I stated by sponging Daffodil Delight ink in the center of the card stock going from the center out.  Next I sponged Not Quite Navy ink from the outside in blending the edge with the daffodil ink where it meets.  Finally I sponged Night of Navy ink from the outside in, not as far as the Not Quite Navy and blended it in with the Not Quite Navy ink.  Again, it just gives your card a little different look and is quite colorful.  Once this was all inked and dried (I let it dry over night) I attached it to the card with runner adhesive. 


The greeting for this card is from the retired stamp set called Pumpkin Patch.  I stamped it using Basic Black ink onto Whisper White card stock and punched it out using the word window punch.  I layered this on top of a modern label punch using runner adhesive.  I added a black pearl to each end and attached it to the card with dimesionals. (I did this after the totem pole was attached.)

The top pumpkin was made using the small oval punch.  I punched 3 ovals from pumpkin card stock and  layered them using a liquid glue.  I added orange glitter glue to the edged of the pumpkin to define the creases.  The stem is a piece of Soft Suede that was run through the big shot using the woodgrain impression folder.  I added Garden Green leaves punched from the bird builder punch and added it with the stem using liquid glue.  I added googlie eyes and a small triangle nose for the fadce.  I ended up drawing the mouth on with my black marker.


The middle pumpkin was made using the large oval punch.  Basically all the pumpkins are made the same way.  I did put black circles under the eyes of this one.  I used the medium circles from the owl builder punch for this.  

The largest pumpkin was made using the wide oval punch.  The black circles for his eyes are the largest circles on the owl builder punch.  Triangles were used once again for noses and the mouths are drawn on by hand.  The pumpkins are attached together using liquid glue and are attached to the card with dimensionals.


To finish my card, I cut out letters for the inside using my big shot and retired billboard decorative strip.   I attached these using liquid glue and added orange glitter glue dots to the letters.  

Easy card with lots of color and a fun theme.  You should give this one a try.  

Well that's it for today.  I will return tomorrow with another share for you.  Come back and see me then.  Thanks dropping by today.


Tuesday, September 18, 2012

Sunflowers Everywhere

Hello everyone.  As promised I wanted to share the birthday card I made for my daughter with you today.  Her favorite flower is the sunflower so when I found some really cool felt sunflowers, I knew I had to use them for her.  Her card came together fairly easily.  Let's get started.


For this card I once again made a square card measuring 5 1/4" x 10 1/2", scored at 5 1/4".  I used Daffodil Delight for this.  I added a layer of Pumpkin Pie card stock cut at 4 3/4" x 4 3/4".  I ran this through my big shot using a texture plate of large dots.  I brushed the edges with Pumpkin Pie ink and attached it to the base with runner adhesive.  I added white glitter balls to the corners and some Dazzling Details glitter glue to the layer.  Then it was time to add my sunflowers.


As I said, I found a pack of 4 sunflowers at my local craft store.  I thought they were so pretty I wanted to use them for my daughters card.  I attached the flowers using a liquid glue and allowed them plenty of time to dry.  I wanted to add a little sparkle to the centers so I used a brown glitter glue and added dots.  While this was drying I went to work on the inside panel.


I started the inside panel for this with a piece of Whisper White cut at 4 3/4" x 4 3/4".  I pulled out a retired stamp set called Touch of Nature.  This set contained the sunflower stamp and I stamped 3 across the bottom of the panel using Chocolate Chip ink.  Using my colored pencils, I colored the stems and flowers in and added some grass.  I used a total of 3 colors to color the petals of the flowers.  I wanted to be sure they resembled the flowers on the front.  Next I used Daffodil Delight ink and my Curly Cute stamp set and stamped the Happy Birthday across the top.  For the main saying, I turned to another retired stamp set called Occasional Quotes and stamped the greeting using Pumpkin Pie ink.  I then added daffodil and pumpkin cupcakes using a stamp from the Itty Bitty Bits stamp set.  

While I did not take a photo of the envelope, I chalked the front of it blue for a sky and added the same sunflower stamp and grass across the bottom.  I cut letters out for her name and placed them in the sky.  It went nicely with the card and she really seemed to love it.

Well, I am off to my laundry today with a little creating in between.  I will return tomorrow with another share for you.  Until then, thanks for stopping by today.  See you later and keep stamping!!!

Monday, September 17, 2012

Homemade Gifts

A few years ago, my niece really go into cooking.  She wanted a recipe box and I decided to do one for her.  I used a tin box that reminded me of a lunch box.  It was white so I added a few embellishments to the outside, stamped recipe cards to go inside and gave it to her as a present.  She liked it a lot. 

Handmade gifts usually mean a lot to people because of the time, love and care you put into them.  So this year, our oldest daughter Heather asked me if I would make her a recipe box for her birthday.  She has really taken to cooking this past year trying new recipes and seems to enjoy it.  She needed a place to store all those yummy recipes and it just seemed like the right time to make one for her.  Since we did her birthday dinner this past Saturday, which by the way it was a build your own pizza party and was a huge hit,  I gave the box to her.  I thought I would share it with all of you today. 


This is a view of the top of her box.  Heather is a big Pirates of the Caribbean fan so we chose a box shaped like a treasure chest for her.  This started as a plain wood box I bought at a local craft store.  I painted the entire box a medium blue and the edges a dark blue.  I knew I would be covering the box with paper but just in case any little areas showed through I wanted there to be a color and not plain wood.  

Once the entire box was painted and dry, I took out some blue gingham paper I picked up a few months ago and a ruler and began measuring the dimensions needed for each side.  Once I had a piece cut, I would add a little repositional adhesive to the paper and put it on the box to verify I had the right shape and measurements needed for the piece.  When all the pieces were cut out and were correctly measured and shaped, it was time to start attaching it to the box.  I did this using a technique called decoupage.  I used an adhesive called Mod Podge.  This is a liquid white glue.  I used a sponge applicator to apply the adhesive to the entire back side of each piece of paper.  Do one piece at a time.  Once the adhesive is on the paper, carefully place it on the box and smooth it down.  You will do this for all the pieces of paper and will need to let the box dry.  Then it is time to decorate your box.  

I made the name plate using Whisper White and Night of Navy card stock.  I added sticker letters to this for the words.  For the rest of the add on, I chose some really cute sticker sets I found at the craft store.  I could have made the decorations but these were so cute I decided to use them.  Let's take a look at the other sides of the box.  


Here is a look from the front.


This is the back side.


Here is one of the sides.


And here is the other side.

I carefully chose the stickers I wanted to use and applied them directly to the box.  For the ones that came with a dimensional on the back, I peeled the dimensional off and add Mod Podge to it so the entire piece would stick.  Once all the stickers were added and I was happy with the look, I used the sponge applicator once again to add another coat of Mod Podge over the paper and stickers to seal these down.  


What good would a recipe box be without some way to organize it.  So I made divider cards to go in the box.  I used various colors of card stock and made tabs using the retired label punch.  These are glued to the card stock.  I then used my label maker to add the headings to the tabs.  I know it is hard to see but I did add some food stamps to the dividers using VersaMark ink to make the designs.  


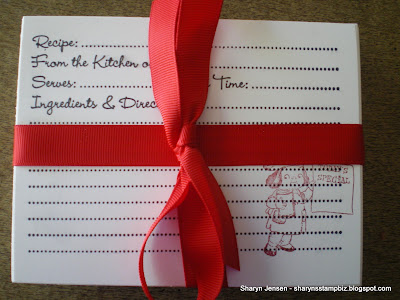
Finally I made about 150 recipe cards for her to use.  I happen to find this stamp a few years ago, where I cannot remember.  I stamped the cards with black ink and then added a little chef person (kind of reminds me of one of the Campbell's Soup kids) to the corner with red ink.  I bundled these together with a red ribbon and place them along with the dividers inside the box.  

I must tell you I think she loved it!!  I know it is something she can use for years to come and I hope it will always remind her of me and how much I love her.  Thanks for stopping by today and I will see you tomorrow.