CARDS FOR SALE

Most cards you see on this site are available for purchase. Simply click the Pay Now button at the bottom of the post of an available card to purchase the card. You will be linked to PayPal for payment. It will come up as "greensnaggletooth@cox.net" which is the name of my internet company. Price is $5.00 unless otherwise stated and includes shipping. Your card will come with an envelope also. Email me with any questions or requests at: sharynsstampbiz@gmail.com
Thanks for taking a look at my creations!!

Tuesday, May 31, 2011

The Wedding

Hello everyone!  I hope you all had a wonderful 3-day weekend.  It is always nice to spend time with family and friends and I sure hope you had some time to do that this weekend.

Our niece's wedding was this past Saturday evening.  It was very beautiful.  She of course was gorgeous.  We were fortunate enough to have my husband's 2 sisters from California and their families come into town as well as his Dad and step-mom (who is really a 2nd mom).  It was so nice to see all of them and especially to see how much the children have grown.  They have all gotten so big!!  Everything seems to go very smoothly.  I hope the wedding was everything our niece was hoping it would be and more.

I wanted to share with you the card I made for her and her new husband for their special day.  I made sure to use their colors which were black, white, and poppy.  Boy did she choose a great year to decide to use the color poppy.  I remember when she first told me that was her color.  I had just learned that Poppy Parade was one of the new in-colors in the 2010-2011 catalog.  I was thrilled to be able to use it for her to make all her save the dates, invitations, and thank you cards.  Oh well, back to the wedding card.


Yes I used the stain glass technique to make the doves and heart for the focal point of the card.  Now if you look closely at the doves, you can see little poppy hearts.  That's because I stamped the white background with little hearts and then put the stain glass image over it.  I used the photo corner punch to make the corners for the acetate which allowed me to attach it with glue dots on the corners because the corners would hide them.  The corners were run through the big shot with the square lattice impressions folder to add texture.  

I wanted to keep the inside of the card rather simple so I used a couple of stamps to stamp the sentiment and added little flowers to it.  Little "diamond" gems adorn the flowers and the "d"'s in the word wedding.  This left plenty of room for us to sign the card.  Simple but elegant.
Well, I must admit that after the long weekend, I am tired.  Perhaps I can rest while I work.  Thanks for dropping in today and I will see you tomorrow.

Friday, May 27, 2011

Yummy Yummy Cupcakes

The card I am going to share with you today was one of the cards I had for sale.  It sold already but I loved it so much I still wanted to show you.  After all, I could make more right.  There is no limit when it comes to crafting.


The color scheme I used for this card is Very Vanilla, Basic Black, and Cherry Cobbler.  Cherry Cobbler was new to Stampin' Up! in the 2010-2011 catalog.  I love this color.  It is a deep red and for some reason, it really appeals to me.  I made the cupcake using the build a cupcake punch.  Once I punched the bottom of the cake out with the punch I ran it through my paper crimper to get the texture.  I added glitter to the bottom and to the dots on the cake top.  I chose not to put a cherry on the cupcake itself since I was using the cherries to decorate the upper and lower section of the card front.  The eyelet border punch completed the look on the front for me.  You could use many other color combinations to make this card.  Be creative.  

Well, we are finally at Friday.  The rest of our family is coming into town today.  The big wedding is tomorrow evening.  Thank goodness it is a holiday weekend so we will have plenty of time to recover from all the fun.  Since Monday is a holiday and we have so many people who are staying in town to see, I too am going to take the holiday off.  So I will not be posting on Monday.  Please come back Tuesday and I will share a very special card with you.  Have a wonderful holiday weekend and please be safe.  Thanks for dropping by today. 

Thursday, May 26, 2011

Fun In The Sun

I love taking trips to the beach.  I love listening to the waves crash on the shore and smelling the salt air from the ocean.  Unfortunately, I live in Arizona so there are no beaches to go to.  It makes trips to one that much more meaningful.  Maybe we will get to do that this summer.  I can at least wish.

Combine the beach with a bear and you get the card I came up with for today.  Are you ready to see it?  Here we go:


I came up with this after seeing several samples of this little guy all dressed up.  In fact, I made him a fireman a few weeks ago.  To get the lei around his neck, I will say you must cut off his head.  Then you use a dimensional to put it back in place once the body is adhered to the card.  I do not like doing this.  It just seems wrong to cut off his head.  The leaves of the palm tree are so much fun to make.  I could not believe how easy they were.  You use the scallop oval ant crease them in the center to get the line you see.  Then you cut diagonally along each scallop to define the leaves further.  Simple but cute. 

I cannot believe how fast this week is going by.  It is hard to believe tomorrow is Friday already.  I still have so much to do.  Oh well, I guess I had better get myself moving and take care of all the tasks I need to.  See you tomorrow and thanks for stopping by today.

Wednesday, May 25, 2011

Ahh, Roses

Now no one would accuse me of having a green thumb.  In fact my girls always told me to leave the plants for dad to take care of.  They knew my record was bad.  We had a beautiful rose bush when we first got married.  My hubby took care of it and it was beautiful.  We had to transplant it several times and the last one proved too much for the plant.  We have not had another one since.  So for me to enjoy roses, I either spend time at our aunt's home and look at all the roses she grows or I stamp them on cards.  I found a beautiful rose stamp a few years ago at a stamp convention.  I have used it several times.  This time, I wanted to turn to my favorite technique:  stain glass.  I stamped a couple of roses and took out the glitter.


The first rose I did  I glittered in purple.  My daughter thought it was nice but asked me to make a white rose.  They both turned out very nicely.  I used Whisper White card stock for my base card and used a piece of dsp (designer series paper) from the hostess pack of in-colors.  The center strip of card stock is a piece of Whisper White that had been embossed using an impression folder in the big shot layered on top of a piece of Concord Crush.  I love the deep purple of this card stock.  The roses are adhered to the card stock using glue dots.  The sparkle of the glitter has to be my favorite part of the card, of course.

While I may not have a green thumb when it comes to plants, vegetables are a different story.  Well at least tomatoes.  We decided to try the whole Topsy Turvy tomato plant growing device.  It really seems to work.  My plant is getting bigger and bigger and has 4 tomatoes on it already.  I must be doing something right.  

Well, the first of our out of town family arrives tonight for our niece's wedding on Saturday.  Life is about to get crazy.  Hopefully, it will be a good crazy.  I promise to be back tomorrow with another card.  Thanks so much for dropping in today. 

Tuesday, May 24, 2011

Buzz Lightyear to the Rescue

One of my favorite movies is Toy Story.  I have enjoyed all 3 movies in this series.  I always worry when I see an animated movie come out with a sequel that it will not be as good as the first one.  I have been pleasantly surprised with each sequel to this movie.  I love the characters and the jokes that are told.  I have to say, I was disappointed not to see Bo Peep back in the 3rd movie.  I always liked her. 

My husband is a HUGE Toy Story fan.  His favorite characters are Woody and Buzz.  So I wanted to created a card that would include at least on of these on the front.  Once again,  I turned to punch queen Ellen Kemper for inspiration and she did not let me down. 


This card is a standard 4 1/4" x 5 1/2".  When I went to Ellen's site for help, she had a full Buzz Lightyear that would work great on a scrapbook page but for me was too large to use on a card.  So I decided to do only the top have of Buzz so it would fit nicely.  There are way too many punches to list here but if you really want a list, I will be happy to provide one.  Just let me know.  I used an impression folder from Cuttlebug with stars on it to make the background.  I thought since Buzz travels through space the stars fit his personality nicely.  White gel pen dots have been added to the areas between the stars.  I have to tell you, my husband loved this.  It is proudly displayed in his home office along with a few other I have made him. 

Since making this card, I have seen lots of other characters and am going to work on each of them.  But first I must finish the rest of my projects for this week.  Thanks for dropping in today.  See you tomorrow.

Monday, May 23, 2011

My Mother's Day Card

As I was sitting at my desk today working, I happened to look up and see the card my youngest, Kaitlyn, made me for mother's day.  When I really got into card making and scrapbooking, she too took an interest.  Believe me, while she does not do it as much as I do, she is very talented.  Anyway, I realized I shared the card I made for my mother in law, but did not share the card I had received from Kaitlyn.  So I wanted to share it with you today.


Yes, it is Miss Betty Boop.  I have a few items in my craft room with her on it and think she is rather silly.  I love her in Who Framed Roger Rabbit and Kaitlyn did a fantastic job of drawing her for me.  She used a magnet that is on my filing cabinet as a guide but did have to free hand her on the card.  I think it turned out wonderful. 

This week, we have family coming into town for the big wedding next Saturday.  I expect as we draw closer to it, we will be busier and busier.  This week I plan on working on a variety of cards, from punch art to stain glass.  I have several projects in my craft room that are almost finished so I will work on those and share them as I finish.  So be sure to stop by each day to see what I came up with.  Thanks for stopping by today.

Friday, May 20, 2011

Tri Fold Birthday

A few days ago, I shared with you a tri fold card I made for our niece's graduation.  I must admit, I think it may have been the first one I ever made.  I know I have seen a lot of examples but always thought it was too complicated.  Well, lucky for me it was not hard at all.  In fact I could hardly wait to make another one.  This time, I went with a completely different theme - birthday.


 I used Whisper White for the base card.  The designer paper is from the In-Color Paper Patterns Pack offered as a level one hostess gift.  The color is Peach Parfait.  I lined most of the panels with this but did leave a few white to do other designs on.  The ice cream cone is made from a scrap of Soft Suede card stock and then run through the square lattice impression folder for the big shot.  The ice cream was made out of Melon Mambo, Chocolate Chip. Very Vanilla, and Pear Pizzazz card stock using the scallop circle punch.  I cut the bottom off each punch piece and then layered them.  The cherry is a 1/2" circle in Real Red with a sliver of Basic Black for the stem.  I added the white gel pen for added design.  The happy birthday oval is from a stamp set called Perfect Punches and coordinates nicely with the wide oval punch.  It is stamped in Peach Parfait with dazzling diamond glitter around the edges.  The two other saying you can see are from the Create A Cupcake stamp set.  I stamped these in Chocolate Chip and sponged the edges with the ink also.  


Here is the card open.  As you can see, I decorated the 4 small white panels with polka dots which I punched out using the Build A Cupcake punch.  The center white panel is decorated first with stamped cherries in the various colors.  The cherry stamp is also part of the Create A Cupcake stamp set.  Then, I made 3 little cupcakes to put on the panel and decorated them again with polka dots.  The small panel next to the cupcakes has a saying from the Crazy For Cupcakes stamp set, again stamped in Chocolate Chip, punched out with the large oval punch, and sponged edges just like the other sayings.  For the final panel, I stamped a birthday cake from the new Pretty Postage stamp set in 3 colors and then punched them out using the new Postage Stamp Punch.  Both of these are in the new Summer Mini.  There are glitter accents on the postage stamps which you can kind of see.  I took the picture before I added glitter to the dots on the cupcakes, but they have glitter now.  

We are about a week away from our niece's wedding.  The excitement is in the air for her.  Our family from California is coming in the middle of next week.  It will be so nice to see all of them.  It is hard to believe we have reached the end of another week.  I wish you all a beautiful weekend.  Thanks for stopping in today and I will see you Monday!!

Thursday, May 19, 2011

Love Is In The Air

Okay so I know it is not Valentine's Day, but shouldn't every day be filled with love?  I guess I was thinking about this today as I am getting ready to attend a wedding in a little over a week for our niece.  I know she is so excited and believe me I am excited for her too.  So I thought why not share one of the cards I have made in the past for Valentine's Day, an anniversary, or a wedding.


I first learned this technique watching a video on Dawn Griffith's blog.  It is the easiest card to make and of course the glitter makes it a keeper for me.  The little white hearts you see on the white part of the card are left over from being punched out of the white strip in the middle.  It took more than the 5 from the strip so of course I punched some other to go along with them.  I placed my red strip of card stock along the middle of my card.  Then before adhering the white strip with the punch out hearts, I put a piece of scotch tape over all the hearts on the backside so the sticky part would be face up once I adhered it down.  This makes glittering those little red hearts very easy.  All you do is shake the red glitter on the hearts and voila, the tape hold the glitter in place.  Simple.  I love simple things.    The red card stock enhances the color giving you nice, bright hearts.  Now the little white hearts I first adhered onto the card are glittered by using a two way glue pen and adding the dazzling diamond glitter onto them.  I do one side at a time so when I shake off the excess glitter I do not have it going over the red hearts.  Just want to keep the colors apart.  The other nice thing about this card is you can use the same technique using other colors of glitter and matching card stock and other shapes.  Versatility -- another favorite of mine.

Well it has been a good week so far.  Our oldest, Heather was in a car accident 2 months ago.  A guy ran the red light, hit her, and kept on going.  Luckily, she was not injured badly but her car has been in the shop for a few weeks.  I am happy to say she is now driving it once again.  Only weird thing is every time she starts her car the horn honks twice.  Maybe the car is just happy to be with its owner again.  I am just happy because it means I now have my car back at home too. 

I hope your week is going well too.  Thanks so much for stopping by today.  I will see you tomorrow.

Wednesday, May 18, 2011

Under The Sea

Okay now don't think this is about the Little Mermaid.  After all, there are lots of things under the sea.  The ocean has always fascinated me as well as frighten me.  The fish and other sea creatures are so interesting to learn about and to watch.  However, I do not think I want to meet some of them up close.  After all, lots of them are bigger than me. 

As I sat at my crafting table yesterday, I had the new stamp set from the Summer Mini called Summer
Splash in front of me.  I was inspired to make a card using the fish, octopus, and the turtle.  So I started by stamping the images with versamark ink and heat embossing them using the me Wild Wasabi, Melon Mambo, and Tangerine Tango embossing powders also in the mini.  (I'm telling you, you need one of these catalogs.  It is filled with fun items.)  Once they were embossed, I cut each one out.  Then I wondered what in the world I was going to do with them.  So I turned to my Cricut machine and this is what I came up with:


I used a cartridge called Life's A Beach and cut out the base card in Marina Mist.  It not only cut the card but also made with window with the coral.  Then I cut the coral out by itself using Certainly Celery.  I glued these on top of the coral and added Certainly Celery glitter to make them stand out.  I turned to my retired stamp set called Crab & Company and used the seashell for the outer part of the frame.  I sponged it with Marina Mist ink and then stamped the shell using the same ink.  My little fish are out for a swim and look like they are having a good time.

Now you may be wondering where is the octopus and the turtle?  Well, I did not feel they would fit well on the front so I decided to put them inside the card.


As you can see, I made my little octopus guys multicolor.  I like the look on them.  The piece of green coral was an extra that was cut out with the two pieces on the front.  I chose to not glitter it because I did not want the glitter on my saying, and we all know glitter goes everywhere.  You can kind of see the shiny glow of the embossing on the octopus at the top.   All in all, I can think of several friends who would love to receive this card in the mail.  I know it brightened my day, and considering this is laundry day, I needed something to add a little excitement.  

It is hard to believe we are approaching the end of May.  Where has the time gone?  I hope all of you are spending some time each day for yourself.  It is so important to make time to do something you enjoy every day.  I appreciate the time you have spent with me today.  See you tomorrow.


Tuesday, May 17, 2011

Fireman Bear

Two of my favorite things in the world are my husband and teddy bears.  My husband is the love of my life, my best friend, and my hero.  You see, he is a true hero.  He is the captain of a ladder company for the fire department.  He heads a citizen emergency response team, and he teaches cpr/first aid.  On top of all that, he is the best husband I could ever wish for and a wonderful father to our 2 girls.  As for my love of teddy bears, well that goes back as long as I can remember.  I just adore having them all over my home.  They make me feel happy. 

It made sense to me to do a punch art project that would combine these 2 favorites of mine.  So I turned to my Under the Stars stamp set and took out the bear.  He is probably my favorite stamp to work with.  I love dressing him up.  Then I started working on a firefighter outfit for him, and here is what I came up with:


I thought he turned out rather well. Now I have to be honest and tell you my husband does not share my love of teddy bears, but he does allow me to have them.  He thought the bear was silly but that it would make a cute card for a child.  I can agree with that.  I need to work on the hose a little more.  While I like the idea, I would like to get the crease where the hose twists a little smoother.  As for the fire outfit, I really like it.  He looks ready to go into the fire and do his job.  All in all this is a punch art creation I will be making again and again.

Thanks for stopping by today to see Mr. Fire Bear.  Please leave comments if you like.  I would love to hear what you think of him.  See you tomorrow.

Monday, May 16, 2011

Graduation Girl

Before I begin today I want to apologize for not getting my post up on Friday.  Somehow, my posting got a little confused.  The Thursday post posted on Wednesday and the Friday one did not post until Saturday night.  Please know I am truly sorry for this.  Hopefully this week will be better.

Sometimes it surprises me just how fast time flies by.  Our niece who is the same age as our oldest daughter, Heather, just graduated from college with a degree in elementary education.  Lord help her.  I graduated with that same degree years ago (we will not go into how many years).  She reminds me of how I was at that time:  eager to get a job, loved being with the kids, and ready to take on the challenge.  I loved every minute I taught.  Sadly, it was not to last for me for family needs took over when my mom became ill.  When she passed, I thought about going back to the classroom, but somehow, I knew that was not God's plan for me.  I just wish his plan had been a happy one.

Anyway, I wanted to make a card for our niece that was uniquely her.  So I went with a tri-fold card.


This is the view of the card from the top down.  I think it looks really cool and gives you lots of room to be creative.  I wrote my message on the back of the card so the inside could be filled with graduation items.

her is a view to give you an idea of what I put inside.  I tried to go with an all grad theme.  I wanted to be sure to include the year she graduated and the university.  I put a little owl in 2 different places because I always associate owls with teachers.  But my favorite part of the card is the graduation girl herself.

Here is another view of her.  She is jumping for joy at the fact she survived the 4 years of college and is ready to take on the world.  I wish I could remember who made a similar girl.  I know I saws something similar a while ago on the internet.  When I sat down to plan her card, this image came into my head.  I remember pulling out my notebook and writing the punches down to use for it so I went to my handy reference tool and pieced her together.  
I am so luck to have so many wonderful females in my family.  While I have only 6 nephews, I have 7 nieces and 2 beautiful daughters.  The men have always been out numbered.    I am proud of each of and every one of them.  They have each had their own battles to find who they are, their own challenges to overcome, and they have built a strength within themselves as they have grown.  I hope they always remember they have an aunt (me) and a mom (to my girls) that will always be there for them whenever they need me.  I love them all.

Soon it will be my youngest, Kaitlyn's, birthday.  I cannot believe she just finished her first year of college.  She is absolutely turning into a wonderful woman right before my eyes.  After that, I am so excited as my Heather will be graduating from her college becoming a full medical assistant.  I am so proud of her.  She has really grown as an individual and become a wonderful young woman.  

Thank you so much for stopping by today to visit.  Please come back again.  See you tomorrow.

Saturday, May 14, 2011

More Triple Blossom Punch Fun

So the other day, I was surfing through some of my favorite blog sites just to see what other demonstrators are doing.  Sometimes, there are links to take me to new sites I have never been to before.  I happen to come across one by Chanda Stehlik (I hope I spelled that right).  Anyway, I had never been there before but she had the cutest card with adorable little watermelons on it.  I was hooked.  I had to stay and read her blog to see how she did them.  Imagine my surprise at learning they were made using the new triple layer blossom punch.  My thought:  I own that punch!!!  So I started making my own watermelon pieces.

Now watermelon always reminds me of summertime.  As I was making watermelons and trying to decide what to design on my card, my daughter walked in and suggested I put the flip flops from the Sunny Fun stamp set on the card with them.  So here is what I came up with:


I did the technique I have termed imbedded embossing again.  I made my watermelons, adhered them to the whisper white card stock, and ran it through the big shot.  I used an impressions folder from a different company (shame on me) that gave the look of mosaic tile on it.  Now you do have to remember, you will need a little muscle power to run this through your big shot as it is several layers you are going through.  For the actual watermelons, I used melon mambo, garden green, and basic black.  I used a basic black solid flower, adhered the garden green outer ring, and then adhered the melon mambo inner flower.  This way, the black shows through giving the appearance of seeds.    Then you can cut them into pieces to use.  I used colored pencils to color my flip flops and inked the outer edge of the flip flop piece with both melon mambo and garden green ink.  Not bad for a first attempt.

Once again we have reached another Friday.  I wish all of you a fantastic weekend filled with fun.  I have quite a busy one myself.  Monday, I will share a graduation card I made for our niece.  Until then, thanks for dropping by today. 

Wednesday, May 11, 2011

Another Fish, Different Punch

Yesterday, I shared with you a card decorated with 2 little fish made with the ornament punch.  Today, I wanted to share another card with 2 adorable fish but this time I used a different punch to make them. 


Do you recognize the punch?  It is the Blossom Petals Punch from the Occasions Mini catalog.  Now, I this punch is still available even though the mini catalog it was featured in has expired.  I also used the coordinating stamp set called Build A Blossom, which was also part of the mini.  It however is not available anymore.  But really, you do not need it to do these lovely little fish.  The seaweed is from the Sizzlits Little Leaves and the sand is a torn piece of crumb cake with dots stamped on it to give a little illusion of texture.  The bubbles are drops of Tombow glue with a light blue glitter on them.  Now let's see those fish a little closer.

Since I chose to use the stamp set, I went with a tone on tone effect.  In other words for this little guy, I stamped the tangerine tango card stock with tangerine tango ink.  Of course, he would not be complete without glitter so I added it to all his fins.  The eye is from the two step owl punch.  It is the smallest circle punched in basic black and glittered with black glitter. 
 
This little guy was done on Daffodil Delight card stock with Daffodil Delight ink.  Again his fins are glittered as well as his eye.  They make quite a pair. 

The neat thing about this particular punch is the is a large petal with a scallop edge.  If you use it as a tail fin, your fish will look like one of those beta fish you see in the pet store.  Very pretty!!

Well, that's all the excitement I have for you today.  I am heading back to my craft room to stamp some more.  See you all tomorrow and thanks for dropping in today.

One Fish Two Fish

I thought I would return to my punch art for today.  I had never worked very much with punches until a few years ago.  I pretty much just used them for whatever shape they were or whatever border they were.  I just did not think outside of the box.  Then I took a class from my upline, Diana Gibbs.  She is fabulous by the way.  It was a class all about punch art.  We put together a little book where we wrote in detail of the punches used to make designs, included samples of those punches, and actually made the designs.  Some of the items we made were a hamburger, a teacup, a rag doll face, a turtle, and so much more.  I think there were 23 in all.  Thus began my love of punches.

When the ornament punch first came out, I knew I wanted it.  I thought making Christmas gift tags with it would be so much fun.  Then as I started to play, I found it could be used as a vase, a face, or , my favorite, a fish.  I was not the only one who saw the fish potential but I was sure one who made lots of fish. 


They are just too cute.  I used the ornament punch for their bodies, the 5 petal flower punch to get their fins and tail, and the 1/2" inch and 1/4" circles for their eyes.  The sand is a piece of torn crumb cake doted to make sand.  As for the sea plants, that came from a sizzlit die for the Big Shot.The bubbles are also a 1/4" circle.  Now the 1/4" circle punch is no longer available, but the two step owl punch has some circles that would also work.  Their bodies are dotted with glue and then sprinkled with orange glitter.  Yes I had to work it is somehow.  The bubbles have a small amount of dazzling diamond glitter added to them too. All in all, this is a delightful card to send to someone special.  Use it for any occasion.

Tomorrow, I will share another fish card.  However, I will use a different punch to make my fish.  Want to know which one?  You will have to stop by tomorrow and see.  Until then, thanks for stopping by today.

Tuesday, May 10, 2011

Embossed Card

Hello everyone.  I hope your Monday was a nice one.  I got to go to lunch with my youngest daughter as part of her Mother's Day present to me.  She had to work on Sunday so there was no time to get together.  We always have such a good time together.  I love it when she tells me I am silly because she is so much like me, I know she too will soon be as crazy as I am. 

One of the latest trends in card making is embossing the front of your card.  Now I know you are thinking well isn't that what you do with your impression folders?  And you would be right.  But this is a little different.  Instead of embossing a piece of card stock, you emboss it along with all the pieces on top of it.  Let me show you what I mean.


 The black piece of card stock might normally be the piece I would choose to emboss.  However, this time, I cut the scallop squares out with the Big Shot and adhered them to the black.  Then punched the
flowers out with the triple layer blossom punch and adhered them.  Last I punched out the little flower from the itty bitty punch set for the center of the larger flowers and adhered them down.   Then I ran the entire piece through my Big Shot using the square lattice folder.


Hopefully this close up allows you to see the impression made on the entire piece.  Now when you run this through, it will take a little muscle power since it is like putting 4 pieces of card stock through at once.  I do like the look of it.  It melds the pieces together as if they are one.  The oval with is saying is not embossed.  I added it after I adhered the black to the pear pizzazz.  It is raised up using a dimensional.  I have seen this technique used with other impression folders and with all kinds of shapes and designs on the front.  Give it a try.  It is a lot of fun.

Have a terrific rest of the day and thanks for stopping by.

Monday, May 9, 2011

Triple Layer Blossom Punch

Happy Monday!  I hope you all had a wonderful weekend, especially all you mom's out there.  I had a nice time with my girls.  Due to their work schedules, I celebrated with each of them seperately.  It was like having 2 Mother's Days in one.  Of course, I would have liked to have spent the day with both but since my youngest works in retail, you have to be willing to make adjustments.  I am one proud mom.  My girls are fabulous.  Yes they have had there moments over the years.  I mean all children go through times of growth and trying to find their way in life.  As with all moms, I had the times of wanting to pull my hair out, but the rewards of seeing them now, the young women they have become and the choices they have made in their own lives, I could not be happier.  Let's face it, there is no tougher job than being a mom.

I had the best mom in the universe.  I guess a lot of people feel that way about their mom.  For me, it is just a true statement.  I lost her 4 years ago to Alzheimer's.  She had been ill for several years.  It was my honor to be her full time care giver for the last 3 years of her life.  She was my best friend, my teacher, my spiritual guide, and my mom.  There is not a day that goes by that I do not think of her and miss her greatly.  She was a very religious person,  devoted to her faith in God.  She taught me who Jesus was and how a real Christian should act.  She always turned the other cheek.  Even when others treated her meanly or disrespectfully, she would treat them with kindness.  I cannot stand when people go around proclaiming their "Christian values" yet they do not treat others kindly, exclude others due to something that happened years ago, and harbor resentment.  That is not Christian.  I have had people who were not always nice to me in my life and still do.  Thanks to my mom, I learned that while I may not forget what others say and do, I can forgive, move on, and treat them nicely.  After all, ill feelings toward others only makes us age faster and holds us in place instead of moving us forward.  So thanks mom for all you taught me and helping me to be a better person today because of who you were ( and still are).

Okay off my soapbox now.  Here is a Mother's Day card I made this year for my husband's mom:


As you can see, I used the new triple layer punch to make the flowers.  I really do like these punches.  I used a stamp set called Bold Blossom.  It too is in the Summer Mini catalog.  The stem stamp and the little butterfly stamp are from this set.  Yes the butterfly is glittered.  I had to fit in glitter somehow.  The "wonderful mother" came from the set Well Scripted, which is retired.  On this inside I put a simple saying:


The saying is also from the Bold Blossom set.  The "happy mother's day" is from the Teeny Tiny Wishes stamp set.  I use this set all the time.  It fits nicely with a lot of the punches and has every saying I could possibly need.  Overall, a simple card but I really like the end result of it.  
Well on to more stamping now.  Thanks for dropping in and I will see you tomorrow.

Friday, May 6, 2011

Last Stain Glass For Awhile

Okay I promise this will be the last Stain Glass card I post for awhile (well at least a week or so).  This one turned out a lot better than I originally thought it would.  I never know what color to make birds.  I do not want to make them look boring but I also do not want them to look completely ridiculous either.  This bird is a parrot and I wanted him to have some personality.  Once again, my husband came to the rescue.  We were out shopping one day before Easter, picking up a few fun items for the holiday when we came across these little statues of parrots.  They were only $1 each and my husband just had to get a couple for his outdoor bar.  He loves to keep funny bird statues out there with him.  Using these as a guide, I remembered I had this stamp and decided to use it.


Isn't he a handsome fellow?  I mounted him on basic black to really make the colors pop.  I used glue dots, which I strategically placed to adhere him.  The black was then mounted onto a piece of Cajun Craze.  I used Always Artichoke ink to stamp a leaf onto the Always Artichoke card stock before mounting the bird onto it.  The leaf stamp came from a set called Build A Blossom.  I just liked the look of the whole enchilada!!

Here he is up close and personal.  I tried to use at least 3 to 4 colors on him.  I really like parrots with all their beautiful colors.  One of my favorite Mexican restaurants has  huge statues of these birds throughout it at each of its locations.  I also must confess on of my absolute favorite attractions at Disneyland is the Tiki Room.  What is not to love - singing birds and totem poles, rainstorms complete with thunder and lightning.   I love that place.  

I guess we have come to the end of another week.  I want to wish all you moms a very Happy Mother's Day.  Monday I will share the card I made for my mother in law.  Until then, have a great weekend.  Thanks for stopping by.

Thursday, May 5, 2011

A Single Rose

Ever have one of those days when you just should have stayed in bed?  That was my day yesterday.  Nothing seemed to go right.  We received news we would rather not have heard.  By 11:00 am I was ready to get back into bed, pull the covers over my head, and not come out again.  Instead, I waded through the tough waters, very unhappily I might add, and survived another day.  I am hopeful today will be a better day.

Well on to the card!!  Yes it is another Stain Glass card.  This time it is a single rose in a vase. 


Again I used the corner punch to secure it to the Elegant Eggplant card stock.  This time to add a little texture to the card, I used a stamp set called Confetti.  This set is one you can use for background.  I chose the falling leaves to add to mine today.  The base card is Daffodil Delight and stamped the leaves in Daffodil Delight ink.  I just liked the way the colors went together.  


Yesterday, I mentioned that there are different types of glitter and which one you use can make a difference.  This card is a good example of that.  When I went to glitter the water in the vase, I grabbed a very pretty blue glitter that reminded me of water.  What I did not do was look to see that it was a type called Transparent Glitter.  What that means is the glitter is actually sheet and is influenced by the background color.  So when I first was trying to decide what color to layer this on, I discovered my error.  The water did not look right if I went with a green or yellow.  Once I realized the glitter was transparent, I began to try colors behind my rose to see what would make the water look right.  Elegant Eggplant worked for me.  I would always recommend you try colors behind your Stain Glass pieces to see what will look the best before adhering it down.  They best glitters to use for this are:

Opaque - these are jewel toned and work with any background
Hologram - these are a glitter color plus all the colors of the spectrum

Neon - these are bright colors and make a bold statement

Pearlescent - these are soft, pastel like colors

I tend to use the Ultrafine Glitter because of the beautiful sparkle it gives off.  I think it looks very natural and finished when dry.  You can experiment with other sizes of glitter like chunky, confetti, or microfine.  Really it is just your preference. 

Tomorrow, I have one more Stain Glass card to share with you.  Then I will move on to some other techniques I promise.  I just really enjoy doing this one.  Believe it or not, it relaxes me.  Guess I am just weird like that.  Oh well.  Thanks for stopping by today.  See you tomorrow.

Wednesday, May 4, 2011

Daisies - The Friendly Flowers

I remember watching the movie You've Got Mail and hearing Meg Ryan say that daisies are such a friendly flower.  I had never thought about it much but I would have to agree with her.  I have a die for my big shot that makes daisy flowers in 3 sizes.  I love to cut them out and make these lovely flowers.  While I will be glad to make a card using the big shot flowers on another day, today's card is actually another stain glass card.  I picked this stamp up a few years ago.  I have used it as a regular stamp on card stock and colored it with markers and colored pencils.  However, it does work for this Stain Glass technique too.


As you can see, I attached this piece of acetate to the card stock using my corner punch and some strategically placed glue dots.   As long as you put the glue dots on the darker areas, you will be fine.  I shaded the edges of the whisper white with garden green ink to match the layer of card stock behind it.  The garden green card stock has been run through the big shot in an impression folder to add dimension to the card.  Let's look at the daisy a little closer.


I chose to layer this one on whisper white in order to insure the daisies would stay looking as white as they could.  It also helped to keep the blue sky nice and blue.  One day,  I will tell you about the different types of glitter you can use and how each one differs from the other.  Trust me, it does matter which glitter you use for a card like this.  But for today, just enjoy the daisies.  This one really reminds me of spring and the beautiful flowers all in bloom.  Yes, I think daisies are a friendly flower.  They bring a smile to my face every time I see them.
I hope you enjoyed the card today.  Be sure to drop by tomorrow.  Thanks for stopping in.

Tuesday, May 3, 2011

Back to Stain Glass

Alright.  I know I have shared several stain glass cards with you in the past week or so.  However, I am going to share some more this week.  See when I sit down to do this technique, I always stamp several images and glitter them all.  So I have all these completed pieces that need to be mounted to cards.  This past weekend at the Crop Party I held, that is what I worked on.  Now I want to share some of them with you.

Today's card was made using the retired stamp set from Stampin' Up! called Voila.  I have a soft spot for this set.  The little chef is just so cute.  I really miss this set in the catalog.  It was very popular.  Most of the demonstrators I know used it.  So anyway, here he is.


Isn't he the cutest?!!  I so wanted to get a close up of him, but the reflection of the camera and my hand were overwhelming in the picture so this is the only shot I have.  This set came with the tray cover as well as some food items you could place on the tray.  There was also an accessory set that had even more food and a bride & groom.  For me, I used the tray cover because I admit, it was easy to glitter.  Also I felt this could be used as an invitation to any type of meal gathering or as a thank you to someone who brought a special treat for you or had you over for a meal.  The biggest challenge for me was finding a glitter to use for skin tone.  I did not have a blush or peach glitter and was not sure anything I had would work.  I came across the one used in my glitter box and thought I would give it a try.  It is called Sand.  It looks a lot like gold to me but it worked extremely well as the skin tone.  I used the Bon Apetit stamp from the same set on the real red cardstock.  I stamped tone on tone so it would give some added dimension but not take away from my little chef.  All in all he turned out better than I thought he would. 

If you have any questions or comments, feel free to click the comment button and leave feedback.  I would love to hear from you.  Thanks for dropping in today.

Monday, May 2, 2011

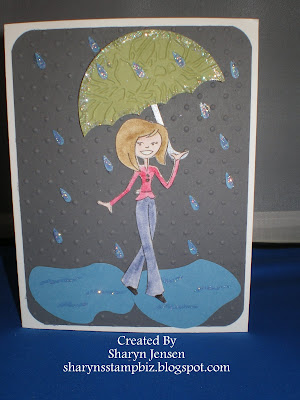
Rainy Day Fun

One of the down sides to living in Arizona, especially Phoenix, is we do not get a lot of rainy days.  Personally, I love rainy days.  I enjoy the sound of the rain on my rooftop, and the rhythm of the rain coming down.  Whenever we travel in our RV, I always hope for a rainy day because the rain really makes a cool sound on the RV roof.  Silly I know but when most of your year if filled with beautiful, sunny days, you learn to appreciate the rain.

Last Friday I shared with you the new triple punches offered in the Summer Mini from Stampin' Up!.  When I shared the Blossom punch, I told you I would show you a way to use the pieces left when you punch the triple setting and the petals are actually punched out.  The shape you are left with is a teardrop.  Now I had used Marina Mist, and when I looked at those pieces, they reminded me of rain.


This card immediately popped into my head.  I knew the Totally Tess stamp set would be fun to use.  This was a simple card to make and was also time friendly as it went together very quickly.  Let me show you a closer look at Tess and those raindrops.

It only seemed fitting to watercolor Tess since she is walking in the rain.  I did add glitter to this card.  I could not help myself.  The umbrella is trimmed in it, the puddles have a little, and of course, those cute raindrops received a little too.  By the way, if you are wondering how I made the puddles, I used the wide oval punch, punched out 2 of them, and then took my paper snips (scissors) and trimmed them to look like puddles.  
This was the first idea I had for using those little pieces.  I am currently working on several cards and ideas, including other ways to put these small pieces to work.  I really love it when I can use every scrap I have.  

I want to thank all my friends who came to the Crop Party I held this past Saturday.  I had such a good time seeing everyone and crafting the day away.  It is always fun to be with friends.  I hope you all had as wonderful of a weekend as I did.

Let me know if you need a Summer Mini catalog and I will get one for you.  Please email me if you have any questions or leave me a comment.  I would love to hear from you.  Thanks for stopping by today, and I'll see you tomorrow.