CARDS FOR SALE

Most cards you see on this site are available for purchase. Simply click the Pay Now button at the bottom of the post of an available card to purchase the card. You will be linked to PayPal for payment. It will come up as "greensnaggletooth@cox.net" which is the name of my internet company. Price is $5.00 unless otherwise stated and includes shipping. Your card will come with an envelope also. Email me with any questions or requests at: sharynsstampbiz@gmail.com
Thanks for taking a look at my creations!!

Thursday, March 31, 2011

Lattice Cross

As I was looking through my favorite blogs the other day, I happened upon a card that I thought was fabulous.  It was made by Dawn Olchefske.  She used the lattice die for the big shot and made a cross out of it.  I was amazed.  That meant I had to try it. 

What amazed me the most was how simple it was.  After you cut out the lattice you turn it so it looks like a diamond shape facing you.  You find the cross in it (very easy to see), and you trim off the excess pieces you will not need.  Simple but elegant and perfect for Easter.  I also use crosses on sympathy cards so it was nice to learn a new technique to create one.  I chose to make this one for Easter and created several, all being different colors.  Let me show you.
The background on each was made with my handy big shot.  I used several impression folders so that each color had its own background.  I used colors that pair together well.  In fact my Color Coach helped me since on the back of each color card it shows a Dynamic Duo.  It made it so easy for me to pair the colors.

For the inside, I used a saying from a retired stamp set called Abundant Hope.  I wanted it to be simple so not much else was added.


There you have it.  These are simple and quick to make.  I will be uploading these into my online store today.  Be sure to drop by there and take a look around.  Thanks for dropping in.

Wednesday, March 30, 2011

Look Who Is Turning...

Well, I thought I would share with you a card I made for my other daughter's birthday since I share her sister's yesterday.  I don't want her to feel left out.  I love to try to come up with unique and quirky cards for my girls.  They love to see what mom has made and are always surprised.  I bought the stamp set called "Look Who's Turning" from Stampin' Up!.  It caught my attention because of the animals in the set.  There is a hippo, an octopus, and an ostrich.  I especially like the ostrich so I wanted to use it on her card.  Here is what I came up with:


This is a fun card that made my daughter laugh when she saw it.  The sky background was created using Stampin' Pastels which are chalks.  I enjoy working with these because I can created a sky as light or dark as I wish.  The tree trunks are just scraps of paper I cut to use.  The trees and bushes are from the scallop circle punch.  I glittered the edges of each one.  For the bushes I cut the circles in half, being sure to make one side larger than the other so I could stack them.  I added white gel pen doodle dots to them just because I wanted to.  The trees also have the doodle dots and "apples" which are 1/4" circles.  Since this punch is retired, you could use the circle from the itty bitty punch set. 

I stamped the ostrich a total of 3 times - 2 in crumb cake and 1 in chocolate chip.  For the one in the tree, you only use the neck and head, yes this means you have to cut it out after you stamp it.  The bottom ostrich uses a whole ostrich.  I cut out the entire crumb cake one and the body of the chocolate chip.  If you look carefully, you can see just a small piece of the body.  Of course you could position it so only the head will show or you could use your Stampin' Markers to color the stamp so your ostrich is the two toned color you want it when it hits the paper.  The birthday hat also comes in the stamp set.  I stamped it in 2 colors, cut them out, added glitter to them and attached them to the little heads.  

I have used this set to make cards for other people especially kids.  They love it.  If you do not have it, be sure to visit my Stampin' Up! site and check it out in the catalog.  Thanks for dropping by.

Tuesday, March 29, 2011

What A "Tweet" Little Bird

Once again I am posting a card that I had shared on my old blog so forgive me if you have already seen it.  It was inspired by Ellen Kemper.  I made it for my daughter for her birthday.  She likes Tweety Bird so I wanted to create a card including him.


Isn't he cute?  I embossed the background using an impression folder called Elegant Lines and ran it through my big shot.  I colored in the dots using a white gel pen.  I liked the contrast against the Night of Navy card stock.  Tweety was made using Daffodil Delight and Tangerine Tango card stock.   The punches used to create Tweety are the full heart ( his feet ); the 1 3/4" circle punch for his head; the small oval for his cheeks with a snip taken out of the center of it on one side; the large oval punched around the small oval hole for his arms; and the word window for his eyes.  His beak was made by punching a small oval and using the tip of one end.  I believe I used the circle from the itty bitty punch pack to punch off the end.  The blue of his eyes uses the small heart from the heart to heart punch.  I colored in the black of his eyes.  I also went around most pieces with a black marker to highlight the edges.  His body is made with the large oval.  It is trimmed on one side.  I saved the trimmed piece and used it for his tail.  

I know it sounds like a lot but he is really easier to make than he sounds.  This is one of my favorite cards I have made.  Give him a try.  If you have questions drop me a line and I will try to help.  Thanks for looking today.

Monday, March 28, 2011

Spring Is In The Air

Wow, what a weekend.  My husband and I spent most of the afternoon Saturday working in our backyard pulling weeds.  Not a lot of fun.  The only bright spot is we have this wonderful company that comes and sprays our yard every 6 months with a weed preventative formula.  It kills existing weeds and keeps them away.  Unfortunately we went about nine months instead of six due to family issues so our weeds came back full force.  Now they have been sprayed, pulled, and sent off in the trash.  Happy days are here again!!

Here in Arizona, the first day of spring happens for us a lot sooner than for other states.  We have been in the 70's and 80's for a few weeks now.  We even hit 90.  I am not ready for that yet.  So I wanted to make a spring themed card.  Of course the first thing I thought of was butterflies.


As you can see, I used one of my favorite embosslit folders for the Big Shot called Beautiful Wings.  The background was made using the lattice die for the Big Shot and the leaves are from the two step bird punch.  Once again, I jazzed it up by adding glitter to the butterflies and leaves.  I chose Daffodil Delight, Tangerine Tango, and Melon Mambo for my butterflies, and used Tempting Turquoise for the background.  I wanted bright colors to give a springtime feel to the card.  It is blank inside, making it the perfect note card to send to a friend (especially one who is in the snow and cold still).  Of course, you could add a nice sentiment stamp to the inside if you prefer.  Either way, it just made me smile to see it.  Hope you enjoyed it as much as I did.  Thanks for stopping by.

Friday, March 25, 2011

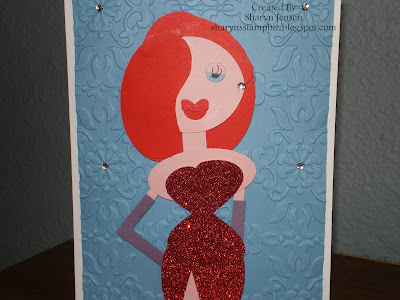
Here Comes Jessica Rabbit

One of my family's all time favorite movies is Who Framed Roger Rabbit.  I laugh every time I watch it.  It is a movie that travels with us on all our RV vacations.  I guess we just cannot get enough of it. 

A few weeks ago, I came across a card that had a Parisian woman on the front made from punches.  I thought she was very well done.  The more I looked at the card, the more I started thinking about Jessica Rabbit.  I could see how to take this lady and change her to become Jessica.  So I decided to give it a try and here is what I came up with:


I used the red glimmer paper, one of my favorite papers to use for her dress.  It is nice and shiny and no glitter mess to clean up!!  I admit, I need to work on her a little more but I felt for a first attempt at her.  She is made using all punches.  The background is from the impression folder for the big shot called Vintage Wallpaper.  She had to have some diamonds on the card because she is after all famous. 

I hope you recognized her.  That after all is the first sign that she is a successful attempt.  Leave me a comment to let me know.  Thanks for stopping by today and I will be back on Monday!!

Thursday, March 24, 2011

New Lattice Rose

I was on my demonstrator website the other day and found a video from Beth Crocker on the lattice die for the big shot.  I love the elegance of this die so I decided to watch the video.  Boy am I glad I did.  She showed a whole new way to use it.  I believe she called it a lattice rose.  Of course I had to try it.


Isn't it pretty?  I absolutely know I will use this on cards for a while.  I also love the fact that the "trash" that you have left over from the die can be used to add decoration to it.  I cut 2 Melon Mambo lattice and 1 shimmer white.  I saved the shimmer white lattice to use on another card but used the "trash" to fill in some spots and add decoration.  Here is a close up of the flower:


The trick to making this is to offset the 2 lattice pieces.  It will actually look like a star burst and could be used that way.  Instead I chose to trim off the pieces that were hanging over the edge.  I put a small amount of adhesive to hold them together and then once they were layered I used a decorative brad to secure them.  This picture did a nice job of showing the shimmer paper.  I bet though that you can see shimmer everywhere if you look close.  I mixed 5-6 drop of the frosted white shimmer paint with about 2 oz. of alcohol in a mini spray bottle.  Then I used the Color Catcher from Stampin' Up to stand the card in and spritzed the front.  It is a nice way to get the shine without the mess of glitter.

I hope you liked this card.  It is a simple one to do and can be used for any occasion.  Thanks for dropping by to take a peek.

Wednesday, March 23, 2011

Owl Bunnies?

Okay it is official -- I love the two step owl punch!!  I just cannot stop using it.  It seems lots of demonstrators feel the same way.  The card I am sharing with you today is one I made for Easter.  I sat down to make a cute bunny to incorporate on the card and for some odd reason, I gravitated to the owl punch again.  I know I have seen several cards made using this punch.  These little owl get dressed up for all kinds of occasions.  So here are my Easter bunny owls:


Are they not the cutest things?  I believe it was Kay Sha who put owls similar to this on her blog.  I bet that is where I remembered them from.  They are easy to make and fun to look at.  I used the two step owl punch and the blossom petals punch to create the owls and their rabbit ears.  The basket is half of the small tag punch.  The handle is a large oval punch around the hole of a small oval punch.  The pattern on the basket is from an impression folder made by Cuttlebug called Argyle.  Of course another great option would be to use the Square Lattice punch from Stampin' Up!.  I have used it before to make baskets and they look beautiful.  Notice I jazzed these up with glitter.  You should know by now I always like to use glitter on cards.  The grass is from the scallop oval punch.  I punched 2 of them and cut them in half lengthwise making one side wider than the other.   They are layered on top of each other across the card .  The sky behind them was done with Stampin' Pastels.  I love using these to make sky scenes.  I made my own template for the little eggs in the basket.  Then I used designer series paper and traced the egg template and cut them out.  

That's it for today.  I seem to have a cold and am going to lay down.  Thanks for stopping by.  See you tomorrow.

Tuesday, March 22, 2011

Anniversary Card

As I promised yesterday, I wanted to share the card I made for my husband for our anniversary:


I was inspired by a demonstrator named Kay Sha for this adorable creation.  She had these adorable owl Wizard of Oz characters for her heading on her blog page for awhile and was kind enough to share the recipe to make them.  I changed colors a little to suit myself and my husband.

Wizard of Oz is one of my all time favorite movies.  I have watched it since I was a very little girl and still look forward to it every time I pop the DVD in.  When I got married,  I was fortunate enough to marry a man who likes the movie too and his favorite character is the Scarecrow.  We started collect some items about the movie and always are looking for things that have both Dorothy and Scarecrow on them.  I placed mine on the Yellow Brick Road on my card to represent the journey we take through life in our marriage.  I think this is my favorite anniversary card as of today.  I am glad to be able to share it with you and hope you enjoy seeing it too.  Thanks for stopping by!!

Monday, March 21, 2011

Little Easter Chicken

Happy Monday!!  And Happy Anniversary to me and my hubby.  I will share the card I made him tomorrow!!

Here is another cute Easter card that is perfect for all those boys and girls to receive. He is much easier to make than the bunny from yesterday and just as cute. There are not as many parts to him so he goes together really fast.

I have to admit I saw this little chick on another demonstrators blog though I cannot remember whose it was. Please forgive me if it was yours. Drop me an email and I would be happy to give you credit for this guy.

I used Daffodil Delight, Tangerine Tango, and Pear Pizzazz cardstock to make this little guy. Of course as always there is a little Basic Black use as well as Whisper White too.

The background is embossed using an embossing folder (not a Stampin' Up! one) with my Big Shot machine. I always like to have some type of background on my cards. This one reminded me of Easter egg decorating. Weird, huh!! Oh well. No one ever said I had to be logical in order to be creative.

Now lets talk about the chick himself. His body is made from a Big Shot die called Top Note. This is a Stampin' Up! exclusive die. You would not believe how many times I have used this die. It is wonderful. Back to the chick. The rest of his body pieces come from punches. His arms are a scallop circle cut in half. His eyelids and whites of the eyes are from a 1" circle punch. You only need one circle for the eyelids cut in half. The pupils of his eyes are a 1/2" circle. I added a little white gel pen to enhance the look. His feet were made using the scallop circle punch. Punch one scallop circle out. Then use the 1" circle punch and punch out the feet from it. I did both from one scallop. His beak is from the 5-Petal Flower punch. It is just one of the petals trimmed off. His "feathers" are also made from the 5-Petal Flower punch. I simply positioned my the flower behind his head at an angle I was happy with. It Easter egg comes from the stamp set A Good Egg. I stamped the egg, then stamped the circle, which is included with the set, onto my egg. I cut it out and colored it in. Pretty simple wouldn't you say?

I hope some of my ideas are inspiring you. Please let me know if you have any questions. I would be happy to explain in more detail or include pictures to show aa step if you need it. Thank you so much for dropping in today!!
Posted by Picasa

Friday, March 18, 2011

Here Comes Peggy Cottontail


Sorry I did not post yesterday.  I was helping my hubby wash our RV.  Believe me when I say it took most of the day to clean the outside and inside!! 

With Easter just around the corner  (can you believe it?) I wanted to share an Easter card with you  It has to be one of my favorite holidays.  I love all the cute little animals like bunnies and chicks that are associated with it.  But my favorite thing is the meaning of it.  To celebrate the resurrection of Jesus and know he has made a place for me in heaven is absolutely amazing!!

I thought I would share this cute little bunny rabbit with you today.  She was a joy to make.  I created her using my Stampin' Up! punches.  The grass she is sitting on was made from the branch of the two step bird punch.  I simply trimmed it down to the size I wanted and layered it across the paper.  The border for this card was made using the Big Shot.  I used an impressions folder called Framed Tulips.  The trick with this folder is making sure you line your paper up right to get the border where you want it.  It really is easier than it sounds.  Now onto the cute little bunny.


I wanted to include a close up of here so you could see all the details.  I used the following punches in creating her:


Ears -- 1 3/8" x 5/8" oval punch; you need 2 for each ear
Head -- full heart punch turned upside down
Body -- curly label punch; I trimmed the side to be flush with the overalls
Arms and Chin -- the wing from the two step bird punch
Overalls -- small tag punch with the retired horizontal punch for straps (scrap paper works too)
Pocket on Overalls -- scrap of DSP trimmed to make it
Feet --  3/4" x 15/16" oval punch; you need one for each little foot
Heels -- small heart from the heart to heart punch
Toes, Nose, and Eyes -- 1/4" circle punch (retired); the medium circle from the two step oval punch works too

And there you have it --an adorable bunny.  Oh, the little butterfly bows on her ears are from the Beauiful Wings embosslit die for the Big Shot.  Of course, I added glitter to make her sparkle all over.  I hope you enjoy making her as much as I did.  Thanks for dropping by today!!


Wednesday, March 16, 2011

Jelly Belly

I must admit I am one of those people who can take jelly beans or leave them. I do have flavors that I prefer if I am going to eat them but I am not fond of sticky, chewy things to eat. I don't even chew gum for pete's sake!!

I was working with my daughter one night on a card for her friend. She had bought a huge jar of Jelly Belly's to give as a gift since her friend loves them so much. She could not decide on what to make for the front of the card though. We talked through many ideas when all of a sudden it hit me: Why not make the Jelly Belly guy!! It would be perfect and would go along with the gift fabulously. I had never seen a punch art Jelly Belly before but thought I could figure out how to do one. So figure it out I did.

His body and puffy part of the hat were made using the wide oval punch. His arms and legs were made by punching a small oval and then punching a large oval around the small one's hole. I cut the oval ring into 4 parts and viola there were his arms and legs. The bottom portion of the hat was made from a 1 1/4" circle, with the sides trimmed off. His hands come from the ends of the modern label punch. I punched them out with a 1/2" circle. His eyes are the large circles from the two step owl punch. I colored in the black part myself as well as drew on his cute little smile. His shoes come from the heart to heart punch and are trimmed to make them fit. As for his socks, I used the now retired horizontal punch but if you don't have it no worries. Just use a scrap of cardstock to make them. The background was made using my big shot and the perfect polka dots impressions folder.  He needed jelly beans falling around him, so I used the 3/4" x 15/16" oval and trimmed it to look like I wanted. I thought he turned out rather well. My daughter chose to make one herself and used her friends favorite flavor as the color of her jelly man. It looked great.

Be sure to drop me a line if you have any questions about him or other cards posted. And be sure sure to stop by my online store. I will be adding inventory later this week!! Thanks for dropping in today!
Posted by Picasa

Tuesday, March 15, 2011

"Who" Knows What The Date Is?

I know it seems like a weird time to showcase a calendar but these are so cute I wanted to share them with you. Every now and then I hold all day crops at my home. In January, I held the first one of the year and it was also the first one I had done in 6 months!! I know it sounds crazy but a family illness took precedence and my crop days had to wait.

I wanted to do something special for all the people who order Stampin' Up! products from me and come to my home for crops so I made them all these cute owl calendars. I chose to do them in 4 colors: Rose Red, Pear Pizzazz, Baja Breeze, Almost Artichoke, and Not Quite Navy. I thought that would give my customers a chance to hopefully get one in their favorite color.
This is an easel card made using the scallop circle die for the Big Shot. It allows the calendar to be easily mailed because it lays flat down. but can then be stood up to be placed on a counter or desk.

I used the two step owl punch to create the cute little owl on the front. The branch came from the two step bird punch. The sentiment I used was a simple one that says "just for you". The large scallop circle used for the front and the small white scallop circle the owl is sitting on were embossed using an impression folder called perfect polka dots. The scallop oval for the sentiment also has the cute polka dots on it.

Needless to say, I have a few left over. I have put them in my online store to sell so be sure to go check them out. You can even choose the color you want!! You will find the link to my store under the "Other Places To Find Me" catagory. Please stop by and check it out. Thanks for dropping into my blog today!

Posted by Picasa

Monday, March 14, 2011

Spring is Almost Here


Flowers and butterflies always remind me of springtime. As we are almost half way through March (can you believe it!) the official first day of spring is just in a few days. Here in Arizona, it has felt like spring for the last few weeks. We are never at a loss for sunshine and warm weather. Our temperatures have been in the mid to upper 80's and yes I saw a 90 in this weeks forecast. Not so excited about that. It seems the earlier we see these types of temperatures, the hotter the summer ends up being. Oh well lets get to something fun now.

This is one of my absolute favorite types of cards because 1) it is very versatile as to what occasion it can be used for and 2) I get to use my Big Shot machine to create most of the embellishments. The first die I used for this card was the Flower, Daisies #2. When this die first came out in the Stampin' Up! catalog it was on back order a lot. People just loved the look of the flower. The die cuts out a small, medium, and large flower and the center of each flower is also cut out. I know it may be hard to see but this was made using 2 of each size of flower. I cut all of them out of whisper white and sponged one set with a yellow ink to give it color (the yellow I used is retired now so I would recommend Daffodil Delight). The flowers are then layered together with the petals for each size being offset. This allows you to see the yellow and white. I used Tombo glue to adhere them together. For the center of my flower, I used the center from one of the large daisies, sponged with yellow for center.  Of course you can add glitter to the petals or the center for a little glitzy look.  The butterflies are also from an embosslit die called Beautiful Wings.  They are cut out and embossed in one simple step by the Big Shot.  I added glitter to them just to jazz them up.  The background on the bottom half of the card was another type of Big Shot tool called an embossing folder.  The name of this one is Finial Press.  I love these folders.  It is an easy way to add dimension to a card as well as a touch of elegance.

So what do you think of it?  You can use any color combination you want to create this card.  Let me know if you try it how it turns out.  Thanks for stopping by today!!
Posted by Picasa

Saturday, March 12, 2011

Here Comes the Bride

Today is my niece's bridal shower. I am so happy for her and her husband to be. They have been together for several years and complement each other so well. I was lucky enough to be asked by the bride and groom to design their Save the Date announcements as well as the actual invitation. This got me started on the creation of several styles of invitations and my creativity just took over.

Today I thought I would share one of these samples with you. While this is not the one I used for my niece (I will share that another day) it is one of my favorites. The card measures 5" x 7". It is on very vanilla cardstock and trimmed with basic black. It amazes me how many brides today choose black as one of their colors. I do think it lends itself to a certain elegance though.
I used the little pearls because when I think of weddings I think of pearls. Not sure why but I really do like them. They matched very nicely with the very vanilla ribbon. The black strip of cardstock was punched with the Eyelet Border punch. This is one of my favorite border punches. I love the way it has the look of lace. For a wedding invitation especially I want to make sure it has a very elegant look to it yet is not over the top. The simplicity of the design and the elements used on this one just work for me.

I do work with brides on custom invitations so if you know someone who is getting married and would like handmade invitations, I would be happy to help. All they need to so is send me an email and we can get started.

Don't forget to stop by me online store to take a look at the cards on there. They are all available for you to purchase. Thanks for taking time to look today.
Posted by Picasa

Friday, March 11, 2011

What's Up Doc!

I have always been a Bugs Bunny fan, but my husband is a REAL fan. So I decided last year to make a cute Bugs card for him for our anniversary. I have to thank a fellow demonstrator named Ellen Kemper. She had made a Bugs and I was able to learn all the basics from her.

I decided to use a Brushed Silver paper to create him due to the shiny appearance it gives him and I felt it matched his coloring perfectly. The shapes for his facial components are all from Stampin' Up! punches, except for the base of his face. That started as a 3" circle cut out with my Cricut machine and trimmed to create the face. That was probably the most difficult part of the entire character for me. Freehand cutting is always a challenge and I admit it took me a couple of tries to get it right. But I love the final look and am proud of it. The background was made using an impressions folder by Cuttlebug and running it through my Big Shot.

I had another blog for awhile as part of my Stampin' Up! demonstrator website. If you were a follower of it I apologize since some of the cards will be posted again on here. I will try to include more information here to help you with your cardmaking skills. Feel free to email me if you have any questions about any of the cards or techniques I post on here. Be sure to visit my Stampin' Up! website at www.sharynjensen.stampinup.net to browse the Stampin' Up! catalogs.

 If you see a card here that you are interested in and it is not in the store, just drop me an email. I would be happy to assist you in any way I can. Thanks for dropping by.
Posted by Picasa

Thursday, March 10, 2011

Welcome to Sharyn's Stamp Biz Blog

I just wanted to do a brief posting to welcome everyone to my blog.  I was fortunate enough to not have to go to jury duty today and was able to set up my blog.  I have been wanting to do this for quite some time.  My goal is to share with you some stamping and card making techniques, photos of cards I have made, and news from Stampin' Up! too.  I also know some people want to send handmade cards to friends and family but have no time to create them.  Well I have a solution for that too.  I will be providing a link to my online store where you can purchase some of these adorable cards.  I am thrilled to be beginning this journey and hope you will come along with me.  Thanks for dropping by.