CARDS FOR SALE

Most cards you see on this site are available for purchase. Simply click the Pay Now button at the bottom of the post of an available card to purchase the card. You will be linked to PayPal for payment. It will come up as "greensnaggletooth@cox.net" which is the name of my internet company. Price is $5.00 unless otherwise stated and includes shipping. Your card will come with an envelope also. Email me with any questions or requests at: sharynsstampbiz@gmail.com
Thanks for taking a look at my creations!!

Monday, April 15, 2013

A New Holiday To Focus On

Hi everyone and welcome to Monday.  I would say happy tax day but who looks forward to taxes!!  I hope you all had a wonderful weekend.  I tried to rest up some since this will be another busy week for me.  I am taking my sister this morning to have surgery on her right foot.  Apparently she tore a tendon years ago and it has never healed.  Now it is causing her a lot of pain so it has become necessary to have it fixed.  Hopefully all will go well and she will have no complications.  I am having her come stay with me for a few days so that I can help her. 

I finally managed to get into my craft room this weekend for a little bit.  I could not decide what to make for you and started thinking about what holiday would be coming up.  It just happens to be Mother's Day.  So this is the first of several cards I will do honoring this day.  Let me show this one to you and let's get started.


I started with a base card of Daffodil Delight cut at 4 1/4" x 11", scored at 5 1/2".  I added a layer of Rich Razzleberry measuring 4 1/8" x 5 3/8".  For the top layer, I went with a piece of Whisper White card stock cut at 4" x 5 1/4".  I took this piece and ran it through my big shot using the Vintage Wallpaper impression folder.  I am going to move on to the next component and will share with you a closer look at the background in a minute. I attached all these layers together using runner adhesive.


The colors I chose to use for my flowers are Rich Razzleberry, Daffodil Delight and Melon Mambo.  I used Wild Wasabi for the leaves.  I used only 2 punches to make these:  the blossom builder punch and the 3/4" circle punch.  I punched 6 petals for each flower, a 3/4" circle of the flower color to glue the petals to and 3 leaves.  I sponged the edges of the petals and the leaves with coordinating ink colors/  I used a liquid glue to attach the petals to the circle and to attach the leaves to the back of the circle.  I then used an alphabet stamp set to stamp the letters for "mom" onto Whisper White using inks to match my flower colors.  I then punched the letters out with the 3/4" circle punch.  I then sponges the edges with the third color so every flower has some representation of the other 2.  The letter circles are attached to the center of the flowers using liquid glue.  I added some Dazzling Details liquid glitter glue dots to each petal for pizzazz!!


Prior to attaching the white layer to the base, I used the ink colors of the flowers and my sponges to add color to the background.  I sponged each color in a diagonal area across the card to that it was a rainbow effect.  I then attached it to the card.   The finished flowers were attached using dimensionals.  I decided to add a couple of gem stones to the open areas of the cards so nothing would look barren.  

I do hope to make it into the craft room today to make another card for you.  Not sure what the theme will be for it.   Please come back to visit me tomorrow.  Thanks for dropping by today!
Friday, April 12, 2013

It's Jackson Day!!!!!

Hi everyone and happy Friday to you all.  I am so happy to finally reach this day and spend it with one of my favorite little people, Jackson.  All the shares I chose for today are inspired by him.  I thought it would be fun to look for things that made me remember what it was like to have my girls be little and how much fun it was to play with them. 


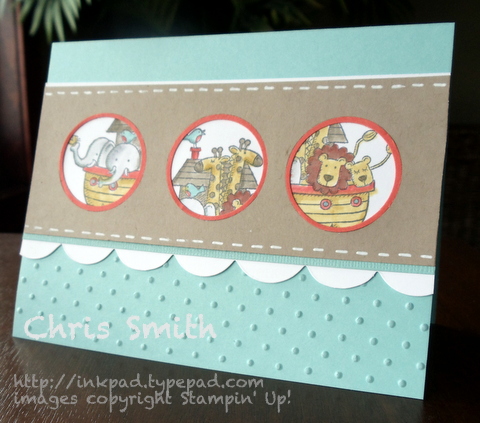
I have is Noah's ark stamp but never thought about using it like this.  Now that I have seen this one, I really love the effect.  I am definitely going to try a card like this.


Pizza punch art card

What kid doesn't like pizza?  I remember taking my girls to Chucky Cheese (did I spell that right) and Peter Piper Pizza when they were younger.  We would eat and play games.  One day I will have to take Jackson to do these fun things too.  


I had to include this card in today's blog for many reasons.  One being that I use to teach elementary school.  The second one being that Jackson's mommy, Kayla, happens to be a teacher now.  She also decorated his nursery with owls so it all seemed to work together.

I am very thankful to all of you for sticking with me this week.  I am officially back in my craft room now and will be back on Monday with an original share to show you.  I do hope you come by to see it.

Have a wonderful weekend and do something you truly enjoy.  I will see you all next week!  Thanks for dropping by today!!!!

Thursday, April 11, 2013

The Day After

Welcome to Thursday!!!!  I am happy to say we all survived.  I am a little tired and sore today but at least most of the heavy work is finished and now my daughter can set everything up the way she wants.  I am going to make this post short simply because I am too tired to even think.  Here are a few cards I found to share with you:

Stampin up stampinup order online pretty floral frames framelits dies big shot daydream medallions card idea

I love the colors used in this one.  The medallions look beautiful!!!!

 How cute is this?  A card with a matching top note purse.  Where do people come up with these ideas!!!


So Grateful with Baja Breeze

Love, love, love the butterflies.  I am always looking for cards that display these!

Well I am going to take a nap and relax.  Tomorrow I get to spend part of the day with little Jackson.  I can hardly wait!!!!!  See you all later and thanks for stopping by today!

Wednesday, April 10, 2013

It's Moving Day


Hi everyone.  Well Wednesday is finally here and my youngest is moving out.  I am so excited for her but at the same time, I am truly sad to see her go.  It is the end of a chapter for me.  While I know you never stop being a parent and worrying about your children, it is the end of bringing them up, preparing them for life and seeing them everyday.  I feel like I have all these different emotions going on and they have been all shaken up.  Tears will come later I am sure but for now, I will put on a smile, do a little stretching and get ready to help her move.

As promised, I am going to share a few more cards with you today that have caught my eye. 


Thanks a Ton

I'll try be back tomorrow hopefully with a few more cards to share with you.  However, depending on what time we finish the moving, I may be too tired.  I hope you understand and it could be Monday before you hear from me again.  Until then, get inspired and send me a photo of your cards.  I would love to see them.  Thanks for stopping by today!!

Tuesday, April 9, 2013

More Shares from Others


Hi everyone.  Well the mountain of boxes is growing steadily.  I did take some me time yesterday to find some other cute cards to share with you today.  Here are a few of the ones I thought were just wonderful and inspired me to want to try to make one like them:


Basic Baby Animal Punch Art Card


Aren't they cute?!!!  Check in with me tomorrow for more inspiration.  Thanks for stopping by today!


Monday, April 8, 2013

A Funny Thing Happened.................

Hi everyone and welcome to Monday!  I am not starting this week off the way I thought I would.  I thought I would spend this weekend in my craft room making cards to share with you for the week.  I knew the heavy packing would start on Sunday but thought I would have the time to get something done before then.  However, I was wrong. 

My daughter decided to start packing boxes on Thursday.  As you know my craft room is storage central until the move this Wednesday.  By Friday morning here is what my craft room looked like.


All my main work areas were blocked and there was no way to get in to reach all the items I needed to do my cards!  If it was not a packed box, it was a loose item or a box waiting to be built and packed.  Needless to say, by this morning, it is a lot worse.  I cannot even enter the room.  I know this will continue until Wednesday so I will not have access to my room until Thursday morning.  

I have decided I will just take this week off from blogging simply because there will be no way into the room for half the week.  I will also be helping with the move and plan on being available on Wednesday and Thursday.  On Friday I get to spend time with my favorite little man, Jackson.  I can hardly wait to have the day to play with him.  I do hope to spend time cleaning my craft room on Thursday so I can work in it on Friday afternoon and over the weekend.  I will need the mental break by then.  

I appreciate your understanding.  I thought I would share with you a card that I found on the internet that I really like.  I am going to try to do this off and on all week long.  We will just see how busy I get.  Here is today's share:


H Bday1

I thought this was one of the prettiest cards I had seen in a while.  Here is the link to the site where I found it:   http://prettypapercards.com/2013/03/05/you-are-simply-wonderful/

Please stop by each day and see if I have been able to find cards to share or if I miraculously get a card made for myself.  Thanks for all your understanding and thanks for stopping by.  See you later!!

Friday, April 5, 2013

Big Shot Tutorial - Reshaping with your Framelit

Hi everyone and happy Friday.  I am glad you decided to stop by today.  It has been a little crazy around here as the collection of items for my daughter's new apartment keeps growing by the day.  We spent time shopping this week for items needed to cook and clean.  It has been really stressful on her so I will be happy once the move in underway and we can get her settled.  My hope as we go into the weekend is that the shopping will be finished and I will still be able to get into my craft room!!

On the card I shared with you yesterday, I used my framelits Label collection to make the centerpiece of the card.  I used them a little differently and wanted to share a tutorial with you on how to make the centerpiece if you would like to.  There will be a lot of photos and not a lot of words just so you know.  So let's get started shall we.


The supplies you need for this are your big shot, your platform, the cutting pads, the set of framelits and the card stock you will need.  I tend to always use scrap first if I have a large enough piece.  


This is the Label Collection of framelits.  When you purchase then, they are secured to the inside with tape.  I always loosen them from the tape and put a magnetic strip in its place.  Since the framelits are metal, they will attach to the magnetic strip.  This is a personal preference of mine.  


This shows you the framelits I will be using.  Notice I chose the 2nd largest one and the one immediately after it in size.


Place your platform base on the big shot.  You will be using tab 1 on it.  Place the first cutting pad on top of it.  Next lay your piece of card stock onto it and place your framelit on top of it.  The final piece will be the other cutting pad being placed on top and then run it through the machine.


Here is your framelit once it is cut out.  After removing the metal framelit from it, place the label back onto your bottom cutting pad on top of the platform.


Using the same framelit, place it on top of the cut out label perpendicularly. Once the framelit is in place, place your top cutting pad back on top and run it through your big shot again.


As you can see, it cuts out the same points on the other sides and you now have a unique shape to use on your project.


Now I would repeat the entire process with my second color of card stock and the smaller framelit.


After you cut it once, do the same preparation to cut it again just like the other one.


And now you have your unique shape in 2 sizes.  This allows you to layer them or do whatever you would like.  

I did not get a chance to make a card with these today due to apartment furnishing shopping.  I am going to make one this weekend though and will have it for you to see on Monday.

I am so glad you stopped by today.  I wish you all a wonderful weekend and hope you find time to just have fun and relax.  I am hoping for some of that relaxation time myself.  Come back and visit me on Monday.  Until then, thanks for stopping by today!

Thursday, April 4, 2013

My Flower Card

Hi everyone.  It's Thursday!!!!  I am so glad you decided to stop by today.  As promised, I am going to share with you the card I made using the lily flowers from yesterday.  Let's just jump in and get started.


I started with a base card of Lucky Limeade card stock measuring 4 1/4" x 11", scored at 5 1/2".   I wanted to add a little bit of background decoration to the card so I stamped the base card with my Pleasant Poppies stamp using Lucky Limeade ink.  It allows the image to be seen but not detract from the rest of the card front.  


Here is a closer look at the background.  To add a little pizzazz to it, I added a bit of white gel pen to some of the flowers.  It highlighted them and added a bit of color.  I also added 3 pearls up in the corner just because I wanted to!


The focal point of the card is my flowers.  To make this area, I started with a piece of Daffodil Delight and Whisper White card stock.  I ran the Daffodil through the big shot using the Labels Collection of framelits.  I cut this out and then ran it through one more time, turning the framelit to lie crossways on the cut label.  This cuts the final shape you see in the photo.  Okay I realize while typing this that it sounds a bit confusing so I will post a tutorial on how to do this for you soon.  I then ran the final shape through the big shot with the Vine Street impression folder from the Sale-a-Bration catalog (no longer available).  The edges were sponged using Daffodil Delight ink and it was attached to the base using runner adhesive.

Next, I took my Whisper White and ran it through the big shot using the same framelits, just one size smaller.  Once it was cut into the shape, I ran it through with the Perfect Polka Dots impression folder.  I sponged the edges with Lucky Limeade ink and ran the sponge lightly over the top of the dots to highlight them too.  It was attached to the Daffodil shape using the runner adhesive.

The only item I added to my lilies is the cut little yellow button at the bottom of each one.  To learn to make these, visit the blog from yesterday.  I attached the flowers to the card with dimensionals.  


For my greeting, I turned to a Sale-a-Bration stamp set called Bloomin' Marvelous.  Just like the impression folder, this is no longer available.  Anyway, I stamped it onto Whisper White card stock with Lucky Limeade ink and punched it out using the scallop oval punch.  I sponged the edges with Daffodil Delight ink and attached the greeting to the card using dimensionals.  

That brings me to the end of my blog for today.  I will be back tomorrow with another blog to share with you.  I think I will show you the step by step tutorial of how to make the center of the card I did today.  So please come by to see it if you are interested.   I will try to make another card with the ones I make to show you too.

Thanks for stopping by today to visit!

Wednesday, April 3, 2013

A New Flower Tutorial

Hi everyone and happy Wednesday!!!  I hope your week is going well.  I am catching up on some housework and enjoying my crafting time.  One week from today my youngest daughter will be moving out.  It is amazing how fast the time has gone.  I am truly happy for her to be in a place where she feels ready to start the next chapter of her life.  As for me, well, ask me in a couple of weeks how I am doing.  Right now, I am fine and right after she moves out, my sister will be having foot surgery.  I am guessing it will be a few months before the reality of her being gone truly sets in.  Enough of this.  Let's talk about today's post.

I happen to be on Pinterest the other day and came across this card with the coolest Lily flower I had ever seen on it.  I wanted to learn how to make it and found it is rather simple to do.  I decided I would share my first attempt with you by showing you step by step how they are made.I want to thank Debbie Henderson for making the card I saw and sharing these wonderful flowers with us all.  Let's get started.


Here are the supplies you will need to make the flowers:

The two-step bird punch; scraps of Lucky Limeade and Whisper White card stock; Lucky Limeade and Daffodil Delight ink; sponges for the inks; and a liquid adhesive (not shown in photo).


To begin use your two-step bird punch and punch out 2 bird wings from Lucky Limeade.  Next punch out 3 birds from the Whisper White and 5 of the bird wings.  This is all you will need to build your flower.


Next, sponge the edges of the leaves with Lucky Limeade ink.  Then sponge all the wings and birds.  I sponges Lucky Limeade ink on one side and Daffodil Delight on the other.


Now it is time to start building your flower.  Begin by attaching the leaves together with a liquid glue.  This is the foundation of the flower.


Then you will attach the birds using the same liquid glue.  As you can see, they are layered on one at a time behind the leaves.  There is no exact science for your angles.  Just make it how you want it.


Once you have the birds on, you will continue the layering with the 5 bird wings.  Again use the liquid glue to attach these.  Angle them how you like.  With the liquid glue, you will be able to manipulate them a little to move them into the place you want for the look you are happiest with.


I made 2 of the flowers.  As you can see one is smaller than the other.  Personally this does not bother me.  After all, if you think about real flowers, they are all unique and individual so the look and size of these gives it a more realistic quality.  

Tomorrow, I will show you the card I put together using these flowers.  Any changes I make to them will be pointed out.  I hope you will come back to see my card.  Thanks for stopping by today.  Have a wonderful rest of the day!!!!

Tuesday, April 2, 2013

Yes I Am Really Back Today!!!!!!

Hi everybody.  Welcome to Tuesday and to the month of April and a great big HAPPY BIRTHDAY AUNT BARBARA!!!!!!!!  I wish you a day of happiness and a year full of joy!!!

  I hope your April Fool's Day was a good one and that no one played any mean jokes on you.  I cannot believe that Easter has come and gone already.  Did you get lots of nice treats from the Easter Bunny?  We had a really quiet Easter at my home.  Both my girls went to their grandmother's so it was just the hubby and me at the house.  That was probably a good thing since I still felt run down from the nasty old flu.  We played games and watched Easter Parade (one of my all time favorite movies!).  Our dinner was grilled ham and 4 cheese sandwiches made by yours truly.  I enjoyed the quiet and time with my hubby as I knew April was beginning to stack up with things to do.  I hope to find a little down time but who knows!

The card I made to share with you today is a very simple one.  I think that is why I like it so much.  It takes a minimum amount of time to make and is cute.  Let me show you the card and we will get started. 


Circles, circles everywhere!!  I love the circles don't you.  We will as always begin at the beginning.  I started with a base card of Melon Mambo measuring 5 1/2" x 8 1/2", scored at 4 1/4".  I added a layer of Elegant Eggplant cut at 4" x 5 1/4" to this using runner adhesive.  The top layer is a piece of 3 3/4" x 5" Whisper White that was attached after being decorated and embossed with the runner adhesive.


The greeting for this one is from the stamp set called Pretty Petites.  This set was part of the Sale-a-bration catalog and is no longer available.  I stamped it using Melon Mambo ink onto Whisper White card stock and punched it out using the small curly label punch.  Next I punched out a regular curly label in Basic Black.  I layered the white onto the black with runner adhesive.  I added a rhinestone to the candle and pearls around the edges of the black.  It is attached to the card using dimensionals.


To make the white front for the card, start by cutting the white to 3 3/4" x 5".  Set this piece aside while you prepare all you circles to attach to it.  I grabbed scrap pieces of Melon Mambo, Elegant Eggplant, Tempting Turquoise, Old Olive and Daffodil Delight card stock.  I then grabbed my 1 1/4", 1" and 3/4" circle punches.  Punch one of each size out of each of the colors.  Place them randomly on your white card stock and attach them using runner adhesive.   Once you have attached all your circles down, trim off any excess that hangs over the sides of the white.  Finally run the piece through your big shot using an impression folder.  I chose to use the Honeycomb folder for mine.  I attached this to the card with runner adhesive and added rhinestones to each circle.  

Easy don't you think?  I made this card while waiting for our exterminator to come spray the house.  I knew I would be out all afternoon but this was a card that could be accomplished in a small amount of time.  

Well that's it for today.  I hope you all have a wonderful day and come back to see me tomorrow.  Thanks for dropping in today!!