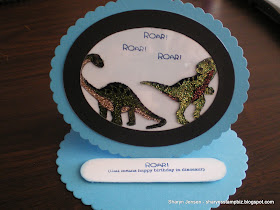
I had one more of my Tempting Turquoise easel cards left and I decided to complete it. I did not decorate this one as much as some of the other ones but it is still cute.
This is a photo of the card flatten to go into the envelope. As you can see it is the oval easel card I made last week on the tutorial. I did not want any of these to go to waste so I decided to use them.
The card was themed to be for a boy. That is one of the main reasons I did not over embellish it. I used a stamp set called Dinoroar from Stampin' Up! I love this set. I wanted to do the stain glass technique on this so the dinosaurs are stamped onto acetate using StazOn Black Ink. I then selected my glitter colors and using a liquid glue that dries clear, I added the glitter to the dinosaurs starting with my darkest color and working towards the lightest one. I then took a piece of Whisper White card stock and used the second largest oval from the oval collection of framelits to cut an oval out. I then used the same oval framelit on a piece of Basic Black card stock. This time I placed the oval on it and then placed the third largest one inside of it so it would cut out a ring. I used a little chalk on the white oval to add a hint of blue and stamped the word "roar" on it with Pacific Point ink. I then attached the acetate to the black ring with runner adhesive and attached that to the white oval with the same runner adhesive. The completed oval was attached to the card with runner adhesive.
The greeting for the inside is also from the Dinoroar stamp set. I stamped it in Pacific Point ink onto Whisper White card stock. I cut it out using one of the framelits from the Apothecary framelits set. Now I knew the framelit I was cutting it out with was a little too big so I trimmed it down. I then sponged the edges with the Pacific Point ink. I attached it to the inside of the card using dimensionals so that I would hold the easel up when the card is opened.
Finally here is the card all set up. These dinosaurs just make me smile. I hope you have enjoyed seeing these cards and I hope I have not bored you with them. I shall be back tomorrow with another card to share with you all so please come back by to see me. Thanks for dropping in today!!


No comments:
Post a Comment