Friday, March 29, 2013

Where Did The Week Go?????

Hi everybody!  Did you think I was lost?  I thought I was.  I have not been in my craft room all week - mainly because I cannot get to any of my supplies.  Let me show you what I mean.


So here are all my stamps........


and here is all my paper/card stock........


and here is everything in front of it!!!!!!

In my blog Monday, I believe I told you that my youngest daughter is preparing to move out in a few weeks and has begun the process of collecting everything she will need for the apartment.  My craft room is now a storage room for all this.  I spent all day Tuesday running errands with my husband and Wednesday we went out to the park for some peace and relaxation before heading to a toy show.  Of course that meant I did not even attempt to get in there to move things around to access my stuff.  I had every intention of doing it yesterday but I spent the day taking my daughter to the doctor for her work physical and ran a few errands with her too.  I then came home, cleaned the house, and got ready to have a special little visitor on Friday.  No it's not my nephew Jackson.  It is the daughter of a good friend of mine.  She happens to have the day off from school and is going to spend it with me.  That means lots of crafts to plan to do with her.  It will be a lot of fun.

I am sorry I have been missing this week.  I do intend to unearth my card stock and punches so that I can at least make some punch art to share with you next week.  I do hope you will understand and come back to see me.  Until then I will share another card I came across that I thought was really beautiful:


Have a wonderful weekend and I will see you Monday!!!!
 

Monday, March 25, 2013

Weird Weekend

Hi everyone and welcome to the start of a brand new week.  I sure hope your weekend was better than mine.  I spent most of mine in bed or in a big comfy chair.  Last Thursday night, my anniversary night, I started not feeling so well.  My stomach felt weird and I was really tired.  I went to bed hoping the feeling would pass and unfortunately I was wrong.  I was up all night so sick I did not know what to do.  I ran a high fever all day Friday and could not even get out of bed.  By Saturday I was a little better but still not 100%.  Sunday was about the same.  Needless to say, there was not fun crafting time for me. 

Meanwhile, my youngest daughter has decided it is time to spread her wings and fly the nest.  She will be moving into her first apartment early next month.  The gathering of items to take with her has already begun and unfortunately my craft room is the holding area.  I cannot get to my stamps or card stock right now.  I am going to have to work to make a path for myself.  I am hoping to feel well enough today to do this so I can get back to crafting.  You will have to stop by for daily updates as to how it is going.  Until I do I thought I would share with you a card I found on the internet and really liked.  I am going to have to make one of these soon.  I promise to share mine with you when I do.  Please stop by tomorrow to see how my progress is going.  See you all tomorrow.


Wednesday, March 20, 2013

New Theme Today

Hi everyone and welcome to Wednesday.  I am changing things up a little and sharing a baby card with you today.  I did not make this one for anyone special so I went with a neutral color.  It seems that everyone wants to find out if it is a boy or girl prior to birth.  With my first daughter I did not want to know.  I wanted to be surprised and all that mattered to me was that the baby would be healthy.  When I was pregnant with my second daughter, I wanted to find out what I was having.  Unfortunately, she wanted me to be surprised and had her back to the camera so they could not see anything.  To be truthful, it was fun to be surprised again. 

The card I am sharing today is one I have seen made by many Stampin' Up! demonstrators.  I would share with you the name of the one who made it but I saw it so long ago I do not remember.  Oh well.  Let me share it with you and we will get started!!


When I think of babies, I think of soft colors.  I wanted a pastel that would be neutral so I chose Certainly Celery card stock.  I cut a base card measuring 5 1/2" x 8 1/2", scored at 4 1/4".  I added a layer of Whisper White that measures 4" x 5 1/4".  I ran this through the big shot using an impression folder called trio dots that I bought at a local craft store.  I edged it with Certainly Celery ink using my sponge and attached it to the card using runner adhesive.  I attached a strip of celery ribbon across my card.  This ribbon is no longer available but I still have a bit.  It is attached with runner adhesive prior to attaching the white to the card.  The green rhinestones were added after all other pieces of the card were complete.


Here's a close up of the baby booties.  I made these using a stamp set called Stitched stockings.  I stamped it in Certainly Celery ink onto Whisper White.  I used the coordinating stocking punch to punch them out.  I trimmed the top piece off and reattached it lower down so that they look like socks and not stocking.  I added a bit of glitter glue to them for added bling.  While they dried, I took a scrap of celery card stock and ran it through my big shot using the Stampin' Up! Oval Designer Frame impression folder.  Once the impression was made, I cut the oval out with my oval framelits collection.  Next I punched a wide oval out of Whisper White card stock and attached it to the center of the oval frame with runner adhesive.  The entire frame was attached to the card with the same runner adhesive.  The bottom bootie was attached using runner adhesive while the top one was attached using dimensionals.  To finish off the look, I added a cute pom pom ball to the top of the top bootie.  


The greeting comes from the stamp set Itty Bitty Banners.  I stamped it using the Certainly Celery ink on Whisper White card stock and cut it out using the bitty banners framelit set.  It is attached to the ribbon with glue dots.  I added a couple of rhinestones to each side of this on the ribbon.  I know it might be hard to tell from the photo but they are just the "diamond" looking rhinestones while the ones on the white of the card are a light green.

Well that concludes my baby card for today.  I will not be posting for the rest of the week but will be back on Monday.  Tomorrow is our 16th wedding anniversary and I plan to spend the day with my hubby.  I know I will not have time to get back into my craft room until Friday or so meaning nothing will be created and ready until Monday.  I hope you all enjoy the rest of your week and have a wonderful weekend.  Thanks for stopping by today!!  See you Monday!!!!!

Tuesday, March 19, 2013

New Big Shot Toys

Happy Tuesday everyone.  I hope you week is off to a good start.  It is one of those weeks where my hubby has to work a lot so I am missing spending time with him.  I guess I will just have to craft more to fill the void.

I ordered a new set of dies for the big shot last week from Stampin' Up!.  I had looked at these in the Spring catalog for  a couple of months and just could not decide if I wanted to order them or not.  Then I happened to come across a how to video about these dies and watched it.  It showed me how to use these as they are and how to use them for other types of projects.  I was so excited about the products, I could not wait to order them.  Today's card is a sample of using the dies as they are designed to use without really changing anything.  Ready to see  it?


Here you can see the front of the card.  I used a base card of Primrose Petals card stock cut at 4 1/4" x 11", scored at 5 1/2".  Prior to folding it on the score line, I ran it through the big shot using the new Card Base Pop n' Cuts die.  This die is unique in that it has an open area where you can insert another die to create something special.  I will show that in a minute.  It also cuts the rounded design on the edge of on end and the slits on the edge of the other.  This allows you to tuck in the flaps which holds the card closed.  I added a layer to the front in Whisper White.  I cut this to be 4" x 4 1/2".  I ran it through the big shot using the Lacy Brocade impression folder and attached it with runner adhesive.  I then added a layer of Baja Breeze to this measuring 3 5/8" x 4 1/8".  This piece was put through the big shot using the Cloudy Day impression folder.  I colored in the clouds using a white colored pencil.  It was then attached to the base card with runner adhesive.


For the center piece of the front, I used a couple of stamp sets from Stampin' Up!.  The first is the Four Seasons which is a hostess set.  I stamped the large floral image onto a piece of Whisper White using So Saffron ink and punched it out using the 2 3/8" scallop circle.  I then used the set called A Fitting Occasion and stamped the circle saying in Baja Breeze.  I then stamped the scissor image from the same set in the center of the circle of words using Primrose Petal ink.  I then punched this out with the 1" circle punch.  I attached it to the center of the floral image with runner adhesive.  The finished design is attached to the card with dimensionals.


I wanted to show you a close up of the edge.  This photo allows you to see the curve in the edge that is created by the die as well as the slits that the corners slide into for closure.  


My inside greeting is a simple one.  I stamped this saying from the stamp set called Perfect Punches onto Whisper White card stock using the Primrose ink and punched it out using the wide oval punch.  It is attached to the inside using runner adhesive.


Here is what makes this die so fabulous - it can be used to make a pop up card.  I took a 5 1/2" x 8 1/2" piece of Whisper White card stock and set it aside to run through my big shot.  I then grabbed the Pop n' Cuts die and placed the Dress Form die inside the opening.  I placed the white sheet on top and ran it through the big shot.  It cut out the pop up dress form for me to use.  I took a butterfly stamp from the Four Seasons stamp set and stamped it randomly on this piece using the Saffron, Baja and Primrose ink.  I folded the score lines to make the dress for stand up.  I took a piece of retired designer series paper and cut it at 4" x 6".  I attached this to the back of my white pop up so the color would show through the openings in the white.  It is attached using runner adhesive.  I then trimmed the top of the white piece to fit like I wanted it to fit, added the runner adhesive to the back and attached it to the base card.  

The really neat thing about this set is there is a coordinating set of framelits and a stamp set to use with this.  So I took a piece of Basic Gray and using the framelits, I cut out a dress stand.  I attached it to the white piece using my 2 way glue pen.  Next I used the All Dressed Up stamp set and stamped my dress in So Saffron ink onto Whisper White.  I used the matching dress framelit and cut out the dress.  I added pearls to the buttons and a little yellow glitter to the top and belt of the dress.  It is adhered to the form with runner adhesive.  A couple of blue rhinestones added to the table finished it off.


Here is the side view of this card so you can see the pop up clearly.


Finally here is the card opened up completely.  If you have made pop up cards before, you will appreciate the slits that hold the card closed.

I do want to show you a step by step tutorial on this card.  I think it may be a lot of steps and I will probably split it into 2 days.  On day one, we will make the basic card and pop up insert.  Day 2 will focus on decorating your dress form.  I have an idea for a dress to go inside for a special occasion so maybe I will try it with you.  

I am so glad you stopped by today to visit.  I hope you come back tomorrow and see me again.  I am not sure I will have the tutorial by then but we will see what happens.  Thanks for dropping in!!!

Monday, March 18, 2013

Another Easel Card For A Boy

Happy Monday to you all!!  I hope you had a wonderful weekend and a happy St. Patrick's Day.  I seemed to have a busy weekend.  It always seems to be busier than I expect but at least it was fun.   I did take a few minutes to craft something for you.

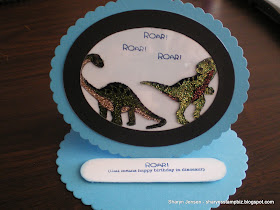
I had one more of my Tempting Turquoise easel cards left and I decided to complete it.  I did not decorate this one as much as some of the other ones but it is still cute. 


This is a photo of the card flatten to go into the envelope.  As you can see it is the oval easel card I made last week on the tutorial.  I did not want any of these to go to waste so I decided to use them.  


The card was themed to be for a boy.  That is one of the main reasons I did not over embellish it.  I used a stamp set called Dinoroar from Stampin' Up!  I love this set.  I wanted to do the stain glass technique on this so the dinosaurs are stamped onto acetate using StazOn Black Ink.  I then selected my glitter colors and using a liquid glue that dries clear, I added the glitter to the dinosaurs starting with my darkest color and working towards the lightest one.  I then took a piece of Whisper White card stock and used the second largest oval from the oval collection of framelits to cut an oval out.  I then used the same oval framelit on a piece of Basic Black card stock.  This time I placed the oval on it and then placed the third largest one inside of it so it would cut out a ring.  I used a little chalk on the white oval to add a hint of blue and stamped the word "roar" on it with Pacific Point ink.  I then attached the acetate to the black ring with runner adhesive and attached that to the white oval with the same runner adhesive.  The completed oval was attached to the card with runner adhesive.  


The greeting for the inside is also from the Dinoroar stamp set.  I stamped it in Pacific Point ink onto Whisper White card stock.  I cut it out using one of the framelits from the Apothecary framelits set.  Now I knew the framelit I was cutting it out with was a little too big so I trimmed it down.  I then sponged the edges with the Pacific Point ink.  I attached it to the inside of the card using dimensionals so that I would hold the easel up when the card is opened.


Finally here is the card all set up.  These dinosaurs just make me smile.  I hope you have enjoyed seeing these cards and I hope I have not bored you with them.  I shall be back tomorrow with another card to share with you all so please come back by to see me.  Thanks for dropping in today!!

Friday, March 15, 2013

The Go Go Girls Are Back!!!!

It's Friday!!!!!!!!  I wanted to end the week on a fun note and my sister gave me the way to do it.  I received a text from her yesterday morning asking me to make a card with the famous go go girls on it.  Now I thought I had one already made and I did but I could not find it at first.  So I set out to make another one.  These girls are so much fun to make!!!


Here they are!!!!  I started with a 5 1/2" x 8 1/2"base card of Daffodil Delight, scored at 4 1/4".  I stamped the greeting down the side of it using a stamp from a company called De Nami.  I picked it up at a convention a few years ago.  It is stamped using Basic Black ink.  I used my Stamp-a-ma-jig to help me line it up along the edge.  I then added the top layer which is a 3 5/8" x 5 1/4" piece of photo paper.  Now I wanted to do something special to this piece to help it stand out.  I decided I would make it look almost like a tie dyed shirt.  This is why I used the glossy photo paper.  I pulled out my Daffodil Delight, Melon Mambo, Raspberry Ripple and Pacific Point ink as well as the sponges that matched them.  I sponged the colors in the order I listed them working from the inside out.  I allowed it to sit for a few minutes to be sure it was dry.  While waiting, I took out a scrap of Silver and Champagne shimmer paper and punched out music notes.  I then attached the background to the card using runner adhesive.  I attached the music notes after I placed the go go girls.  They were attached using a liquid glue. 


The girls are made exactly the same.  The only difference is the color used for the dresses.  The face, legs, arms and nose are the retired Blushing Bride card stock.  The hair is Chocolate Chip card stock and the eyes are Marina Mist and Whisper White.  The zebra prints used for the dresses are from a local craft store as is the white shimmer card stock I used for the boots.  The black of the eyes and the mouth are drawn on using a fine tip black marker.


Now for the punches.  The one fun thing about making this girl is you use such a small number of punches.  The white and blue of the eyes are punched using a 1/8" circle punch.  The nose is the smallest circle from the owl builder punch.  You can use this circle for the eyes also if you would like.  The bangs are made using a 1" circle punch.  I punched only one out, cut it in half and had bangs for both girls.  The face is a 3/4" circle.  Once it is punched out, punch a 1" circle around the hole.  Cut this into 5 pieces.  Use a small piece to make the neck and the other 4 are for the arms and legs.  The head band is also a 1" punch off set from a 3/4" circle hole.  The hands are the owl feet of the owl builder punch.  The back hair is an owl turned upside down with the feet cut off.  The dress is the vest from the owl builder and the boots are the hearts from the owl builder.  You cut one side of the heart flat to make it look more like a book.  All pieces of the girls were attached using TomBow liquid glue.  The completed girls were attached to the card using dimensionals.  

Now I hope this all makes sense to you.  I seem to be a little off today and it is hard for me to concentrate.  If you need clarification on any of the instructions please ask.  

I wish you all a wonderful weekend.  Do something fun and relax.  I will see you all on Monday.  Thanks for dropping by today!!


Thursday, March 14, 2013

New Punch Art Character

Hi everyone.  I hope your Thursday is off to a great start.  I am happy to say my hubby survived his live burn the other night and I am sure he had a great time participating with the students.  He came home smelling like a fire and I must say as the wife of a fire fighter, I really like the smell.  I guess that's a good thing because it happens quite often. 

No one was more disappointed when the Hostess factory shut down than my hubby.  He absolutely loved Twinkies.  Now I did not go crazy like some who raided the shelves in stores buying all they could before supplies ran out.  We had a box at home at the time and when it was gone, well it was gone.  I am happy to say that we have discovered another treat similar to this that he seems to like just as much but there are some things about Twinkies that you just cannot replace.  What does this have to do with my blog?  Everything.  My punch art character for today was inspired by these sweet treats.  Let's see if you know him.


So do you know who he is?  If you guessed Twinkie the Kid you would be right.  Now I will show you my inspiration for him in just a minute.  I used the oval easel card that I made yesterday during the turtorial.  I am not going to go over how to make it again since it would be easier for you to read the tutorial.  I added a layer of Whisper White with the 2nd largest oval from the oval framelits set.  I did some paper piercing along the edges of it just for decoration and add a few Daffodil Delight circles punched out with the circle from the itty bitty punch pack.  I attached these with liquid glue.  The edges were sponged with Tempting Turquoise ink and then attached to the card with runner adhesive.  I added some turquoise Stickles glitter glue dot to the scallops along the edge.  


To add some decoration to the stand portion of my card, I used a retired stamp set called Fresh Fillers and stamped the swirls onto the base of the card using Tempting Turquoise ink.  Next I used the same ink to stamp my greeting.  I used a stamp set available only until the end of this month called Pretty Petites.  It is from the Sale-a-bration collection.  It is punched out using a punch also from this collection called the small curly label.  I layered this piece using runner adhesive onto a Daffodil Delight curly label punch and added some yellow Stickles glitter glue dots to this.  I attached the finished greeting to the card using runner adhesive.  Since I did not raise this up with a dimensional I knew I would need to add something to right above it with a little depth to it.  I chose a button.  It is attached with glue dots.


Here is the inspiration for my Twinkie the Kid character.  It is a container designed to hold a twinkie that my hubby had on his collection shelf.  He took it down to clean and I just knew I wanted to make him.  I am sure you can see why.  His shapes are fairly common and can easily be replicated using punches. Ready to learn how?  Let's go.


The colors of card stock I used when making him are Daffodil Delight, Pacific Point, Real Red, Whisper White, Basic Black and the retired Creamy Caramel.  For his body, I used the 3rd largest oval from the framelits oval collection.  I trimmed off the sides to give him the right shape and then I was ready to go.  I think I will show you to bottom half of him and then list the punches I used to make him.


I attached all the pieces of him together with my 2 way glue pen and attached the finished one to my card using dimensionals.  Here is a list of the punches used to create him:

Body - framelits oval collection for the big shot; trim down to get right shape

Hat - wide oval for the base and a 1 1/4" circle for the top and band;  I cut the swoop in the brim; for the top I punched the circle for the hat and a half circle for the band; attach the band first and then attach it to the back of the base; cut the swoops in the top

Eyes - word window; I punched one out and then reinserted each end again and repunched to get the oval for them; the black of the eyes was added using a fine tip black marker; I also shaded the edges with the marker

Mouth - large oval punch; cut it down to the size you like; once attached, I drew on the edges the black with my marker and added the sides and nose with it too

Bandana - I used the pennant punch for this; I punched out 2 and cut them down to fit on him; the hearts are from the owl builder punch; I attached them prior to cutting these down

Arms/Legs - word window; I punched this along the edge of the card stock since they needed to be thinner that the entire window; insert the card stock only about half way to achieve this

Hands - boho blossom punch; use the scallop flower and trim them down

Boots - retired heart to heart punch; I used the wide heart from this for the main part of the boot; cut off one round for the top and then trim the other one to get the boot look; the heels of the boots are made using the smallest heart from this punch; you only need one; cut it in half and trim the round end flat

I had so much fun making this guy.  I sure hope you like him.  Now I just need to figure out what I want to make for tomorrow.  Maybe I should go look at the shelves with out collections on them.  Who knows - I might get inspired again.  Thanks for stopping by today and I will see you all tomorrow.

Wednesday, March 13, 2013

Errand Day

Hi everyone.  It is a sunny Wednesday here in Arizona.  Last week we had rain and cold, this week we are approaching the 90's very quickly.  As I thought about this, I remembered a card I made a year or so ago and wanted to show it to you again now.


I am sure that once we are in the 90's I will be ready to head for the beach for a nice swim.  If only we had a beach in Arizona, it would be a lot easier to do this!!

I spent all day yesterday running to the hardware store and grocery store.  It was errand day!!  I also had to get my hubby ready to teach last night.  Now usually his teaching has no cause for worry for me.  However, last night they were training recruits in the fire program how to deal with real fire.  That means that they go into this box and a real fire is lit that will flash-over to train them.  Knowing he is going into a real fire always worries me but I know he is a stickler for safety so I try not to worry too much.  Anyway, I started working on a punch art character last night but did not get him quite finished so I guess you will have to stop by tomorrow to see what it is.

Thanks for stopping by today and please come back soon!!

Tuesday, March 12, 2013

Oval Shaped Card Tutorial

Hi everyone.  As promised, I have the tutorial on how to make the oval card for you today.  There are a lot of photos and it may seem long but hopefully it will help you.  So let's get started.


Start with a piece of card stock for your base card cut at 5 1/2" x 8 1/2".  You will score it at 4 1/4".  I used Tempting Turquoise as my color but use whatever color you want for your card.  As you can see in the photo I use the scoring tool on my paper trimmer to score my piece.


I folded my card on the score line and placed it onto my cutting plate.  I used a little painters tape to hold the card in place.  These corners are going to be cut off so I do not need to worry if the tape pulls on them.  I do this so that the card stays in place and closed for me to line up my framelit.  I have left a small area of the framelit off the fold of the card.


Here is a close up of the fold line.  As you can see an area of about 4 scallops are off the card.  This will leave an area intact for the card to function properly.  Run it through the big shot and then set the newly cut card aside.


Next take a piece of 4 1/4" x 5 1/2" of your base card card stock and run it through the big shot using the same framelit on it.  You want this one to be a whole oval so be sure all the edges are on the card stock.


The image on the left the is whole single layer oval while the image on the right is the base card.  You can see on the card the area that is flat where the card is intact.


Next open you card up and using a ruler measure from the fold line to the edge.  Find the middle of the card and put a small dot using a pencil so you can find it once the ruler is removed.


I then take the card still opened and place it on my paper trimmer once more.  I line my pencil dot up along the line where my scoring tool will run and score the card all the way across.


Here is another view of the card after the front is scored.


Now fold along that score line inwardly so that it causes the front to stand up.


Place runner adhesive along the area below the score line.


Now take the whole oval and being careful to line up the scallops, attach it to the front of the card.  The adhesive on the bottom half will hold the oval in place while the lack of adhesive on top will allow it to fold into the easel.


If you want to have your card as an elongated card, start with a base card cut at 4 1/4" x 11", scored at 5 1/2".


Line the oval framelit up leaving some of the folded edge exposed.


Here you can see the exposed edge.  


Here is the whole oval on the left and the folded card on the right.  You can once again see the flattened edge where the card is still intact.


Again you will measure from the fold line to the edge of the card and mark it with a pencil dot.  Use your paper trimmer and score a line across the center of the card front.


The fold will fold inward to create the stand for the card.  


Attach the whole oval to the card by putting adhesive on the bottom half of the front of the card below the fold line.  Again be careful to line up the scallops so when the whole oval is attached to the card it looks like one piece and not an attachment.

Well there you have it.  It is really pretty simple to make.  I do hope you will give this a try.  Now I just need to decorate mine and they will be ready for someone special.  I will share these with you once they are completed.  

Please come back by tomorrow to see me.  Thanks for stopping by today.

Monday, March 11, 2013

More Easter Bunnies

Hi everyone and happy Monday!!!  Well we did get rain on Friday and at times it was heavy rain but no snow or hail at my house.  We spent a few lovely days in the upper 60's and now we are moving up.  By tomorrow, we are going to be in the mid 80's.  I even saw one report that had us in the low 90's by the end of the week!!  I am so not ready for that.  Reaching the 90's now usually means we are in for a hot hot summer.  Not fun!!  With Easter just around the corner, I pray we can have a little bit lower temperatures for all those Easter egg hunts and family gathering.

Speaking of Easter, today's card is another one themed for that special day.  I used one of the new individual stamps that you can purchase until the end of this month.  It only comes as a clear mount stamp but I love those!!  I also decided to do a shape card today so let me show you the card.  Oh there is also a special trick for this one!!


My card for today is oval in shape.  I guess I was thinking about eggs when I made it.  To achieve this, I used the framelits Oval Collection.  The largest oval in the set is scallop and looks wonderful as a card.  I used Pretty in Pink card stock for the base.  I started by cutting this to be 5 1/2" x 8 1/2", scored at 4 1/4".  I placed the framelit on the folded line of the card leaving a little of the folder edge uncut in order to hold the card together.  Now I know if you are looking at the photo, you cannot see the edge of the card which is intact at the top.  The reason you cannot see it is because I cut a single oval out of Pretty in Pink with the scallop oval framelit to layer on top.  While I could attach it to the entire front, I did not.  You will see why in a bit.  The edges of it are sponged with Pretty in Pink ink.

For layer 1, I used Bashful Blue card stock and cut the second largest oval framelit out.  I ran this through the big shot using the Fancy Fan impression folder and brushed the edges with matching ink on a sponge.  I attached it the the pink with runner adhesive.  Layer 2 is a piece of Certainly Celery card stock cut with the third largest oval from the framelits collection.  Once it was cut, it too went through the big shot using the Vine Street impression folder.  The edges were brushed with matching ink and it was attached to the blue with runner adhesive.


The name of this stamp is Ears To You.  I thought it was one of the cutest stamps I had ever seen.  It is hard to see the texture look of each rabbit but they all have a different design on them.  In order to have each rabbit be its own color, I used my Stampin' Up! markers.  The colors are Pretty in Pink, Bashful Blue, and Certainly Celery.  I used the end that looks like a paint brush.  I took my time covering each image and word.  I gave a little huff on it of warm air to remoisturize it and stamped it onto Whisper White card stock.  I then took the fourth largest oval and cut the image out.  I brushed to edges of the oval with my sponges and all three colors of ink.  I attached this to the green with the same runner adhesive.  


This is the special feature of this card - it is a fancy fold card called an easel card.  I like using this technique with oddly shaped card that will not stand up on their own.  To make the easel, I took the base card and opened it up.  On the front flap, I measured and found the half way point.  I made a score line across the card for this  and bent the piece inward.  I then used runner adhesive to attach the single pink oval to this bottom half, carefully lining up the scallops to match.  I wanted a little more design and added the pearls to every other scallop on the edge.  Now I need to make it stand up.


To do that, I took out my Teeny Tiny Wishes stamp set and stamped my greeting with Certainly Celery ink onto Whisper White card stock.  I punched this out using my retired small oval punch.  The edges are brushed using a sponge and the celery ink.  I then punched a scallop oval out of Bashful Blue card stock and brushed the edges with the blue ink.  I wanted to add the paper piecing look to this which is why I needed the greeting punched with the retired small oval.  You can use the large oval punch for the greeting piece if you want.  You will just not be able to do the piercing since it will be covered up by it.  To guide my piercing, I used my piercing pad and the Essential Paper Piercing Pack to do this.  There is a template in this pack that lines up perfectly with the scallop oval.  It makes piercing the holes so easy.  I then added the greeting to the scallop using runner adhesive and added a little pink bunny brad I bought at a local craft store to the greeting.  I placed 2 dimensionals onto the back of this.  I pushed the top piece up to where I wanted it to be to stand and attached the greeting piece right in front of it.  This will fold flat for the envelop but is easy for the receiver to stand up once opened.

I think I will do a step by step tutorial on how to make this easel so that you can see in photos what I have described using words.  I want to be sure you can make this if you would like to so I will post that tutorial tomorrow for you.  

Be sure to stop by and see me again.  I appreciate your visits and look forward to seeing you again.  Thanks for stopping by today!!!