Today I wanted to share a card I made just the other day. I was looking through my book I keep about punch art I have seen and want to try. I always make notes but sometimes I forget to write down the name of the person whose site I was visiting when I saw the sample. That unfortunately is the case for today's card. So if you recognize this as your original design, please let me know. I would love to give you credit.
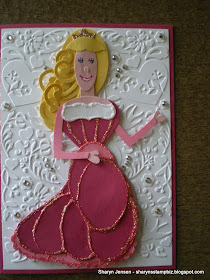
Anyway, I came across a sample of one of the Disney princesses and just felt the need to give her a try. Now the sample I had seen was a little different than the one I actually made. While I had my notes to follow, I did not have a clear image of it to look at so I based mine on what I had written down. The princess in this card is Sleeping Beauty. So let me show you my card and we will go from there.
Because of the size of the princess, I started with a base card of Rose Red measuring 7" x 10", scored at 5". I added a layer on top of this using Whisper White card stock measuring 4 3/4" x 6 3/4". I ran this through my big shot using an impression folder made by Provo Craft. I can't remember the name of it but it is very pretty and has hearts and flowers on it. Once impressed, I attached it using the runner adhesive.
Now let's talk about the princess herself. Her hair is made using Daffodil Delight card stock. The back of the hair is 2 wide ovals and several curls made from the retired Sizzlit die Scribble Swirls. I cut several of swirls out with my big shot and attached them. For the bangs, I punched out a curly label and repunched it with a 1 1/4" circle. Her crown is the medium size flower from the boho blossom punch, cut down to a size I likes. I punched it out of champagne shimmer card stock. After all crowns are shiny aren't they?
Her face, neck, nose, chest and hands were punched out of Blushing Bride card stock which is retired. The face and chest were punched with the retired small oval punch. The neck is the word window and her hands are the small heart from the retired heart to heart punch, trimmed down to make them the shape I wanted. The nose is a 1/8" circle.
The dress is made using 2 different colors of card stock - Red Rose and Regal Rose. The upper part of the dress is made using the full heart punch. The white piece is a curly label the was punched out and then I repunched the hole using the curly label punch. The arms are the full heart which I punched one out and then repunched using the full heart punch 2 times. I added glitter glue to the dress to add dazzle.
The bottom of the dress is made using only 2 punches - the wide oval and the scallop oval. I punched out about 7 wide ovals from the Red Rose and 1 from the Regal Rose. I began by cutting the Regal one down and layered it onto one of the Red. I then layered the rest of the Red and trimmed it to make the swoop of the dress. I attached 3 scallop ovals at the bottom of the dress and then embellished the bottom half with the same glitter glue I used on the top.
All piece of the princess were assembled using a liquid glue. I drew the eyes and mouth onto the face. Once she was all assembled and the glue had dried, I added her to the front of the card using dimensionals. I then added some rhinestones to the card background just to enhance it a little.
I showed this completed card to my youngest daughter because this is her favorite Disney princess. I knew she would give me an honest critique. She thought it was a wonderful card. I was truly happy to pass her test.
Well I am planning on ending the week on a Disney note tomorrow so come back to see what I have to share. I thank you all for stopping by today to visit. I will see you all tomorrow.


No comments:
Post a Comment