I am always looking for new ideas for my cards. I am sure all of you are too. When I find a card I really like, I tend to copy a picture of it and save it in a file of ideas to try. That is where I found my inspiration for today's card. It always amazes me how many ideas I have in my file. A lot of them I collected over 2 years ago. When my brother became ill and my life became caring for him and spending as much time with him as I could, I slowed down on my card making. So these ideas really sat and were forgotten. For me, opening this file is like opening a present. I always find something new I wanted to try. While the idea may be cased, I always try to change the color scheme of the card and believe it or not, I do not have every punch Stampin' Up! has ever made so I use different punches. Some were retired before I became a demonstrator so I figure out what to use in the place of any retired ones which can sometimes alter the look of the card. I happen to be looking through the card samples and found this little cutie. I wanted to give her a try so I will let you decide if I did a good job or not. Ready?
Doesn't Disney make the cutest characters? Minnie Mouse is one of the best and most recognizable characters out there. I saw this card on Ellen Kemper's site a while ago. However, she did not make it. It was made by a woman named Anita (I do not know her last name) and was first posted on her daughter Lucia Dune's blog. When I saw the face, I could not resist this one.
I started with a base card of Daffodil Delight measuring 4 1/4" x 11", scored at 5 1/2". Minnie always has a sunny attitude so the color seemed to fit it. I then rummaged through some retired designer paper that I had and found this beautiful Tempting Turquoise one with the dotted white circle on it. I cut it to be 4" x 5 1/4". I adhered it to the base card with runner adhesive. Next I took another piece of Daffodil Delight and cut it to be 2" x 4". I ran it through my big shot using the Finial Press impression folder. I then attached it to the top of the designer paper. I added white gel pen to the dots in the center of the flourishes.
Since Minnie is not my own original design, I am not going to list all the punches used to create her. Instead I would recommend you visit Lucia's Blog. Anita does a wonderful job of giving you instructions. I only had to substitute one punch on this one. The one she used for the black of the eyes is a retired one that I do not have. I used the wide heart from the heart to heart punch. I also chose to add pearls to Minnie's bow. I just love her in polka dots! The colors I used for her are Whisper White, Basic Black, Blushing Bride, Melon Mambo, and Regal Rose (tongue only). She is attached to the card with dimensionals.
The greeting comes from the Teeny Tiny Wishes stamp set. I stamped it with Basic Black ink onto Whisper White card stock. I highlighted the edges with black ink and then attached it to a Tempting Turquoise modern label. I added a pink rhinestone to each end and attached it to the card using dimensionals.
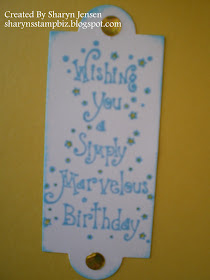
For the inside saying, I used a non-Stampin' Up! stamp. It is stamped in Tempting Turquoise ink onto Whisper White, I cut it out using the new Apothecary Accents framelits and my big shot. I edged the sides with Tempting Turquoise ink. I attached it to the card using runner adhesive. Jewel tone stickers were added to the top and bottom of the saying. I also colored in the stars with a Daffodil Delight marker. I promise it is on the card straight. I just did not hold the camera straight I guess.
Well that's it for today. Please come back tomorrow and I will have another share for you. Thanks for dropping by today. Happy crafting!


No comments:
Post a Comment