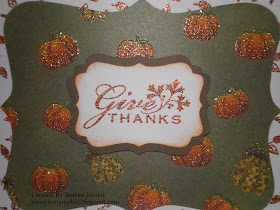
For this card, I thought the top note die for the big shot would form the perfect shape. Usually when I cut the card stock with this die, I use the center piece on my cards. This time, I used the frame. I cut a piece of Very Vanilla card stock cut at 4" x 5 1/4". I centered it on the die and ran it through the big shot. I placed the center piece to the side and took the frame with me to use on my card. I used the same leaf stamp from the Confetti stamp set and stamped it with VersaMark ink. I then heat embossed it using the harvest embossing powder. I then went to my Debbie Mumm paper pack and selected another piece of designer paper to use. I cut it at 3 7/8" x 5 3/8". I adhered it to the back of the top note frame. I placed both of these on to a pumpkin pie card.
For the center greeting, I used a stamp from the retired stamp set Holiday Best. I inked it with VersaMark ink and then pumpkin pie ink on top of that and stamped it on Very Vanilla. By doing this, I was able to heat emboss it using the harvest embossing powder. The pumpkin pie ink provides the rich orange color while the VersaMark allows the embossing powder to stick. I punch it out with the Decorative Label punch and edged it with pumpkin ink. I then punched out 2 more decorative labels in Soft Suede to make a frame for the greeting. This was attached to the card using dimensionals.
Once again I used the stamp from Stampabilities for the inside greeting. I stamped it the same way as I did the one on the front. I inked it with VersaMark and then pumpkin pie ink, stamped it on Very Vanilla, and heat embossed it with the Harvest powder. I edged the Vanilla with the pumpkin ink. I then cut a piece of Always Artichoke to be about a 1/4" wider on each side. I used the leaf stamp from the Confetti set again and made a watermark of it on the piece of card stock. Creating a watermark is easy to make. You ink the stamp with VersaMark ink, stamp the image on the card stock, and let it dry. That's all there is to it.
So what do you think? Do you like this one better than Tuesday's or do you like them equally? I like both equally. They are just different enough that I think both are unique and beautiful. Leave me a comment with what you think. I value your opinion.
That's all for today. Not sure what I will be working on for tomorrow. Inspiration will come I am sure. Thanks for stopping by today and please come by tomorrow. See you then!


No comments:
Post a Comment